
12
SMART PLUGS FOR SMART HOME HACKS
IN THIS CHAPTER, YOU’LL LEARN TO CONTROL YOUR ELECTRONICS REMOTELY THROUGH YOUR PHONE. TO DO THIS, YOU’LL COMBINE YOUR RASPBERRY PI WITH AN ENERGENIE SMART PLUG THAT ALLOWS YOU TO CONTROL THE POWER FLOWING THROUGH THOSE ELECTRONICS VIA A SINGLE TAP ON YOUR MOBILE PHONE.
You will be able to use the completed project to turn on a bedroom lamp, a kettle, the TV, some party lights, or anything else that can turned on by simply plugging it in! Figure 12-1 shows the Energenie smart plug. The plug is controlled by the Pi-mote, a small board that attaches to your Pi and enables you to turn the plug on or off.
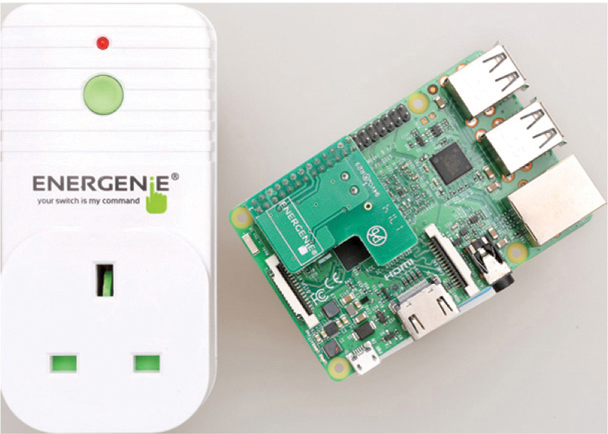
FIGURE 12-1 The Energenie smart plug and remote board (Pi-mote) attached to a Raspberry Pi
NOTE
The mobile phone control section of the project works only with Android devices.
WHAT YOU’LL NEED
Here are the items you’ll need for the project:
- Raspberry Pi
- Mobile phone or tablet (Android)
- Energenie Pi-mote
- Energenie smart plug
- UK to US adapter plug
In the United States, you can find the Pi-mote and plugs at a number of websites by searching “Energenie Pi-mote control with two remotes” or using the product code ENER002-2PI.
Energenie supplies directly to 220-Electronics (https://www.220-electronics.com/pi-mote-remote-control-outlet-starter-kit-with-2-sockets.html), which is based in the US and ships worldwide.
Plugs are also supplied and sold at the following retailers:
If you can’t find Pi-mote anywhere else, you can try eBay.
In the United Kingdom, you can buy the Pi-mote directly from Energenie at https://energenie4u.co.uk/. Pimoroni (https://shop.pimoroni.com/) and Amazon also carry it.
SETTING UP THE ENERGENIE REMOTE PLUG
As technology advances, you can control more and more electrical devices without leaving your seat via your phone or tablet. For example, you can adjust your central heating from websites, switch on the oven from an app, and open your garage door automatically as your car approaches.
Many of these kinds of controls use a relay, a switch that turns circuits on and off. A circuit is a flow of current around a connected set of wires that are attached to pieces of hardware (for example, a motor, lamp, or buzzer). The Energenie company has created a set of safe and easy-to-use relay plugs that you can control directly from your Raspberry Pi. By turning these relays on or off, you turn the appliance or hardware connected to the plug on or off.
To use the Energenie plug, you slot a small controller board, the Pi-mote, onto the Raspberry Pi to enable you to toggle the plug to switch on or off. The plug works within a range of up to 30 m and through doors, walls, and ceilings. Does this project sound exciting? Let’s get started. First, you’ll make sure your plug works:
- Test the plug: Plug your Energenie plug into a power outlet. Switch on the outlet to provide power to the Energenie plug. Plug a lamp into the Energenie plug, and turn on the lamp. Press the green button on the plug to switch it on. You should hear a distinctive click, which is the sound of the relay inside closing the circuit as it turns on. When you press the green button, the relay closes and connects the circuit inside the plug, and electricity flows to the lamp. Because the lamp is switched on, the bulb will light up.
- Attach the Pi-mote: Ensure that your Raspberry Pi is off and the power supply to your Raspberry Pi is removed. It doesn’t matter whether your smart plug power is on or off. Attach the Pi-mote (the L-shaped board) to the top row of GPIO pins so the L shape of the board faces inward, toward the HDMI port, as shown in Figure 12-2. Press the board on firmly so it makes contact with the GPIO pins and fits securely.

FIGURE 12-2 Attaching the Pi-mote to your Pi
- Install the software: Before you can create the program to run the plug and Pi, you need to install the required Python libraries that will allow you to interact with the plug. Open the terminal window and enter the following two lines of code, pressing ENTER after each line:
pi@raspberrypi:- $ sudo apt-get install python3-pip
pi@raspberrypi:- $ sudo pip3 install energenie
After the installation completes, reboot your Raspberry Pi by entering this command:
pi@raspberrypi:- $ sudo reboot
TESTING THE LAMP
You’ll create a simple program to test that the Energenie plug and the Raspberry Pi are communicating with each other.
Controlling the Lamp Remotely
The simple program you’ll use will turn on the plug, which will then turn on the lamp. Make sure your lamp is still plugged into the Energenie plug that you’ve inserted into the electrical outlet and that the lamp switch is on. Leave the power to the plug switched on, and if the lamp turns on, the relay is closed. Then press the green button on the Energenie plug to turn it off. Open your Python editor and start a new file. Enter the following code and save the file as plug_test.py.
❶ from energenie import switch_on
❷ switch_on()
The program begins by importing the switch_on class ❶, which, as you can probably work out, is the program function to switch on the plug.
On the next line, call the switch_on() function ❷, which triggers the Pi to send a message from the Pi-mote to the plug, switching it on. Press F5 to execute the code. Your plug will switch on, and the lamp will turn on. That’s pretty cool.
To turn off the plug, change the code in your Python program to the following:
from energenie import switch_off
switch_off()
Save this program and run it again; the lamp should turn off! This code also imports the switch_off() function and then calls the function to switch off the plug.
Flashing the Lamp On and Off
As a final test, you’ll combine the two preceding programs and add a short delay to make the lamp flash on and off. Technically, you’re not flashing the lamp but simply switching the plug on and off every 5 seconds. In a new Python file, add the program code in Listing 12-1 and save it as plug_flash.py.
❶ import time
❷ from energenie import switch_on, switch_off

❸ while True:
    ❹ switch_on()   # add the socket number between the parentheses
    ❺ time.sleep(5)
    ❻ switch_off()
    ❼ time.sleep(5)
LISTING 12-1 Switching the plug on and off
The program begins by importing the time module ❶ so you can add a delay between the plug switching on and off. Then you import the switch_on() and switch_off() functions ❷.
Next, use a while True loop to keep the next lines of the program running continuously ❸. Then use the imported functions to switch on the plug ❹, pause for 5 seconds ❺, and then switch off the plug ❻.
The last line of code ❼ adds another 5-second delay. Otherwise, there would be no delay between the plug switching off and then back on again: the lamp would switch on for 5 seconds, then off, and immediately back on again.
Save the code and then run the program. Your lamp should flash on and off every 5 seconds.
After testing the program, stop it by pressing CTRL-C.
USING AN APP TO CONTROL THE PLUG
Using Python programs to control household appliances is cool. But even better, you can use an app that lets you tap a button to control the smart plug. Blue Dot is a super simple Android app that lets you interact with LEDs, motors, and other components, including the Energenie plugs, via a large blue dot on your mobile phone or tablet device, as shown in Figure 12-3. The app uses Bluetooth to enable your device and the Raspberry Pi to communicate, giving you a range of about 10 m. You can think of your device as a handheld remote control for your lamp.

FIGURE 12-3 The Blue Dot app
- Set up Blue Dot on your Raspberry Pi: You’ll begin by installing the required Python libraries on your Pi. Open the terminal window and enter the following commands:
pi@raspberrypi:- $ sudo apt install python3-dbus
pi@raspberrypi:- $ sudo pip3 install bluedot
pi@raspberrypi:- $ sudo pip3 install bluedot --upgrade
- Install the app: While the Python libraries are installing, unlock your mobile phone or tablet device (remember that this works for only Android devices) and head over to the Google Play Store. In the store, search for the Blue Dot App, which should look like Figure 12-4. Tap the Install button, and the app will download onto your device.

FIGURE 12-4 Downloading the Blue Dot App for your device
- Pair your device and Raspberry Pi: Enable Bluetooth on your mobile device, which is usually an option in the settings (Figure 12-5). Ensure that it’s set to the Discoverable option so your Raspberry Pi can locate your device. Return to your Raspberry Pi and find the Bluetooth symbol at the top right of the desktop. Click the symbol, and from the menu, select Turn On▸Make Discoverable. After a few minutes, you should see your mobile device listed. Select it to connect to it. You might have to enter a shared PIN, depending on the device you’re using.

FIGURE 12-5 Connecting to your Raspberry Pi from your device
An alternative method to connect to Bluetooth is to pair via your mobile device. Start by searching for nearby devices, and then select your Raspberry Pi from the list. Follow the onscreen prompts. Pairing is fairly standard, although it might differ slightly depending on the make of your device.
CODING THE SMART PLUG
With your Pi and device connected, you’re ready to write the program to control the Energenie plug from your mobile device! Return to your Python editor and enter the program code in Listing 12-2, saving it as plug_bluedot.py.
❶ from energenie import switch_on, switch_off
❷ from bluedot import BlueDot

❸ bd = BlueDot()

❹ while True:
    ❺ bd.wait_for_press()
    ❻ switch_on()
    ❼ bd.wait_for_release()
    ❽ switch_off()
LISTING 12-2 Controlling the plug from your mobile device
The program begins by importing the switch_on() and switch_off() functions ❶ and then the BlueDot() class ❷.
Set the BlueDot() class to a variable named bd ❸ to make it quicker to use, and then create a while loop to make the program code repeat continuously ❹.
Then tell the Pi to detect whether the blue dot on your device is being tapped ❺, and if it is, switch on the Energenie plug, which turns on the lamp ❻. When you release the dot ❼, the plug is switched off ❽, turning off the light.
Running the Program
Check that the Bluetooth connection between your Raspberry Pi and your device is still active. You might need to reestablish the connection if it was dropped. Run the program. If the Pi is successfully connected to your device, a message will appear in the console window, confirming the connection (Figure 12-6).

FIGURE 12-6 Connecting your devices to Bluetooth
Return to your device and open the Blue Dot app; you’ll see a large blue dot on your screen, as shown in Figure 12-7. Press your finger on the blue dot and hold it there to turn on the lamp; then release it to turn off the lamp.

FIGURE 12-7 Connecting to the Raspberry Pi
Improving the Code to Switch On and Off
Now you’ll adapt the plug_bluedot.py program so you can switch on the plug by tapping the dot once and then switch off the plug by tapping the dot again. This way, you can switch on the plug and it will stay on until you tap the blue dot again.
This program is even more useful, because you can rig up anything to the plug! For example, if you connect an electric kettle to the Energenie plug, you can turn it on with a tap of the dot. If you need to turn off the kettle, press the blue dot again and the switch will turn off.
To do this, you’ll use Blue Dot’s D-pad feature, which is similar to the directional pad on game console controllers on which you can press up, down, left, and right buttons to control the player. For this project, you’ll use the up button to turn on the plug and the down button to turn off the plug. Open your plug_bluedot.py file and modify it so it matches the code in Listing 12-3.
   from energenie import switch_on, switch_off
   from bluedot import BlueDot
❶ from signal import pause

   bd = BlueDot()

❷ def dpad(pos):
       if pos.top:
           print ("up")
           switch_on()
    ❸ elif pos.bottom:
           print ("down")
           switch_off()

❹ bd.when_pressed = dpad

❺ pause()
LISTING 12-3 Using Blue Dot to turn the plug on and off
In the new code, you first import the pause() function from the signal library ❶. You need this function, because when the program is running, it’s always waiting for the D-pad to be tapped, which puts a strain on the processor. Adding the pause() function reduces that overall strain.
Next, create a dpad() function to hold the instructions for what should happen when the D-pad is tapped ❷. First, tell the program that if the top of the D-pad has been tapped, it should run the switch_on() function to turn on the plug.
Second, add an elif statement ❸ to catch when the bottom position of the D-pad is tapped. Tell the program that if the bottom of the D-pad is tapped, it should switch off the plug by using the switch_off() function.
Then check for blue dot taps ❹. This line runs the dpad() function you just created when the dot is tapped. Finally, add the pause() function ❺ to reduce the strain on the processor.
Save and execute the program. Make sure your Raspberry Pi and your device are connected via Bluetooth, and then load the Blue Dot app on your mobile device. With your lamp still plugged into the Energenie plug, tap the upper part of the blue dot, where an up button would be on a D-pad, to turn on the lamp. Tap the lower part of the blue dot, where a down button would be on a D-pad, to turn it off. Remember that you don’t need to press and hold on the dot this time.
You now have a working smart plug that lets you control your house remotely! Try it out with a few other appliances.
WRAPPING UP
Once you’ve mastered the basics of this project, you can adapt it to meet your needs. You could make a prank project that turns off a lamp each time someone tries to turn it on. Or how about creating something a little more useful, like a system that turns on your television, the radio, or even a dishwasher? You can combine this project with the glue gun night-light in Chapter 3 to create a lamp that switches itself on when the room gets to a certain level of darkness and then switches off as the room gets brighter.