
11
NATURE BOX: MOTION-SENSING CAMERA
IN THIS CHAPTER, YOU’LL BUILD AND CODE A NATURE BOX CAMERA THAT CAN SNAP A PHOTO WHEN IT SENSES MOVEMENT. YOU’LL THEN PLACE THE NATURE BOX IN THE WILD TO PHOTOGRAPH LOCAL WILDLIFE. YOU NEVER KNOW—YOU MAY SNAP A BIRD, A BADGER, OR EVEN A FOX!
The box will contain a motion sensor. Whenever animals come close to it, the sensor triggers the built-in Pi Camera to take a photo. The Raspberry Pi then uploads each image to an online Dropbox folder for you to view and share with your friends. You can leave the camera running from morning to evening and see what kind of visitors you get (Figure 11-1).
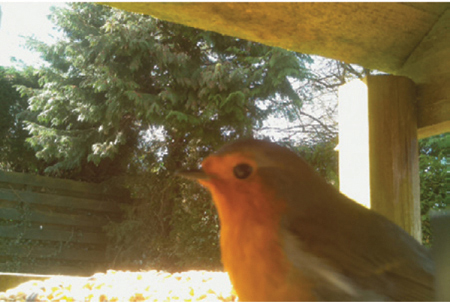
FIGURE 11-1 Build a nature box that takes animal photos like this one.
WHAT YOU’LL NEED
Here are a few items you’ll need to complete the project:
- Raspberry Pi (You can build the nature box with any of the Pi models. The Pi 2, 3 A+, and Zero W work well because they are small and can be hidden in a smaller space.)
- Pi Camera
- Passive infrared sensor (PIR)
- Jumper wires
- Clear plastic box to hold the hardware
- Dropbox account
- USB portable battery
- Drill
SETTING UP THE PASSIVE INFRARED SENSOR
A PIR (Figure 11-2) is more commonly referred to as a movement detector. It detects infrared light emitted from warm objects and bodies, such as humans, animals, and even vehicles; it measures changes in that light. You can write code to respond to the detection of certain levels of change and trigger events in response, such as turning on lights, sounding alarms, or opening doors automatically.
As an object passes by the PIR, it emits heat that changes the surrounding temperature. This difference in the surrounding infrared radiation is picked up by the PIR and changes the internal voltage, which means it has detected something. Inside the sensor’s dome are small mirrors that help the PIR to detect changes in infrared light from as far away as 30 feet.
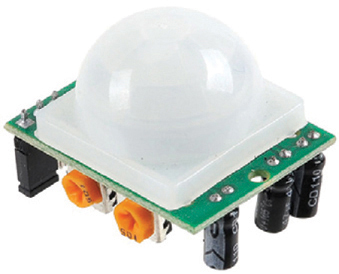
FIGURE 11-2 A PIR
Wiring the PIR
You need just three wires to connect the PIR to the Raspberry Pi. Connect the VCC PIR pin, which provides power, to the 5V GPIO pin located at the top of the Pi’s board. The diagram in Figure 11-3 uses the 5V pin, which is physical pin 2. Connect the OUT pin to GPIO pin 4, which is physical pin 7, on the Pi. Then connect the ground (GND) pin on the PIR to a ground pin on the Pi.
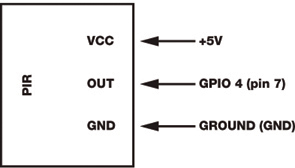
FIGURE 11-3 Wiring the PIR
Testing the PIR
Let’s write a simple program to test that your PIR works correctly. Your body gives off heat, and when you move about, you disturb and move the heat surrounding your body. The code in Listing 11-1 initializes the PIR and then checks for a change in heat. If the PIR detects a significant change, according to a threshold you’ll set, the program indicates that it has seen you. Open your Python editor and enter the code in Listing 11-1. Save it as PIR_test.py.
❶ import time
   import RPi.GPIO as GPIO
   GPIO.setmode(GPIO.BCM)

❷ PIR = 4
   GPIO.setup(PIR, GPIO.IN)

   print ("Ready to find you")
   time.sleep(2)

❸ def Motion_Sensing(PIR):
       print ("We see you")

❹ try:
   ❺ GPIO.add_event_detect(PIR, GPIO.RISING, callback=Motion_Sensing)
   ❻ while 1:
          time.sleep(1)
❼ except KeyboardInterrupt:
       print ("Quit")
       GPIO.cleanup()
LISTING 11-1 Detecting movement with the PIR
Import the time module and the RPi.GPIO module to control and code the GPIO pins ❶. Because there are two GPIO pin numbering systems, define which one you’re using by setting the mode to BCM.
Next, declare a variable to define the GPIO pin number you’re using to check for a response. This is the GPIO 4 pin that you connected to the PIR ❷. Tell the program to check for input on GPIO pin 4 by using GPIO.IN.
Because this is a test program, print a line indicating that the sensor is ready to find you and then provide a short time delay before retrieving the data from the PIR. This gives you a moment to prepare before you move about or wave your hands, triggering the sensor.
Then define a function that responds to any sensed movement or motion ❸. In this test program, the response is a simple statement indicating that you’ve been seen.
Next, the program tries to detect motion ❹. You use the try and except method to avoid causing an error if the PIR doesn’t work correctly or takes an odd data reading. This ensures that the program will continue to run if the PIR malfunctions.
Then you take the reading from the PIR ❺. This code checks GPIO pin 4 to see whether the voltage is rising. If it is, something has triggered the PIR. So you use the callback method to run the function that responds to any sensed movement or motion ❸ and print We see you.
To keep the PIR from reading the same input multiple times, you add a 1-second delay ❻. This allows enough time for the PIR to reset before it checks for a change in temperature again. Remember that you’re looking for motion, not presence; therefore, the camera doesn’t have to be constantly active.
Finally, you need a way to stop the program. You add the except response, which checks whether any key on the keyboard has been pressed ❼. If it detects a keypress, it prints Quit, resets the GPIO pins, and stops the program.
Save the program and press F5 to run it. Alternate between moving and staying still to make sure the PIR detects you. If you want, you can turn this into a game. Can you stand so still that you don’t trigger the PIR? Can you walk into a room without having the PIR spot you?
SETTING UP THE PI CAMERA
With a working PIR that can detect motion, you can set up the Pi Camera to capture images of whatever triggers the sensor.
Attaching the Pi Camera
If you completed the Pi Camera projects in Chapter 4, you might already have the hardware set up. Use the ribbon cable to connect the camera to the Pi, as shown in Figure 11-4, and remember to ensure that the Pi Camera is enabled in the Configuration tool. This requires you to restart the Raspberry Pi. If you get stuck or need more detailed instructions, refer to “Interfaces” on page 16.

FIGURE 11-4 Setting up the Pi Camera
Creating a New Folder to Store the Images
To keep the nature box project organized, you’ll want to store the images and program files in one place. Create a new folder named Nature_Box by opening the terminal and entering the following command:
pi@raspberrypi:- $ mkdir Nature_Box
Making a project folder will prevent your home folder from becoming cluttered with hundreds of images.
WRITING THE TEST CODE
With the Pi Camera attached, you can now start a new Python file or adapt the code in Listing 11-1 to make the camera take a picture each time the PIR senses movement. You can photograph birds, cats, or other native wildlife—maybe even a fox—as they move past your nature box setup. Enter the code in Listing 11-2 and save it as Cam_PIR.py.
❶ from time import sleep
   from picamera import PiCamera
   import RPi.GPIO as GPIO
   GPIO.setmode(GPIO.BCM)

   PIR = 4
   GPIO.setup(PIR, GPIO.IN)

❷ global Image_Number
   Image_Number = 0
   camera = PiCamera()

   print ("Ready to find you")
❸ sleep(2)

   def Motion_Sensing(PIR):
    ❹ global Image_Number

    ❺ camera.resolution = (1024, 768)

    ❻ camera.capture("Nature" + str(Image_Number) + ".jpg")
    ❼ Image_Number = Image_Number + 1

   try:
      GPIO.add_event_detect(PIR, GPIO.RISING, callback=Motion_Sensing)
      while 1:
       ❽ sleep(1)
   except KeyboardInterrupt:
       print ("Quit")
       GPIO.cleanup()
LISTING 11-2 Taking a picture whenever the PIR detects motion
Edit the program code by importing the sleep() function from the time module and import the picamera class too ❶.
Then, to stop each new image from overwriting the previous one, create a variable to hold the current Image_Number ❷. Make this a global variable so you can use this data later in the main program function to save each file with a different name. Set the Image_Number variable to 0, which means the first image taken will be named Nature0.jpg.
Then add the PiCamera() function to the camera variable. Replace time.sleep(2) with the simpler code sleep(2) ❸. This is a better way of writing the code, as you have less text to type and therefore reduce the chance of an error. You can use this simpler code in your other programs and projects. It serves the same purpose: it pauses the program for 2 seconds, creating a small delay before the next line of code runs.
Next, within the Motion_Sensing(PIR) function, add the code to trigger the Pi Camera and take a picture. At ❹, you add the global variable you created at ❷. Then you set the camera resolution ❺ and add the code to capture the image ❻.
Note that the code that captures the image ❻ combines the string "Nature" and the Image_Number value ❷, which is currently set to 0. This creates a file named Nature0, to which you add the .jpg file extension to save the image as Nature0.jpg.
Then add a value of 1 to the current image value ❼, so the program will save the next file as Nature1.jpg, the following as Nature2.jpg, and so on until the program stops. You also change the final line from time.sleep(1) to sleep(1) ❽.
Save the program in the Nature_Box folder so all the images will be stored there, making it easy to access them later. Press F5 to run the program. Each time something triggers the PIR, the Pi Camera will take a picture and save it in the folder. You could set up your nature box near your most prized possessions or chocolate stash. If anyone steals from you, you’ll have photographic evidence of the culprit.
If the PIR triggers too easily, you can adjust its sensitivity. On warm days, tree branches can move infrared radiation around, which the PIR can pick up. If the box is near a road, cars driving past might alter the surrounding air.
To avoid triggering the camera in those cases, locate the two small dials (Figure 11-5) on the back of the PIR (they’re usually orange). One is the Delay Time Adjust dial, which changes how long it takes to reset the PIR each time it’s triggered. The other is the Distance Adjust dial, which increases or decreases the sensitivity; basically, it determines how much of a change in heat is required to trigger the PIR. Experiment with adjusting these dials to find the perfect settings for your nature box and your local environment.
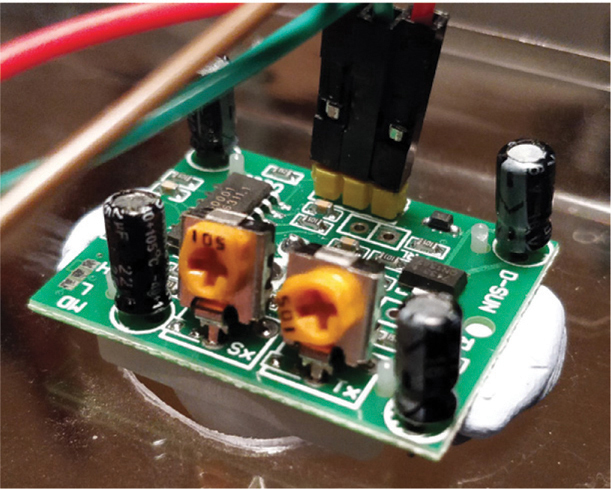
FIGURE 11-5 Adjusting the PIR sensitivity on the back of the PIR
RETRIEVING THE IMAGES FROM THE RASPBERRY PI
Now you need to figure out how to retrieve your images. If you leave your hardware in the wild, you won’t be able to access the images until you collect your nature box. Depending on your setup or the type of wildlife you’re trying to monitor, you might want to leave it out for a few days. But waiting that long to view images isn’t ideal. The solution is to connect your nature box to the internet so that you can use the file-sharing website Dropbox and a simple Python program to upload each image in real time. You’ll be able to access the photos remotely by using a tablet, a laptop, or a mobile phone.
Setting Up a Dropbox Account
If you already have a Dropbox account, you can skip this step. If not, head over to the Dropbox website at https://www.dropbox.com/ and register for a new account. Click Create an account and fill in the sign-up form (Figure 11-6). Alternatively, you can use your Google account details to sign up.

FIGURE 11-6 Signing up or logging in to Dropbox
Once you’ve logged in, navigate to the Dropbox Developers page (Figure 11-7) at https://www.dropbox.com/developers/ to create an app.

FIGURE 11-7 Going to the Dropbox Developers page
Click the Create your app option. Dropbox presents you with several options. When it prompts you to choose an API, select Dropbox API. Then select App folder as the access type. Name your app; I called mine Nature Box. Agree to the terms and conditions, and click the blue Confirm button to access the next page of configuration settings (Figure 11-8).
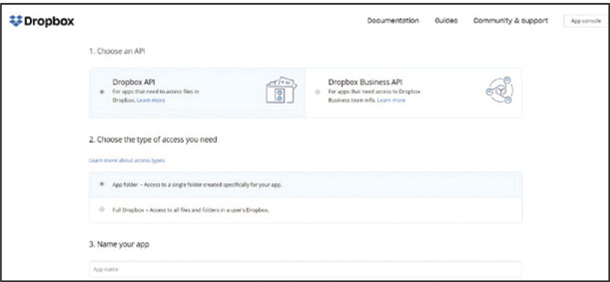
FIGURE 11-8 Configuring your app’s settings
Keep the Status row set to Development, and the Development users row set to Only you. This means only you will have permission to edit the app. You can also edit the app folder name.
Ignore the App key and App secret rows; you don’t need these for this project.
Select the Generated access token box to create a code that will enable your Raspberry Pi to send image files to the Dropbox app. You’ll need to use this token in your Python program later. Remember that this token keeps your account secure, so don’t share it with others.
With your Dropbox app set up, you can now use it to upload the nature box images.
Installing Dropbox for Python
You need to install a Python Dropbox library so you can access your Dropbox app and folder from the Python program code. To install the required software, open the terminal and enter the following command:
pi@raspberrypi:- $ sudo pip3 install dropbox
Then, to make sure you’re using the newest updates, enter this command:
pi@raspberrypi:- $ sudo pip3 install dropbox --upgrade
Creating a Test Program
Before you connect the PIR and Pi Camera to Dropbox, you need to create a simple program to test whether the Dropbox app and token are functioning correctly. But first, save a JPEG image in the Nature_Box folder to test with. In the program in Listing 11-3, I’ve used an image of a cute squirrel (Figure 11-9) and named the file squirrel.jpg.

FIGURE 11-9 Saving an image in the Nature_Box folder
Open your Python editor, create a new file, and add the following code. Save it as DB_uploader.py.
❶ import dropbox

❷ token = "xxxxxxxxxxxxxxxxxxxxxxxxxxxx"

❸ dbx = dropbox.Dropbox(token)

❹ with open("/home/pi/Nature_Box/squirrel.jpg", "rb") as file:
    ❺ dbx.files_upload(file.read(), '/squirrel.jpg', mute = True)

❻ print ("uploaded")
LISTING 11-3 Testing your Dropbox app and token
Import the dropbox module ❶. Create a variable named token, and enter the app token you acquired earlier within quotation marks ❷. Next, create another variable named dbx to hold the Dropbox class ❸, which enables your Python program code to communicate with your Dropbox account.
Now you’re ready to locate and open the image file you want to upload ❹. Open the folder where the image is stored by using with open. Next, read from the file and use the Dropbox API to upload the image to your account ❺. Then print a short confirmation message ❻ so you know the file upload is complete.
Running the Program
Go to the Dropbox website, log in, and navigate to your app folder. Then return to your Raspberry Pi and run the test program. The test will attempt to upload your image file (in this example, the image of the squirrel), so check your Dropbox folder for the upload (Figure 11-10).

FIGURE 11-10 The uploaded image in the Nature_Box folder
CODING THE FINAL NATURE BOX
So far, you’ve created three separate programs: a first to test that the PIR is working correctly, a second to trigger the Pi Camera whenever the PIR senses motion, and a third to allow the Raspberry Pi to upload the images to your linked Dropbox folder. Now let’s combine everything you’ve learned so far in this chapter to make the final nature box program.
Setting Up the Final Program
Save and rename your previous DB_uploader.py file or start a new Python file and save it as NatureBox.py. Then enter the code in Listing 11-4.
❶ import dropbox
   from time import sleep
   from picamera import PiCamera
   import RPi.GPIO as GPIO
   GPIO.setmode(GPIO.BCM)
LISTING 11-4 Beginning the final nature box program
Import the dropbox module ❶, which lets you interact with Dropbox via the Python code. Also import the usual sleep() function to add small delays, then the picamera library, and finally the Rpi.GPIO module to control the PIR. Then you set the GPIO numbering system to BCM.
Combining the Camera and Sensor
The next section of the code, shown in Listing 11-5, combines the PIR code and the camera code, so when movement is sensed, the Pi Camera is triggered. It takes a picture and then creates and saves the image file. The first lines should be familiar to you because they’re from the Cam_PIR.py test program you created.
PIR = 4

GPIO.setup(PIR, GPIO.IN)

global Image_Number
Image_Number = 0
camera = PiCamera()

print ("Ready to find you")
sleep(2)

def Motion_Sensing(PIR):
    global Image_Number
    print ("We see you")
    camera.resolution = (1024, 768)
 ❶ Image_Number = Image_Number + 1
    camera.capture("Nature" + str(Image_Number) + ".jpg")

 ❷ pic = ("Nature" + str(Image_Number) + ".jpg")
LISTING 11-5 Capturing and saving an image
Add a value of 1 to the image file variable ❶ (which you set to 0 earlier), so the first image saved is named Nature1.jpg.
After the Pi Camera captures an image, it saves the image file, but not the filename. To save the filename as well, create a new variable named pic ❷ to hold the image’s filename as a string. This means the program can access it later when it’s selecting and uploading the image file to Dropbox.
Creating the try and except
Next, in Listing 11-6, you use the try and except method. The try part attempts to run the section of code responsible for uploading the image files to Dropbox. If for some reason the nature box is unable to access Dropbox—say, because the site is unavailable or because the nature box is no longer online—the program will bypass this section by using the except part and continue to run without halting or causing an error.
   try:
     ❶ token = "xxxxxxxxxxxxxxxxxxxxxxxxxxxxxxxxx"
     ❷ dbx = dropbox.Dropbox(token)
        print ("ready")
     ❸ with open("/home/pi/Nature_Box/" + pic, "rb") as file:
         ❹ dbx.files_upload(file.read(), '/Nature%s.jpg'
            %(Image_Number), mute = True)
            print ("uploaded")
            file.close()
 ❺ except:
        pass
        print("failed")
LISTING 11-6 Saving the image filename
Add your Dropbox token ❶ and assign it to a variable named dbx ❷, which you use to authenticate your account credentials and enable interaction with Dropbox. At ❸, open the image file that the camera just took by combining the folder location of the image and the pic variable, which holds the filename of the most recent image. The code rb opens the image as a binary file and reads the contents as bytes rather than strings. This is important because the file contains an image, not text. Then assign this data to a variable named file, as in the physical data that makes up the image in the file stored on your Raspberry Pi.
The program reads the bytes from file and tries to upload the data ❹. The code '/Nature%s.jpg' %(Image_Number) adds the filename to Dropbox, because the binary data you uploaded doesn’t contain a filename otherwise. The code mute = True prevents the user from being notified of the upload. You can imagine how distracting receiving hundreds of notifications about uploaded files would be.
After the upload, close the file: open files use processor resources and can slow your Raspberry Pi, especially if there are a lot of them. Finally, add the except section of the program’s try and except method ❺. If the program can’t upload the image, it responds by passing and printing a notification before looping back, resetting the PIR, and waiting for the sensor to be triggered again. The image is still saved in the Nature_Box folder on the Pi but just won’t be uploaded.
Running the Motion Sensor
The final section of the program, shown in Listing 11-7, is identical to the PIR_test.py program you created earlier. It tells the PIR to wait for an input and, upon receiving one, runs the Motion_Sensing() function.
try:
    GPIO.add_event_detect(PIR, GPIO.RISING, callback=Motion_Sensing)
    while 1:
        sleep(1)
except KeyboardInterrupt:
    print ("Quit")
    GPIO.cleanup()
LISTING 11-7 Ending the program
Once you’ve copied the complete program, save and run it. Test that it’s working by moving around to trigger the PIR. Open your internet browser and navigate to your Dropbox folder to check out the uploaded images (Figure 11-11). Before you deploy your nature box into the wild, you can test your program in fun ways: compete with your friends to see who can walk into a room without triggering the sensor, or position your nature box at the front door and check to see who is knocking. Look for the evidence in the Dropbox folder before you decide to open the door!
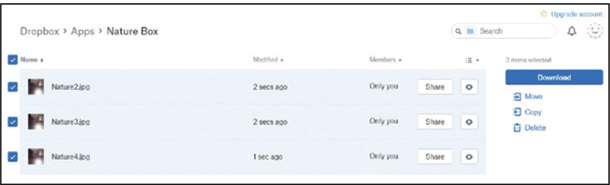
FIGURE 11-11 Your photos should appear the Dropbox folder when you run the program.
If the nature box doesn’t function correctly, consider the following common errors:
- Is the Dropbox token used in your program correct?
- Is the Raspberry Pi connected to the internet? Otherwise, all image files will remain stored in the Nature_Box folder.
- Do the folder names in the code match the actual folder names?
- Do the filenames in the code match the actual filenames?
- Is the PIR’s sensitivity adjusted so the proper amount of motion triggers it?
When uploading to Dropbox, you can’t overwrite the same file. Therefore, whenever you run the program again after the first time, make sure you’ve either moved the first batch of image files to a different folder or deleted them.
STARTING THE PROGRAM AUTOMATICALLY
Because you’ll set up the nature box outside, you won’t have a monitor attached to it. The program will need to execute whenever you plug power into the Raspberry Pi. Recall that I covered how to start programs automatically in Chapters 7, 9, and 10. Now you’ll do it again for the nature box program.
You’ll use cron to run the program automatically by creating instructions in the crontab file specifying what event you want to run and when you want to run it. Refer to Chapter 9 if you need a refresher on using cron.
Open the terminal and enter the following command to open the cron console:
pi@raspberrypi:- $ sudo crontab –e
The cron console presents you with three methods of editing the crontab file. Select option 2 and press ENTER to open the crontab file with the nano text editor.
Scroll to the bottom of the text in the crontab file and locate the blank space. Then add the following code line to run the program automatically:
@reboot sudo python3 /home/pi/Nature_Box/NatureBox.py &
The command states that every time the Raspberry Pi reboots, it should run Python in super user mode, open the /home/pi/Nature_Box folder, and execute your NatureBox.py program.
If you named your code file something else, replace NatureBox.py with your filename. Also, check that the folder path is correct by opening the folder where your NatureBox.py program is stored and noting the file path.
The & at the end of the code line tells your program to run in the background, so you can do other tasks with your Raspberry Pi at the same time.
Once you have checked the command details and are confident they’re correct, press CTRL-X to save and exit the crontab file. Now, each time you turn on or reboot your Raspberry Pi, the crontab file will run, starting up the nature box.
If you want to stop the program from automatically running, reopen the crontab file from the terminal and delete the line of code you added, like this:
pi@raspberrypi:- $ crontab –e
Then save the file and reboot.
The nature box is designed to run without a monitor, so you don’t need the Raspberry Pi to boot to the desktop interface and display the background wallpaper and icons. Because you won’t see the desktop, you don’t need to load it. Instead, you can configure the Pi to boot to the command line. Open the terminal window and enter this command:
pi@raspberrypi:- $ sudo raspi-config
Select the third option, Boot Options, and press ENTER. Then select the B1 Desktop / CLI option, followed by the B1 Console option. Click the Save option and then reboot your Raspberry Pi.
Once this is set, select the <Finish> option and press ENTER: you’ll be prompted to save the config file and reboot. Press Yes to restart your Pi. As your Raspberry Pi boots up, the nature box will load. Before you place the box in the wild, run a quick test and check that it’s working and uploading images to your Dropbox account.
PUTTING IT ALL TOGETHER
Now that you have a working program, you can set up your box and then leave it in your garden, at a local park, or elsewhere. Using a plastic case for the box is ideal (Figure 11-12) because you can seal it with tape, and it will remain fairly watertight—although I don’t recommend that you lower the nature box into a pond or leave it out during a thunderstorm.
Preparing your nature box is fairly easy:
- Use a drill to create a small hole for the camera lens to poke through.
- Use a drill to create a larger hole so that the PIR can poke through. It’s best to drill a small hole to start with and then increase the size of the drill bit so that you don’t split the plastic. If you’re using a wooden box, this shouldn’t be an issue. The hole needs to be just big enough for the PIR to poke through.
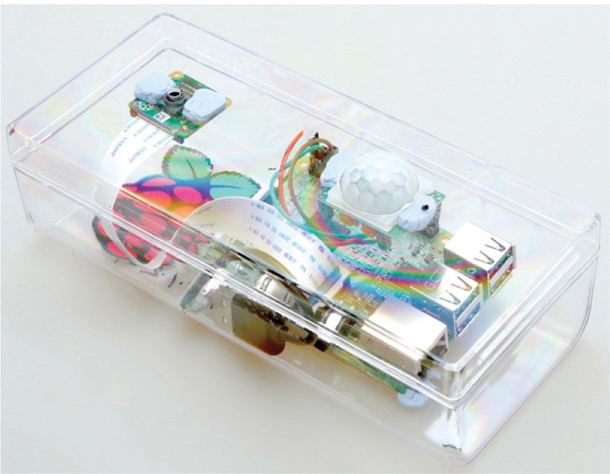
FIGURE 11-12 An example of the finished nature box
- Use mounting putty or double-sided tape to secure the Pi Camera and PIR inside your box. Alternatively, the Pi Camera and some PIRs have small screw holes that you could use to mount them.
Happy nature hunting!
WRAPPING UP
Well done, excellent work–you now have a nature box that can sense movement, triggering the Pi Camera to take a picture. This image is then uploaded to your Dropbox account for you to view and share. Now try the following:
- Use your setup in your bedroom to see who goes in and hopefully out.
- Place it near the cookie jar or your stash of chocolate to gather photographic evidence of who keeps stealing from you.
- Purchase the Pi NoIR Camera, which can be used to take photos at night, in the dark.