
1
GETTING STARTED WITH THE RASPBERRY PI
WHEN I STARTED MY FIRST RASPBERRY PI CLUB, SEVERAL PEOPLE THOUGHT IT WAS A COOKING CLUB. THEY TURNED UP EXPECTING TO MAKE CAKES, PIES, AND OTHER SWEETS. LOOKING BACK, I SUPPOSE THAT IN SOME SENSE THEY WERE RIGHT. A RASPBERRY PI ENABLES YOU TO MAKE. YOU MIGHT NOT MAKE DESSERTS, BUT LIKE BAKING, YOU FOLLOW RECIPES TO BUILD SOMETHING FROM A FEW DIFFERENT COMPONENTS AND ADD YOUR OWN SPIN ON THEM. OR, YOU CAN GO COMPLETELY OFF TRACK AND DO YOUR OWN THING. THE RASPBERRY PI IS ULTIMATELY A TOOL FOR DISCOVERY, CREATION, AND LEARNING.
Like a recipe book, this book contains instructions for 12 fun projects. You can then combine elements and skills from all the chapters to create your own hacks. Each chapter stands alone, meaning it covers all the skills, content, and techniques you’ll need to complete the project.
This chapter covers the essentials for getting started with your Raspberry Pi, including how to set it up, connect it to the internet, and transfer files to it. This chapter is also a reference for all the common tasks you’ll want to perform with your Raspberry Pi. Of course, if you already know your way around the Raspberry Pi and the Python programming language, you can skip to Chapter 3 and begin the hot glue night-light.
WHAT IS A RASPBERRY PI?
A Raspberry Pi is a small computer about the size of a credit card. But the first time many people see it, they say, “That’s not a computer! It has no screen.”
Well, like all desktop computers, you can connect a screen or monitor to your Raspberry Pi. But a computer doesn’t require a screen; it’s just a device that computes, meaning it takes an input, processes the input, and then, usually, outputs something. Even a television’s remote control is a computer, although you might not think of it as one. When you use a remote, you press the channel numbers, which is the input. The channel changes, which is the output. The part in the middle that controls changing the channel is called the process.
Since its release in February 2012, the Raspberry Pi has become the UK’s bestselling computer. It was created by Ebon Upton with the intention of promoting the teaching of computer science using an affordable, accessible, and fun device. The Raspberry Pi family has since expanded to several different versions of the computer to meet a range of needs and abilities.
THE RASPBERRY PI’S HARDWARE
The Raspberry Pi’s hardware consists of the physical parts of a device—the ones you can hold or touch. In other words, the hardware is the Raspberry Pi’s board itself. The reason the Raspberry Pi can be so small and cheap is that it’s a system on a chip (SoC), or a single board that holds all the main components of the computer, similar to those used in smartphones. We’ll go over the board’s features in this section, starting with the differences between the six Raspberry Pi models.
The Raspberry Pi 4
The projects in this book can be completed on most of the Raspberry Pi models. The latest model, the Raspberry Pi 4 (Figure 1-1), has the highest specification and costs the same as the earlier models. It supports both 2.4 and 5GHz Wi-Fi, which provides a fast Wi-Fi connection for downloads and updates.
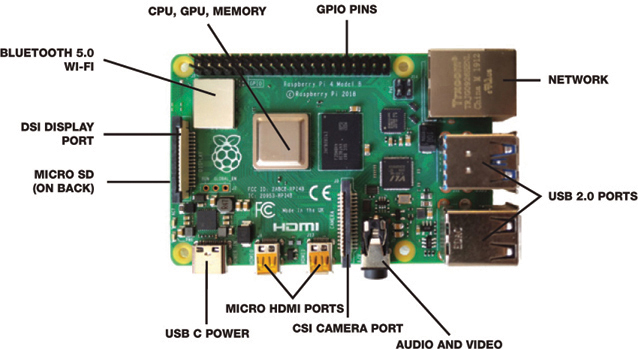
FIGURE 1-1 The Raspberry Pi 4
You can buy the Raspberry Pi 4 for approximately $35. It lets you run a wide range of programs, including Open Office, Java, and Minecraft Pi Edition. The board boasts dual HDMI (high definition) ports to connect your existing TV or monitor as a display or dual screens. The graphics chip (GPU) also supports 4k video playback and displays.
Other Models
Although I recommend using the Pi 4 for this book, other Raspberry Pi models will work for most of the book’s projects. I won’t discuss the hardware specification for every Raspberry Pi model, but the following table compares them.
MODEL |
PROCESSOR |
CORES |
RAM |
USB PORTS |
BLUETOOTH |
WI-FI |
4 |
1.5 GHz |
4 |
1GB, 2GB, or 4GB |
4 |
Yes |
Yes (2.4 & 5 GHz) |
3B+ |
1.4 GHz |
4 |
1GB |
4 |
Yes |
Yes (2.4 & 5 GHz) |
3A+ |
1.4 GHz |
4 |
512MB |
1 |
Yes |
Yes (2.4 & 5 GHz) |
3 |
1.2 GHz |
4 |
1GB |
4 |
Yes |
Yes |
2 |
900 MHz |
4 |
1GB |
4 |
No |
No |
Pi Zero W |
1 GHz |
1 |
512MB |
1 (micro USB) |
Yes |
Yes |
Pi Zero |
1 GHz |
1 |
512MB |
1 (micro USB) |
No |
No |
The key component of the Raspberry Pi is its brain, known as a processor, which is responsible for processing all the instructions it receives. The faster the processor speed, the more instructions it can complete per second. For example, the 4 model has a processor speed of 1.5 GHz (processor speed is measured in gigahertz). The prefix giga means 1,000,000,000, and hertz refers to the number of times a second that something happens. So a 4 processor can process 1,500,000,000 instructions every second. That’s a lot of processing!
The term cores refers to the number of processors a processor has. Imagine having two or even four brains! The model 4 processor has four cores, meaning it has four processors; each is capable of processing up to 1,500,000,000 instructions per second. That is potentially up to 6,000,000,000 instructions every second! This is why you might notice that your Raspberry Pi gets very hot, especially close to the processor.
All that processing power is useful, but the Pi needs somewhere to store all those instructions, which is where the random access memory (RAM) comes in. RAM is high-speed memory for storing data. The more RAM your Pi has, the more instructions it can save and read before filling up. Once the RAM is full, your Pi starts to slow down because redundant instructions must be removed and new ones must be written to RAM. Therefore, the more RAM the Pi has, the faster it will appear to perform.
You can provide power to the Pi 4 using a USB C cable, the same that many phone chargers use. Other models use a micro USB. You can also use the USB ports to connect a keyboard and mouse.
The Raspberry Pi models starting with model 3 also have built-in Bluetooth and Wi-Fi chips that provide wireless connection, as well as an Ethernet port for a wired connection. For media projects, the Pi has a standard HDMI port, 3.5 mm audio port, which can output sound and video; a CSI port you can attach a Pi Camera to; and a display port you can connect the official Raspberry Pi screen to.
GPIO Pins
Each Raspberry Pi model from model B+ onward has 40 golden GPIO pins sticking out of the board, as shown in Figure 1-2.
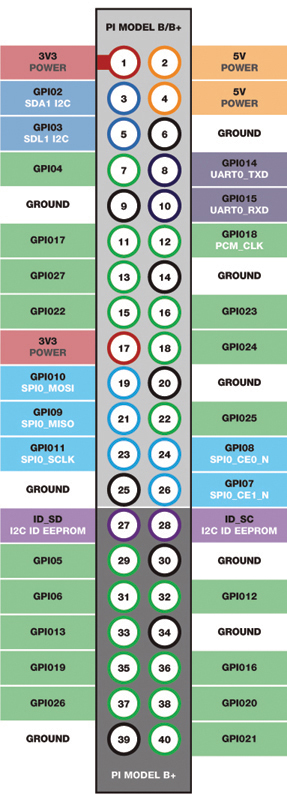
FIGURE 1-2 The Raspberry Pi GPIO pin layout
Each pin has a different function, such as providing power and taking readings from sensors, among other functions, enabling you to create circuits. For example, if you connect one leg of an LED to pin 18 and the other to one of the ground pins, you can turn the LED on and off using a short program. Ground pins have zero voltage and are used as a reference point from which you measure voltages.
Confusingly, there are two standards for identifying and numbering the GPIO pins. One standard is called the BOARD numbering system. Using this system, you identify each pin by its physical position on the Raspberry Pi. The numbering starts from the top-left pin, which is number one. The top-right pin is number two, and the rest of the pins are numbered counting across the row. The Raspberry Pi Foundation standard, which is the more common system for numbering the pins, uses the Broadcom SoC channel (BCM) numbering system. The BCM numbering system identifies each pin by the channel numbers used within the SoC chip. For example, physical pin 40 on the board is channel 21, so you call it GPIO 21. Refer to Figure 1-2 for these GPIO numbers. In the earlier chapters in the book, I’ll refer to the physical and BCM numbering to help you understand both. Standard practice is to use the BCM numbering system.
SETTING UP YOUR RASPBERRY PI
To set up your Pi, you’ll need the following items:
- USB keyboard
- USB mouse
- Micro SD card with at least 8GB
- Official Raspberry Pi power supply or a USB C 15.3 W 5.1V 3 A charger for the Pi model 4 or 2.5 A power supply (like a phone charger) for all other models
- Screen (a computer monitor or a TV)
You’ll also need either a laptop or desktop computer with an internet connection to download the required software that will run and operate your Raspberry Pi.
To use hardware, you need software. Software is a set of instructions that tells the Raspberry Pi what to do when it receives certain inputs. When you press a key on the keyboard, click an icon onscreen, or move the mouse, the Raspberry Pi will take the appropriate action. Software also controls the processes that enable you to use the Raspberry Pi.
The biggest piece of software you’ll need is an operating system, which allows you to run all your other software. Common operating systems include Windows, iOS, Android, and Linux. Although the Raspberry Pi can run a number of different operating systems, you’ll use the Raspbian operating system, which is built specifically for the Raspberry Pi. This software is free and open source, meaning you can use it, customize it, and share it with others.
Downloading the Operating System
On your internet-connected laptop or desktop computer, open your web browser and visit https://www.raspberrypi.org/downloads/. This web page on the Raspberry Pi website lists available operating systems.
Click Raspbian to go to the download page. You’ll see the Raspbian Buster with desktop and recommended software option (Figure 1-3). This includes all recommended software. Click Download ZIP to begin downloading the ZIP folder onto your computer. Once the download has completed, locate and open the ZIP folder to see the operating system image file. Extract this file from the folder by either copying and pasting or dragging and dropping it into a new location.
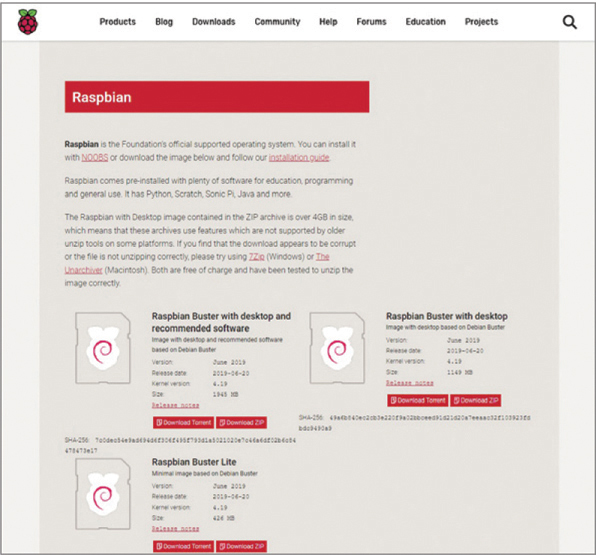
FIGURE 1-3 Download the Raspbian operating system from the Raspberry Pi website.
Installing the Operating System
You’ll need to write the operating system image onto your micro SD card (Figure 1-4), so you’ll likely need a micro SD adapter to fit it into your computer.

FIGURE 1-4 A micro SD card converter
The easiest way to write the operating system to the SD card is to download a free piece of software called Etcher.
Downloading Etcher
Visit https://etcher.io/ and click the Download button (it should detect your computer’s operating system, but if it doesn’t, just click the down arrow and choose the appropriate system in the list).
Once Etcher has downloaded, double-click the file to open it. It will ask whether you want to install the program. Click I Agree to install it. Installing the program files onto your computer will take a few minutes.
Writing the Operating System to the SD Card
Now you’re ready to write the operating system to the SD card. Slide your micro SD card into the converter. Then find the SD card slot on your internet-connected computer and insert it there. Wait for the SD card to load and for the computer to recognize it. Usually, your computer will make a sound to notify you that it has recognized the SD card. Open the Etcher program and click the first Image button, then select the location of the Raspbian.img file you just downloaded.
Click Select Drive and select your micro SD card from the list of drives. Finally, click the Flash! button to write the image to the SD card (Figure 1-5). This process will take a few minutes, so read on while you wait.
If you get stuck or encounter any problems, you can follow a more detailed installation guide available on the Raspberry Pi website at https://www.raspberrypi.org/documentation/installation/installing-images/. There is also a free, detailed user guide here: https://www.raspberrypi.org/magpi-issues/Beginners_Guide_v1.pdf.
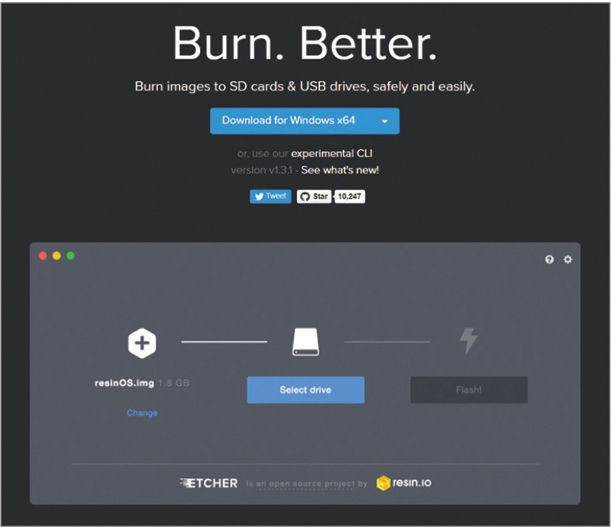
FIGURE 1-5 Writing the operating system to your SD card
Setting Up Your Pi Equipment
Connect your USB keyboard and mouse to your Raspberry Pi via any of the USB ports. Then attach your monitor to your Raspberry Pi using the HDMI lead.
Once the operating system finishes writing to the micro SD card, eject the card from your computer and remove it from the converter. Turn over your Raspberry Pi and slide the card into the SD card slot until it’s secure. Connect your mouse, keyboard, and HDMI display. Then plug the power supply into the power port on your Raspberry Pi and connect the other end to a main power wall socket. Switch on the power and turn on your monitor.
Booting Up Your Pi
After a few seconds, you’ll see activity on the screen. Usually, you’ll see a colored rainbow, which means the graphics are loading. Then the monitor will display the Raspberry Pi logo, which means your Raspberry Pi is booting up and loading the operating system.
Several lines of the operating system program code will run on the screen before you’re presented with the main desktop shown in Figure 1-6. Boot-up time depends on which Pi model you’re using (the fastest is the model 4; the slowest are the Pi Zero and original models).
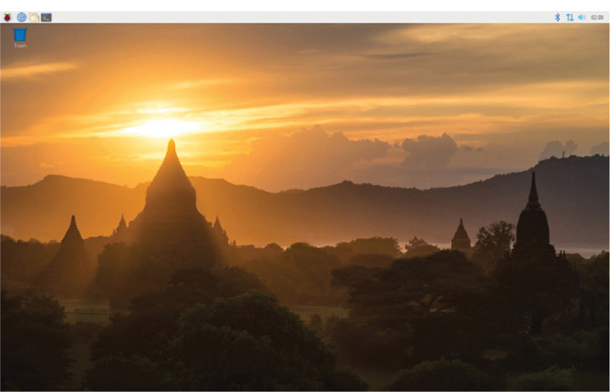
FIGURE 1-6 The Raspbian operating system desktop
Configuring Your Raspberry Pi
The Raspbian operating system has a number of different settings and configurations you can use to customize your Pi. For example, you can increase the amount of memory available for the graphics chip to run games like Minecraft more smoothly. You can also rename your Raspberry Pi, change your password, and make other modifications.
When you boot up your Pi for the first time, it will automatically ask you to configure a number of features. The first screen you’ll see is a setup window, as shown in Figure 1-7. Click Next to continue.
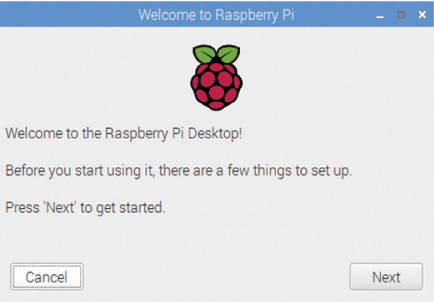
FIGURE 1-7 Start of the initial configuration
Now you’ll see the option to set your location details. This is essential so you can connect to the internet in your country, set the correct keyboard layout, and ensure that the Pi’s clock time is accurate. Select your country, language, and time zone, as shown in Figure 1-8, and then click Next. (If you’re in the United States, make sure to select Use US keyboard as well.)

FIGURE 1-8 Setting your required localization
The next option window prompts you to change your password, as shown in Figure 1-9. By default, this is set to raspberry until you change it. This means that anyone could log into and access your Pi. If you want to, change your password now, but make sure you remember that it’s no longer the default password, which I’ll use in other chapters.
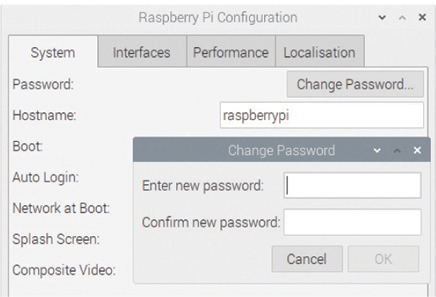
FIGURE 1-9 Changing the default password
Now the configuration wizard will search for any visible Wi-Fi networks and list them. You can connect to yours by selecting it from the list. Then you’ll be prompted to enter your Wi-Fi password, as shown in Figure 1-10. Click Next to connect. If you decide to skip this setup, need to change your Wi-Fi connection settings, or want to connect to a different Wi-Fi network, you’ll need to run the Configuration tool, which is covered in “Going Online” on page 18.
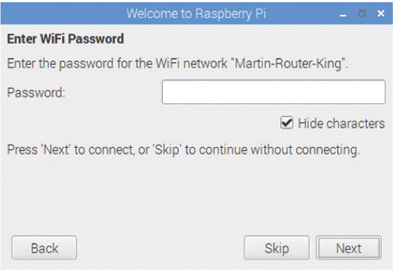
FIGURE 1-10 Configuring the Wi-Fi
Next, you will be prompted to resize the screen; you only need to do this if there is a black border around the image and it does not fill the screen to the edges. Click the Next button.
The final window automatically checks for and downloads any operating system updates and then installs them, as shown in Figure 1-11. This can take a while.
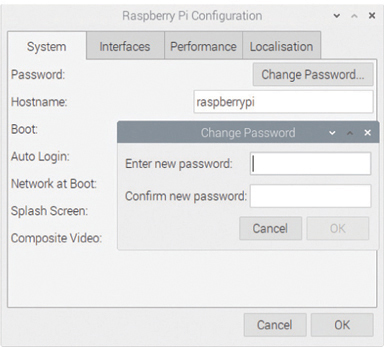
FIGURE 1-11 Updating the software
The desktop consists of the Raspberry Pi logo, the waste bin icon, and the main taskbar at the top-left corner of the screen.
A Quick Tour of the Raspbian Operating System
The first icon on the taskbar is the Raspberry Pi logo, which opens the operating system’s main menus and submenus (Figure 1-12). All programs you load onto your Raspberry Pi are grouped into categories to make them easier to find. For example, you’d find Minecraft on the Games menu. If you wanted to create a document—say, a letter—you’d find supporting software on the Office menu. To open a program on the menu, simply click it. If the program icon is on the desktop, double-click to open it.
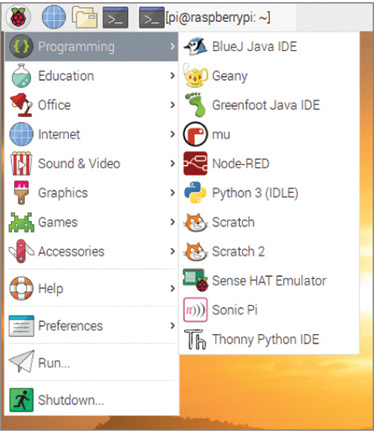
FIGURE 1-12 Use the taskbar at the top of the screen to access menus containing software.
Figure 1-13 shows the remaining icons in the taskbar.
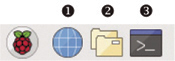
FIGURE 1-13 The Raspbian operating system taskbar
The second icon ❶ opens the internet browser Chromium. You need to be connected to a Wi-Fi network to access the internet. I cover this process in “Going Online” on page 18.
Next is the folder icon ❷, which you’ll use to view and manage your files and folders. You can create, delete, rename, copy, and move your files using this tool.
The fourth icon ❸ opens the terminal, a tool that enables you to navigate your Raspberry Pi, install and delete software, and perform other tasks using lines of code, called commands, instead of mouse clicks. I’ll cover the terminal in more detail in the next section.
On the right side of the taskbar, you’ll see the icons shown in Figure 1-14.
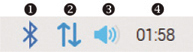
FIGURE 1-14 The icons on the right side of the taskbar
The first icon ❶ turns Bluetooth on and off and connects to Bluetooth-enabled devices. Next is the Wi-Fi icon ❷, which tells you if you’re connected to a network and the current signal strength. You can also view the available Wi-Fi networks, sign into them, and disconnect from them here.
The third icon ❸ opens the volume-management dialog, which lets you choose where to output your sound. Right-click this icon to choose speakers, the HDMI screen, or a Bluetooth device.
You may want to display the amount of work the Pi’s processor is doing, so you know how much processing power you’re using up. The ARM processor is the brains of the Raspberry Pi. It handles all the number crunching and program instructions, and it processes up to 1,500,000,000 instructions every second, depending on which model you are using. Right-click the taskbar and then choose the Add/Remove Panel Items option. If you press the Add button you should see the icon CPU Usage Monitor. Opt to add this. The icon displays a percentage: 20% indicates that the job at hand is taking about 20% of your Raspberry Pi’s processing power. Sometimes it will spike to 100%, which usually means you have a lot of programs open or you’re running graphics-heavy software. Check this tool if your Pi is unresponsive. If it’s at 100%, wait until it drops before carrying out your next activity.
The fourth icon ❹ shows you the current time and date (so you can check how much time you’ve spent hacking!). One last icon will appear when you plug in a USB flash drive or memory stick. Memory sticks are useful for transferring and backing up files between your Raspberry Pi and other computers. You can also use this icon to safely eject your mass storage device.
Configuring Your Raspberry Pi
You can access and change any of the previous settings using the Raspberry Pi Configuration tool. To open the tool, click the Raspberry Pi logo and load the main menu. Click the Preferences option. Scroll down to the Raspberry Pi Configuration option at the bottom of the list of preferences (Figure 1-15) and click it. The Configuration tool should open.

FIGURE 1-15 Click the Configuration tool to change your preferences.
In the following subsections, I outline settings you might want to change using this Configuration tool.
System Tab
The tool’s System tab (Figure 1-16) contains a button to change the password. Recall that when you booted your Raspberry Pi, you didn’t have to log in or enter a password because the operating system comes with a default account. This account’s username is pi and the password is raspberry. To change your password, click Change Password, and enter your new password. Below Change Password is the Hostname field where you can rename your Raspberry Pi. This is useful if you have several SD cards and one is for a particular project. Just remember what you choose, because you’ll have to use these, rather than the defaults, for the projects in the chapters.
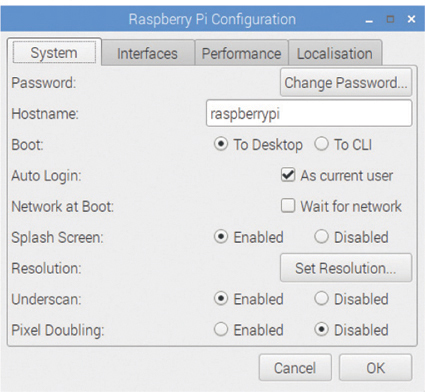
FIGURE 1-16 Use the System tab to change your password or rename your device.
The System tab also gives you the option to boot the Raspberry Pi to either the desktop or the command line interface (CLI). The desktop should be familiar if you’ve used Windows; it includes a background image and icons and menus that you click to open programs. You also use the mouse to click, select, and scroll. The CLI is a text-only interface in which you write text commands via the keyboard to control the operating system and the Pi. You’ll find more details about the CLI in “Using the Command Line” on page 20.
By deselecting the Auto Login box, you can require a user to log in, adding an additional level of security to your Raspberry Pi. You can also adjust the resolution of the screen output from the Pi so that the onscreen text is legible and the icons are a suitable size for your display.
Interfaces
An interface is a method of sharing data between computers, hardware, software, and humans. For example, a graphical user interface (GUI) enables you to interact with the Raspberry Pi via buttons and menus. A keyboard interface enables you to control or input data into a device.
The Raspberry Pi Configuration tool’s Interfaces tab (Figure 1-17) allows you to enable or disable the various software and hardware interfaces.

FIGURE 1-17 Enable or disable interfaces in the Configuration tool.
If you’re using a Pi Camera, as you will in the selfie snapper, Minecraft hacks, and nature box projects, you’ll need to enable it in this tab for it to work. We’ll do so when you need it, so don’t worry about that now.
Performance
On the Performance tab, you can use the GPU Memory field (Figure 1-18) to increase or reduce the amount of memory available for processing graphics. If you’re working with images, games, and videos, you’ll want to increase the GPU memory. However, if your project uses the command line or doesn’t require a screen, you can decrease the GPU memory, which frees up more memory for the processor to use.
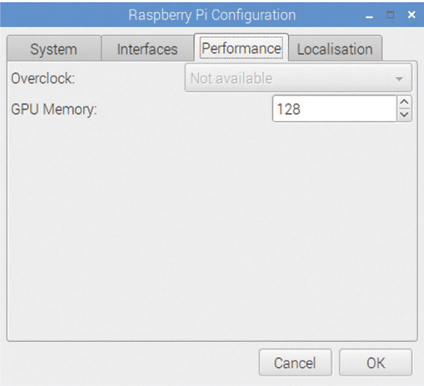
FIGURE 1-18 Increase or decrease the GPU memory on the Performance tab.
For now, leave the setting as is.
Localisation
The Localisation tab (Figure 1-19) contains the settings for your country and local area. Configuring these settings ensures that the Raspberry Pi can access the online software repositories and connect to the internet. On this tab, you can also change the time zone, adapt the keyboard layout to suit your preferences, and choose locations and preferred languages.
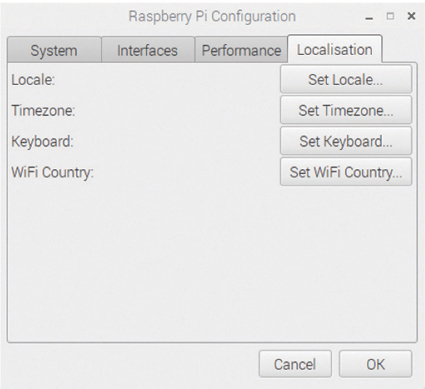
FIGURE 1-19 Select your country and local area on the Localisation tab.
When you’re done, click OK to close the Configuration tool.
Going Online
To access the full potential of the Raspberry Pi, you’ll need to go online. The built-in web browser enables you to view websites and content as you would with any other internet-enabled device. However, unlike, say, a tablet or mobile phone, when you go online with the Raspberry Pi, you can use the terminal to update your operating system and install software (I’ll show you how to do this soon). You can also access your Raspberry Pi remotely from other devices and transfer files between your Pi and the device. This also means that you can disconnect your Pi from the monitor, keyboard, and mouse and use it remotely. Using your Pi remotely will come in handy when you create the Pi spy, magic music box, nature box, and social media mirror projects.
Connecting to the Internet with a Monitor Attached
When you start your Raspberry Pi for the first time, it attempts to connect to your Wi-Fi. If you change your location or time zone, you’ll need to reconfigure your Wi-Fi. In the Raspberry Pi Configuration tool, click the Localisation tab, and then click Set WiFi Country. A window opens that lets you select your current country from a list. Figure 1-20 shows this entire process. Once you’ve selected your country, click OK and close the Configuration tool.
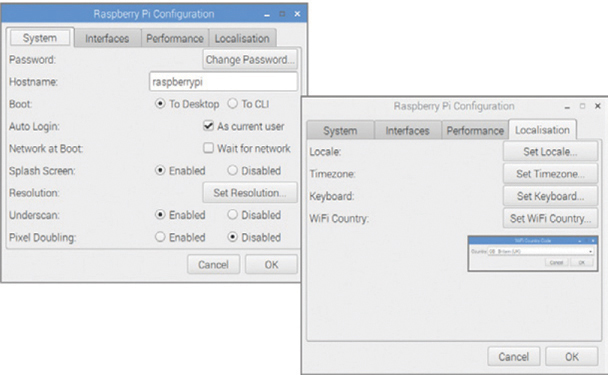
FIGURE 1-20 Click Set WiFi Country to select your current country.
Now you’re ready to scan for available Wi-Fi networks. Locate the Wi-Fi symbol (Figure 1-21) to the right of the taskbar and click it to see a list of available networks. Find your network, click it, and enter your Wi-Fi network password if you have one. Once you’ve done this, your Raspberry Pi will connect to your Wi-Fi and you’ll be online. Now each time you start your Raspberry Pi, it will attempt to connect to this Wi-Fi network by default.

FIGURE 1-21 Connect to your Wi-Fi network.
Connecting to the Internet via the SD Card
When you can’t access a monitor (which is known as going headless), you can connect to the internet via the SD card. You can program your card ahead of time so when you insert it into your Pi and boot up, it will automatically connect to the Wi-Fi. This is also useful for projects you set up outside, such as the MP3 player or the nature box later in the book.
To program the SD card, shut down your Raspberry Pi, remove the power supply, and then eject the micro SD card. Insert the SD card into the converter, and then place it into the computer or laptop SD card reader. Open it in the file browser (Figure 1-22).
In the SD card’s main directory, create a new file called wpa_supplicant.conf by right-clicking the mouse and creating a new text file; then press ENTER. Download and install the Notepad++ text editor from https://notepad-plus-plus.org/. Open the file in Notepad++, and add the following lines of code:
ctrl_interface=DIR=/var/run/wpa_supplicant GROUP=netdev
network={
  ssid="YOUR_NETWORK_NAME"
  psk="YOUR_PASSWORD"
  key_mgmt=WPA-PSK
}
This file is stored in your SD card’s boot partition, which means it’s loaded and read from when the Raspberry Pi starts and will connect to your internet. Replace YOUR_NETWORK_NAME with the name of the Wi-Fi network you want to connect to, and replace YOUR_PASSWORD with the network’s password. Save the file. Eject the SD card and place it in your Raspberry Pi. The next time your Pi boots, it will use the supplied credentials to connect to the Wi-Fi.
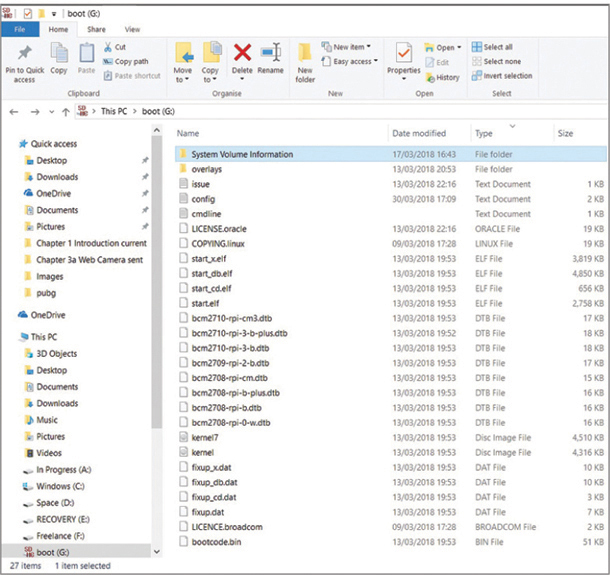
FIGURE 1-22 Open the micro SD card in your computer’s file browser.
If you prefer to use a wired connection to access the internet, you can connect to your network using a standard Ethernet cable. Attach one cable end to your router and the other to the Ethernet port on your Raspberry Pi. Note that the Raspberry Zero models don’t have an Ethernet port.
USING THE COMMAND LINE
So far, we’ve looked at the Raspbian operating system’s GUI elements—in other words, the parts you access by clicking the buttons onscreen. But the operating system also comes with a command line, which you can access via the terminal. Click the terminal icon in the taskbar to open the terminal in a new window, as shown in Figure 1-23.
The command line lets you input instructions to control your Raspberry Pi. Once you’re comfortable using it, you’ll be able to do tasks a lot faster than you could with the mouse and GUI.
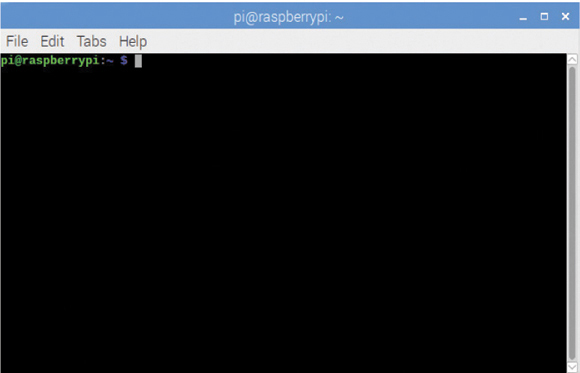
FIGURE 1-23 The terminal
Notice that the terminal already contains this text: pi@raspberrypi:- $. This is known as the prompt; it contains information on the user you’re logged in as (pi) as well as the current folder you’re in, which you’ll see later. When there is no slash (/) and folder name after the username, you’re in the home directory.
To illustrate the difference between using the GUI and using the terminal, imagine you’re making a new folder called sounds. Using the GUI, you have to do the following:
- Move the mouse to the folder icon.
- Click it.
- Right-click the window.
- Scroll down to the new folder icon.
- Click it.
- Name the folder sounds.
- Press ENTER.
Using the terminal, you simply enter the following command (excluding the prompt text) to create the new folder:
pi@raspberrypi:- $ mkdir sounds
The command mkdir is short for “make a directory.” This process is considerably quicker than using the GUI. The downside is that you need to learn and remember the commands, but over time, they’ll become familiar to you. The following table contains a number of common and useful command line instructions for you to try.
INSTRUCTION |
WHAT IT DOES |
cd foldername |
Go into a folder (replace foldername with the name of the folder you want to go into) |
cd ~ |
Go to the home directory |
cd |
Go back to the home folder from any folder |
cd /home/pi |
Go to the folder named pi |
ls |
List all the files in the current folder |
mkdir filename |
Make a new folder (replace filename with your folder name) |
ifconfig |
Find your IP address |
sudo shutdown |
Shut down the Raspberry Pi |
sudo reboot |
Reboot the Raspberry Pi |
top |
List all the programs currently running |
sudo idle3 |
Open the Python 3 editor as a sudo user |
free -m |
Show how much free storage you have (in megabytes) |
sudo -s |
Stay as sudo user in the terminal |
alsamixer |
Open the volume controls |
Notice that some commands are preceded by the word sudo. For example, the command to shut down the Raspberry Pi is sudo shutdown. The term sudo refers to super user do, or the administrator of the Raspberry Pi. In this case, that’s you. Being the super user grants you additional privileges, permissions, and rights, which permit you to carry out certain tasks. Not everyone is entitled to just shut down your Raspberry Pi!
To become familiar with the terminal, try some simple tasks that I’ve provided in the following subsections.
Setting the Time
If your Raspberry Pi has been off for a while, the clock display will probably be incorrect. The reason is that the Raspberry Pi doesn’t have an internal power source to keep the clock ticking. If the time is incorrect, you might not be able to access the internet or run your programs.
One way to fix this is to ensure that the Raspberry Pi is connected to the internet. This will automatically update the clock to the current time. If you’re offline, you’ll have to set it manually. Open the terminal and enter the following command to set the clock.
pi@raspberrypi:- $ sudo date -s "Jul 5 08:10"
Be sure to replace the time and date in the example with the correct month, day, and time. For a more precise time setting, you can enter something like this:
pi@raspberrypi:- $ sudo date --set '2020-04-26 18:26:00'
Replace the time and date in the example with the current year, month, and day, followed by the correct hour, minute, and second. After a moment, the clock will update.
Accessing the Configuration Settings
You already learned how to customize the Raspberry Pi using the Configuration tool settings. But you can also access the Configuration tool directly from the command line. Enter the following command to open the window shown in Figure 1-24:
pi@raspberrypi:- $ sudo raspi-config

FIGURE 1-24 Accessing the Configuration tool from the command line
You can control this tool with your keyboard; use the arrow keys to make a selection, and press ENTER to navigate to that option. Once you’ve completed your configuration settings, navigate to <Finish>, and press ENTER to reboot your Raspberry Pi.
Updating and Upgrading
Over time, your software and operating system will need upgrading. Most software updates are held in an external repository online, which updates whenever you make changes. To upgrade your Raspberry Pi and keep it up-to-date, you need to be connected to the internet. Then, you can use two simple commands. In the terminal window, enter the following to download any updates to the operating system and installed software:
pi@raspberrypi:- $ sudo apt update
Then enter this command to upgrade most of your software to their current versions:
pi@raspberrypi:- $ sudo apt upgrade
Installing Software Packages
A lot of software is also stored in a central online repository, which you can access when your Pi is connected to the internet. You can download software directly from the terminal window by typing a simple command followed by the name of the program you want to install. For example, to install GIMP, a free image-editing software package for your Raspberry Pi, enter this command:
pi@raspberrypi:- $ sudo apt install gimp
You can also delete unwanted software by entering the purge command to remove it:
pi@raspberrypi:- $ sudo apt purge gimp
To search for available software when you don’t know the software’s full name, enter this command:
pi@raspberrypi:- $ sudo apt search keyword
Replace keyword with part of the software’s name. I’ll cover other methods of installing software in later chapters when required.
ACCESSING YOUR RASPBERRY PI REMOTELY
Some of the projects in this book require you to remove your screen or monitor and disconnect your mouse and keyboard from the Raspberry Pi. For example, to build the magic music box MP3 player in Chapter 10, you’ll have to put the Raspberry Pi in a wooden box. In these situations, you’ll need to access the files on your Raspberry Pi even while it’s disconnected from everything. The simplest way to do this is to connect to your Raspberry Pi remotely from another computer or device via your home network, which you’re connected to when you’re connected to the internet. I’ll show you a couple of ways to do this. To get started, you’ll need your username, password, and your Pi’s IP address.
Remember that if you’ve changed any of this information, you’ll need to use your updated information.
Accessing the Raspberry Pi via SSH
You can remotely access your Raspberry Pi’s command line from another device using Secure Shell (SSH). This allows you to open a terminal session or window on another device that is connected to your Pi so you can send commands such as those in the table of command line instructions, to your Pi remotely. For security reasons, SSH is turned off by default to prevent others from hacking into your Pi. To enable SSH, open the Raspberry Pi Configuration tool from the desktop menu.
On the Interfaces tab (Figure 1-25), set the SSH field to Enabled. Click OK or select Finish if you’re using the terminal Configuration tool. I strongly advise you to change the password from the default if you’re using SSH. You can do this in the Configuration tool.

FIGURE 1-25 Enable SSH on the Interfaces tab in the Configuration tool.
Next, you need your Raspberry Pi’s IP address. The IP address is a set of numbers that identifies your Raspberry Pi on the wireless network. To find this address, open the terminal and enter this command:
pi@raspberrypi:- $ hostname –I
A number appears in the terminal (Figure 1-26). It should look something like 192.134.244.03. Record this number somewhere; you’ll need it later to remotely access your Pi.
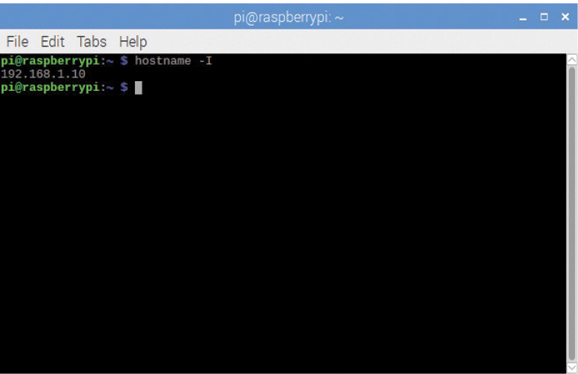
FIGURE 1-26 Record the IP address number that appears in the terminal.
Next, you’ll work with the device you’re using to access your Raspberry Pi, which could be a phone, tablet, or computer. To connect to your Pi, you need to install an SSH client. An SSH client is the software or program that enables you to use SSH to connect to your Pi via your other device. You can download PuTTY, a commonly used client, from https://www.chiark.greenend.org.uk/~sgtatham/putty/latest.html or search for an SSH client app in an app store if you prefer.
Once you’ve downloaded and installed the SSH client (Figure 1-27), open it and enter either the Raspberry Pi’s IP address or raspberrypi.local under Host Name (or IP address). If you’re using the Windows operating system to access it, you’ll need to install Bonjour from https://support.apple.com/downloads/bonjour_for_windows. If you’re using Linux or macOS, you’re good to go!
You’ll be prompted to enter the SSH password, which is your login password (it will be raspberry unless you changed it). Then enter your Raspberry Pi login details to establish a connection with your Raspberry Pi. A terminal window should appear. You can use it to control your Raspberry Pi.
Sometimes, the hostname raspberrypi.local won’t work. Most likely it’s because the IP address you’re using has changed since the last time you used the network. Look up the new IP address using the preceding hostname –I command and enter that instead.
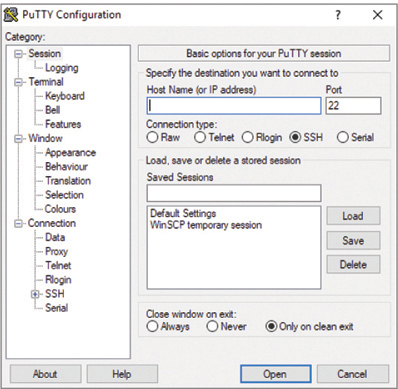
FIGURE 1-27 Configuring your SSH client
Accessing the Raspberry Pi via VNC Using RealVNC
Accessing your Raspberry Pi remotely using the SSH method allows you to control it using the command line. If you want access to the full graphical desktop (GUI) on a device other than the Pi, you can use the built-in Virtual Network Connection (VNC) server. The VNC allows you to access your Pi’s desktop over your network.
An added bonus of VNC is that it’s free to install and use. It requires two parts: the first is a VNC server that’s already installed on the Raspberry Pi. You just need to enable it (Figure 1-28): open the Interfaces tab in Preferences, and click the option to enable VNC.
The second part involves installing a VNC viewer on the remote device you want to view your Pi desktop on. Open your internet browser on the remote device. Browse to the RealVNC website at www.realvnc.com. Click Products, and then click Hobbyists and makers. You should see a page for VNC Connect for Raspberry Pi. Scroll down and click Download in the Download VNC Viewer section.
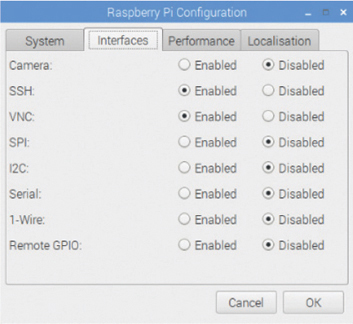
FIGURE 1-28 Enable the VNC client.
Here you should see a wide range of supported operating systems (Figure 1-29). Click your operating system icon, and then click Download VNC Viewer to download the installer. Find the installer (probably in your Downloads folder) and double-click it to run it. Then follow the onscreen setup instructions, accepting the default options.
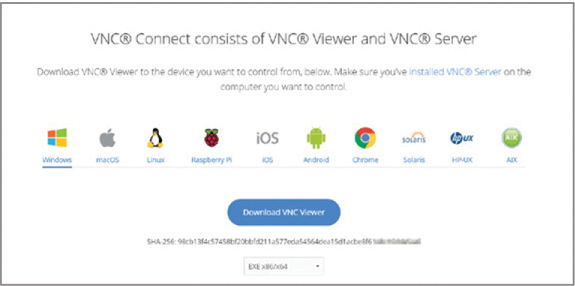
FIGURE 1-29 Select and install your required RealVNC viewer.
Once the installation is complete, find the VNC Viewer icon and click it to open the program. You should see a window like the one shown in Figure 1-30.
NOTE
Remember that you can find out your Raspberry Pi’s IP address by opening the terminal, entering the command hostname –I, and then pressing ENTER. You can also find the IP address by clicking the VNC icon on your Pi, and the address is sometimes displayed below the connectivity heading.
Enter your Raspberry Pi’s IP address into the box at the top.
Then find the same VNC icon on the device you are using to access the Raspberry Pi. Click the icon, and the VNC server should load.
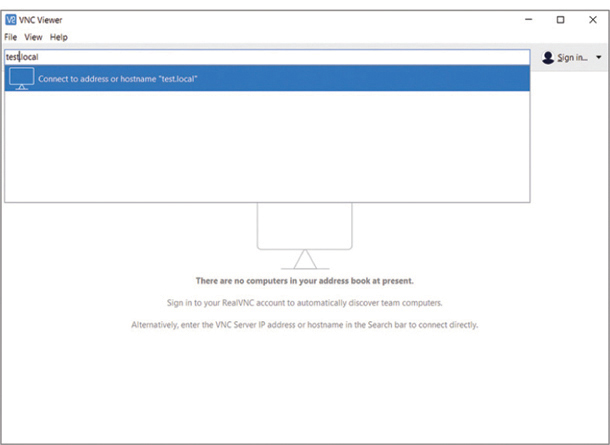
FIGURE 1-30 Entering your Raspberry Pi’s IP address
The first time you connect, or if you connect to a new Pi, you might see the identity check screen in Figure 1-31.
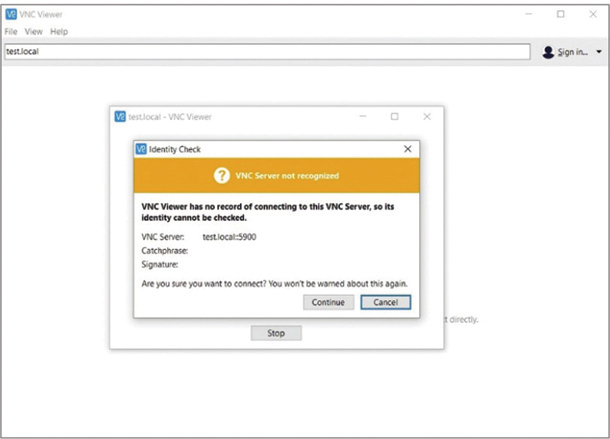
FIGURE 1-31 The identity check
If so, click Continue to access your Pi. You should then be asked to enter your username and the password for your Raspberry Pi.
You should now be connected! If you want to disconnect, just shut down your Pi or close the VNC Viewer window. Sometimes you may be presented with the message computer refused connection. This may be due to a number of reasons. Check that you’ve entered the correct IP address, username, and password. Also check that you’ve enabled VNC in the Raspberry Pi Configuration menu. See Figure 1-28 to do so, and then restart your Pi to ensure that the change is picked up. Finally, consider that some networks block VNC. This is common in schools, libraries, and businesses.
Accessing the Raspberry Pi via Remote Desktop
There’s a second way to access your Pi’s GUI from another device: via a remote desktop. This is similar to using VNC connection, but if you’re using a Microsoft Windows system, you won’t have to install any software on your computer, laptop, or Surface. Using a remote desktop also means that as Microsoft releases updates, your device will remain current, whereas if you use a VNC, you’ll have to download and manually update the server and viewer.
Return to your Raspberry Pi, open the Interfaces tab in Preferences, and enable VNC.
NOTE
At the time of this writing, there was no free software for this alternative method for Apple devices. For a free option, return to the “Accessing the Raspberry Pi via VNC Using RealVNC” section on page 27.
With VNC enabled, you need to install some remote desktop software onto your Pi. Open the terminal window and enter the following command to do so:
pi@raspberrypi:- $ sudo apt-get install xrdp
While this software is installing on your Pi, return to your laptop or other internet-connected device and install a remote desktop app. If you’re using a Windows device, a quick search in the Start menu will locate a built-in remote desktop app called Remote Desktop Connection. If you’re using an Android device, you can download a remote desktop app from the Google store; just search for Microsoft Remote Desktop in the store. If you’re using an Apple device, search for the Apple Remote Desktop in the Apple app store (there is a charge for this app).
Once your Raspberry Pi has finished installing its remote desktop software, open the remote desktop app on your other device. A window, like the one shown in Figure 1-32, should appear.
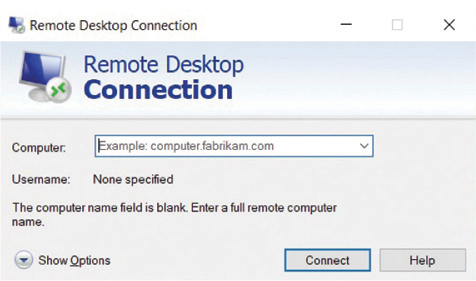
FIGURE 1-32 Connect to your Raspberry Pi with a remote desktop app.
Enter either your Raspberry Pi’s IP address or the hostname into the relevant text box next to Computer:, and then click Connect or the equivalent button. You’ll be prompted to enter your username and password for the Raspberry Pi. Once you’ve done this, the app will establish a connection and open a separate window that enables you to view your Raspberry Pi’s desktop (Figure 1-33).
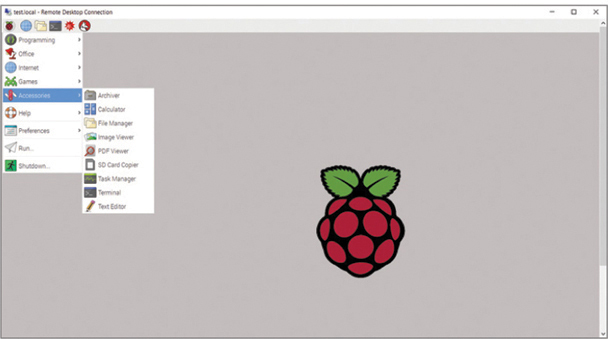
FIGURE 1-33 Viewing your Raspberry Pi’s desktop remotely
You can interact with the desktop the same way you would on the device. Remember that any changes you make will be saved to your Raspberry Pi.
TRANSFERRING FILES
Sometimes you’ll need to transfer files between a computer and your Raspberry Pi. Maybe you’ll want to back up code saved on the SD card, transfer MP3 files between devices, or add new files to your Raspberry Pi. To do this, you’ll need to download a file transfer program to the device you want to connect to your Pi.
If you’re using Windows, visit https://winscp.net/eng/download.php/ and download the latest version of the WinSCP software. If you’re using macOS, search for the File Transfer App in the Apple app store.
The good news is that you don’t need to install any additional software on the Raspberry Pi to transfer files. Once you’ve downloaded and installed the file transfer program for your other computer or device, open it and enter your Raspberry Pi’s hostname or IP address (Figure 1-34). You’ll need to ensure that SSH is enabled, as shown in Figure 1-25.
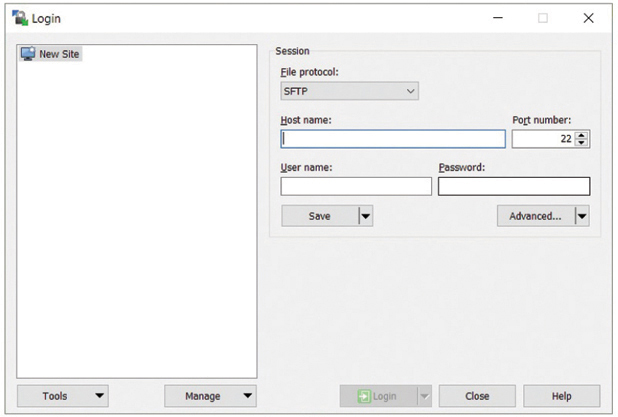
FIGURE 1-34 Enter your Raspberry Pi’s hostname or IP address in your file transfer program.
You’ll probably be prompted to enter your Raspberry Pi’s username and password. Once you’ve done this, your devices should connect, and a file manager should appear onscreen (Figure 1-35).
The file manager will display the files saved on both devices. Click and drag files from one side of the file manager to the other to transfer them.
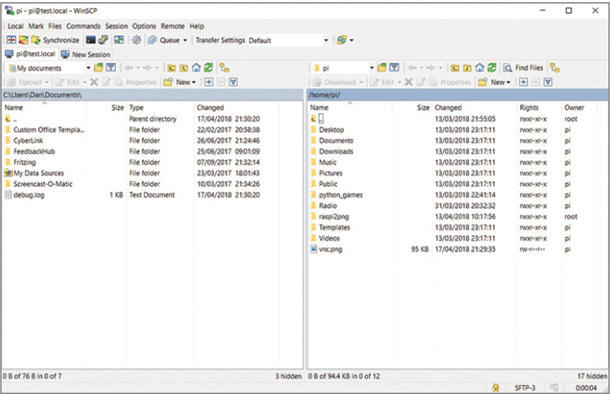
FIGURE 1-35 Use a file manager to transfer files between your devices.
WRAPPING UP
Now you should have a basic understanding of your Raspberry Pi and some of its features. Keep in mind that each chapter’s hack is self-contained and covers all the required skills, theory, and code that you’ll need. Refer back to this chapter if you need reminders or explanations.
Let’s start hacking!