
14
COMPUTER GAMES WITH THE SENSE HAT
IN THE FINAL PROJECT IN THIS BOOK, YOU’LL USE THE SENSE HAT HARDWARE AND PYTHON CODE TO BUILD A VERSION OF THE CLASSIC GAME OF ROCK, PAPER, SCISSORS — BUT WITH A TWIST. YOU’LL PROGRAM A COLORFUL LED MATRIX AND A JOYSTICK TO ADD A GAME DISPLAY AND CONTROL TO YOUR PROGRAM.
In late 2015, the European Space Agency (ESA) sent a supply rocket to replenish the International Space Station (ISS). Among the cargo were two Raspberry Pi computers, each fitted with a special add-on board known as the Astro Pi. These were sent in preparation for the inaugural visit of Major Tim Peake, a British astronaut. Each Astro Pi boasts an array of hardware and sensors and an 8 × 8 LED display—perfect for taking and displaying readings such as temperature, pressure, acceleration, and magnetic field strength.
Previously, in the summer of 2015, the Raspberry Pi Foundation held a competition for children to write a program or experiment for the Astro Pi that would run aboard the ISS. During Peake’s stay, the Astro Pi ran the preloaded experiments designed by the winners. The Astro Pi will stay onboard the ISS until 2021, and, provided you meet the qualifications to take part, you can still enter the competitions. Find more details at https://astro-pi.org/. Who knows—maybe you’ll be inspired to write your own program to run in space aboard the ISS, shown in Figure 14-1.
In December of that year, the Astro Pi became available for sale to the public, rebranded as the Sense HAT. The Sense HAT you can buy today consists of exactly the same hardware and sensor set found on the Astro Pi.

FIGURE 14-1 The International Space Station
The Sense HAT’s LED display can serve as a screen, making it the perfect tool for creating games. In this chapter, you’ll use it to program a twist on the classic game of rock, paper, scissors. This version—called rock, paper, scissors, lizard, Spock—introduces new possibilities to mix up the gameplay.
First, though, you’ll look at simple programs in order to explore the Sense HAT’s key features. You’ll scroll text, make an interactive temperature display, and use a tool called an array to draw a basic image. These skills also stand alone, and you can adapt them for your own projects.
WHAT YOU’LL NEED
Here’s what you’ll need to build this game project:
- Raspberry Pi 3 or 4 (suggested)
- Sense HAT
- USB portable battery (optional)
- Small Phillips-head screwdriver
WHAT IS THE SENSE HAT?
Let’s take a look at the Sense HAT’s sensors and hardware, shown in Figure 14-2.
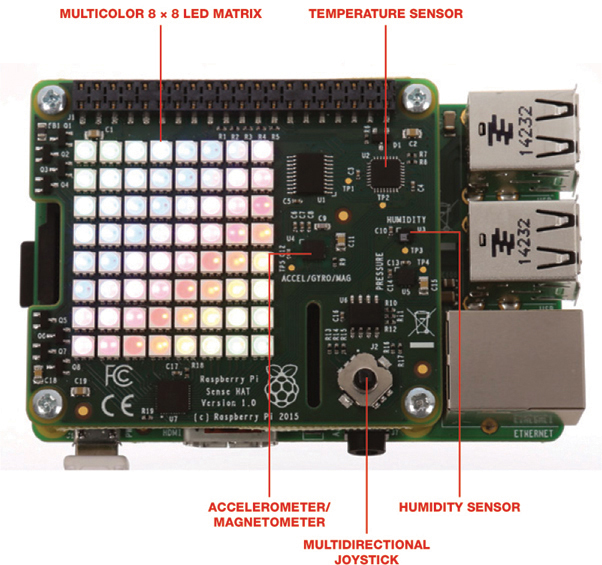
FIGURE 14-2 The Sense HAT and its parts
The Sense HAT parts are as follows:
Multicolor 8 × 8 LED matrix You can use these 64 programmable LED lights to scroll messages or to display data from the sensors, animations, or simple games.
Temperature sensor This built-in sensor is accurate to about 2°C (approximately 4°F) in the 0-65°C (32-150°F) range. It’s useful for measuring the temperature of your surrounding environment.
Magnetometer Works like a compass by detecting magnetic field strengths. You can use its readings to measure magnetic fields and find compass points relative to north.
Accelerometer Measures acceleration in the directions of up, down, and across. You can use this to track movements, or modify it to create a controller for a game.
Multidirectional joystick Can be used to move characters in a game or as a selection tool for options.
GETTING STARTED WITH THE SENSE HAT
Setting up the Sense HAT is extremely easy, because it was designed to work with the Raspberry Pi. Take the Sense HAT and slide it onto the GPIO pins. Firmly push it down to secure it into place. Then take the Raspberry Pi’s offset mounts (these should come with your Sense HAT) and screw them into the Sense HAT. Fitting these mounts will keep the board from moving around when you’re using the joystick. Next, plug in your power supply and boot up your Raspberry Pi.
You’ll now have a look at some basic programs that will show off the various features and capabilities of the Sense HAT.
Scrolling Text Across the Sense HAT
Let’s write your first program, which will scroll a message across the LED display.
Making the Text Scroll
Open your Python editor, start a new file, and enter the program in Listing 14-1.
❶ from sense_hat import SenseHat
   sense = SenseHat()
❷ sense.show_message("My name is Ada")
LISTING 14-1 Scrolling a message across the LED display
Start by importing the SenseHat module ❶. Then create a line of code ❷ that’s responsible for scrolling the message. Replace the text between the quotation marks with your own, save the file as scroll_text.py, and press F5 to run it. Your message will scroll across the LEDs.
Changing the Color of the Text
You can change the color of the text by altering its red, green, and blue (RGB) values. You can combine any amount of red, green, and blue using values between 0 and 255, where 0 is none and 255 is the maximum amount, to create an overall color.
Replace the last line of code from Listing 14-1 with the following:
sense.show_message("Hi, this is Ada!", text_colour=[255, 0, 0])
This code sets the color to the maximum red value (255) and the minimum green and blue values (0) to change the text to red. Save and run the program code as before.
Play around with other color variations. Change the color values at the end of the line of code, and then run the program to see the colors change. The following table lists color values you could use.
COLOR |
RGB VALUES |
Pink |
255, 102, 255 |
Yellow |
255, 255, 0 |
Orange |
255, 128, 0 |
Purple |
102, 0, 102 |
Light blue |
0, 255, 255 |
Taking a Temperature Reading
Now you’ll combine the code that scrolls text with the Sense HAT’s temperature sensor to display the temperature of your surroundings. Open a new Python file and enter the code in Listing 14-2.
   from sense_hat import SenseHat
   sense = SenseHat()
❶ temp = sense.get_temperature()
❷ print ("Temperature: %s C" % temp)
❸ sense.show_message("Temp: %s C" % temp)
LISTING 14-2 Scrolling the temperature across the LED display
Again, begin by importing the SenseHat module. Then tell the temperature sensor to take a reading and store this value in a variable named temp ❶. Next, print out the value ❷. On the last line, use the same code as you did in Listing 14-1 to scroll text, but make the message the value from the temp variable ❸.
Now the temperature (in degrees Celsius) will scroll across the LED display. If the number seems high, that’s because the sensor is located near the Raspberry Pi’s CPU, which gets hot. So the reading is probably 5 or 6 degrees Celsius above your environment. If you want a more accurate temperature reading, you can subtract 6 from the reading by replacing line ❶ with temp = sense.get_temperature() - 6.
Making a Real-Time Temperature Display
Our program so far takes a single temperature reading at the moment when you execute the program. This isn’t useful if you want to monitor a change in temperature, so you’ll edit the code to update the temperature readings continuously. You’ll also use the LEDs to make a virtual thermometer, rather than representing the temperature as a number. You’ll do this by assigning the value of the temperature reading to a number of pixels, creating an LED thermometer. Open a new Python file and copy out Listing 14-3, which that shows this program.
   from sense_hat import SenseHat
   sense = SenseHat()
❶ red = (255, 0, 0)
❷ blue = (0, 0, 255)
❸ while True:
    ❹ temp = sense.temp
    ❺ print (temp)
    ❻ pixels = [red if i < temp else blue for i in range(64)]
    ❼ sense.set_pixels(pixels)
LISTING 14-3 Making an updating virtual thermometer
Start the program by importing the SenseHat modules. Then assign two colors for the temperature display. In this example, use red ❶ to represent the current temperature and blue ❷ to represent the rest of the scale.
Next, create a while loop to ensure that the program repeats, updating the temperature ❸. As before, take the temperature reading and store the value in temp ❹ and then print the value ❺.
Calculate how many LEDs should be red and how many should be blue ❻. Each LED represents a degree, so if the temperature were 26°C, you would want the first 26 LEDs to be red and the rest to be blue (the blue LEDs, would mark temperature values 27°C and above). The code indicates that the LEDs should be blue if their number is greater than the temperature and red if they are equal to or lower than the temperature. These color values are then written to the LED display ❼.
As the temperature changes, the looping program will recalculate the combination of red and blue LEDs. You’ll have more red LEDs as it gets hotter and more blue LEDs as it gets colder. Figure 14-3 shows the LED thermometer.

FIGURE 14-3 The Sense HAT real-time temperature sensor
Save the program as temp.py and run it. Try adjusting the temperature by safely placing your Sense HAT near a heat source or maybe putting the Sense HAT in the fridge for a few minutes!
Building a Compass
The Sense HAT has an onboard magnetometer that you can use as a compass to calculate the Sense HAT’s position in relation to magnetic north. Open a new Python file and try this out now, using the code in Listing 14-4.
   from sense_hat import SenseHat
   sense = SenseHat()
   import time
   while True:
❶ north = sense.get_compass()
❷ print ("North: %s" % north)
❸ time.sleep(1)
LISTING 14-4 Finding the magnetic north
Add the first three lines of code, which are the standard imports and assignments. Then create a while loop to keep the program repeating; this way, as in the thermometer project, the Sense HAT will continuously update its location. Next, take a reading from the magnetometer ❶, and store it in a variable named north. Print out the value ❷ and then add a 1-second pause ❸ in order to allow you to settle in a position before the next reading is taken.
Save and run the program. Move the Sense HAT around and watch the readings change.
Making a Magical Sparkle Screen
This nice little program from the Raspberry Pi Foundation turns the Sense HAT LED display into a wall of sparkling colors, as shown in Figure 14-4. It selects a random LED and assigns it a random color, turns that LED on, and then pauses for one-tenth of a second before selecting and turning on another random LED with a random color. This pattern continuously loops, creating a sparkling show. Stick a transparent object on top, and you’ll have your own mood light.
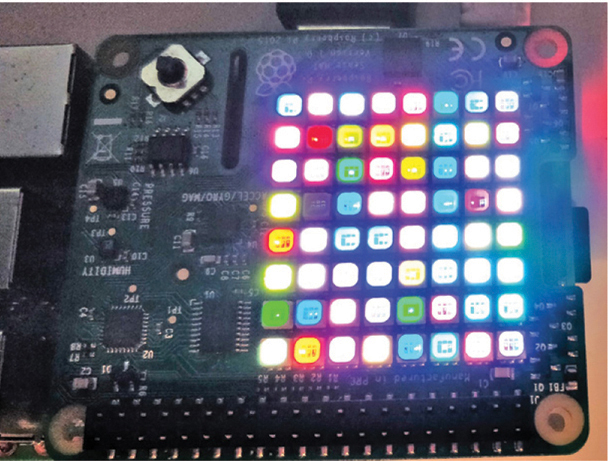
FIGURE 14-4 The Sense HAT sparkles.
Open Python and save a new file as sparkles.py. Enter the code from Listing 14-5.
   from sense_hat import SenseHat
❶ from random import randint
❷ from time import sleep
   sense = SenseHat()
❸ while True:
   ❹ x = randint(0, 7)
   ❺ y = randint(0, 7)
   ❻ r = randint(0, 255)
   ❼ g = randint(0, 255)
   ❽ b = randint(0, 255)
   ❾ sense.set_pixel(x, y, r, g, b)
   ❿ sleep(0.01)
LISTING 14-5 Choosing random LEDs and colors
Begin the program by importing the SenseHat module. Then import the randint() function from the random module ❶. The randit() function, short for random integer, selects a random integer (a nondecimal number) to use in the program, which will give you the random color selection. Next, import the sleep() function to add a short delay to the program ❷.
Create a while True loop so the program continuously selects new random LEDs and gives them new random colors, creating the sparkling effect ❸. In this while True loop, build up the details of the random LED. First, the LED’s position is selected using random integers for the x- and y-coordinates on the display. The x position is a random value between 0 and 7 ❹ that’s stored in a variable named x. The y value is also a random value between 0 and 7, and it’s stored in a variable named y ❺. Although you have eight LEDs across and down, in programming we start numbering from zero, so the first LED is in position 0, and the second is in position 1. This means that the eighth LED is number 7.
Second, create variables for red, green, and blue, which the program will then combine at random to create the LED’s random color. Store the RGB values in the variables r, g, and b ❻ ❼ ❽.
Finally, combine all these values and write them to the LEDs with sense.set_pixel() ❾ followed by the x, y, r, g, and b variables. When the program runs, it will choose a random value for each of those five variables. Finish by adding a small pause ❿ before the program loops. Save and run the program, and enjoy the light show!
Creating an Image with the LED Display
Images are made up of pixels, which you can think of as tiny dots of color. If you treat each individual LED on the Sense HAT display as a pixel, you can create an 8 × 8 pixel image, as shown in Figure 14-5.

FIGURE 14-5 An 8 × 8 pixel drawing
In this program, you’ll use an array to hold the position and color of each LED. An array is a list that uses more than one line. Like a list, an array is used for holding data, which can be numbers, strings, or symbols. For example, shopping = ['eggs', 'chocolate', 'bread'] is a list. You enclose the lists in square brackets, [ ], and can select any item in the list by referring to its index number. As you know, the item in the first position (eggs) is 0, the next item (chocolate) is 1, then 2, and so on.
Your array will contain 64 entries, one for each LED. This way, you can control each LED individually, turning it on or off and setting the color. For simplicity, the array is divided into eight lines consisting of eight entries each, mimicking the layout of the LED display. Start a new Python file and save it as face.py. Enter the program code in Listing 14-6 to create a smiley face emoji.
   from sense_hat import SenseHat
   sense = SenseHat()
❶ R = [255, 0, 0] # Red
❷ O = [0, 0, 0] # Black or off
❸ B = [0, 0, 255] # Blue
❹ Y = [255, 255, 0] # Yellow
❺ face = [
❻ O, O, O, Y, Y, O, O, O,
   O, Y, Y, Y, Y, Y, Y, O,
   O, Y, B, Y, Y, B, Y, O,
   O, Y, Y, Y, Y, Y, Y, O,
   O, Y, Y, Y, Y, Y, Y, O,
   O, Y, Y, R, R, Y, Y, O,
   O, O, Y, Y, Y, Y, O, O,
   O, O, O, Y, Y, O, O, O
   ]
❼ sense.set_pixels(face)
LISTING 14-6 Drawing a smiley face emoji
Start the program by importing the SenseHat module. Then assign RGB values to four color variables: R for red ❶, O for black ❷, B for blue ❸, and Y for yellow ❹. To create black as we see it, you have to turn off all the color by setting the RGB to 0, 0, 0 ❷. Of course, you can also adjust the RGB values to create your own customized colors for the face.
Next, create an array called face ❺ to hold the color and position of each LED. Populate the array with the proper color variables ❻. Each of the list’s eight lines contains eight individual entries. Typing B, B, B, B, B, B, B, B, for example, would set the top line of LEDs to blue, because the variable B represents the RGB value for blue.
Note that the final line of the array doesn’t end with a comma. This indicates that it’s the end of the array, and Python should expect no more values. Close the array with a closing square bracket.
Finally, tell Python to write the elements in the array to the LED display ❼. This turns on each LED with the relevant color, building up the image.
Save and run the program. You’ll see a smiley face appear on the Sense HAT display, as shown in Figure 14-6.
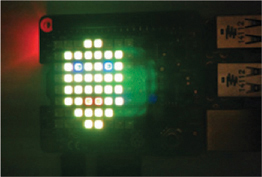
FIGURE 14-6 Smiley face displayed on the Sense HAT
Have a go at creating another face—or maybe an animal, car, plane, or tree. You may find it helpful to draw your image ahead of time by shading in squares in a similar 8 × 8 square grid.
Figure 14-7 shows some examples. Can you guess what they are?

FIGURE 14-7 Try displaying one of these icons on your Sense HAT.
Creating Images with the Grid Draw Program
Creating images by using an array is fun but can be time-consuming. Using an array can also become frustrating if you’re trying to draw something precisely. Another way to create images is to use 8x8GridDraw, an interactive program designed to make creating images on Sense HAT a lot easier.
Once installed, the 8x8GridDraw program allows you to do the following:
- Create an image on an 8 × 8 grid and write it directly to the LED display.
- Choose from nine colors.
- Export the image as a set of code, which you can add to your Python program.
- Export and save the image as a PNG file.
- Rotate the image on the LED display.
- Add new frames to create a simple animation.
This project will be slightly more involved than those you’ve done so far in this chapter, so I’ll walk you through it step-by-step:
- Install the software: To install the software, open the terminal window and enter the following:
pi@raspberrypi:- $ sudo pip3 install pypng
This installs the software library, which enables you to export and save your image as a small 8 × 8 pixel PNG file.
Next, install the main program by entering this command:
pi@raspberrypi:- $ git clone https://github.com/topshed/RPi_8x8GridDraw
This downloads the required files to a new folder. Once completed, you’ll have a new folder that contains several programs related to 8x8GridDraw.
- Create an image: Let’s have a go at creating an image. First, you need to start the program. Return to the terminal and enter the following:
pi@raspberrypi:- $ cd RPi_8x8GridDraw
This command navigates to the program folder for 8x8Grid-Draw. To run the program, enter this:
pi@raspberrypi:- $ python3 8x8grid-sense.py
This loads the main window, shown in Figure 14-8.
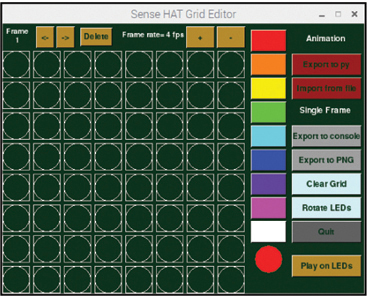
FIGURE 14-8 The Sense HAT Grid Editor
Clicking a circle on the grid will fill the square surrounding it with color. To change the color, select a new color from the right side. To turn off an LED, double-click the square, and it will return to the original transparent outline. You draw images by filling particular squares with chosen colors. Go ahead and create a simple image.
- Display the image: Once you have created your image (like the tree in Figure 14-9), you can write the image into your Sense HAT. Locate and then click the Play on LEDs button. Your image will show up on the Sense HAT’s LEDs. Check it out!
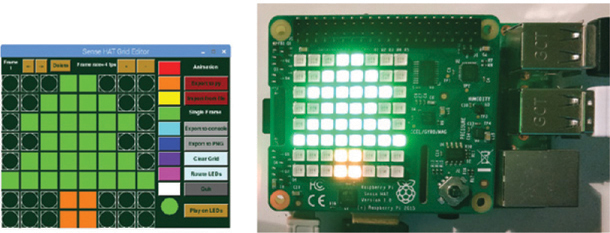
FIGURE 14-9 Click the Play on LEDs button to make your drawing appear on the Sense HAT.
- Export the image: Once you have completed your image, you can export it. You could export it as code and then add it to your other programs, but it’s much easier to export it as a PNG, so that’s what you’ll do now.
Click the Export to PNG button on the GUI and save the file in the RPi_8 x 8 GridDraw folder (Figure 14-10). To load the image, it needs to be located in the same folder as your program code, so you may need to copy your image from this folder into the same folder where your Python program code is saved.

FIGURE 14-10 Exporting your file as a PNG will save it in the RPi_8x8 GridDraw folder.
This will produce a small 8 × 8 PNG file, which you can load onto the Sense HAT with the following line of code written into your Python program:
sense.load_image("name_of_your_file.png")
Now that you can create drawings, you have everything you need to program a game of rock, paper, scissors, lizard, Spock.
BUILDING THE ROCK, PAPER, SCISSORS, LIZARD, SPOCK GAME
NOTE
This variation on the game was originally created by Sam Kass and Karen Bryla (http://www.samkass.com/theories/rpssl.html).
You’re probably already familiar with rock, paper, scissors. You and an opponent play by forming a rock, a piece of paper, or a pair of scissors with your hands; each object beats—and gets beaten by—a different one. The issue with the original game is that it’s too easy to predict the outcome (because only three possible results exist, other than a tie). During season two of the popular TV show The Big Bang Theory, the character Sheldon makes the classic game more exciting and challenging by using an alternative version that adds Spock and lizard to the three original choices.
To play Spock, you use the Vulcan hand sign from the TV series Star Trek. To play a lizard, you make your hand into a sock-puppet-like mouth.
Wondering how they work? Well, Spock smashes scissors and vaporizes the rock. However, he is poisoned by the lizard and disproved by the paper. The lizard poisons Spock and eats the paper, but it is crushed by the rock and decapitated by the scissors. Gruesome! Adding these options creates more possible combinations and makes the overall game much more exciting and less predictable. Figure 14-11 shows all of the hand signs (arrows are pointing at the move that is defeated by the move at a given arrow’s origin).
In our version of the game, RPSLS, the player will select one of the five options by scrolling through the five images with the Sense HAT’s joystick. The player presses the joystick in, like a button, to select an option. Then the Raspberry Pi will randomly select its option. The game will compare both options and choose a winner. The player will then be able to choose to play another game or quit.
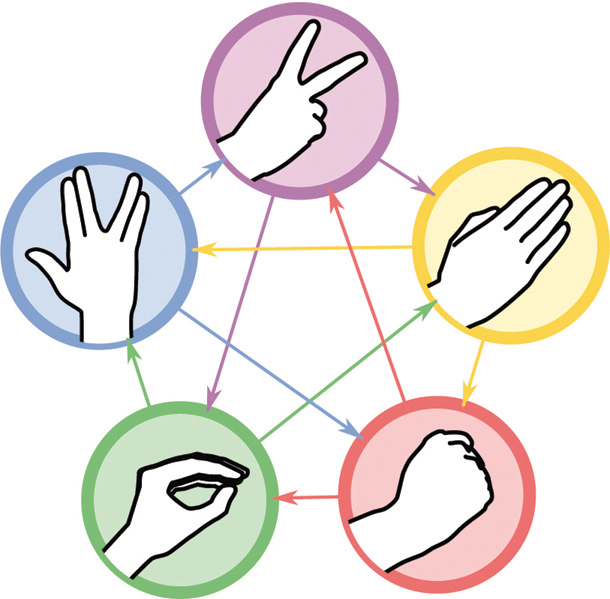
FIGURE 14-11 How to play rock, paper, scissors, lizard, Spock
First you need an 8 × 8 PNG image for each option. You can either make these yourself or download the example ones used in this chapter from https://www.nostarch.com/raspiforkids/ and save them in the folder you’re using for this project. Note that if you create your own images, you’ll need to save them as 0.png, 1.png, 2.png, 3.png, and 4.png. These are the image filenames the program will look for.
Importing Modules and Creating the Variables
Open your Python editor and add the code in Listing 14-7. Save the program as RPSLS.py, and make sure the program file is saved into the same folder as the images are saved in, or the program won’t know where to find them.
❶ from sense_hat import SenseHat
   import random
   import time
❷ global playersChoice
❸ global count
❹ global computer_choice
❺ gameRunning = True
LISTING 14-7 Adding the modules and global variables
Begin the program by importing the SenseHat module ❶ that enables the player to control the joystick, scroll text, and display images on the LED matrix. Then import the random module to enable the Raspberry Pi to select a random number and the time module to add small pauses.
Next, set up three global variables, which you’ll be able to access from anywhere in the program (unlike local variables defined inside a particular function, which can be accessed only within that function).
The first variable ❷ stores the player’s choice of rock, paper, scissors, lizard, or Spock. You use the second variable ❸ to store the amount of time the Raspberry Pi has to make its move. The number will be random, creating the illusion that the Raspberry Pi is taking its time to select its choice. You use the next variable ❹ to store the Raspberry Pi’s choice for later use. Finally, create a variable named gameRunning ❺ to hold the status of the game. The value True means the game is currently running.
Preparing the Game
The code in Listing 14-8 prepares the Sense HAT for the RPSLS game.
   # Prepare Sense Hat
❶ sense = SenseHat()
❷ sense.load_image("0.png")
❸ sense.low_light = True # Save your eyes!
❹ playersChoice = 0
LISTING 14-8 Creating the initial game settings
First, initialize the Sense HAT ❶ and load the first image for the game ❷. Then reduce the brightness of the LEDs ❸. This is useful if the LEDs are too bright; dimmer lights are better for your eyes. You can adjust this later to suit your tastes.
For the start of the game, set playersChoice to 0 ❹. This is the first option in the list that the player can select. Remember that in programming, the first option in a list is in position 0. The PlayersChoice variable will hold a number between 0 and 4 that represents the player’s option: 0 is rock, 1 is Spock, 2 is paper, 3 is lizard, and 4 is scissors. The player will get to select an option when the game begins by scrolling through the options with the joystick.
Setting Up the Player’s Choice
Now, you’ll create the function that will convert the player’s choice from a number into its corresponding rock, paper, scissors, lizard, or Spock image. Enter the code in Listing 14-9.
   # Converts the Number into the choice i.e. lizard, spock, etc.
❶ def number_to_name(number):
       if number == 0:
           return "Rock"
    ❷ elif number == 1:
           return "Spock"
       elif number == 2:
           return "Paper"
       elif number == 3:
           return "Lizard"
       elif number == 4:
           return "Scissors"
LISTING 14-9 Setting up the player’s choice
Create and name the function ❶ that checks which option the player has selected with the joystick (the option is stored as a number, and then that number is converted into the name of the option).
This function uses conditionals ❷ to check each number and then assigns the name of the option for each number that’s selected. The first conditional checks whether the value 0 is selected and returns Rock if it is. If 0 isn’t selected, the program checks for the number 1. If 1 is selected, the program returns Spock, and if it isn’t, the program checks for the number 2. The program continues until it has checked for every possible selection.
Selecting an Object
The next section of the program creates a function that holds the main gameplay mechanics. The player will use the Sense HAT’s joystick to scroll through the five options. The LED display will show each option as the player scrolls through. To select one, the player must click using the joystick. Add the code in Listing 14-10 to your program.
def mainGame():
    ### PLAYER SELECTION ###
    # Loops while running variable is True
    running = True
 ❶ global playersChoice
    global computer_choice
    while running == True:
     ❷ sense.set_rotation(90)
     ❸ for event in sense.stick.get_events():
        ❹ if event.action == "pressed" and playersChoice < 5:
           ❺ if event.direction == "up":
                 print (playersChoice)
              ❻ sense.load_image(str(playersChoice) + ".png")
                 playersChoice = playersChoice + 1
        ❼ if playersChoice == 5:
                playersChoice = 0
   # Checks for a 'select / Enter' Choice
         if event.action == "pressed":
          ❽ if event.direction == "middle":
                running = False
             ❾ break # Ends loop and moves onto main game
LISTING 14-10 Coding the player’s object selection
Begin this function by importing the global variables you created earlier ❶. Add your while running = True statement, which indicates that the game is in play.
Rotate the image displayed on the LEDs so it’s oriented correctly with respect to the joystick ❷. Now start checking for joystick movements ❸, called events in the Sense HAT stick events.
First the program checks whether the joystick has been pressed (moved) and whether playersChoice is set to a value of less than 5. If the value is less than 5, the player hasn’t reached the end of the images. At the start of the program, you assigned playersChoice a value of 0, which means that the conditional on line ❹ is True when you first run the program, because 0 is less than 5, so the next lines of code run.
Now check whether the joystick has been moved up, using event.direction == 'up' ❺. The line below prints out the name of the option that the player selected. You won’t normally see this when playing the game, as RPSLS is designed to be stand-alone. However, this line is useful for testing that the selection part of the program is working correctly.
The program then loads the first image file, 0.png, which is the image of the rock ❻. The next line increases the playersChoice variable by 1, which loads 1.png the next time the joystick is moved up. Eventually, the playersChoice value will reach the top value of 5, the last option in the list, Spock ❼. At this point, there are no other options to select in the list, so playersChoice returns to 0, loading the rock image again. This loop continues until the player selects an object by pressing the middle button with the joystick ❽; this acts like pressing ENTER and therefore selects the player’s choice of option. This sets the running variable to False, which stops the loop. The break at line ❾ moves the program into the next section.
Notifying the Player of Their Option Choice
Once the player has selected an object, the code in Listing 14-11 will notify them of their option choice.
   # Message for player about their choice
❶ print ("Your Choice is", playersChoice)
   number = playersChoice - 1
❷ playerMessage = number_to_name(number)
   sense.set_rotation(0)
LISTING 14-11 Notifying the player of their choice
The line at ❶ is an optional test to see whether the program has selected the correct image file; remove it once you are happy that the program is running correctly by commenting out that line with a hash mark. The line at ❷ runs your object number through the number_to_name(number) function, which you wrote in Listing 14-9. This converts your number into the name of the option and returns that name so it can be scrolled as text across the LEDs. This name of the option is stored in the playerMessage variable.
Coding the Raspberry Pi’s Selection
Now it’s the Raspberry Pi’s turn to select its object. Copy the code from Listing 14-12 into your program.
   ### RASPBERRY PI SELECTION ###
   # Raspberry Pi selects a random choice from the options
❶ count = random.randrange(5,50)
   sense.set_rotation(90)
   while count > 1:
    ❷ computer_choice = random.randrange(0,5)
       # print (computer_choice)
       time.sleep(0.1)
    ❸ sense.load_image(str(computer_choice) + ".png")
    ❹ count = count - 1
LISTING 14-12 Coding the Raspberry Pi’s object selection
Use the random.randrange() function ❶ to get the program to generate a number between 5 and 50. Then store this number in a variable named count. This count value creates a delay of 0.10 to 5 seconds between the player selecting their option and the Raspberry Pi’s selection. During this delay, the five images are repeatedly displayed and changed, creating the illusion that the Raspberry Pi is scrolling through the options and thinking about which option to choose.
The images are selected on line ❷, where the program picks a random number between 0 and 5. Each number is associated with an image file. On line ❸, make the computer_choice value into a string and add the .png extension so that the name you pass to sense.load_image() matches the name of one of the image files. That image file is loaded.
Use a small pause to allow the player to view the image before the loop runs again and displays another image. Subtract a value of 1 from count ❹ to keep the count decreasing; this ensures that the delay will eventually reach 0 and run out.
If the count value is greater than 1, the loop continues, an image is displayed, and 1 is subtracted from count. This continues until the count reaches 0. Then the current image displayed is selected as the Raspberry Pi’s choice; it has made its selection.
Displaying the Raspberry Pi’s Choice
In the next section of the program, shown in Listing 14-13, you tell the player which option the Raspberry Pi selected by showing it on the Sense HAT.
   # Message for player about the Raspberry Pi's choice
❶ number = computer_choice
❷ sense.set_rotation(0)
❸ sense.show_message("Raspberry Pi = ", text_colour=[0, 150, 255],
   scroll_speed = 0.06)
   sense.set_rotation(90)
❹ sense.load_image(str(computer_choice) + ".png")
❺ time.sleep(1)
   sense.set_rotation(0)
LISTING 14-13 Displaying the Raspberry Pi’s selection
Store the program’s choice in the number variable ❶ so you can use number to represent the Pi’s choice in the rest of the program.
Set the image rotation to the correct angle ❷. Then scroll a message across the LED display, announcing the Raspberry Pi’s choice ❸. The code text_colour=[0, 150, 255], where the three values represent the RGB value, sets the color of the text. You can also adjust the speed of the scroll to any value between 0 and 1.
Next, load the image corresponding to the number that the Raspberry Pi selected ❹. If, for example, the Raspberry Pi selected option number 3, the program would load and display the image of the lizard. Add a short pause ❺ before the program calculates the winner of the game.
Choosing a Winner
The final part of the mainGame() function, shown in Listing 14-14, compares the player’s option with the Raspberry Pi’s option and calculates the winner of that round. This uses a branch of math called modulus.
   ### WINNER CALCULATED ###
❶ result = (int(computer_choice - (playersChoice-1))) % 5

❷ if result == 0:
   ❸ sense.show_message("Player and Pi Tie!", text_colour=
      [0, 0, 255], scroll_speed = 0.08)

❹ elif result >=3:
   ❺ sense.show_message("Player Wins!", text_colour=
      [0, 255, 0], scroll_speed = 0.08)

❻ else:
   ❼ sense.show_message("Raspberry Pi Wins!", text_colour=
      [255, 0, 0], scroll_speed = 0.08)##??
LISTING 14-14 Calculating the winner
First, create a variable called result ❶ to store a particular value, which you’ll use to determine who won. The math behind the calculation is interesting. In general, this line subtracts the value that corresponds to the Pi’s option choice away from the player’s choice value (which already has 1 subtracted from it). For example, if the Pi’s value is 5 and the player’s value is 3, you’d calculate 5 - (3 - 1) to 5 - 2, which equals 3. The modulo of this number by 5 is then found; the modulo is the remainder from the division. In this example, the answer would be 2, because 3 goes into 5 once with a remainder of 2. The number 2 is then used to determine whether the player or the Pi has won the game.
If the result value is equal to 0, both players picked the same option, and the game ends in a tie ❷. Make the message Player and Pi Tie! scroll across the LED display ❸. Again, you can adjust the color and speed of the text scroll.
If the value of result is greater than or equal to 3, your option beats the Raspberry Pi’s option, and you win the game ❹. Make the message Player Wins! scroll across the LED display ❺.
The final possible outcome of the game is that the Raspberry Pi’s choice beats yours ❻. This is the case if anything other than the first two possibilities occurs. If this happens, scroll a message telling the player that the Raspberry Pi wins. You can customize the color and the speed of the message ❼.
This completes all of the code for the mainGame() function that controls the essential gameplay mechanics of rock, paper, scissors, lizard, Spock. To recap: the function enables the player to select an option and then makes the Raspberry Pi select an option (after a delay, to make it seem like the Pi is thinking). It then compares the two options to calculate the winner of the game and scrolls a message updating the player on the outcome.
Starting a New Game
You’re almost done! Listing 14-15 is the initial welcome section of the game. It introduces the game and then runs the mainGame() function (whereas before you were simply defining the mainGame() function). After a round has finished, it also gives the player the option to play again by moving the joystick up or to end the game by moving the joystick down.
### START THE GAME ###
sense.show_message("Welcome to R.P.S.L.S!", text_colour=[155, 100,
30], scroll_speed = 0.08)
sense.show_message("Please use 'Up' to select", text_colour=[155,
255, 255], scroll_speed = 0.05)
sense.load_image("0.png")
LISTING 14-15 Starting the game
Begin by adding the welcome message. You can customize this, but in my experience, I’ve found that simple messages work best, since most players just want the game to begin. Then add a second message that tells the player how to select an option. Again, feel free to adjust the color and scroll speed for each message. If at first you want a slower scroll speed, try setting it to 0.60 instead. Once you are familiar with the game, you’ll want to just get on with it and not wait for slow scrolling text.
Then add sense.load_image("0.png"), the code that loads the first image, and shows it on the LED display. This is your rock image.
These three lines will run only the first time the program is executed, because you don’t need to have the welcome message and instructions show every time you play the game, just the first time it loads. Therefore, keep these lines of code outside the mainGame() function.
Play Again?
End your program with code that checks whether the player wants to play again. Add the code in Listing 14-16.
❶ while gameRunning == True:
    ❷ play_again = 1
    ❸ mainGame()
       sense.show_message("Play Again?", text_colour=[255, 255, 255],
       scroll_speed = 0.08)
❹ while play_again == 1:
    ❺ for event in sense.stick.get_events():
           if event.action == "pressed":
               if event.direction == "up":
                ❻ play_again = 0

       ❼ if event.action == "pressed":
              if event.direction == "down":
               ❽ sense.show_message("Bye Bye", text_colour=
                  [255, 255, 255], scroll_speed = 0.08)
               ❾ play_again = 0
               ❿ gameRunning = False
LISTING 14-16 Starting a new game
For this, use a while loop named gameRunning, which you set to True; as long as the variable is set to True, the game will keep running ❶.
Now create another variable to hold a value that indicates whether the player wants to play again ❷. Use a value of 1 to signify the player wants to start a new game. A value of 0 would mean that the player doesn’t want to play again.
The next line of code calls the mainGame() function, which holds the main gameplay elements and starts the game. After the first game is completed, a message scrolls across the LED display asking the player whether they wish to play again ❸. Now, because the play_again variable is set to 1 ❹, the program waits for the player to move the joystick ❺. If the player moves the joystick up, the variable play_again is set to a value of 0 ❻. This breaks the play_again loop ❹ and returns to the main loop, which loads the mainGame() function ❸ and begins the game again.
If the player moves the joystick down ❼, a message appears, informing the player that the game is ending ❽. The play_again variable is reset to 0 ❾ and, most important, the gameRunning variable is set to False ❿. So when the program loops back to the beginning, gameRunning no longer has a value of True, which means the mainGame() function doesn’t load, and the program ends. To play the game again, you’d have to start up the entire program by pressing F5.
This completes the program code for rock, paper, scissors, lizard, Spock. Double-check that your five images are saved into the same folder as the program code, and then give it a test run. A lot of indentation levels need to be exact, so ensure that you double-check them if your program doesn’t run the way you expect it to. Have fun!
WRAPPING UP
Once you have RPSLS working, you can customize your version of the game. Why not try creating your own images for rock, paper, scissors, lizard, Spock? Add sound effects or a scoring system. Adapt the code so that you can play another human being rather than your Raspberry Pi. Also, if you want to see Sheldon in full effect, check out https://www.youtube.com/watch?v=hoV-SNpdyW8.