
Chapter 27. Automating SQL Server Management using SMO
When managing Microsoft SQL Server, there is rarely just one best way to accomplish any given task. Server Management Objects (SMO) and its sisters, Replication Management Objects (RMO) and Analysis Management Objects (AMO), are object libraries that enable you to manage SQL Server to best fit your needs.
Microsoft provides excellent tools to manage SQL Server, but they may not always fit the skill set of your administrative team. For example, your operations team may be more inclined to script all management tasks (not a bad idea and the graphical tools provided don’t necessarily lend themselves to automation). SMO, introduced with SQL Server 2005, was built using the .NET Framework, so the objects it exposes are available in your language of choice. In this chapter, I’ll give examples using Visual Basic .NET, but you can build your own application using any .NET language.
SMO was designed to be easier to use and more efficient than its predecessor, Distributed Management Objects (DMO). For example, when returning the collection of databases for a server, SMO returns only the name and the schema for the databases on the server. DMO returns the fully instantiated collections of every database on that server, taking additional time to both populate that collection and send it. In addition, DMO increases the network bandwidth required to pass that entire collection to the client. The point is that when you need additional detail from the server, SMO returns that detail, but not by default. SMO also supports a wealth of features new to SQL Server 2005 and SQL Server 2008.
In SQL Server 2008, Microsoft added the ability to launch a PowerShell window from the Object Explorer window of SQL Server Management Studio (SSMS). What loads is a special executable of PowerShell with two snap-in modules and the SMO assemblies already loaded. This executable is in the SQL Server binaries and is called sqlps.exe. In the PowerShell window, you can browse SMO objects just as you’d browse a file structure tree on a disk file system. As people are exposed to this feature, they’ll create new and different ways to manage SQL Server through scripts, and understanding the SMO object library will help reduce the time required to write these scripts.
Another powerful use of SMO will be through the Policy-Based Management feature of SQL Server 2008. Although SSMS makes it easy to create conditions and policies, doing so across an enterprise can be tedious. By scripting these objects using PowerShell and SMO, you can maximize the consistency of your enterprise servers.
PowerShell is the new scripting environment for the Windows platform. For administrators who don’t have access to the Visual Studio environment, or for the IT professional who prefers scripting to compiled code, PowerShell provides full access to the .Net Framework and all the objects available within. PowerShell is available as a free download from Microsoft at http://www.microsoft.com/powershell/.
Other chapters in this book provide a great amount of detail on PowerShell, so here we’ll focus on the administrative tasks you can accomplish with PowerShell using SMO.
Loading required libraries
Before you can use SMO within PowerShell, you must load the SMO assembly into the environment. To load the basic SMO environment interactively, you must execute the following command:
[System.Reflection.Assembly]::LoadWithPartialName('Microsoft.SqlServer.SMO')
     | out-null
The results of the command are piped to the out-null device because we generally don’t need to see the version number of the library when it’s loaded.
When Microsoft introduced SQL Server 2008, they moved a number of objects from the SMO library into new dynamic-link libraries (DLLs) called SMOExtended.dll and SQLWMIManagement.dll. To allow the scripts to run in either environment, the example scripts will extract the FullName property from the Assembly object from the load of the SMO DLL, and then filter the string to determine the release number of the SMO DLL. If the release number indicates the DLL is from SQL Server 2005 (Version 9.0) no more work is required; otherwise the two new DLLs must be loaded, as shown in listing 1.
Listing 1. Code to load SMOExtended.dll and SQLWMIManagement.dll
# Load SMO assembly, and if we're running SQL 2008 DLLs load the SMOExtended and SQLWMIManagement libraries
$v = [System.Reflection.Assembly]::LoadWithPartialName ('Microsoft.SqlServer.SMO')
$p = $v.FullName.Split(',')
$p1 = $p[1].Split('=')
$p2 = $p1[1].Split('.')
if ($p2[0] -ne '9') {
    [System.Reflection.Assembly]::LoadWithPartialName('Microsoft.SqlServer.SMOExtended')  | out-null
    [System.Reflection.Assembly]::LoadWithPartialName('Microsoft.SqlServer.SQLWMIManagement')  | out-null
    }
All the example scripts will contain these commands near the beginning just to be certain the library is loaded, but it’s easier to edit your PowerShell profile file to include it, so the libraries are always loaded when you start the environment. You can learn how to do this on the MSDN site at http://msdn.microsoft.com/en-us/library/bb613488(VS.85).aspx.
Backup
The most important task of a database administrator is to maintain a reliable set of backups for the databases being managed. System and disk failures occur in the best hardware environments, so maintaining consistent backups is critical to the prevention of data loss.
SMO provides objects that provide the administrator a variety of ways to back up and restore databases, as we will see. First, let’s take a look at the objects.
We need to find out where SQL Server stores the backup files by default; that location is specified in a property in the Settings collection of the Server object, as shown in figure 1.
Figure 1. The BackupDirectory property is in the server’s Settings collection.

After creating a Server object and setting it to connect to our target server, we need to copy the Server object’s Settings.BackupDirectory (figure 1) property to a variable. We’ll use the variable to build the path to the file we create as the backup device.
We also need to create a Backup object and set its properties. We need to add a backup device to the Backup object’s Devices collection to have a place for the backup to go, and then we need to execute the SqlBackup method to perform the backup.
The Action property (figure 2) can be set to one of three values—Database, Log, or File—to define the type of backup to be performed. The BackupSetDescription, BackupSetName, and MediaDescription properties aren’t required, but are useful when looking at a backup file later to determine what’s contained in the file. The Database property contains the name of the database to be backed up. The AddDevice method of the Devices collection takes two arguments, the full path and filename of the file to contain the backup, and the device type of the backup, in our case File.
Figure 2. The SMO Backup object
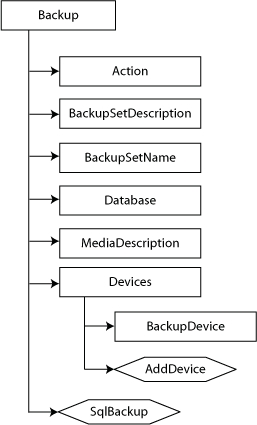
After the properties are set, the SqlBackup method is called, and we pass as its sole argument the Server object variable name.
The design of the code samples shown here is to perform a full database backup of all of the non-system databases on the target server, then, if the database is not in the SIMPLE recovery mode, to also perform a transaction log backup of the database. This code can then be executed every time your backup strategy calls for a full database backup of all databases on the target server. If you remove the full database backup logic from the code sample the code can be run every time transaction log backups are to be run for all databases on the server, improving your recovery interval to minimize the potential data loss in the event of a system failure.
In the following script, shown in listing 2, we’ll connect to our target server, and then get the default backup directory from the Settings collection. We’ll next grab the database collection and iterate through that to do the backups. For each database we’ll get the current date and time and put it into a string to use in the backup filename. We’ll do the full backup for the database, then we’ll check to see if the database recovery model is Simple. If not, we’ll perform a transaction log backup on the database as well.
Listing 2. Backing up user databases
#backup.ps1
#Performs a Full backup followed by a transaction log backup on all user databases
param (
    [string]$srvname='MyServerMyInstance'
    )

# Load SMO assembly, and if we're running SQL 2008 DLLs load the SMOExtended and SQLWMIManagement libraries
$v = [System.Reflection.Assembly]::LoadWithPartialName('Microsoft.SqlServer.SMO')
$p = $v.FullName.Split(',')
$p1 = $p[1].Split('=')
$p2 = $p1[1].Split('.')
if ($p2[0] -ne '9') {
    [System.Reflection.Assembly]::LoadWithPartialName('Microsoft.SqlServer.SMOExtended')  | out-null
    [System.Reflection.Assembly]::LoadWithPartialName('Microsoft.SqlServer.SQLWMIManagement')  | out-null
    }

$s = new-object ('Microsoft.SqlServer.Management.Smo.Server') $srvname
$bkdir = $s.Settings.BackupDirectory
$dbs = $s.Databases
foreach ($db in $dbs) {

  if ($db.IsSystemObject -eq $False -and $db.IsMirroringEnabled -eq $False) {
    $dbname = $db.Name
    $dt = get-date -format yyyyMMddHHmmss
    $bk = new-object ('Microsoft.SqlServer.Management.Smo.Backup')
    $bk.Action = 'Database'
    $bk.BackupSetDescription = "Full backup of " + $dbname
    $bk.BackupSetName = $dbname + " Backup"
    $bk.Database = $dbname
    $bk.MediaDescription = "Disk"
    $bk.Devices.AddDevice($bkdir + "" + $dbname + "_db_" + $dt + ".bak", 'File')
    $bk.SqlBackup($s)

    # Simple Recovery Model has a Value Property of 3
    # SQL Server 2008 doesn't recognize the enumerated value so the code is slightly different
    # Set a variable to run the transaction log backup, and if Simple, turn it off
    $trnbck = 1
    if ($p2[0] -eq '9')
        {
        if ($db.DatabaseOptions.RecoveryModel -eq 'Simple') { $trnbck = 0 }
        }
    else
        {
        if ($db.RecoveryModel.value__ -eq 3) { $trnbck = 0 }
        }
    if ($trnbck -eq 1) {
        $dt = get-date -format yyyyMMddHHmmss
        $trn = new-object ('Microsoft.SqlServer.Management.Smo.Backup')
        $trn.Action = 'Log'
        $trn.BackupSetDescription = "Trans Log backup of " + $dbname
        $trn.BackupSetName = $dbname + " Backup"
        $trn.Database = $dbname
        $trn.MediaDescription = "Disk"
        $trn.Devices.AddDevice($bkdir + "" + $dbname + "_tlog_" + $dt + ".trn", 'File')
        $trn.SqlBackup($s)
        }
        }
  }
Restore
All the backups in the world don’t do a bit of good if they can’t be restored, and there are scenarios that require restores to be done. One is where a server or disk drive fails and the data needs to be recovered for business to continue. This is the primary reason we perform regular backups. For this case, the backup is restored (generally) to the same location where the original database files existed.
In addition to this there may be the case where data is inadvertently modified or deleted, and some alternate recovery method is required, usually restoring the database backup to a new database name, so that the original data can be copied to the production database without disturbing other transactional activity occurring. Another use is for development and Quality Assurance (QA) testing, where a copy of the production database is restored in the development or QA environment to examine the effect of some application update. Finally, and this is often overlooked, database backups should be regularly tested in disaster recovery testing, to be certain that, should a problem occur, the backups are in fact usable.
A valuable piece of information is available to us via SMO for the restore process that isn’t available through Management Studio or through straight T-SQL, and that is the location of the default data and log file paths (figure 3). We can use this in our restore scenario, using the following objects.
Figure 3. Database file path properties
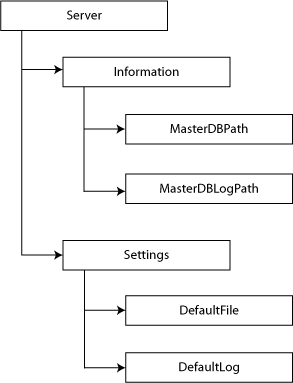
When we have this information, we can set the properties of the SMO Restore object (figure 4). We first connect to the server, then we create a BackupDeviceItem, specifying the name and path of the backup file we’re going to use, and add that to the Devices collection of the Restore object. We need to create at least two RelocateFile objects (more if there are more logical files in the backup file) and add them to the RelocateFiles collection. These RelocateFile objects will allow us to specify both the LogicalFileName and the PhysicalFileName properties of the new database. In the PhysicalFileName properties, we’ll use the MasterDBPath and MasterDBLogPath properties from the server information shown previously. Figure 4 shows the object hierarchy for the Restore object.
Figure 4. The SMO Restore object
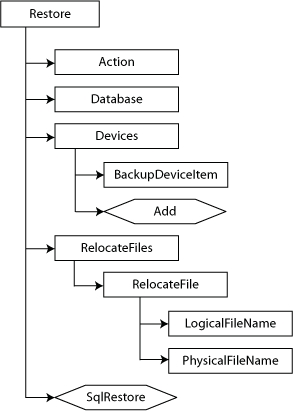
As shown in listing 3, after we’ve set the properties, we can invoke the SqlRestore method to perform the restore; then the restored database is available for use.
Listing 3. Restoring a copy of an existing database from backup
#restore.ps1
#Restores a database with a new name from an existing backup
param (
    [string]$srvname='MyServerMyInstance',
    [string]$dbname='AdWorks',
    [string]$bckfile='C:MSSQL.2MSSQLBackupAdventureWorks_db_20071227175004.bak'
    )

# Load SMO assembly, and if we're running SQL 2008 DLLs load the SMOExtended and SQLWMIManagement libraries
$v = [System.Reflection.Assembly]::LoadWithPartialName('Microsoft.SqlServer.SMO')
$p = $v.FullName.Split(',')
$p1 = $p[1].Split('=')
$p2 = $p1[1].Split('.')
if ($p2[0] -ne '9') {
    [System.Reflection.Assembly]::LoadWithPartialName('Microsoft.SqlServer.SMOExtended')  | out-null
    [System.Reflection.Assembly]::LoadWithPartialName('Microsoft.SqlServer.SQLWMIManagement')  | out-null
    }

$srv = new-object ('Microsoft.SqlServer.Management.Smo.Server') $srvname

$bdi = new-object ('Microsoft.SqlServer.Management.Smo.BackupDeviceItem') ($bckfile, 'File')
$restr = new-object('Microsoft.SqlServer.Management.Smo.Restore')
$restr.Database = $dbname
$restr.Devices.Add($bdi)
$restrfile = new-object('Microsoft.SqlServer.Management.Smo.RelocateFile')
$restrlog = new-object('Microsoft.SqlServer.Management.Smo.RelocateFile')
$restrfile.LogicalFileName = "AdventureWorks_Data"
$restrfile.PhysicalFileName = $s.Information.MasterDBPath + ''+ $dbname + '_Data.mdf'
$restrlog.LogicalFileName = "AdventureWorks_Log"
$restrlog.PhysicalFileName = $s.Information.MasterDBLogPath + ''+ $dbname + '_Log.ldf'
$restr.RelocateFiles.Add($rsfile)
$restr.RelocateFiles.Add($rslog)
$restr.SqlRestore($srv)
Creating a database
Using SMO to create databases and database objects may seem counterintuitive, because these objects are usually created using T-SQL scripts, but automating the processes that create the objects can provide consistency in an area that is usually quite inconsistent. Let’s start with the database itself.
SQL Server requires that a database have a PRIMARY filegroup and that the system tables (the database metadata) reside in that filegroup (in fact their location cannot be changed). Best practices recommendations include keeping your application data out of the PRIMARY filegroup, to help in managing the disk files for the database. When using SSMS, it can be tedious to create a database with the desired size, file location, and with a separate, default, filegroup to hold the application data. This is a relatively simple process with SMO.
For the example database, we’ll create a database called MyAppDB, which will have a 5 MB file in the PRIMARY filegroup to hold the database metadata. This file should never grow beyond 5 MB because it contains only database metadata. We’ll use the logical name MyAppDB_SysData for this file and house it in the default data path for the server.
The application data will be located in a second filegroup called AppFG, which we’ll set as the default filegroup for the database. We’ll create one file with a logical name MyAppDB_AppData and house it in the default data path for the server as well. We’ll set an initial size of 25 MB and allow it to grow by 25 MB each time it is required, but set a maximum size of 100 MB.
Log files in SQL Server do not use filegroups, so we’ll add a log file to the LogFiles collection of the database with a logical name MyAppDB_Log and house it in the default log file path for the server. We’ll set its initial size to 10 MB and allow it to grow by 10 MB each time it needs to do so, but we won’t set a maximum size for the log file.
After we’ve created the structural objects for the database, we execute the Create method, but SQL Server automatically sets the default filegroup to PRIMARY when a database is created, so we have to go back in and set the default filegroup to AppFG using the Alter method at both the filegroup and database levels.
Figure 5 is a hierarchical diagram of the objects we’ll use to create the database.
Figure 5. The SMO Databases collection and Database object

Now let’s look at the example code in listing 4.
Listing 4. Creating a user database
#createdatabase.ps1
#Creates a new database using our specifications
param (
    [string]$srvname='MyServerMyInstance',
    [string]$dbname='MyAppDB',
    [int]$datsize=25,
    [int]$maxsize=100,
    [int]$logsize=10
    )

# Load SMO assembly, and if we're running SQL 2008 DLLs load the SMOExtended and SQLWMIManagement libraries
$v = [System.Reflection.Assembly]::LoadWithPartialName('Microsoft.SqlServer.SMO')
$p = $v.FullName.Split(',')
$p1 = $p[1].Split('=')
$p2 = $p1[1].Split('.')
if ($p2[0] -ne '9') {
    [System.Reflection.Assembly]::LoadWithPartialName('Microsoft.SqlServer.SMOExtended')  | out-null
    [System.Reflection.Assembly]::LoadWithPartialName('Microsoft.SqlServer.SQLWMIManagement')  | out-null
    }

$srv = new-object ('Microsoft.SqlServer.Management.Smo.Server') $srvname

# Instantiate the database object and add the filegroups
$db = new-object ('Microsoft.SqlServer.Management.Smo.Database') ($srv, $dbname)
$sysfg = new-object ('Microsoft.SqlServer.Management.Smo.FileGroup') ($db, 'PRIMARY')
$db.FileGroups.Add($sysfg)
$appfg = new-object ('Microsoft.SqlServer.Management.Smo.FileGroup') ($db, 'AppFG')
$db.FileGroups.Add($appfg)

# Create the file for the system tables
$dbdsysfile = new-object ('Microsoft.SqlServer.Management.Smo.DataFile') ($sysfg, 'MyAppDB_SysData')
$sysfg.Files.Add($dbdsysfile)
$dbdsysfile.FileName = $srv.Information.MasterDBPath + 'MyAppDB_SysData.mdf'
$dbdsysfile.Size = [double](5.0 * 1024.0)
$dbdsysfile.GrowthType = 'KB'
$dbdsysfile.Growth = [double](5.0 * 1024.0)
$dbdsysfile.IsPrimaryFile = 'True'

# Create the file for the Application tables
$dbdappfile = new-object ('Microsoft.SqlServer.Management.Smo.DataFile') ($appfg, 'MyAppDB_AppData')
$appfg.Files.Add($dbdappfile)
$dbdappfile.FileName = $srv.Information.MasterDBPath + 'MyAppDB_AppData.ndf'
$dbdappfile.Size = [double](25.0 * 1024.0)
$dbdappfile.GrowthType = 'KB'
$dbdappfile.Growth = [double]($datsize * 1024.0)
$dbdappfile.MaxSize = [double]($maxsize * 1024.0)

# Create the file for the log
$dblfile = new-object ('Microsoft.SqlServer.Management.Smo.LogFile') ($db, 'MyAppDB_Log')
$db.LogFiles.Add($dblfile)
$dblfile.FileName = $srv.Information.MasterDBLogPath + 'MyAppDB_Log.ldf'
$dblfile.Size = [double]($logsize * 1024.0)
$dblfile.GrowthType = 'KB'
$dblfile.Growth = [double]($logsize * 1024.0)

# Create the database
$db.Create()

# Set the default filegroup to AppFG
$appfg = $db.FileGroups['AppFG']
$appfg.IsDefault = $true
$appfg.Alter()
$db.Alter()
After this script is completed, the MyAppDB database will exist and user objects will be placed in the AppFG filegroup instead of PRIMARY, which will improve the long-term management of the database.
Scripting
The scripting of SMO is a vast improvement over the scripting of its predecessor, DMO. With SMO you can create T-SQL scripts from objects even if they don’t yet exist. When you open almost any maintenance dialog box in SQL Server Management Studio, you’ll see a button that allows you to generate a script from the changes you’ve made in that dialog box. You can then save that script for archival purposes, cancel out of the dialog box, and execute the script as written, or make changes to it before you execute it.
Another useful feature of scripting existing objects is to generate scripts of all database objects for documentation or source code control. This allows the administrators to then rebuild a database in the form it existed at the time the script was created.
At any time while creating or working with objects in SMO, you can script those objects for archival or later use. Figure 6 shows the Scripter object and the properties we need to set.
Figure 6. The SMO Scripter object

The Server property allows the Scripter object to connect to the server. The remaining properties that need to be set are in the Scripter Options collection.
The ScriptDrops property specifies whether the script will consist of drops for the objects or create for the objects. If you specify c to this property, the script will contain a DROP statement for the object (within an IF condition to ensure that it exists), but a False value will cause the scripter to generate the CREATE statement for the object. The WithDependencies property, if True, will cause the objects to be scripted in an order that respects the dependency of one scripted object on another. The FileName property contains the full path of the resultant script file. The IncludeHeaders property, when True, will include a comment indicating the name of the object and when the script was created in the script. The AppendToFile will append the script to the end of an existing file if True, and overwrite the file if False. By default the scripting process will send the results to the console, so setting the ToFileOnly to True will cause the scripter to send the script only to the file specified. Setting ClusteredIndexes to True will cause the clustered index for a table to be included in the script, and setting Indexes to True will cause the nonclustered indexes to be included in the script. The DriAll property, when set to True, will cause all objects with enforced declarative referential integrity to be included in the script.
The objects to be scripted need to be added to an array of type SqlSmoObject. This allows you to decide at what point you want the object included in the script. After the array has been populated with all the objects to be scripted you can invoke the Script method and the script will be created.
Now let’s look at the example code in listing 5.
Listing 5. Scripting all objects in the AdventureWorks database
#scripting.ps1
#Script all the table objects in the AdventureWorks database
param (
    [string]$srvname='MyServerMyInstance',
    [string]$dbname='AdventureWorks',
    [string]$scrname='c:dbscript.sql'
    )

# Load SMO assembly, and if we're running SQL 2008 DLLs load the SMOExtended and SQLWMIManagement libraries
$v = [System.Reflection.Assembly]::LoadWithPartialName('Microsoft.SqlServer.SMO')
$p = $v.FullName.Split(',')
$p1 = $p[1].Split('=')
$p2 = $p1[1].Split('.')
if ($p2[0] -ne '9') {
    [System.Reflection.Assembly]::LoadWithPartialName('Microsoft.SqlServer.SMOExtended')  | out-null
    [System.Reflection.Assembly]::LoadWithPartialName('Microsoft.SqlServer.SQLWMIManagement')  | out-null
    }

$srv = new-object ('Microsoft.SqlServer.Management.Smo.Server') $srvname
$db = $srv.Databases[$dbname]

$scrp = new-object ('Microsoft.SqlServer.Management.Smo.Scripter') ($srv)
$scrp.Options.ScriptDrops = $False
$scrp.Options.WithDependencies = $True
$scrp.Options.FileName = $scrname
$scrp.Options.IncludeHeaders = $True
$scrp.Options.AppendToFile = $True
$scrp.Options.ToFileOnly = $True
$scrp.Options.ClusteredIndexes = $True
$scrp.Options.DriAll = $True
$scrp.Options.Indexes = $True

$scrp.Script($db.Tables)
Summary
This chapter presents just a few examples of methods for automating your management of SQL Server using SMO and PowerShell. You can find many additional examples on the web and on the Codeplex site to help you solve your SQL Server management problems. You’ll also find additional examples in my blog at http://sqlblog.com/blogs/allen_white/default.aspx.
About the author

Allen White is a SQL Server trainer and consultant who’s been using SQL Server since 1992. He has been awarded Microsoft’s MVP Award for his work in the SQL Server community for three years.