
Now that we have defined the types of applications that can be built with Force.com and created a developer account, we can move deeper into application development. In this chapter, we are going to:
- Create objects
- Create fields
- Create relationships
The exercises covered in this chapter will be useful for you till the time you are working on the Force.com platform.
So, let's begin.
Force.com is an object-oriented relational database system. An object is the background of any application built on Force.com. An object is like a database table that allows you to store data in different formats. It also gives you options to create a UI in order to enter, modify, or delete records.
Force.com doesn't give you the option to create database tables using code. To create a table, we need to define the object using the UI. The UI not only allows you to define the object definition but also comes with unique built-in features, including recording activities (such as logging a call, sending an e-mail, and so on) and the ability to add notes and attachments. The platform automatically creates a standard UI for the object thus defined and adds basic features, such as create, update, and delete.
Before we define a new object, let's explore what Force.com offers us initially.
Standard objects are part of Salesforce CRM Cloud. These objects are offered as is, and while we can extend them and add new attributes to them, we cannot modify the existing attributes unless permitted; for example, while we can add new values to Status Picklist, we cannot change the name of the Picklist value.
The following are important objects that are part of the Sales Cloud:
- Accounts: The entire CRM Universe revolves around
Accounts(andContacts). An individual account is an organization that is associated with your business. It could be yourCustomer,Competitor, orPartner. - Contacts: A contact complements an
Accountby acting as a contact manager or an address book. - Leads: A lead is the contact information for a prospect or an opportunity.
- Opportunity: An opportunity is a pending sale or a deal.
- Other supporting Objects: Along with the top four objects mentioned previously, there are many other supporting objects, such as
Products,Orders, and so on.
The following are objects from the Service Cloud offering:
- Case: This is a customer issue such as a customer's feedback, problem, or question.
- Solutions: These store the detailed description of a customer's issue and the resolution of that issue. These objects and others come with the packaged CRM offering. Along with them, we have built-in processes, for example, Leads can be converted into Contacts and Accounts. We can create Case from Email. We can rename the standard objects based on the business process; for example, we can rename Accounts to Customers and Leads to Prospects. The other ways to customize the standard application is to extend it by adding custom fields or modifying the Picklist values.
Apart from the standard objects defined earlier and others that come built-in with the Salesforce CRM package, we can extend the Force.com platform by building our own set of custom objects.
Let's explore custom objects in detail.
The public library needs to store information regarding its customers, its workers, the physical locations of its branches, and the media stored in those locations.
It specializes in lending out two types of media: books and videos. The library must keep track of the attributes of each media item, its location, status, descriptive attributes, and cost for losses and late returns.
Books will be identified by their ISBN and videos by their title and year. In order to allow multiple copies of the same book or video, each media item will have a unique ID number.
The following diagram shows a basic E-R diagram of the Library Management System:
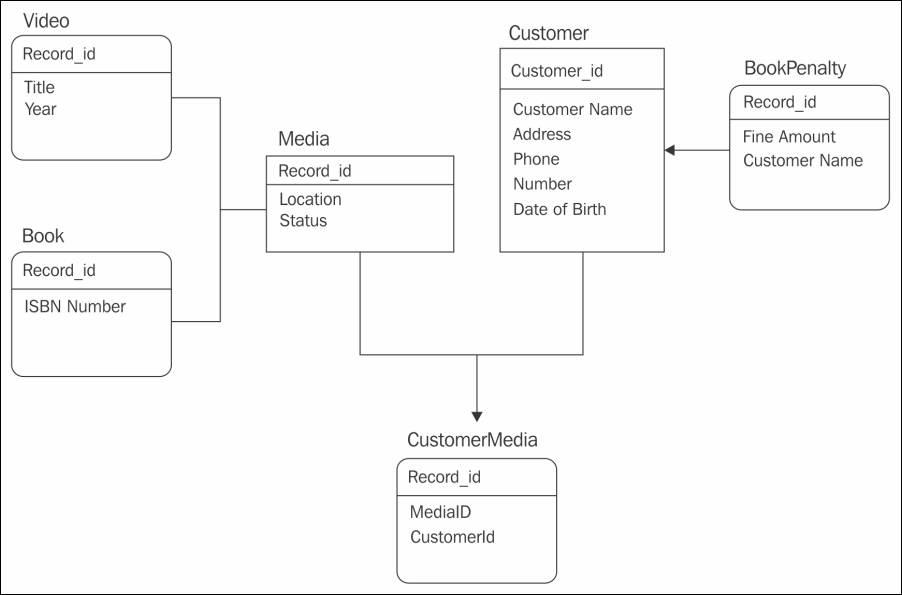
The Library Management System
The library customers will provide their name, address, phone number, and date of birth when signing up for a library card. They will then be assigned a unique ID number. Checkout operations will require a UID number as well as requests to put media on hold. Each library card will store its own dues. The late fees for returning the media items will be stored in a separate penalty object. These penalties will be summed up for the master object.
Employees will work at a specific branch of the library. They receive a paycheck, but they can also have library cards; therefore, the same information that is collected from the customers should be collected from the employees as well.
The object structure of the Library Management can be summarized in the following table:
The Library Management System
For the purpose of this exercise, we need to create all the four objects for the Library Management System, so let's start with the Customer object.
The steps to create a custom object are as follows:
- Go to Setup | Build | Create | Objects.
- Click on the New custom object.
- Enter the details in the object. The following screenshot shows the Custom Object wizard:
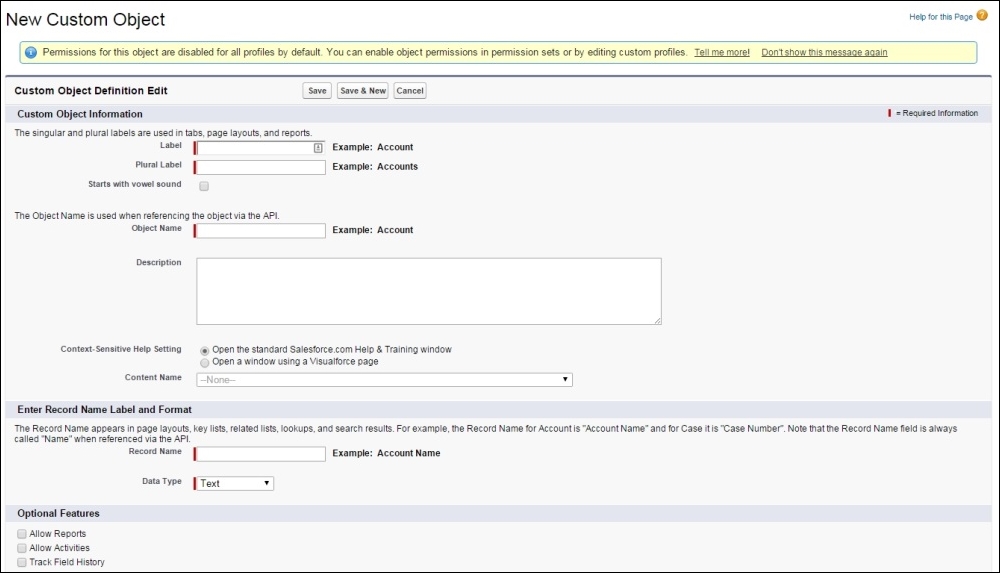
The wizard consists of the following fields:
Fill the form with the values for the Customer object. Label the object as Customer; the plural is Customers. Fill the other values according to the description.
- Save the page.