
We have successfully created the Customer object. We are going to take a look at some major types of custom fields on Force.com. Let's create the fields for the Customer object.
When we create a new field, we have to go through four steps. Let's take a look at each one of them in detail.
Custom objects include some standard fields that are included automatically. When we create a new custom object, it automatically has five standard fields. To capture additional data in the object, we need to add more fields to it. The standard fields include audit fields such as:
- Created By
- Last Modified By
- Owner
- CreatedDate
- ModifiedDate
Apart from the owner field, the other fields cannot be edited from the UI. The owner field is automatically assigned to the person who created the record and can be changed by transferring the record to another user.
The Force.com platform provides us with some good and unconventional custom data types. These custom data types are directly aligned with business use cases and come packed with unique properties and validation rules. For example, the Email field comes automatically with e-mail validation, the URL field automatically checks whether the input is a valid URL, the Phone field automatically formats the phone number in the local format. One of the latest additions to the custom fields is geolocation compound fields that come bundled with functions to calculate the distance between two locations.
We can change the data type of a custom field in some cases; however, it is not recommended as it can result in data loss. For example, we can change a text area to a text field; this may result in loss of data (truncate) if the field length is also decreased.
To begin with, let's create a few custom fields and take a look at the custom field wizard.
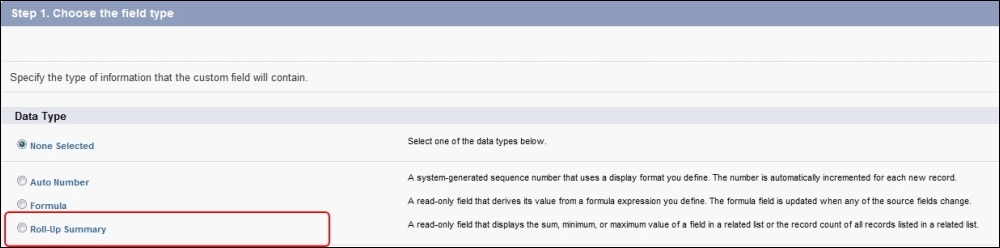
The first step to create custom fields is to choose the right field type that can capture the correct data.
Let's take a detailed look at all the custom field types.
Text fields are used to capture free-flowing text. They are used to capture alphanumeric data. The five types of text fields are used to capture different lengths of data:
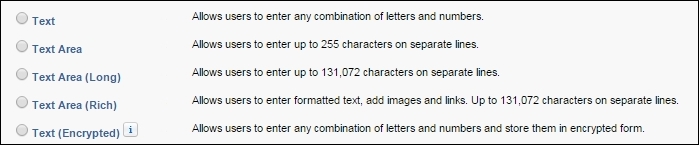
There are four types of basic text fields, which are as follows:
- Text (maximum 255 characters, only single-line characters)
- Text area (maximum 255 characters, allows multiple lines and paragraphs)
- Long text area (maximum 131,072 characters on multiple lines and big paragraphs)
- Rich text area (maximum 131,072 characters on multiple lines, accepts rich text formatting also; accepts images and links via the special editor)
Picklist is a type of predefined text field. It can be used to prevent spelling mistakes and grammatical errors while entering the data. Picklist is rendered as a drop-down select list on the UI, but it is stored as text in the database. It can store predetermined values, such as City names, State names, and Status:

Picklist (Multi-select) is a special type of picklist that can allow the users to select multiple values at the same time.
Let's take a look at the other general data fields:
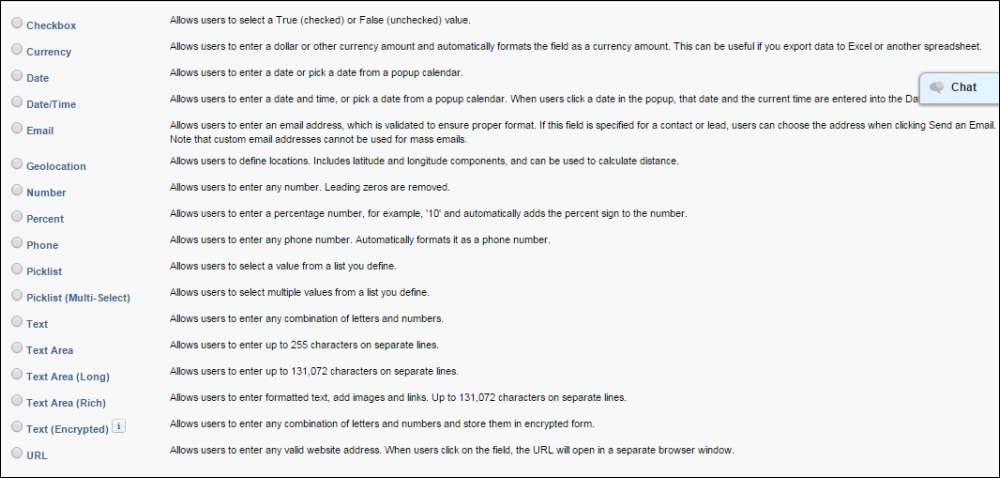
Checkbox: This field stores values as true or false. On the page layout or Visualforce, the field is rendered as a checked box for true and an unchecked box for false.
Date: This field captures the date based on a data picker. The Salesforce platform stores the date/time values in the GMT time zone, but the values that are displayed are based on the Locale & Time Zone preferences in My Settings:
Date/Time: This is similar to the date but also captures the time along with the date.
Email: This captures and validates the e-mail values.
Number: This field is used to capture numeric values. We can specify the number of digits before and after the decimal point.
Percent: This field captures the percent data. The values are stored as decimals, such as 0=0%, 0.5=50%, 1=100%, and so on.
Phone: When we enter the phone number through the Salesforce UI, it is auto-formatted as Phone. If we use a third-party softphone with Salesforce, the phone number fields are auto click-to-dial-enabled.
URL: This captures the URL and makes it a clickable link.
Geolocation is a compound field that allows us to identify the location using the latitude and longitude. The geolocation field comprises three separate fields: latitude, longitude, and a field used for internal purposes. The Geolocation field comes bundled with special formulas, such as DISTANCE that calculates the distance between two geolocation fields:
The geolocation field is broken down into separate latitude and longitude components demarked by __s; for example, if the field is called Location, then the latitude is stored as myObject__c.Location__latitude__s and Longitude is stored as myObject__c.Location__Longitude__s.
The Currency field captures the currency values, such as Price and Amount. If your organization has multi-currency enabled, another field called CurrencyIsoCode is visible that allows you to select the type of currency. When multi-currency is enabled, the currency field converts the value into corporate currency and displays it on the field:
We can specify the exchange rate in the setup. We can also specify historic exchange rates for existing values.
Currency fields are easy to export into Excel as they are directly compatible with the Excel currency format.
Let's take a look at the encrypted fields:
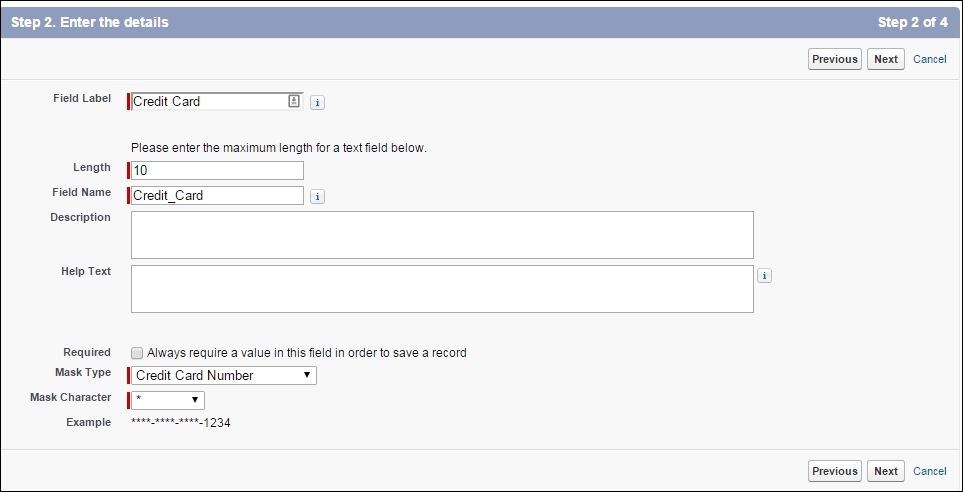
If the Salesforce org is storing some sensitive information, such as credit card numbers, social security numbers, bank account numbers, and so on, we can use the encrypted field access to the Salesforce org.
The encrypted fields mask the value of the information with an *. For example, ****-****-****-1234 for a credit card field, as shown in the following screenshot:
We can choose the mask type of the encrypted field, as shown in the following screenshot:
Encrypted fields are used to mask the value of the field from users. The only way to see the encrypted fields is by enabling the View Encrypted Data permission on the profile.
Encrypted fields cannot have default values and cannot be unique or external IDs.
The encrypted field can be edited irrespective of the View Encrypted Data permission. To prevent people from editing them, we need to use the field level security, validation rules, or mark them as read only on the page layout.
Encrypted fields are encrypted with 128-bit keys and use the AES (Advanced Encryption Standard) algorithm. They are 175 characters in length, unlike the normal text field, which is 255 characters.
Due to encryption, there are some limitations on the use of encrypted fields:
- Encrypted fields are not indexed and hence are not searchable
- They are not available in filters, such as reports, list views, and roll-up summary fields
- Encrypted fields cannot be used in the where condition in SOQL queries
- In an e-mail template, an encrypted value is always masked, irrespective of the View All Data permission
- If you clone a record that has encrypted custom fields, Salesforce will copy the data from the field only if the user has the View Encrypted Data permission
Since Summer 2015, Salesforce has offered another level of encryption known as the platform encryption. When we enable the platform encryption, a few standard fields and some custom fields can be encrypted.
The following fields can be encrypted using the platform encryption:
- Standard Fields: Account object:
Account Name
- Contact objects:
E-mail
Fax
Home Phone
Mailing Address (encrypts only Mailing Street and Mailing City)
Mobile
Name (encrypts First Name, Middle Name, and Last Name)
Other Phone
Phone
- Case object:
Subject
Description
- Case comments objects:
Body
Custom Fields:
Email
Phone
Text
Text Area
Text Area (Long)
URL
Only users with View Encrypted Field can see the data. For more information on the platform encryption, go to https://help.salesforce.com/HTViewHelpDoc?id=security_pe_overview.htm.
A formula field is a special type of field that uses a formula similar to an Excel formula. It is calculated at runtime and uses functions, operators, and other fields to calculate its value.
Here's an example of a formula field on a media object. It calculates the number of days after the due date has expired (assuming that we have all the fields in the media object):
If(TODAY()>BookIssueDate__c,TODAY() - BookIssueDate__c,0);
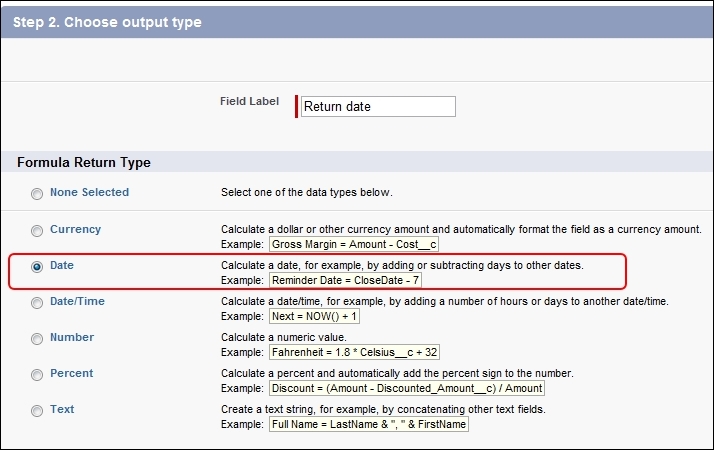
The members of the general library are allowed to borrow the media items for only 15 days. They want to reduce the typing work for the entry clerk and wish to auto-calculate the return date of the book.
The return date will be calculated on the CustomerMedia object that will record the transaction when the book is issued. To create the Return Date formula:
- Create a Date field entitled Issue Date; this field will store the date of issue for the media item.
- Create a new field entitled Return date, as shown in the following screenshot. It is of the Formula type and the return type is Date. Click on the Next button.
- The next page is the formula editor. We can create a Simple Formula or an Advanced Formula. A Simple Formula gives us a list of the fields of the existing object on which the formula is written along with some global variables. The Advanced Formula editor helps us write cross-object formulas. The other highlighted part is Insert Operator, which helps build the formula. Check Syntax checks for syntax errors before saving the formula. The Advance Formula editor also provides easy access to the list of functions that we can use in the formula:
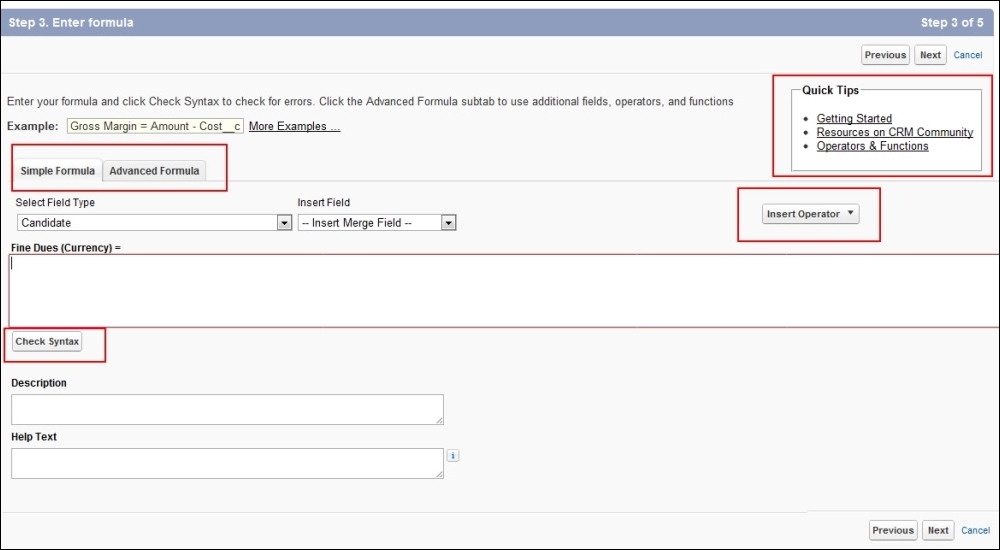
- Add the
Issue_Date__c +15formula to the formula editor, as shown in the following screenshot: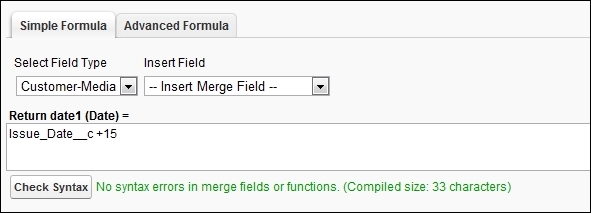
- Here,
Issue_Date__c+15is the date field used to store the issue date for the media. We can also use theInsertfield's drop-down list to insert this field. Make sure that you click on the Check Syntax button to compile the formula and check for errors.
Every time a new record is created with the Issue Date, the Return Date field will automatically calculate and store the return date for it.
Using cross-object formula fields, we can calculate the value of a field based on fields in the parent record. We can traverse up to five levels upwards from the parent relationship.
The record owner and activity fields cannot be used in cross-object formula fields. Let's create the cross-object formula field for the Customer object.
A general library wishes to calculate the Penalty Amount for a media resource when it is checked out late. Write a formula field that can calculate the amount for the Customer–Media object.
The formula field is a read-only type of field that is auto-calculated. We define the formula on the basis of other fields and static values and the formulae are auto-calculated globally on the page.
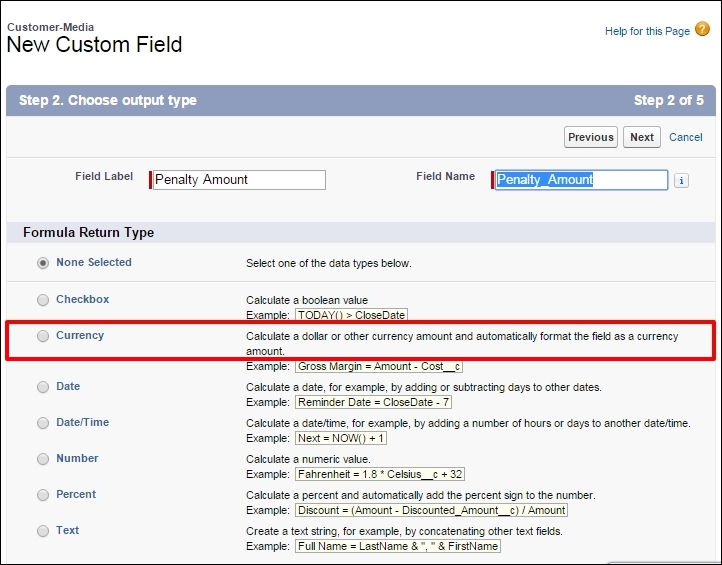
Let's create a formula field to calculate the penalty. Select the Formula field in the list of fields. It will open the Formula creation wizard:
- Choose the return type of the formula. For the purpose of the exercise, because we are calculating the fine amount on the book, the return type will be Currency, as shown in the following screenshot:
- Click on Advance Formula to open the Advance Formula editor. In the Advance Formula editor, click on Insert Field to open a pop-up field, as shown in the following screenshot:

- The Insert Field dialog box allows us to access fields of different objects that are related to the current object. In this case, we can access the field, Loss Fine, which is stored in the Media object, in the Customer–Media object to generate the formula. We can traverse all the lookup and the Master-detail fields on the object. Once the field is selected, click on Insert in the last column.
- The formula to calculate the penalty amount will be the number of days after the return date × the fine amount. The formula editor also provides us with the system dates in system functions. Select the formula for TODAY from the Functions on the right-hand side of the formula editor, as shown in the following screenshot:
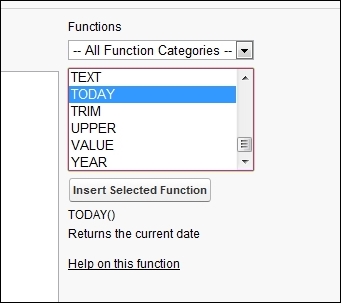
Note
The formula quick reference guide on Force.com provides an effective cheat sheet for the formulae. You can refer to it at https://na3.salesforce.com/help/doc/en/salesforce_formulas_cheatsheet.pdf.
- Now, we have both the functions and fields that we require in the formula editor; we also need one more field called
Return_date__c, which we created in the previous section. Create the(TODAY() - Return_date__c )* Media__r.Loss_Fine__cformula to calculate the fine, as shown in the following screenshot: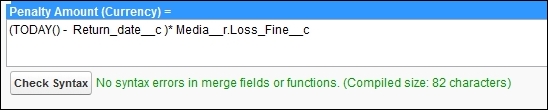
- The next step determines the Field Level Security, as seen during the field creation; field level security determines who can see the field and who can edit it.
- Select the appropriate page layout where the formula should appear. If no page layout is selected, it is not displayed on the screen.
We have already discussed that Force.com is an object-oriented relational database management system. The backbone of the entire system based on Force.com is relationships.
Relationship fields determine how an object is related to another. For example, a library user will have a library card that can issue many books; an Account can have many opportunities. We can create these relationships using the relationship fields.
There are two main types of relationship fields, as shown in the following screenshot:

Let's take a look at each one of them.
The lookup relationship is the most basic form of a relationship. The lookup relationship is a foreign key on another object. While creating a lookup relationship, we can determine the behavior of the related record if the primary record is deleted.
If the primary record is deleted, then we need to choose from the following options:
- Clear the value of this field: This option allows us to loosely couple the two records. Deletion of the primary record has no effect on the secondary.
- Don't allow the deletion of the lookup record that's part of a lookup relationship: We can restrict the deletion of a primary record using this option.
- Delete this record also: This allows the cascading deletion of the secondary record.
The Lookup relationship can be visualized in the following figure:
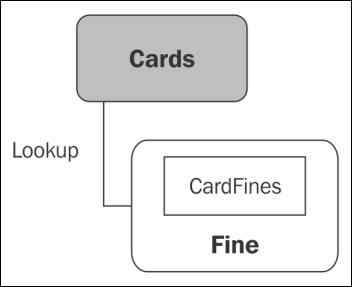
For example, a card of a member can have multiple penalties (fines) on it. The penalties on the card are shown at the bottom of the card in a list.
Lookup relationships have the following properties:
- The two object records have no relationship dependencies on each other
- The lookup field value is optional
- Updating and deleting the child record has no effect on the parent
- Both objects have their own owners and sharing rules
- A record can have 40 lookup fields with 40 different objects
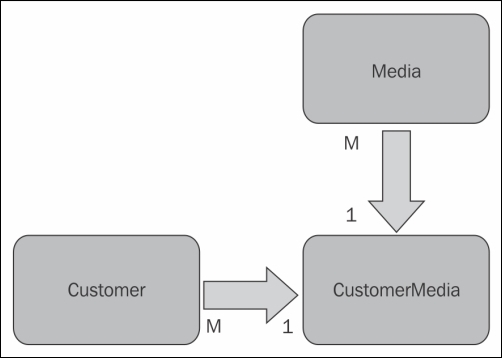
The following figure illustrates the Master-Detail relationship:
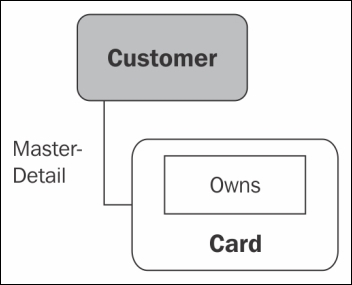
Master-Detail relationships are more tightly coupled relationships. One object is the Master or Primary object and the other is the Detail or Secondary object. The primary object controls the look and style of the tab as well as the security of both the objects. When the primary record is deleted, the secondary record is deleted as well.
For example, the relationship between the customer and the card in the library management will be Master-Detail where the customer is the master and the card is the child in the relationship.
Master-Detail relationships have the following properties:
- The ownership of the child record is given to the master object's owner. The child record does not have a separate owner.
- The detail record inherits the sharing and security settings as well as the look and feel of the master.
- A master record is always required to store the child record.
- If the master record is deleted, the child record is also deleted.
- We can define master-detail relationships between custom objects or between a custom object and a standard object. However, the custom object cannot be on the master side of a relationship with a standard object. In addition to this, we cannot create a master-detail relationship in which the User or Lead objects are the masters.
- An object can have a maximum of two master objects. In cases of multiple objects, both the masters are required. If one master is deleted, the child record gets deleted immediately.
- By default, records can't be reparented in master-detail relationships. However, we can allow child records on custom objects to be reparented to different parent records by selecting the Allow re-parenting option in the master-detail relationship definition.
Note
We cannot create a Master-Detail relationship in an object that contains records in detailed objects. If there are records present in the detailed object, the trick is to create a lookup relationship first. Populate the lookup fields on the existing records and then change them to master-detail.
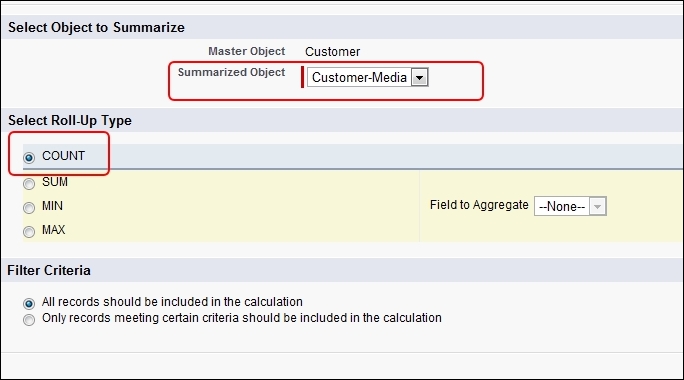
The roll-up summary field is a special type of field that can be used in a master-child relationship. Roll-up summary fields are used to aggregate the numeric fields from the Child object on the master object. The roll-up summary field uses aggregate functions, such as SUM, MIN, MAX, and COUNT. They are calculated periodically and their value is stored in the database.
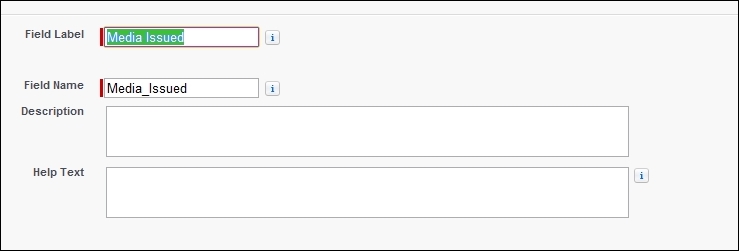
A general library wishes to keep track of all the media items issued to the customer. They want the total number of items issued in a single field called Media Issued against the member record.
The media items that are issued against the customer are stored in the CustomerMedia object; we will store their count in the Customer object:
- Go to the Customer Object and click on new fields. When your object is the master object (in this case, Customer is the master for the CustomerMedia object), the data type for the roll-up summary field is visible, as shown in the following screenshot. Select the data type, and click on the Next button.
- We will name this field Media Issued. Fill in the details, as shown in the following screenshot, and then click on Next.
- On the next page, select the child object available for roll-up. In the example, select Customer-Media, as shown in the following screenshot:
- As mentioned previously, we will skip the field-level security for now and leave it for later chapters on security. On the final page, select the page layout to add the field and Save the field.
This covers the basic formulae and the logic that helps us simplify our work.
In the following section, we will discuss how to automate business processes using workflows and approval processes.
Using Master-Detail and Lookup relationships, we can create two more types of relationships:
- Self-relationships:
- When an object has a lookup with itself, it is a self-relationship. A self-relationship creates a tree diagram of the objects. For example, the account has a lookup on itself, called Parent Account.
- On the user object, a special self-relationship called a hierarchical relationship helps create superior roles, such as a supervisor and manager on the user object. The hierarchical relationship is a self-relationship of the user object.
- Many-to-many relationships:
A real-world example is the relationship between a student and teacher. A student can be taught by multiple teachers while a teacher can teach multiple students. We can create a many-to-many relationship between two objects by creating a third object that has both the main objects as a primary relationship.
The third object thus created is called a Junction object. It is a junction between the two objects.
Some properties of the junction objects are as follows:
- The junction object identifies the first master as the primary master. It uses the look and feel of the primary master.
- If any master record is deleted, the junction record is automatically deleted.
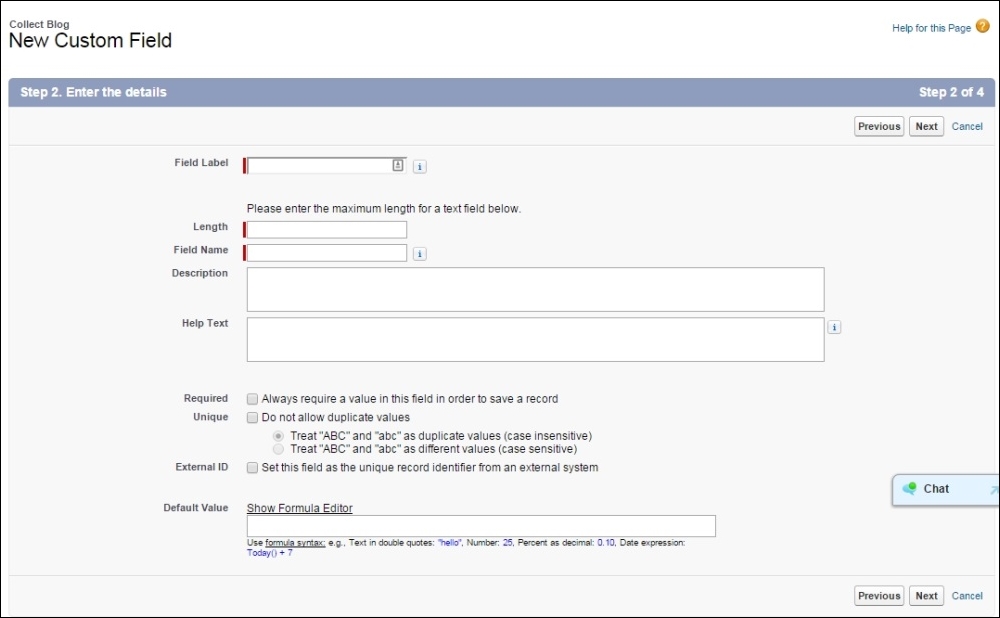
When we select the desired field types in the previous step, the second step allows us to customize the field and its properties. The following are the most common attributes in the text fields, as shown in the following screenshot:
A universally Required field is a custom field whose value is always required whenever a record is saved in Salesforce, the Force.com API, Connect Offline, Connect for Lotus Notes, Connect for Outlook, Salesforce for Outlook, the Self-Service portal, or processes such as Web-to-Lead and Web-to-Case.
To create a universally required custom field, check Always require a value in this field in order to save a record option.
Tip
If there is a need to make a particular field required for a particular record type, do not make it universally required. The field can be set as required from the page layout of the record type. We will discuss how to make a field required in the next chapter. Refer to the page layout section in Chapter 3, User Interface for more details.
The following fields can be made universally required:
- Currency
- Date
- Date/Time
- Master-Detail Relationship (always required)
- Number
- Percent
- Phone
- Text
- Text Area
The custom field can be made unique and case-sensitive using this option. Unique fields will automatically get the duplicate check attach while inserting values in them.
To set a field as unique, select the Set this field as the unique record identifier from an external system checkbox, as shown in the previous screenshot.
External ID is a user-defined cross-application reference field. If the company is using some legacy system or any other computer system to store data, which is to be synced with Salesforce.com, the primary key in the external system is marked as an external ID in Salesforce.
The benefits of an external ID are as follows:
- The field is auto-indexed, which means that it has better search performance as compared to non-auto-indexed fields.
- It improves the API SOQL performance.
- Records can be upserted (Updated + Inserted) using the external ID to easily integrate with external systems. We will learn about this in detail in the Managing Data chapter.
- Only text, a number, or an e-mail ID can be marked as an External ID field.
The third step to create the field is to set up the Field-level security. Whenever we create a new field, we need to determine who can edit it and who can only read it. This step is required for every new field as improper field-level security could prove hazardous for data-security.
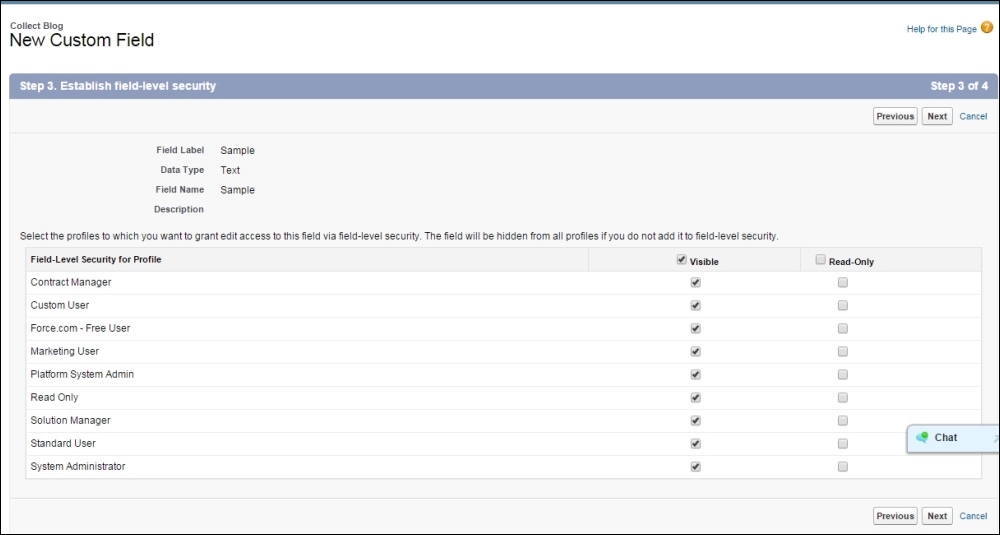
In the third step, we choose on which profile the field is Visible and on which profile the field is Read-only. We can customize the field-level security of each individual profile, and hence we will revisit this part again when we discuss the profile-based security.
The general library collects different information about books and videos. Create different fields (as required) to catalog the information.
To create a field on the object, perform the following steps:
- Go to Setup | Create | Objects.
- Click on the object you want to create the field on. In this case, click on Media.
- On the Custom Objects details page, click on the New custom field and the relationships section.
- It will open a field creation wizard will open.
A dependent picklist is a picklist whose values are filtered by another controlling picklist. The values in a dependent picklist are changed according to the values selected in the controlling picklist. Standard picklists are always controlling fields. Custom picklists can be dependent as well as controlling.
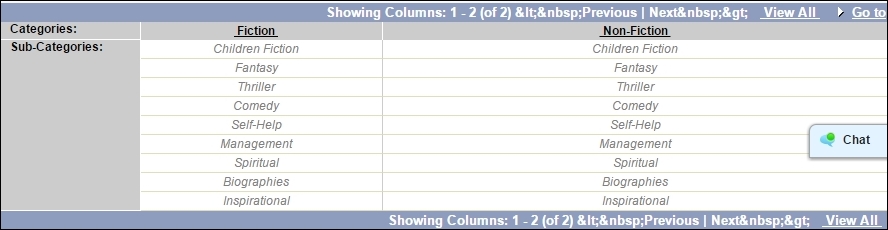
The general library wishes to create categories and subcategories of books that are available. They first classify the books according to the fiction and nonfiction categories. Fiction books are further classified as children's fiction, fantasy, thriller, and comedy. Nonfiction books are then classified as self-help, management, spiritual, biographies, and inspirational.
We will create the picklist on the Media__c object that we created in our previous exercise.
To create a dependent picklist, we first need to create two normal picklists. First, create a general picklist of the fiction and nonfiction categories, as shown in the following screenshot:
We create another picklist that has all the combined values of fiction and nonfiction, as shown in the following screenshot:
The steps to create a dependent picklist are as follows:
- Navigate to Setup | Create | Objects, and click on the Media object name.
- Go to Custom Fields and Relationships | Field Dependencies | New.
- Most of the chapters in this book are based on custom objects. To customize standard objects, go to Customize | Object Name instead of Create.
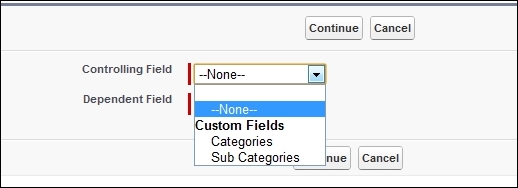
- In the Controlling Field drop-down menu, select Categories, and in the Dependent Field, select Sub Categories.
- Click on Continue:
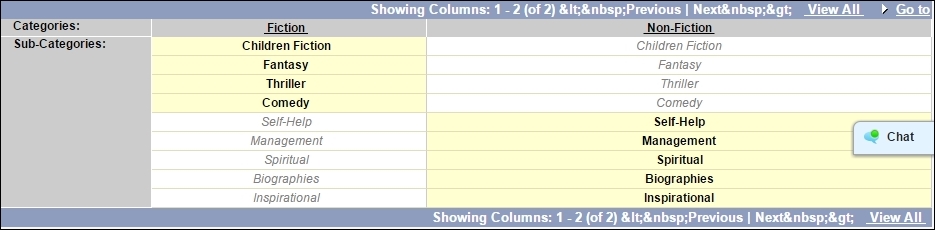
- The preceding screenshot shows the interface for creating the dependent picklist. On the X-axis, we have the Controlling Field values and on the Y-axis the values of the Dependent Field are spread.
- To select the values, press the Ctrl key and select the dependent values by selecting the corresponding controlling value:
- Fiction: Children Fiction, Fantasy, Thriller, and Comedy
- Nonfiction: Self-help, Management, Spiritual, Biographies, and Inspirational
- Click on Include values.
- Save the record.
On the page layout, you will see that the Sub Categories checkbox is disabled until you select the categories.
Validation rules are used to preserve the data quality. We can use validation rules to prevent the data loss from the record. They are executed before the record is committed to the database. A validation rule is executed irrespective of whether the record is saved from the UI or from the API. If the evaluation of the error condition results in a true value, the record is not saved and an error message is generated.
Some standard fields have built-in validation. For example, an E-mail field checks for a valid e-mail, while the Number field checks for numbers entered in the string. For all other custom validations, we can use validation rules.
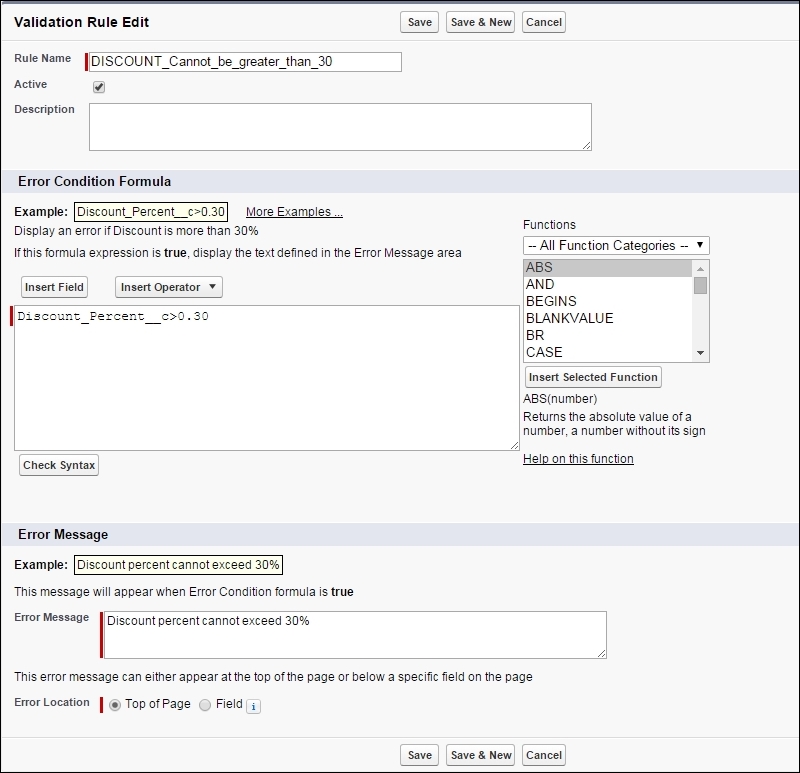
Let's take an example to check whether the discount given to a customer is not greater than 10%. For this example, we will use a percent field called DISCOUNT on the Customer_Fine object.
We can use the isChange formula to determine whether the value in a certain field is changed and the user profile.
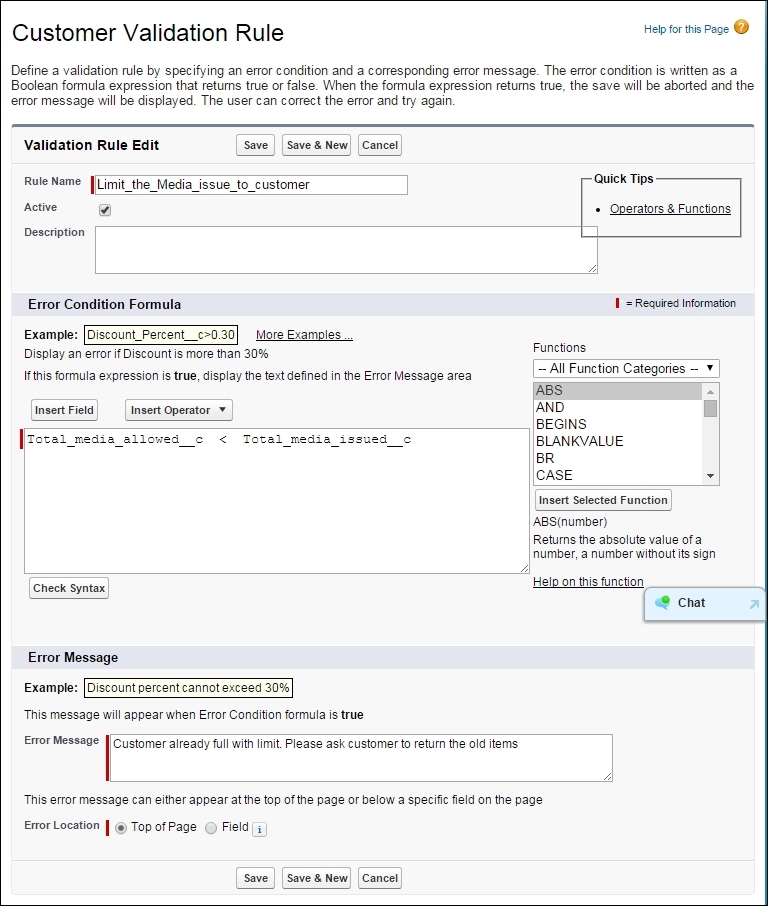
Our general library wishes to reinforce the rule on the number of books a user can check out. Every user will have a limited number of books they can issue, depending on their membership type. We will store Total_media_allowed__c in a Number field. Total_Media_Issued__c is a roll-up summary field that stores the number of Media issued to the customer.
To create a validation rule, perform the following steps:
- Navigate to Setup | Objects | Validation Rules | New. This will bring you to a screen similar to the one shown in the following screenshot:
- Add a user-friendly Rule Name to identify the rule in the first section.
- In the second section, on the right-hand side of the screen, we see a list of all the Functions available to create the formula.
Note
The formula uses basic functions, which are provided by Salesforce.com. These functions are similar to the Excel-based functions. For a complete list of functions, visit the formula quick reference guide at https://na3.salesforce.com/help/doc/en/salesforce_formulas_cheatsheet.pdf.
- We can also use Insert Field to insert fields in the formula to create a dynamic formula. The fields that can be selected while creating a formula are $ fields, which are globally available, such as login user fields. For example,
$User.City. - The fields from related objects, such as a master object or a lookup object, are also available to be linked in the field name. We can include other custom object fields in the formula field using
ObjectType. - In the Error Message section, we add the error message that will appear on the page if the validation rule evaluates to true.