
Creating the design requirements for a financial calculator
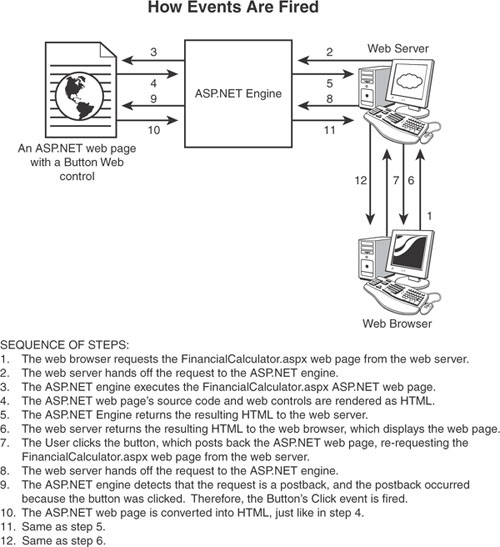
Creating the user interface
Adding the needed Web controls to the ASP.NET web page
Writing the code for the ASP.NET web page’s source code portion
Testing the ASP.NET web page
In the past three hours we’ve spent quite a bit of time talking in very high-level terms about ASP.NET web pages, the ASP.NET programming model, and Visual Web Developer. We’ve looked at how to configure our computer to serve ASP.NET web pages, and we’ve looked at the role of the web server. We’ve examined the HTML and source code portions of an ASP.NET web page. And we’ve created some very simple ASP.NET web pages with Visual Web Developer.
In this hour we turn from these high-level discussions to actually designing, building, and testing a nontrivial, useful ASP.NET web page that illustrates the concepts discussed in the past three hours. Specifically, we’ll be creating an ASP.NET web page that serves as a financial calculator.
In the process of creating any piece of software, whether a Windows desktop application or a dynamic web page, a number of development stages occur. First and foremost, the purpose of the software must be decided, along with what features and functionality the software should provide. After this, the software application must be created. Finally, it needs to be tested, and any bugs or errors that arise should be fixed.
These three steps—design, development, and testing—should always be performed when creating an ASP.NET web page, but too frequently, developers jump straight to the coding task without spending enough time in the planning stage.
This initial planning stage, sometimes called the design requirements stage, is vital for the following reasons:
It lays down a road map for the software project. Having a road map helps in determining how much progress has been made, as well as how much work remains.
The design requirements spell out precisely what features and functionality the software will provide.
To help get into the habit of designing before coding, let’s spend a bit of time discussing what features will be present and what user interface elements will be employed in the financial calculator ASP.NET web page we will create this hour.
By the Way
Without spending adequate time in the design requirements stage, you would be unable to accurately answer your boss when she asks, “How much longer will this take?” or “How much progress have you made?” Additionally, agreeing on a list of feature requirements—a task typically performed during the design requirements stage—avoids any confusion at the conclusion of the project when your boss or client wonders why a feature she thought was going to be present is not.
An important step in the design requirements process is to list the features you plan to provide in your application. So far, I have mentioned that we will create a financial calculator, but let’s take the time to specifically define the features this calculator will provide.
Our financial calculator will be able to determine the monthly payments for a simple fixed-rate home mortgage. To determine the monthly payments required for a fixed-rate mortgage, we need three inputs:
The amount of money being borrowed (the principal)
The loan’s annual interest rate
The duration of the loan—typically 15 or 30 years (the loan’s term)
The output of our financial calculator, along with these three inputs, gives us the features of our financial calculator. In a sentence: Our financial calculator will compute the monthly payment of a simple fixed-rate mortgage when provided the amount, duration, and interest rate of the mortgage.
After describing the features that the application will have, the next stage in the design requirements phase is to create a user interface. The user interface, or UI for short, is the means by which the user interacts with the application. How will the user enter these inputs? How will the results be displayed?
With large applications, the user interface portion of the design requirements phase is usually very involved and can take quite some time; there may be dozens or hundreds of ASP.NET pages through which the user interacts with the website. For our financial calculator, however, the user interface is fairly straightforward and will exist on a single web page.
Essentially, our users need to be able to do two things: enter the three inputs discussed earlier and see the result of the calculation. These inputs can be entered via TextBox Web controls. The output of the financial calculator should show the mortgage’s monthly cost.
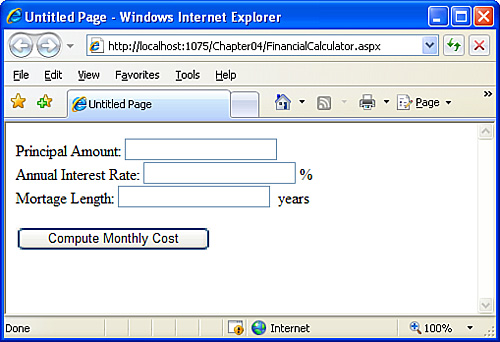
Figure 4.1 shows the ASP.NET web page financial calculator when first visited by the user. Note the three text boxes for the three inputs. Additionally, there is a button labeled Compute Monthly Cost that the user is instructed to click after entering the required inputs.

Figure 4.2 shows the financial calculator after the user has entered the requested inputs and has clicked the Compute Monthly Cost button. Note that the output shows how much money the mortgage will cost per month.
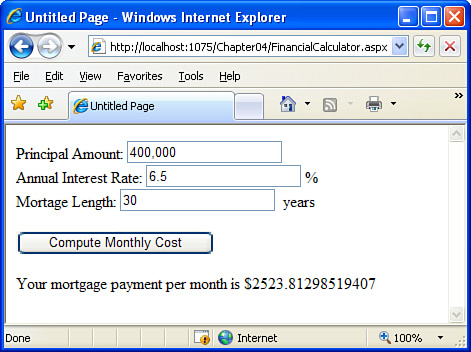
To display the output of our calculation, we need to add a Label Web control to our ASP.NET page. We should place this Label Web control in the ASP.NET web page precisely where we want the final output to appear. As you can see from Figure 4.2, I have created the financial calculator so that the output appears below the input text boxes.
Now that we’ve decided what features our financial calculator will provide, as well as how the interface will appear to the user, it’s time to actually start creating our ASP.NET web page.
The first task is to create the user interface (UI). To construct the UI shown in Figure 4.2, we add the following elements: a TextBox Web control for each of the three inputs; a Button Web control that, when clicked, performs the necessary computations; and a Label Web control to display the calculation.
By the Way
After creating the user interface, we will turn our attention to writing the code to perform the financial computation.
Launch Visual Web Developer and create a new ASP.NET website on your computer’s file system, just as we examined in the preceding hour. As we’ve seen, this creates a website with an ASP.NET page named Default.aspx. For practice, go ahead and delete this ASP.NET page and then add a new page named FinancialCalculator.aspx. When adding the FinancialCalculator.aspx ASP.NET page, remember to select the Web Form item type; also be sure to choose Visual Basic as the language and check the Place Code in a Separate File check box.
Let’s start by adding the TextBox Web controls for our user’s three inputs. Although we’ve yet to examine using the TextBox Web control in any of our previous examples, it’s fairly straightforward. Just like with the Image and Label Web controls we added to our page in Hour 2, “Understanding the ASP.NET Programming Model,” adding a TextBox Web control to a page is no different. Simply drag the TextBox from the Toolbox onto the page. After adding the TextBox to the page, you can configure its properties through the Properties window (or by typing them directly in the Source view, if you prefer).
Watch Out!
One caveat is important to mention. When adding Web controls that collect user inputs—like TextBoxes, RadioButtons, DropDownLists, Buttons, and so on—you must place these Web controls within the page’s Web Form. The Web Form is the name for that <form runat="server"> markup we talked about in Hour 2. In short, you need to ensure that these controls appear between the opening and closing <form> tags.
We’ll be discussing why this is essential in detail in Hour 9, “Web Form Basics.”
Before we drag a TextBox Web control onto the page, let’s first create the title for the TextBox we’re going to add. Because the first input is the amount of the mortgage, start by typing this title into the FinancialCalculator.aspx page’s Design view:
Principal Amount:.Next, add a TextBox Web control after this title. To accomplish this, drag a TextBox control from the Standard tab in the Toolbox and drop it onto the page after the Principal Amount: title.
Take a moment to make sure your screen looks similar to Figure 4.3.
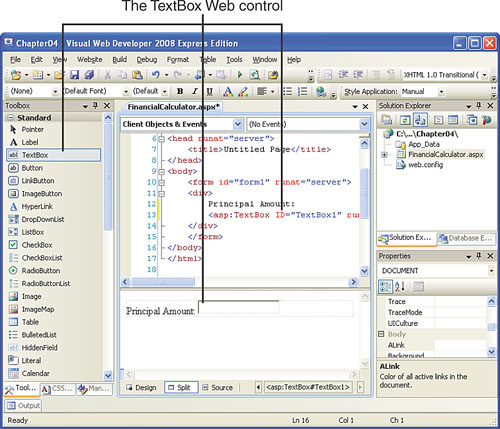
Currently, the TextBox Web control we just added has its ID property set to TextBox1. Because we will later need to programmatically refer to this ID to determine the value of the beginning mortgage principal entered by the user, let’s choose an ID value that is representative of the data found within the TextBox. Specifically, change the ID property to LoanAmount.
Did you Know?
To change a Web control’s ID property, click the Web control, which will load the Web control’s properties in the Properties pane in the lower-right corner. Scroll through the Properties pane until you see the ID property. This is the property value that you should change. Note that in the list of properties in the Properties pane, the ID property is denoted as (ID).
Now let’s add the second TextBox, the mortgage interest rate. Add it just as we did in the previous TextBox Web control by first creating a title for the TextBox. Type in the title Annual Interest Rate:. Next, drag and drop a TextBox Web control after this title and change the TextBox’s ID property to Rate.
Finally, add the third TextBox, the duration of the mortgage. Start by adding the title Mortgage Length:. Then drag and drop a TextBox Web control after the title. Set this TextBox’s ID to MortgageLength.
Did you Know?
You might want to type in some text after each TextBox Web control to indicate the units that should be entered into the TextBox. For example, after the Annual Interest Rate TextBox, you might want to add a percent sign so that the user knows to enter this value as a percentage. Similarly, you might want to enter the word years after the Mortgage Length TextBox. Figure 4.4 includes these optional additions.
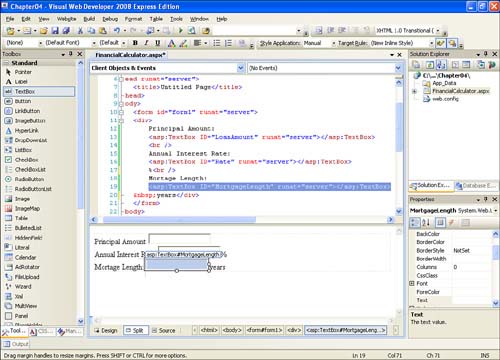
Figure 4.4 shows the Design view after all three input TextBox Web controls have been added.
Did you Know?
Figure 4.4 shows the TextBox Web control titles in the standard font. Feel free to change the font or the aesthetics of the HTML portion however you see fit. Likewise, you can adjust the font, color, border, and other aesthetic settings of the TextBox Web controls through the Properties pane.
After the user has entered inputs into the three TextBox Web controls, we need to take that information and perform the financial calculation. As we discussed in Hour 1, “Getting Started with ASP.NET 3.5,” though, a temporal, physical, and logical disconnect exists between the client—the end user’s web browser—and the server—the web server software that renders the ASP.NET pages.
When the user visits the FinancialCalculator.aspx ASP.NET web page via her browser, she is receiving HTML that contains the user interface we created from the Web controls and static HTML. After the user’s browser receives our ASP.NET page’s HTML, no communication occurs between the client and the server until the client explicitly makes a request back to the web server. Therefore, for the calculation to take place, the inputs entered by the user must be sent back to the ASP.NET web page (FinancialCalculator.aspx). After our ASP.NET web page receives these user-entered values, it can perform the financial computation and display the results.
For the client to transmit the inputs entered by the end user back to the web server, an HTML <form> is used. This process typically commences when a submit button is clicked. We can add such a button by adding a Button Web control to our ASP.NET web page.
By the Way
The intricacies involved in having the browser send back a user’s inputs to the appropriate web page are handled for us automatically by the browser’s built-in functionality and the HTML produced by the ASP.NET web page and its Web controls.
Although an in-depth understanding of this low-level plumbing is not a requisite, it is important to have at least a cursory understanding. For now, let me wave my hands and we’ll not worry about what’s happening behind the scenes; however, we will return to this topic, discussing the specifics involved with collecting and computing user input, in Hour 9.
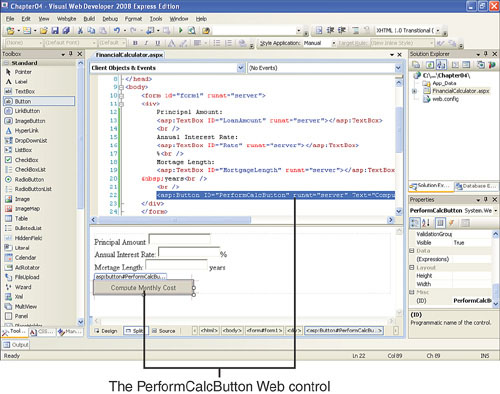
To add a Button Web control, drag the Button Web control from the Toolbox onto the page, dropping it after the last input title and TextBox. When you add a Button Web control, the Button’s caption reads “Button.” To change this, click the Button, and then in the Properties window, change the Text property from Button to Compute Monthly Cost. Also, while in the Properties window, change the Button’s ID property—listed in the Property window as (ID)—from the default Button1 to PerformCalcButton.
Take a moment to make sure that your screen looks similar to Figure 4.5.
The final piece we need to add to our user interface is a Label Web control to display the output of the financial calculation. Because the Label Web control will display the output (the amount of money the mortgage costs per month), the web page’s final result will appear wherever you place the Web control. Therefore, if you want the output to appear at the bottom of your ASP.NET web page, drag and drop a Label Web control after the existing content in the designer. If you want the output to appear at the top of the web page, place it before the existing content in the designer.
After you have added the Label Web control, you will see that it displays the message “Label.” The Label Web control displays the value of its Text property, which is configurable via the Properties window. Figure 4.6 shows Visual Web Developer after the Label Web control has been added.
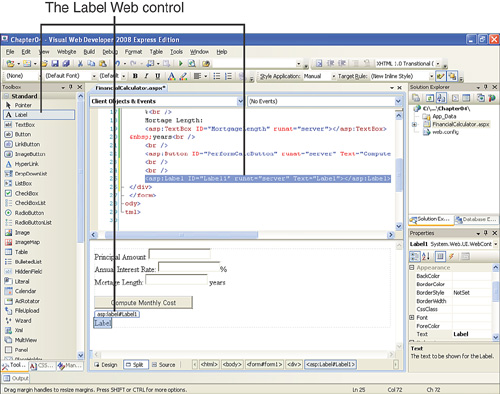
Because we don’t want this Label to display any content until the user has entered the three inputs and the calculation has been performed, clear out the Label’s Text property.
To clear out the Text property value for the Label Web control, first click the Label so that its properties are loaded in the Properties pane. Then, in the Properties pane, locate the Text property and erase its value by clicking it and pressing Backspace until all the characters have been removed.
After you clear out the Label’s Text property, the designer will show the Label Web control as its ID property, enclosed by brackets. Currently, the Label’s ID property is Label1, meaning that in the designer you should see the Label Web control displayed as [Label1]. Go ahead and change the ID property of the Label from Label1 to Results, which should change the Label’s display in the designer from [Label1] to [Results].
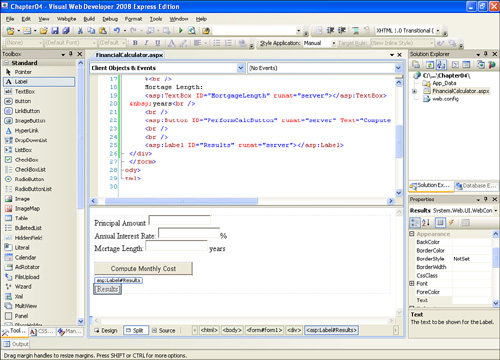
Figure 4.7 shows the designer after the Label Web control’s Text property has been cleared out and its ID has been changed to Results.
Now that we have completed the HTML portion of our ASP.NET web page, all that remains is to write the code. The code reads the user’s inputs, performs the calculations to arrive at the monthly cost for the mortgage, and then displays the results in the Label.
In Hour 2 we looked at the page’s Load event and the corresponding Page_Load event handler. This event handler, which you can include in your ASP.NET web page’s source code portion, is executed each time the web page is loaded. We will not be placing the source code to perform the monthly mortgage cost calculation in this event handler, though, because we do not want to run the calculation until the user has entered the principal, interest rate, and duration values and has clicked the Compute Monthly Cost button.
Button Web controls have a Click event that fires when the button is clicked. Therefore, what we want to do is create an event handler that is associated with the Compute Monthly Cost button’s Click event. This way, whenever the Compute Monthly Cost button is clicked, the event handler that we provide will be executed.
Creating an event handler for a Button Web control’s Click event is remarkably easy to accomplish with Visual Web Developer. The quickest way is to go to the Design view and double-click the Button Web control. This automatically creates the necessary event handler and whisks you to the page’s source code portion, where you should see the following source code:
Partial Class FinancialCalculator
    Inherits System.Web.UI.Page

    Protected Sub PerformCalcButton_Click(ByVal sender As Object, ByVal e As System.EventArgs) Handles PerformCalcButton.Click

    End Sub
End Class
Another way to create this same event handler is to go to the source code portion. At the top you’ll find two drop-down lists. From the left drop-down list, select the Button Web control (PerformCalcButton) and then, from the right drop-down list, select the Click event. After you select the Click option, an event handler is automatically created for the Button’s Click event with the same code as if you had double-clicked the Button in the Design view.
By the Way
Note that the event handler is named PerformCalcButton_Click. More generically, Visual Web Developer names event handlers WebControlID_Event, where WebControlID is the name of the Web control and Event is the name of the event the event handler is wired to.
Any code that you write within the event handler will be executed whenever the PerformCalcButton button is clicked. Because we want to compute and display the monthly cost of the mortgage when this Button is clicked, we will put the code to perform this calculation in this event handler.
To calculate the monthly cost of the mortgage, we must first determine the values the user entered into the three TextBox Web controls. Before we look at the code to accomplish this, let’s take a step back and reexamine Web controls, a topic we touched upon lightly in Hour 2.
Recall that when the ASP.NET engine is executing an ASP.NET web page, Web controls are handled quite differently from standard HTML elements. With static HTML content, the markup is passed directly from the ASP.NET engine to the web server without any translation; with Web controls, however, the Web control’s syntax is rendered into a standard HTML element. Specifically, what’s happening behind the scenes is that an object is created that represents the Web control. The object is created from the class that corresponds to the specific Web control. That is, a TextBox Web control in the HTML and Web control portion is represented as an object instantiated from the TextBox class in the source code portion. Similarly, the Results Label Web control is represented as an object instantiated from the Label class.
By the Way
Recall that a class is an abstract blueprint, whereas an object is a concrete instance. When an object is created, it is said to have been instantiated. The act of creating an object is often referred to as instantiation.
Each Web control class has various properties that describe the state of the Web control. For example, the TextBox class has a Columns property that indicates how many columns wide the TextBox is. Both the TextBox and Label classes have Text properties that indicate that Web control’s text content.
Did you Know?
A complete list of properties, methods, and events for the Web control classes, along with a description and sample code, can be found in the Visual Web Developer help. If you have enabled Dynamic Help, you can click the Web control that you want to learn more about, and the Dynamic Help window will be populated with technical documentation, articles, and other related information on that particular control.
Web control properties can be accessed in the ASP.NET page’s source code section. Because the Text property of the TextBox Web control contains the content of the TextBox, we can reference this property in the Compute Monthly Cost button’s Click event handler to determine the value the user entered into each TextBox.
For example, to determine the value entered into the LoanAmount TextBox, we could use the following line of code:
LoanAmount.Text
When the ASP.NET engine creates an object for the Web control, it names it using the Web control’s ID property. Because we set the TextBox Web control’s ID property to LoanAmount, the corresponding object in the source code portion is named LoanAmount. Consequently, to programmatically retrieve the Text property of the LoanAmount TextBox, we use the syntax LoanAmount.Text.
Listing 4.1 contains the complete source code for our ASP.NET web page. Visual Web Developer has already written some of the code for us, namely the class declaration and the event handler definition. We need to enter the code between lines 4 and 35 into the PerformCalcButton Button’s Click event handler.
Did you Know?
Keep in mind that you should not type in the line numbers shown in Listing 4.1. The line numbers are present in the code listing only to help reference specific lines of the listing when we’re discussing the code.
Also, remember that IntelliSense can help expedite entering property names and alert you when there’s a problem. For example, when referencing the Text property of the LoanAmount TextBox Web control, we use LoanAmount.Text. When you type the period (.) after typing in LoanAmount, you should see a drop-down list of available properties and methods for the TextBox Web control. You can then type in the first few letters of the property or method you want to use and press the Tab key to autocomplete the rest of the property or method name.
If you don’t see a drop-down list after pressing the period key, something has gone awry. Did you mistype the LoanAmount? Did you not set the TextBox Web control’s ID to LoanAmount?
Example 4.1. The Computation Is Performed in the PerformCalcButton Button’s Click Event Handler
 1: Partial Class FinancialCalculator
 2:     Inherits System.Web.UI.Page
 3:
 4:     Protected Sub PerformCalcButton_Click(ByVal sender As Object, ByVal e As System.EventArgs) Handles PerformCalcButton.Click
 5:         'Specify constant values
 6:         Const INTEREST_CALCS_PER_YEAR As Integer = 12
 7:         Const PAYMENTS_PER_YEAR As Integer = 12
 8:
 9:         'Create variables to hold the values entered by the user
10:         Dim P As Decimal = LoanAmount.Text
11:         Dim r As Decimal = Rate.Text / 100
12:         Dim t As Decimal = MortgageLength.Text
13:
14:         Dim ratePerPeriod As Decimal
15:         ratePerPeriod = r / INTEREST_CALCS_PER_YEAR
16:
17:         Dim payPeriods As Integer
18:         payPeriods = t * PAYMENTS_PER_YEAR
19:
20:         Dim annualRate As Decimal
21:         annualRate = Math.Exp(INTEREST_CALCS_PER_YEAR * Math.Log(1 + ratePerPeriod)) - 1
22:
23:         Dim intPerPayment As Decimal
24:         intPerPayment = (Math.Exp(Math.Log(annualRate + 1) / payPeriods) - 1) * payPeriods
25:
26:         'Now, compute the total cost of the loan
27:         Dim intPerMonth As Decimal = intPerPayment / PAYMENTS_PER_YEAR
28:
29:         Dim costPerMonth As Decimal
30:         costPerMonth = P * intPerMonth / (1 - Math.Pow(intPerMonth + 1, -payPeriods))
31:
32:
33:         'Display the results in the results Label Web control
34:         Results.Text = "Your mortgage payment per month is $" & costPerMonth
35:     End Sub
36: End Class
An in-depth discussion of the code in Listing 4.1 is provided toward the end of this hour in the “Examining the Source Code” section. For now, enter the code as is, even if there are parts of it you don’t understand. One thing to pay attention to, though, is in lines 10 through 12. In these three lines we are reading the values of the three TextBox Web controls’ Text properties and assigning them to variables P, r, and t.
By the Way
If the source code in Listing 4.1 has you hopelessly lost and confused, don’t worry. The point of this hour is to get you creating a useful ASP.NET web page. We will examine the source code for this page in more detail later in this hour. Additionally, we’ll spend Hours 5 through 7 investigating the Visual Basic syntax in greater detail.
The mathematical equations used to calculate the monthly interest cost can be found at www.faqs.org/faqs/sci-math-faq/compoundInterest/. A more in-depth discussion of these formulas can be found at http://people.hofstra.edu/Stefan_Waner/RealWorld/Summary10.html.
Now that we have completed the HTML and source code portions of our ASP.NET web page, it’s time to test the financial calculator. To view the ASP.NET web page through your browser, go to the Debug menu and choose Start Without Debugging (or press Ctrl+F5 on your keyboard). This launches a web browser and loads FinancialCalculator.aspx.
By the Way
The Start Without Debugging option visits the page without launching the debugger, whereas Start Debugging visits the page with debugging enabled.
A debugger is a piece of software that can intercept running code, allowing a programmer to step through executing code one line at a time. Visual Web Developer’s debugger is quite powerful and is a very helpful diagnostic tool when your page’s programmatic output isn’t what you expected. For now, just use Start Without Debugging; in the section “Using the Debugger,” we’ll examine the basics of debugging an ASP.NET page.
When first visiting the page, you should see three empty TextBoxes and the Compute Monthly Cost button, as shown in Figure 4.8.
Enter some valid values into the TextBoxes and then click the Compute Monthly Cost button. When this button is clicked, the monthly cost is displayed beneath the TextBoxes and Button, as shown in Figure 4.9.

When an ASP.NET page is requested by a browser, the ASP.NET engine on the web server renders the ASP.NET page and returns the resulting HTML to the browser. The Web controls are transformed into standard HTML elements, and the applicable event handlers in the source code portion are executed, potentially tweaking the resulting output further. (For example, in FinancialCalculator.aspx the PerformCalcButton Button control’s Click event handler updates the Results Label Web control’s Text property, which affects the resulting HTML for the page.)
You can see the page’s rendered markup by viewing the page’s source through the browser. All browsers allow you to view the markup they received; for Internet Explorer, go to the View menu and choose the Source option.
Viewing the resulting HTML markup can, at times, help with diagnosing a problem. Even if no problems exist, I encourage you to view the source often as you are learning ASP.NET. Doing so helps illustrate how Web controls get rendered into HTML.
Let’s take a moment to examine the HTML output generated by FinancialCalculator.aspx, both when the page is first visited as well as after the user has entered values and clicked the Compute Monthly Cost button.
Listing 4.2 contains the HTML received when first visiting the ASP.NET page.
Example 4.2. The HTML Markup Received by the Browser When First Visiting the Page
1: <!DOCTYPE html PUBLIC "-//W3C//DTD XHTML 1.0 Transitional//EN" "http://www.w3.org/TR/xhtml1/DTD/xhtml1-transitional.dtd"> 2: 3: <html xmlns="http://www.w3.org/1999/xhtml"> 4: <head><title> 5: Untitled Page 6: </title></head> 7: <body> 8: <form name="form1" method="post" action="FinancialCalculator.aspx" id="form1"> 9: <div> 10: <input type="hidden" name="__VIEWSTATE" id="__VIEWSTATE" value="/wEPDwUKMTY1MDQyNjc5NWRk0P2vgXwmx2ZYXGDLcgiW4GDz5Cs=" /> 11: </div> 12: 13: <div> 14: Principal Amount: 15: <input name="LoanAmount" type="text" id="LoanAmount" /> 16: <br /> 17: Annual Interest Rate: 18: <input name="Rate" type="text" id="Rate" /> 19: %<br /> 20: Mortage Length: 21: <input name="MortgageLength" type="text" id="MortgageLength" /> 22: years<br /> 23: <br /> 24: <input type="submit" name="PerformCalcButton" value="Compute Monthly Cost" id="PerformCalcButton" /> 25: <br /> 26: <br /> 27: <span id="Results"></span> 28: </div> 29: 30: <div> 31: 32: <input type="hidden" name="__EVENTVALIDATION" id="__EVENTVALIDATION" value="/wEWBQL9hoydDwLio9b4CwK0hujeBAK4uu/ yAgK4kM+MBOI0DiB1FRIJYeJCNXwZKLYDTDmY" /> 33: </div></form> 34: </body> 35: </html>
The HTML received by the browser looks pretty similar to the HTML content in the ASP.NET page’s HTML portion, save for a few exceptions. First, the @Page directive that is found at the top of the ASP.NET page’s HTML portion is not rendered. Second, the Web Form—<form runat="server">—is converted into a more detailed <form> tag (see line 8) and also includes some hidden form fields (see lines 10 and 32).
The TextBox, Button, and Label Web controls have also been transformed from their Web control syntax—<asp:WebControlName runat="server" ... />—to standard HTML elements. The TextBox Web controls have been converted into <input type="text"> elements (lines 15, 18, and 21), the Label Web control into a <span> (line 27), and the Button Web control into <input type="submit"> (line 24). Notice that the properties of the Web controls are translated into attributes in the controls’ corresponding HTML elements. For example, the ID properties of the Web controls are rendered as id and name attributes in the resulting HTML elements.
After a user enters particular values into the three text boxes in his browser and clicks the Compute Monthly Cost button, the browser re-requests FinancialCalculator.aspx from the web server, but this time includes this user-entered information with the request. Submitting user-entered values back to the same web page is referred to as a postback and is the most common way user-entered information is relayed back to the web server for server-side processing.
On postback, the ASP.NET engine can determine that the postback was caused by the PerformCalcButton Button Web control being clicked and therefore raises the Button’s Click event, which in turn causes the associated event handler to run. In addition, the Text properties of the three TextBox Web controls are updated to reflect the values entered by the user. The event handler for the Button’s Click event then runs (refer back to Listing 4.1), computing the monthly cost for the mortgage based on the user’s inputs. The event handler updates the Results Label Web control’s Text property with this computed monthly cost. Finally, the page is rendered, generating the HTML that is sent back to the client.
The resulting markup from the postback has changed slightly from the first time the page was requested because now the TextBox Web controls’ Text properties have values (based on the user’s inputs), and the Results Label Web control’s Text property is set to the monthly cost. Listing 4.3 shows the HTML received by the browser after the inputs have been entered and the Compute Monthly Cost button has been clicked.
Example 4.3. The HTML Markup Received by the Browser After the User Has Clicked the Button
1: <!DOCTYPE html PUBLIC "-//W3C//DTD XHTML 1.0 Transitional//EN" "http://www.w3.org/TR/xhtml1/DTD/xhtml1-transitional.dtd"> 2: 3: <html xmlns="http://www.w3.org/1999/xhtml"> 4: <head><title> 5: Untitled Page 6: </title></head> 7: <body> 8: <form name="form1" method="post" action="FinancialCalculator.aspx" id="form1"> 9: <div> 10: <input type="hidden" name="__VIEWSTATE" id="__VIEWSTATE" value="/wEPDwUKMTY1MDQyNjc5NQ9kFgICAw9kFgICCQ8PFgIeBFRleHQFNFlvdXIgbW9ydGd hZ2UgcGF5bWVudCBwZXIgbW9udGggaXMgJDI1MjMuODEyOTg1MTk0MDdkZGTD5LjhyFZ2WhKJvA tFb1JrZm8jlQ==" /> 11: </div> 12: 13: <div> 14: Principal Amount: 15: <input name="LoanAmount" type="text" value="400,000" id="LoanAmount" /> 16: <br /> 17: Annual Interest Rate: 18: <input name="Rate" type="text" value="6.5" id="Rate" /> 19: %<br /> 20: Mortage Length: 21: <input name="MortgageLength" type="text" value="30" id="MortgageLength" /> 22: years<br /> 23: <br /> 24: <input type="submit" name="PerformCalcButton" value="Compute Monthly Cost" id="PerformCalcButton" /> 25: <br /> 26: <br /> 27: <span id="Results">Your mortgage payment per month is $2523.81298519407</span> 28: </div> 29: 30: <div> 31: 32: <input type="hidden" name="__EVENTVALIDATION" id="__EVENTVALIDATION" value="/wEWBQL9urXOCgLio9b4CwK0hujeBAK4uu/yAgK4kM+MBC6lrCSDFznHCrbrG7RzTdK tGXV0" /> 33: </div></form> 34: </body> 35: </html>
The HTML markup in Listing 4.3 has some very important differences from the HTML in Listing 4.2. The Text property of the three TextBox Web controls is now reflected in the corresponding <input type="text"> HTML elements. Specifically, the value of the TextBox Web control’s Text property has been emitted as a value attribute (lines 15, 18, and 21). Additionally, the Label Web control’s Text property has been emitted as the inner content of the corresponding <span> tag (line 27).
The key points in this interaction are highlighted in Figure 4.10.
It’s important to understand that the only way the code in an ASP.NET page’s source code portion can run is when a request is made from the end user’s browser to the web server. For pages on which the user is prompted to supply inputs, the server-side code does not execute until the user submits the form, which typically involves clicking a submit button (which is rendered by a Button Web control). This process is discussed in greater detail in Hour 9.
By the Way
When you click the Compute Monthly Cost button, your browser is re-requesting the FinancialCalculator.aspx page from the web server, sending along your inputs. This entire interaction is likely happening in a split second on your computer, so you might not even realize this step is taking place. It just looks instantaneous: You click the button; the mortgage cost immediately appears on the page.
The reason there is seemingly no delay in your testing is that in this case the client—your web browser—and the server—the ASP.NET Development Web Server—reside on the same machine, your personal computer. Your user experience when testing this ASP.NET page is so snappy because there is no network lag time. In a real-world setting, though, the client and server are typically separated physically, but connected via the Internet. This physical separation results in a short delay between clicking the button and seeing the result, with the actual delay time depending on a host of variables (whether the client has a low or high bandwidth connection to the Internet, the responsiveness of the web server, the route across which the request and response must travel over the Internet, and network congestion).
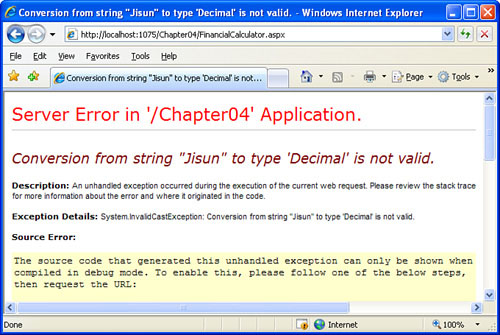
When testing an ASP.NET page, it is important to not only test expected inputs, but also unexpected ones. For example, what will happen if the user enters a mortgage length of “Jisun”? Obviously, this is not a valid number of years.
Entering such an erroneous value will cause a runtime error, as shown in Figure 4.11.
Errors such as those shown in Figure 4.11 are an eyesore. Rather than displaying such error messages when the user enters erroneous input, it would be better to display a succinct message next to the text box(es) with erroneous input, explaining that the input is not in the right form.
The process of ensuring that user input is in the correct format is known as input validation. Fortunately, input validation is incredibly easy with ASP.NET. We’ll examine ASP.NET’s input validation features in Hour 12, “Validating User Input with Validation Controls.”
Although we’ve yet to take an in-depth look at the Visual Basic programming language, I believe it’s worthwhile to take a moment to go over the source code for the ASP.NET page we just created, which can be found in Listing 4.1. We’ve already discussed the “filler” code inserted automatically by Visual Web Developer—the class definition and Inherits statement, as well as the event handler—so let’s concentrate on the code within the event handler. This is the code that is executed when the user clicks the Compute Monthly Cost button. Its purpose is to read the user’s inputs and calculate and display the monthly mortgage cost.
The first line of code in the event handler (line 5) is a comment. In Visual Basic, comments are denoted by an apostrophe ('); all other content on the line after an apostrophe is ignored. Comments serve a simple purpose: to make source code more readable for humans. Most of the code examples in this book include comments to make it easier for you to read and understand what’s happening.
After the first comment are two constants. A constant is a value that cannot be changed programmatically. The two constants here—INTEREST_CALCS_PER_YEAR and PAYMENTS_PER_YEAR—define how often the interest is compounded and how many pay periods will occur each year throughout the life of the loan. By default these are both 12, indicating that the loan compounds every month and payments are made once per month. Next, on lines 10 through 12, the values from the three TextBox Web controls are read into variables. A variable is a construct that holds some value. The variables defined here are named P, r, and t, and are of type Decimal. The type of a variable indicates what sort of information it can hold. A Decimal is a predefined type in the .NET Framework that can hold large numbers with decimal places.
After these TextBox Web control values have been read in, the mathematical formulas needed to compute the monthly payment due are applied.
On lines 14 and 15 the variable ratePerPeriod is created and assigned the value of the interest rate each time it’s compounded. Following that, the number of pay periods is recorded and stored in the payPeriods variable. Next, the annual interest rate is determined as well as how much interest per payment is due (and then how much interest is due per month). Finally, the cost per month is computed on line 30. The resulting output is then assigned to the Text property of the Results Label Web control.
The source code in Listing 4.1 is fairly readable, although the mathematical formulas might seem foreign. But I hope you’ll agree that if you read through the lines of code, one at a time, it is clear what is happening. For example, on line 18, payPeriods = t * PAYMENTS_PER_YEAR, we are taking the value of t (the loan’s term) and multiplying it by the number of payments made per year. This gives us the total number of payments made throughout the life of the loan. The point is that with Visual Basic’s English-like syntax and semantics, even to someone with little to no programming background, it’s possible to pick up the gist of the code by simply reading through it.
Don’t worry if Listing 4.1 leaves you feeling lost and bewildered. Your code-reading acumen will greatly improve over the next three hours as we delve into the syntax of Visual Basic. By the time you finish working through Hour 7, “Working with Objects in Visual Basic,” you’ll have the Visual Basic background necessary for understanding all the examples throughout this book.
Over the course of creating ASP.NET pages, you’ll undoubtedly run into problems where the page’s source code portion isn’t behaving as you’d expect. Perhaps a particular block of source code is not running when you expect it to, or the output you’re seeing is different from what you expected. In such circumstances, your best friend is the debugger. A debugger is a special piece of software that can intercept a running program and provide the programmer a deep level of introspection into its inner workings. Unfortunately, we don’t have the time or space to delve into the depths of debugging; instead, we’ll just concentrate on some of the more common debugging tasks.
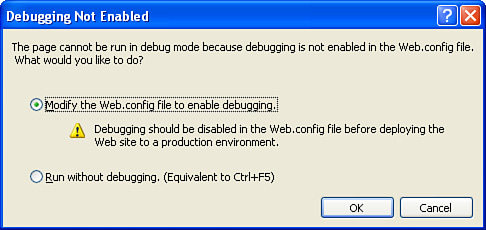
To use the debugger when testing an ASP.NET page, you need to go to the Debug menu and choose Start Debugging. If this is the first time you’ve attempted to debug this particular website, the Debugging Not Enabled dialog box appears, as shown in Figure 4.12. To debug an ASP.NET website, it must be configured to support debugging; by default, a new ASP.NET website project is not configured to support debugging. The Debugging Not Enabled dialog box warns you of this and offers to automatically alter the web.config configuration file to enable debugging support.
Did you Know?
You can also start debugging by pressing F5 or the green play button icon in the toolbar.
Start debugging the application, selecting Modify the Web.config File to Enable Debugging radio button if necessary. Starting with debugging launches the debugger, fires up the browser, and visits the current page (FinancialCalculator.aspx), just as in Figure 4.8.
Watch Out!
When launching the debugger, you may also get the Script Debugging Disabled warning. In addition to debugging server-side code, the debugger can also debug client-side code, which is code that is sent to and executed on the visitor’s browser. To debug client-side script, however, Internet Explorer’s script debugging features must be enabled. Because our page does not include any client-side script, it doesn’t matter whether Internet Explorer’s script debugging is disabled. Therefore, if you see this warning, feel free to dismiss it.
At this point you can’t even tell that the debugger is running. The web page does not appear any different in the browser if the debugger is running. But with the debugger running, you can add one or more breakpoints to your ASP.NET page’s source code portion. A breakpoint is a marker in the source code that, when reached, causes the program to halt, letting the debugger take over. When a breakpoint is reached, control automatically reverts to Visual Web Developer, allowing you to step through the execution of the code one line at a time.
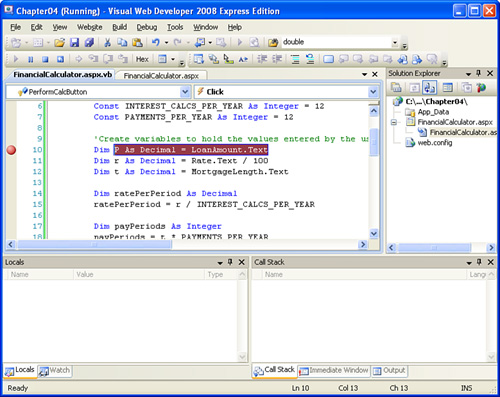
Let’s set a breakpoint. Leave the browser running and return to the FinancialCalculator.aspx page’s source code portion in Visual Web Developer. Add a breakpoint to the line of code that reads Dim P As Double = LoanAmount.Text (line 10 in Listing 4.1). To accomplish this, place your cursor on this line of code and press F9; alternatively, you can click in the light gray left margin next to this line of code. In either case, a breakpoint will be set, which will display a red circle in the margin and highlight the line of code in red. Figure 4.13 shows the page’s code portion in Visual Web Developer after this breakpoint has been set.
Now return to the browser, enter some values into the text boxes, and click the Compute Monthly Cost button. Clicking the button causes a postback, which returns control to the ASP.NET page’s source code portion, invoking the Button’s Click event handler. As the event handler is executed, the Dim P As Decimal = LoanAmount. Text line of code is eventually reached. When this line is reached, the program halts and the debugger takes over. In Visual Web Developer, the current line of code being executed is highlighted yellow (see Figure 4.14); this current line of code is the line where we set the breakpoint moments ago.
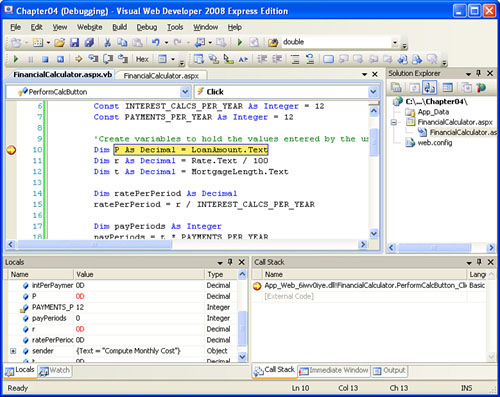
From the debugger, we can inspect the values of various variables. For example, in the lower-left corner of Figure 4.14, you’ll find the Locals window, which shows all the current variables and their values. Many of these variables have their default values. For example, the variables annualRate, costPerMonth, intPerMonth, and so on all have values of 0. The reason is that we’ve yet to reach the lines of code where these variables are assigned a value. As we step through the executing code, these values in the Locals window will be updated accordingly.
To move to the next line of code in the debugger, go to the Debug menu and choose Step Over, or press F10. Press F10 a couple of times and note how the yellow highlighted line moves further down the lines of code in the event handler, updating the values in the Locals window. If you want to run until the next breakpoint, press F5, or go to the Debug menu and choose Continue. Doing so in our example will return control to the browser because there are no other breakpoints.
Did you Know?
In addition to using the Locals window, you can determine the value of a variable by hovering your mouse pointer over the variable’s name in the source code portion. Additional debugging windows can be of help. The Watch window allows you to specify particular variables or expressions whose values you want to monitor. A complete list of debugging-related windows can be found in the Debug menu’s Windows submenu.
To stop debugging, go to the Debug menu and choose Stop Debugging. Alternatively, you can click the Stop icon in the Toolbar.
The preceding explanation is but a brief overview of Visual Web Developer’s debugging capabilities. You can learn more about debugging at Microsoft’s “Walkthrough: Debugging Web Pages in Visual Web Developer,” available online at http://msdn2.microsoft.com/en-us/library/z9e7w6cs.
In this hour we saw how to create a useful ASP.NET web page. We started by outlining the page’s features, including the output and needed user inputs. We then briefly discussed what the user interface should look like.
Next, we implemented the user interface by completing the HTML portion of the ASP.NET web page. With Visual Web Developer, this was a matter of typing in some text and dragging and dropping the needed TextBox, Button, and Label Web controls onto the page. Next, we turned our attention to the source code portion, creating and writing the code for the Compute Monthly Cost button’s Click event handler. Following the design and development stages, we tested the ASP.NET web page by entering values into the three TextBoxes.
This hour concluded with discussion of the source code portion of the ASP.NET page and a look at Visual Web Developer’s debugging capabilities.
The design-requirements phase outlines the specific features for the software project and the user interface. It is an important stage because, by enumerating the features, you can more easily determine the current progress of the project. Furthermore, there is no ambiguity as to what features will and will not be included in the final project. | |
There are two ways to add a TextBox Web control. You can drag a TextBox Web control from the Toolbox onto the page, or you can manually type in the TextBox’s declarative syntax: <asp:TextBox runat="server" ID="ID"></asp:TextBox> | |
A Label Web control was added to the ASP.NET web page’s HTML portion to indicate where the output of the financial calculator would appear. | |
If the user provides invalid input, a runtime error will occur. Refer to Figure 4.11 for the error message the user will receive. | |
To add an event handler for a Button Web control’s | |
The TextBox’s TextBoxID.Text |