
Working with data source controls
Understanding SQL, the language of databases
Retrieving specific columns from a database table
Returning database data that meets certain criteria
Ordering the results of a database query
In the preceding hour we examined, from a high-level perspective, what databases are, their internal structure, and their purpose. We looked at creating a database with SQL Server 2005 Express Edition through Visual Web Developer. We also saw how to create database tables and populate them with data.
Often we will want to retrieve information from a database and display it on an ASP.NET web page. To be able to do this, we need to learn how to retrieve data from a database. ASP.NET provides a set of Web controls—called data source controls—that are designed specifically to access data from an underlying database. With the data source controls, retrieving database data is as simple as dropping a control onto your ASP.NET page and stepping through a wizard, indicating the database data you want to grab.
Underneath the covers, the data source controls are simply sending commands to the database using a language called Structured Query Language, or SQL (pronounced either S-Q-L or Seequell). SQL is the language used by all modern database systems for retrieving and modifying data. In addition to examining the ASP.NET data source controls, we’ll also spend a bit of time in this hour learning the general syntax of SQL.
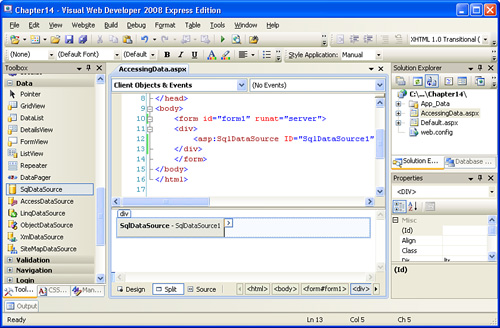
ASP.NET contains a myriad of Web controls, which we grouped into various categories in earlier hours. For example, in Hour 8, “ASP.NET Web Controls for Displaying Text,” we looked at those Web controls designed for displaying text content on an ASP.NET page. In this hour we’ll examine a new class of Web controls—ones designed for accessing database data. This class of Web controls, referred to as data source controls, can be found in the Toolbox in the Data section (see Figure 14.1).

ASP.NET includes six data source controls. Each data source control shown in Figure 14.1 has a name that ends in DataSource, such as SqlDataSource, AccessDataSource, and so on. Each data source Web control is designed for working with data from a different type of source. For example, the SqlDataSource and AccessDataSource controls are designed to retrieve data from databases; the XmlDataSource can be used to access data from an XML file; the SiteMapDataSource control is used to query a site map and return the website’s navigational structure so that it can be displayed in a TreeView or Menu Web control.
By the Way
An XML file is a text file that contains data encoded in a special syntax. A thorough discussion of XML is beyond the scope of this book; for more information, refer to www.XMLFiles.com or www.w3schools.com/xml.
A site map is an XML file that is formatted in a particular way and contains information about a website’s navigational structure. This information can then be displayed in the form of navigational breadcrumbs, menus, or trees. We’ll examine ASP.NET’s site map features and SiteMapDataSource in detail in Hour 20, “Defining a Site Map and Providing Site Navigation.”
This hour focuses on accessing data from a database. There are two data source controls for working with database data: SqlDataSource and AccessDataSource. The AccessDataSource control is designed to work specifically with Microsoft Access databases, whereas the SqlDataSource control is a more general control and can work with Microsoft Access, Microsoft SQL Server, and other popular database systems. In Hour 13, “An Introduction to Databases,” we created a Microsoft SQL Server 2005 Express Edition database; therefore, we will be using the SqlDataSource control.
By the Way
Data source controls serve as a bridge between the ASP.NET page and the database. That is, a data source control only retrieves database data and does not have any capabilities for displaying the retrieved data on the page. To display the data, we need to use an additional Web control, such as the DropDownList, GridView, DetailsList, CheckBoxList, and so on. This hour focuses on retrieving data using the data source controls. In the next hour, “Displaying Data with the Data Web Controls,” we’ll see how to display the data retrieved by a data source control in an ASP.NET page.
To practice using the SqlDataSource control, we’ll need an ASP.NET website with a database. To save time in creating a new website and database, let’s use the website and database from Hour 13.
Start by creating a new ASP.NET page named AccessingData.aspx. Next, drag a SqlDataSource control from the Toolbox onto the page. Each data source control is rendered in the Design view as a gray box with the data source control type followed by its ID value. As Figure 14.2 shows, after we add a SqlDataSource control to the page, the gray box reads SqlDataSource – SqlDataSource1. Here, SqlDataSource1 is the ID of the control.
In addition to this gray box, there’s also a smart tag. A smart tag is a list of common tasks that can be performed from the Web control. For the data source controls, the smart tag contains a single option, at first: Configure Data Source. Clicking this link starts the Configure Data Source Wizard, from which we’ll specify what data we want to retrieve from the database.
To be able to work with a database’s data, the SqlDataSource control needs to know two bits of information:
How to connect to the database
What query to issue to the database
The SqlDataSource control’s wizard prompts you to provide these two vital pieces of information and does so in a very intuitive and developer-friendly manner.
Let’s start examining the SqlDataSource control’s wizard. Go ahead and click the Configure Data Source link.
The first step of the Configure Data Source Wizard prompts you to select the database to work with. A drop-down list contains those databases listed in your Database Explorer and should include the MyFirstDatabase.mdf database we created in the preceding hour. Go ahead and select this database from the drop-down list (see Figure 14.3).

Beneath the drop-down list of available databases is a Connection string label with a plus next to it. If you click this plus, it displays the connection string used to access the database data. A connection string is low-level information required by ASP.NET that provides the specific details for connecting to the database.
By the Way
If you need to connect to a database that’s not located in the App_Data folder, click the New Connection button to bring up a dialog box that prompts you for the connection information.
If this is the first time you’ve used a data source control to connect to this database, you’ll be prompted to save the connection information in the web application’s configuration file (see Figure 14.4). If you choose to save the connection string information in the web application’s configuration file, which I heartily recommend, a new setting will automatically be inserted into the web.config file that associates the name provided in Figure 14.4 with the connection string.

The benefit of saving the connection string information in the web application’s configuration file is that it adds a level of indirection in your application, which makes responding to changes easier. For example, imagine that you are using the MyFirstDatabase.mdf file and have created a dozen ASP.NET pages that work with this database’s data. If you do not save the connection string in web.config, the database connection string will appear in each of these 12 ASP.NET pages. Now the gotcha: Imagine that your database’s connection string changes. Perhaps you’ve renamed the database file, or you have deployed your website to a web hosting company that has moved your database from the App_Data folder to their database server. With the connection string hard-coded into each of the dozen ASP.NET pages, you’ll have to go into each of those 12 pages and update the connection information. Had you stored the connection string information in web.config, however, you would have had to modify the connection string in only one place—the web.config file.
Because the data source control’s wizard will handle adding the connection string setting in web.config automatically, there’s no reason not to store the connection string there. Therefore, leave the check box in Figure 14.4 checked and click Next to proceed to the next step.
After choosing the database to use, the next step is to specify what data you want to retrieve from the database. With the SqlDataSource Wizard, you can select data in one of two ways:
By specifying a database table, along with the columns to return
By providing a SQL SELECT query
With the first option, you can pick the table and specify the columns to retrieve through the wizard. With the second option, you’ll need to spell out the precise SQL query to use. Regardless of what approach you use, the result is the same: The SqlDataSource control concocts some SQL statement that is sent to the database to retrieve the data. We’ll examine the basics of SQL later in this hour in the “A Look at SQL, the Language of Databases” section. For now, let’s practice with using the first option.
In the Configure the Select Statement step of the wizard, you choose whether to select a database table or specify your own SQL query by selecting the appropriate radio button at the top of the dialog box. To pick a table, select the Specify Columns from a Table or View radio button (see Figure 14.5).
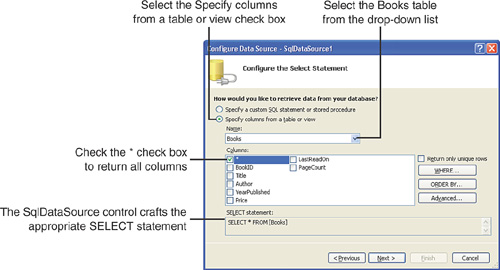
The tables in the database are listed in the drop-down list, with the selected table’s columns listed underneath. Because only one database table is in our database—Books—it’s the only option in the drop-down list. The area beneath lists the columns—BookID, Title, Author, YearPublished, Price, LastReadOn, and PageCount. There’s also a * option list. This represents all columns.
We need to check those columns that we want returned from the Books table. If you want to retrieve all column values, select the * option, or check each of the individual columns. For this example, return all columns by checking the * check box. After you check this, a SELECT statement appears at the bottom of this dialog box. Specifically, you’ll see the query syntax:
SELECT * FROM [Books]
SELECT queries are used to retrieve information from a database. There are many parts to the SELECT statement, some of which we’ll examine further in this hour. For now, don’t worry about the intricacies of the SQL syntax. Instead, focus on how the table data is selected through the SqlDataSource control’s wizard.
Now that we’ve specified the data to return from the Books table, click the Next button to proceed to the final wizard step.
The final step in the SqlDataSource control’s wizard is the Test Query screen. The Test Query screen allows you to run the query to see what data, exactly, is returned. As Figure 14.6 shows, the SELECT * FROM [Books] SQL query returns all records from the Books table, with each record containing all the table’s columns.

If you received the database results you expected, click the Finish button to complete the wizard. If something is awry, you can click the Previous button and adjust the query as needed.
By the Way
Notice that when you select a table to display, all records from the table are returned. Furthermore, the results of the Books table are ordered by the BookID values. The SQL SELECT statement makes it easy to limit the records returned—such as retrieving only those books with a price less than $20.00—and to order the results by some column. We’ll examine the SQL syntax for filtering and sorting results in the “A Look at SQL, the Language of Databases” section and see how to apply these settings through the SqlDataSource’s wizard later in this hour.
The SqlDataSource control’s Configure Data Source wizard simply sets a number of the control’s properties. Let’s take a moment to examine the markup generated in the Source view by the SqlDataSource control’s wizard. After clicking the Finish button in the wizard you should find a SqlDataSource control declaration in the Source view like so:
<asp:SqlDataSource ID="SqlDataSource1" runat="server"
   ConnectionString="<%$ ConnectionStrings:ConnectionString %>"
   SelectCommand="SELECT * FROM [Books]">
</asp:SqlDataSource>
As you can see, the SqlDataSource control has three property values at this point:
ID—. This property uniquely identifies the data source control from all other Web controls on the page. Feel free to rename this to something more descriptive, likeBooksDataSource, rather than the nondescriptSqlDataSource1.ConnectionString—. This property indicates the connection string used to connect to the database. If you opted to place the connection string information in the web application’s configuration file, the value will be the name of the connection string setting inweb.config. The syntax<%$connectionStringName%>tells the data source control to look in the application’s configuration to retrieve the appropriate information. If you decided against putting the connection string inweb.config, the full connection string will be here in place of<%$connectionStringName%>.SelectCommand—. This property specifies theSELECTquery issued to the database. Note that this property’s value is identical to theSELECTstatement displayed in the wizard.
At this point, the SqlDataSource’s declarative markup is pretty simple. As we get into more involved examples that include interactive user filtering and updating, inserting, and deleting database data, the declarative markup generated by the SqlDataSource will quickly balloon. The lesson to take away from this discussion is that the SqlDataSource control’s wizard is helpful in two ways: First, it helps us construct the appropriate SQL statements, rather than having to enter them ourselves by hand; and second, it saves a lot of tedious and cryptic typing of markup in the Source view.
For the SqlDataSource control to be able to retrieve database data, two pieces of information were required: the database’s connection string and the query to issue to the database. As we discussed in the preceding section, the query issued to the database must be in a dialect that the database understands. The common dialect among all modern database systems is SQL.
To retrieve data from a database, we use a SQL SELECT statement. The SELECT statement, in its simplest form, specifies what database table to retrieve data from, along with what columns of data to return. For example, to return the title of each book in the Books table, we use the following SQL statement:
SELECT Title
FROM Books
We examine the SQL SELECT clause in great detail in the next section.
Although SQL is used primarily for retrieving database data, it can also be used to insert new data and update or delete existing data. These data modification capabilities are expressed using INSERT, UPDATE, and DELETE statements. In this hour we focus strictly on using SQL to retrieve data. However, starting in Hour 16, “Deleting, Inserting, and Editing Data,” we examine how to delete and edit database data.
A SELECT statement must specify what database table and columns to return. It does so via the following syntax:
SELECT Column1, Column2, ..., ColumnN
FROM TableName
Column1 ... ColumnN are columns from the database table TableName. For example, to retrieve the values from the Title and Author columns of the Books table, use the following SQL statement:
SELECT Title, Author
FROM Books
Note that this SELECT statement contains two clauses: the SELECT clause and the FROM clause. Clauses are keywords in the SQL SELECT statement that precede the data they operate on. The SELECT clause specifies the columns whose values are to be returned, and the FROM clause specifies the database table to retrieve the data from.
By the Way
A SELECT statement may contain a number of optional clauses, many of which we examine in this section. For example, you can use the WHERE clause to return only those rows that meet certain criteria. The ORDER BY clause sorts the results by the values of a specified column.
Did you Know?
The SELECT clause is a comma-delimited list of the columns whose values you are interested in. If you want to retrieve the values of all columns for a specific table, you may use the asterisk (*) instead of entering each column name.
When you’re learning SQL, it helps to run queries against a database so that you can see the specific results returned by the SQL query. Fortunately, Visual Web Developer makes this task quite simple.
As we saw in the preceding hour, the Database Explorer window lists the databases used in the current ASP.NET website. Go to the Database Explorer, right-click the database name (MyFirstDatabase.mdf), and choose the New Query option from the context menu. This displays the query window, which first prompts you to select what tables to query. Because our database has only one table—Books—this is the only table listed (see Figure 14.7).

Select the Books table and click the Add button; this adds the table to the query window. After adding the table, click the Close button in the dialog box. At this point your screen should look similar to Figure 14.8.

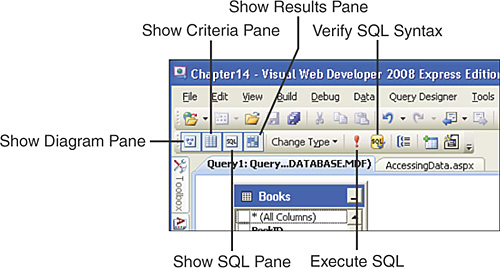
By default, the query window contains four regions:
Diagram Pane—. This pane lists the tables added, along with their columns at the top of the query window.
Criteria Pane—. This grid comes beneath the diagram pane and lists the columns that are returned by the query, along with any conditions (whether they’re sorted, whether a filter applies, and so on).
SQL Pane—. This pane is beneath the criteria pane and lists the SQL query that will be executed.
Results Pane—. This final, bottommost pane lists the results after the query has been executed.
The first three panes work together, in a sense. For example, if you check a subset of columns in the Books table representation in the diagram pane and then execute the query, the criteria pane and SQL pane will be updated accordingly. Likewise, if you write a SQL query by hand in the SQL pane and then execute the query, the diagram pane and criteria pane will be updated. In short, the diagram, criteria, and SQL panes provide alternative ways to specify a SQL query. The results pane shows the results of the executed query, regardless of what pane was used to express the query.
Along the top of the query window are a series of icons that are especially useful (see Figure 14.9). Starting from the left, the first four icons toggle what panes are displayed. You can show or hide the panes you don’t use. (Personally, I like to enter my SQL queries by hand, so I turn off the diagram and criteria panes.) Next is the Change Type icon, from where you can specify what type of SQL query you are interested in running (SELECT, INSERT, UPDATE, DELETE, and so forth). Next to that is the red exclamation point icon. This icon, when clicked, executes the query and displays the results in the results pane. The next icon, when clicked, validates the SQL query syntax, informing you of any syntax errors in your SQL query. The remaining icons are for functionality that’s beyond the scope of this book.
Let’s practice using the query window. Go ahead and type into the SQL pane the following query:
SELECT * FROM Books
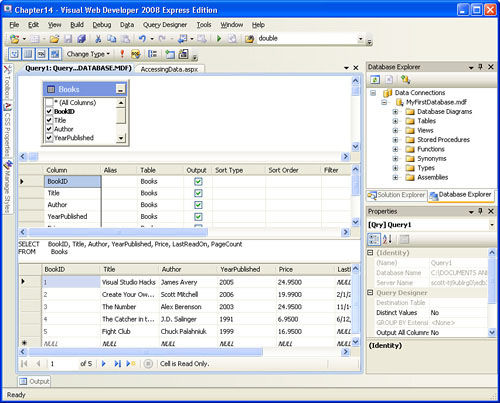
Next, click the red exclamation point icon in the Toolbar to execute the query. At this point the diagram and criteria panes should update to reflect the SQL query entered in the SQL pane, and the results should be shown in the results pane. Figure 14.10 shows the query window after this SELECT statement is executed.
Did you Know?
In addition to clicking the red exclamation point icon, you can also execute the query by going to the Query Designer menu and choosing the Execute SQL menu options. If you prefer executing the query using keyboard shortcuts, either Ctrl+R or Alt+X will work.
One thing to note is that at times the query engine will rewrite your SQL queries. I typed in SELECT * FROM Books as my query, but the query was rewritten to
SELECT     BookID, Title, Author, YearPublished, Price, LastReadOn, PageCount
FROM        Books
Of course, this query and my query are identical in their results. Also, note that the results in the results pane are identical to the results we saw in the Test Query step of the SqlDataSource control’s wizard in Figure 14.6.
Let’s try executing another SELECT statement. Change the SQL query in the SQL pane from SELECT * FROM Books to
SELECT Title, Author
FROM Books
This SQL query returns all of the rows from the Books table, displaying the values for just the Title and Author columns. After you have entered this query into the text box, execute the query; the results are shown in Figure 14.11. Notice how the diagram and criteria panes have been updated to reflect the new SQL query and how the results pane has only two columns returned instead of seven.
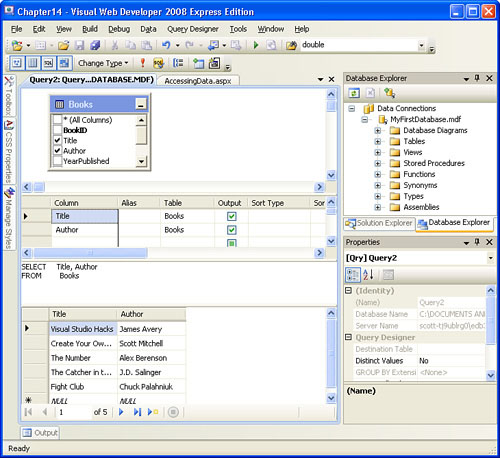
The SELECT statement, when composed of just the SELECT and FROM clauses, returns all rows of the specified database table. For example, the SQL query results shown in Figures 14.10 and 14.11 display all the rows in the Books table; the only difference between the two results is the columns whose values are returned.
Often, when querying database data, we are not interested in all the data in a table, but only a subset. For example, when you are searching Amazon.com for books on ASP.NET, the search results page lists only those books that match your search criteria rather than all the books in Amazon.com’s database.
To limit the rows returned by the SELECT statement, we use the WHERE clause. The WHERE clause specifies conditions that a row must match to be returned by the SELECT statement. For example, the following SQL SELECT statement returns only those rows in which the Title column’s value equals The Number:
SELECT *
FROM Books
WHERE Title = 'The Number'
Go ahead and enter this query into the SQL pane and click the Execute SQL Toolbar icon. The results should show all the columns of the Books table, but only one row—the book The Number.
Watch Out!
Note that there are apostrophes around the string The Number in the WHERE clause. If you accidentally enter quotation marks instead of apostrophes, you will get a SQL Execution Error with the following error message: Invalid column name 'The Number'.
As you can see, the WHERE clause has a Boolean condition preceding it: Title = 'The Number'. The = operator here is synonymous with the = operator in Visual Basic, which we examined in Hour 5, “Understanding Visual Basic’s Variables and Operators.” In addition to the = operator, other comparison operators, such as <, <=, >, >=, and <>, can be used as well. Table 14.1 summarizes these other comparison operators.
Table 14.1. Comparison Operators That Can Be Used in the WHERE Clause
Example | Description | |
|---|---|---|
|
| Compares two values, returning |
|
| Compares two values, returning |
|
| Compares two values, returning |
|
| Compares two values, returning |
|
| Compares two values, returning |
|
| Compares two values, returning |
In addition to the comparison operators, the logical operators AND and OR may be used to string together multiple Boolean expressions. The AND and OR keywords in a WHERE clause and are synonymous with the Visual Basic And and Or keywords. For example, the following SQL SELECT statement returns the Title, Author, and Price columns of books whose YearPublished equals 2006 or whose Price is less than or equal to 18.00:
SELECT Title, Author, Price
FROM Books
WHERE YearPublished = 2006 OR Price <= 18.00
This query returns the Title, Author, and Price columns for three books: Create Your Own Website, The Catcher in the Rye, and Fight Club.
Did you Know?
When comparing a column’s value to a string or date/time constant, such as WHERE Title = 'Fight Club' or WHERE LastReadOn < '2008-02-01', you must enclose the string or date/time constants (Fight Club and 2008-02-01, in this example) in apostrophes. If, however, you are comparing a numeric column to a numeric constant, the numeric constant does not need to be surrounded by single quotation marks.
Fortunately, we need to worry about this esoteric rule only when crafting SQL statements by hand in the query window. When we build SELECT statements through the SqlDataSource control’s wizard, this minutia is handled for us automatically by the data source control.
When a WHERE clause is used, the following sequence of steps happens behind the scenes. Each record in the queried table is enumerated. The condition in the WHERE clause is checked for each record. If the condition returns the value True, the record is included in the output; otherwise, it is discarded.
For example, consider the following query:
SELECT Title, Author
FROM Books
WHERE Title <> 'The Number' AND BookID <= 3
The WHERE clause condition is analyzed for each row in the Books table. Starting with the first book, Visual Studio Hacks, we see that this book’s title doesn’t equal The Number and its BookID is indeed less than or equal to 3; therefore, the book Visual Studio Hacks is returned by this SELECT statement. The next book is Create Your Own Website. Again, this book’s title does not equal The Number and its BookID is less than or equal to 3, so it’s returned in the results as well.
The third book, however, is The Number. This book isn’t returned because the Title <> 'The Number' condition returns False. The next book evaluated is The Catcher in the Rye; this book is also excluded from the resultset because its BookID is equal to 4, which is not less than or equal to 3. Similarly, Fight Club is omitted from the results because its BookID value is also greater than 3.
Therefore, the aforementioned SQL statement will return the values in the Title and Author columns for only two books: Visual Studio Hacks and Create Your Own Website.
You may have noticed that the results returned by the SQL queries we have examined so far have all been ordered by the BookID value. To see this point illustrated, refer to Figure 14.10, which shows the results of the query SELECT * FROM Books. What if we want the results ordered by some other column value, though?
The SELECT statement can include an optional ORDER BY clause, which specifies the column to sort the results by. For example, to retrieve books sorted alphabetically by title, use the following SELECT query:
SELECT *
FROM Books
ORDER BY Title
Figure 14.12 shows the query window when this SQL query is used. Note that the books are ordered by the values in the Title column, instead of by the values in the BookID column.

Did you Know?
If you want to construct a query that has both a WHERE clause and an ORDER BY clause, it is vital that the ORDER BY clause appear after the WHERE clause. The following is a legal SQL query:
SELECT *
FROM Books
WHERE Title <> 'Fight Club'
ORDER BY Author
The following is not:
SELECT *
FROM Books
ORDER BY Author
WHERE Name <> 'Fight Club'
By default, the ORDER BY clause sorts the results of a query by a specified column in ascending order. You can specify that the sort ordering should be in descending order by adding the DESC modifier in the following fashion:
ORDER BY ColumnName DESCAs illustrated in Figure 14.12, sorting the results by a column that contains alphabetic characters in ascending order sorts the results in alphabetical order. If you want to sort the results in reverse alphabetical order, use the DESC keyword.
In the “Working with the SqlDataSource Control” section, we looked at how to use the SqlDataSource control’s wizard to return all records from a specific table. However, we didn’t examine how to filter or sort the results. Now that we have a bit more experience with the SQL SELECT statement, let’s return to examining the SqlDataSource control’s wizard and see how to filter and sort the results.
Start by returning to the AccessingData.aspx page we created earlier in this hour. Add another SqlDataSource control to the page and then click the Configure Data Source link from its smart tag. Because we’ve already created and stored a connection string for the MyFirstDatabase.mdf database in our web application’s web.config file, the drop-down list in step 1 of the wizard lists this connection string name. Pick this connection string value and click the Next button.
From the Configure the Select Statement screen, choose the Books table from the drop-down list and click the * option to return all columns (refer to Figure 14.5). As we saw earlier in this hour, this issues a SELECT * FROM [Books] query to the database, which returns all records from the Books table ordered by the BookID values.
At this point we are ready to filter and sort the data as needed. Note the WHERE and ORDER BY buttons on the right of the Configure the Select Statement screen. These buttons bring up dialog boxes that we’ll use to configure the WHERE and ORDER BY clauses of our SELECT statement.
As things stand now, all records from the Books table will be returned. Imagine, however, that we want to return only those records that have a BookID value of 3 or less and cost more than $20.00. We can add these WHERE clause filters via the SqlDataSource’s wizard by clicking the WHERE button. This will display the Add WHERE Clause dialog box, shown in Figure 14.13.
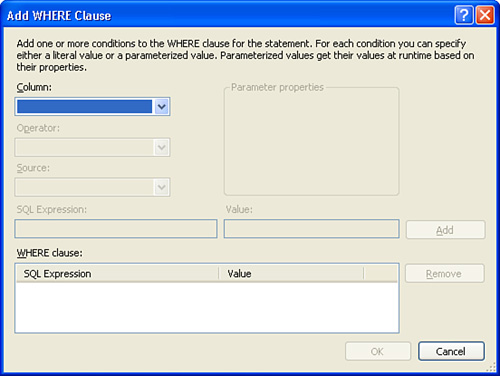
Adding a filter through the Add WHERE Clause dialog box involves a number of steps, such as choosing what column to filter on, the operator to filter with, and what value to use in filtering. To add the filter expression on the BookID column, perform the following steps:
Choose a column to filter. Because we want to filter on
BookID, select theBookIDvalue from the Column drop-down list.Select the filtering operator from the Operator drop-down list. Because we want books with a
BookIDvalue less than or equal to 3, choose the<=operator from the list.Specify the source of the filter value. The Source drop-down list contains the potential places where the filter value can be read from. For example, you might present a TextBox control to the user visiting the web page through which he could specify the
BookIDvalue to filter on. In that case you’d set the Source to the Control option. However, we want to enter a hard-coded value as our filter value (3, for this example). Therefore, choose None for the Source.After you choose None, the Parameter Properties section displays a Value text box. Here, you can enter the hard-coded filter value. Enter
3. (Figure 14.14 shows the Add WHERE Clause dialog box at the end of this step.)Click the Add button to include the filter expression in the
WHEREclause.

Congratulations, you have added your first WHERE clause expression using the SqlDataSource wizard!
Because we want our query to have two WHERE clause expressions, our work is only halfway done. Repeat the preceding steps, this time adding an expression that filters on the Price column for results with values strictly greater than $20.00. After adding both filter expressions, click the OK button to return to the Configure the Select Statement screen. At the bottom of this screen, you see the SQL query the wizard has constructed thus far:
SELECT * FROM [Books] WHERE (([BookID] <= @BookID) AND ([Price] > @Price))
Watch Out!
The Add WHERE Clause dialog box works great if you want to add only one filter expression or if all the filter expressions are joined by AND logical operators. However, if you want to have multiple filter expressions joined by OR operators, such as filtering on books with a BookID less than or equal to 3 or Price greater than $20.00, you’ll need to craft the SQL statement yourself. From the Configure Select Statement screen, you’ll need to select the Specify a Custom SQL Statement or Stored Procedure radio button and then provide the precise SQL query.
At this point we have added two filter expressions to the WHERE clause. However, the results returned will still be ordered by BookID. Let’s instead have the books ordered by Price in descending order (from most expensive to least). If any ties occur in Price, let’s break them by alphabetically sorting on the Title.
To accomplish this, click the ORDER BY button, which is beneath the WHERE button in the Configure Select Statement screen. This brings up the Add ORDER BY Clause dialog box, from which you can specify up to three columns to order the results.
The results are sorted by the column specified in the first drop-down list. If any ties occur in the results, the second column is consulted; finally, if any ties occur there, the third column specified is used to break those ties.
Figure 14.15 shows the Add ORDER BY Clause dialog box after it has been configured to sort first by Price in descending order, with ties being broken based on the alphabetical ordering of the Title column.
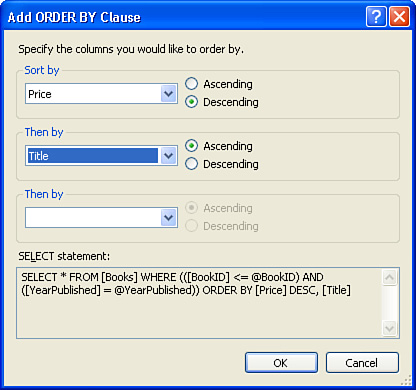
As Figure 14.15 shows, after we add the ORDER BY clause, the final SQL statement for our SqlDataSource control is
SELECT * FROM [Books] WHERE (([BookID] <= @BookID) AND ([Price] > @Price)) ORDER BY [Price] DESC, [Title]
After you’ve entered the ORDER BY clause, click the OK button to return to the Configure Select Statement screen. At this point, our SQL query is complete; it returns all columns of the Books table records that have a BookID less than or equal to 3 and a price exceeding $20.00. These results are sorted by Price in descending order, breaking ties by sorting on Title alphabetically. Click the Next button to advance to the Test Query screen.
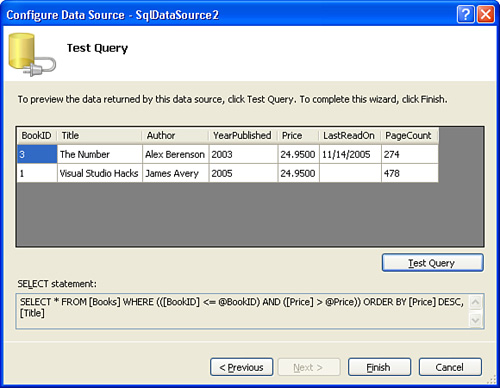
When you have a query that involves a WHERE clause, clicking the Test Query button prompts you to supply values for the WHERE clause filter expressions. For this example, we are prompted to enter values for BookID and Price (see Figure 14.16). You can either leave in the default values—3 and 20.00, respectively—or enter different numbers.

If you leave in the values of 3 and 20.00 for the BookID and Price filter expressions, you should see two books in the results—The Number and Visual Studio Hacks (see Figure 14.17). These are the only books that have BookID values less than or equal to 3 and prices greater than $20.00. The Number and Visual Studio Hacks have the same price—$24.95. The Number is listed first because its title comes before Visual Studio Hacks when sorted alphabetically.
To complete the SqlDataSource control’s wizard, click the Finish button. For more practice with the Add WHERE Clause and Add ORDER BY Clause dialog boxes, click the Previous button to return to the Configure Select Statement screen.
After you have configured the SqlDataSource control to include both WHERE and ORDER BY clauses, take a moment to inspect the control’s declarative markup in the Source view:
<asp:SqlDataSource ID="SqlDataSource2" runat="server"
ConnectionString="<%$ ConnectionStrings:ConnectionString %>"
SelectCommand="SELECT * FROM [Books] WHERE (([BookID] <= @BookID) AND ([Price] > @Price)) ORDER BY [Price] DESC, [Title]">
<SelectParameters>
<asp:Parameter DefaultValue="3" Name="BookID" Type="Int32" />
<asp:Parameter DefaultValue="20.00" Name="Price" Type="Decimal" />
</SelectParameters>
</asp:SqlDataSource>The ID and ConnectionString properties are nothing new; we examined them back in the “Examining the Data Source Controls” section at the start of this hour. The SelectCommand is more intricate, though, now including both a WHERE clause and an ORDER BY clause. Notice that no values are supplied for the filter expression values, even though we provided hard-coded values in the Add WHERE Clause dialog box. Instead, a parameterized query is used.
A parameter is a placeholder in a SQL statement that has the form @ParameterName. It serves as a location where a value will be inserted right before the actual SQL statement is sent off to the database. The SqlDataSource control lists the parameters for the SelectCommand in the <SelectParameters> element. There are two <asp:Parameter> elements within <SelectParameters>: one for the @BookID parameter and one for the @Price parameter. Here, their hard-coded values are specified in the DefaultValue properties.
When a user visits the ASP.NET page, the SqlDataSource control takes those parameter values and injects them into the appropriate places within the SELECT query before sending the query to the database. Although parameterized queries seem like overkill when filtering on hard-coded values, their utility will become more apparent when we start filtering based on values specified by the user visiting the page or from other external sources. We’ll see how to base parameter values on user input in Hour 17, “Working with Data-Bound DropDownLists, RadioButtons, and CheckBoxes.”
In this hour we discussed the ASP.NET data source controls, focusing specifically on the SqlDataSource control, which is designed to retrieve data from a database. The SqlDataSource control needs two bits of information to be able to grab data from a database: information on how to connect to the database and the SQL query to execute. As we saw in the “Working with the SqlDataSource Control” section, the SqlDataSource control contains a wizard that makes specifying this information a breeze.
The SqlDataSource control’s wizard generates a SQL SELECT statement that specifies the data to retrieve from the underlying database. This query is written using the Structured Query Language, or SQL, which is the language used by all modern databases for retrieving, inserting, updating, and deleting data.
To retrieve rows from a database table, a SELECT statement is used, which has the syntax
SELECT Column1, Column2, ..., ColumnN
FROM TableName
WHERE whereConditions
ORDER BY ColumnName
The SELECT and FROM clauses are mandatory; WHERE and ORDER BY are optional.
Fortunately, we do not have to be SQL aficionados to retrieve database data from an ASP.NET web page. The SqlDataSource control’s wizard allows us to construct our queries through an easy-to-use graphical interface.
Now that we have examined how to retrieve data from a database using the SqlDataSource control, the next step is to display that data in an ASP.NET page. This is accomplished through the use of data Web controls, which are examined in depth in the next hour.