
Creating a master page
Defining editable regions within a master page
Associating a newly created page with an existing master page
Making an existing page use a master page
Adding source code to a master page
Virtually all professionally done websites have a very consistent look and feel across their pages. The common look and feel usually includes both the layout of the page—where various user interface elements appear and how they are oriented with respect to one another—and the fonts, colors, and graphics used within the page. For example, if you visit sports channel ESPN’s website at ESPN.com, you’ll find that regardless of where you go on the site, the top of the page includes the ESPN logo, a search box, and a menu listing the sports covered by ESPN. At the bottom of each page is another search box, along with the links to the most recently published stories.
When you create the web pages for a website, you do not want to manually add the common sitewide features to each and every page. The web designers at ESPN.com would be remiss to repetitively add the search box, logo, and common links to each and every page. Not only would this add significantly to the time required to build each page, but it would make updating the website’s layout a nightmare. If the designers at ESPN.com wanted to remove the search box from the top or add to their menu of sports covered, they would have to visit and update each and every page in the site.
The approach used by professional web developers is to design a single site template that contains the HTML content that should be present on each and every page. This is accomplished in ASP.NET through the use of a master page. A master page is like a regular ASP.NET page in that it contains both a code portion and an HTML portion, but rather than defining the HTML for a specific page the master page contains the website’s common layout content. New ASP.NET pages can optionally inherit the master page’s look and feel. With the master page model, updating the master page automatically updates the common content in all the ASP.NET pages that are associated with the master page.
With master pages, creating a unified site layout that can be easily updated is a snap!
Programs for designing websites and creating web pages, like Microsoft FrontPage and Adobe Dreamweaver, have long offered template features. With these tools, a designer can create a single template page that contains both common, sitewide content as well as regions that can be customized by each page that uses the template.
With ASP.NET and Visual Web Developer, a page developer provides a sitewide template by creating a master page. Just like the template files in FrontPage and Dreamweaver, a master page consists of two pieces: content that appears on each and every page that inherits the master page and regions that can be customized by the content page. A content page is the ASP.NET page that is bound to the master page. The master page model in ASP.NET outshines simple HTML-based templates because master pages, like any ASP.NET page, can contain not only HTML, but Web controls and server-side source code as well.
Before we jump into creating our own master pages, let’s first look at how the entire master page model works. Imagine that we wanted a website where each page on the site had the following four common user interface elements:
The website’s name on the top of the page
A navigation breadcrumb at the top of the page
A navigation treeview on the left of the page, showing the site’s structure
A copyright statement and a series of links—Legal, Privacy Policy, About Us, and so on—at the bottom of the page
By the Way
The navigation treeview and breadcrumb on the pages in our site would ideally be implemented using the site navigation features and the SiteMapPath and TreeView Web controls examined in Hour 20, “Defining a Site Map and Providing Site Navigation.”
Figure 22.1 shows the About page on this site.
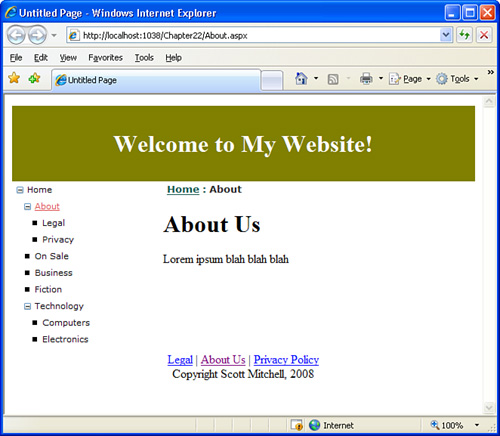
The title at the top of the page (Welcome to My Website!), the treeview on the left, the breadcrumb, and the list of links at the bottom will exist on each page in our site precisely as they appear in the About page in Figure 22.1. The remaining portion of the page, the part that says About Us and Lorem ipsum blah blah blah, can be unique to each of the web pages on the site.
To accomplish this in an ASP.NET website, we first create a master page. A master page needs to specify both the regions of the page that are common to all content pages as well as the regions that are customizable on a page-by-page basis. The content that is common to all content pages can be added to the master page the same as you add content to a regular ASP.NET page. You can enter the HTML and Web controls by hand, in the Source view, or by using the WYSIWYG designer.
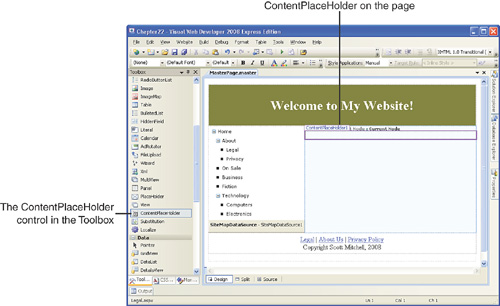
To indicate a region in the master page that is customizable on a page-by-page basis, use the ContentPlaceHolder Web control. As Figure 22.2 shows, this Web control renders as a box in the Design view of the master page. Later, when creating an ASP.NET page that inherits from this master page, we will be able to add content only inside this box.
Did you Know?
A master page may have multiple ContentPlaceHolder Web controls. Each ContentPlaceHolder control represents a location on the master page that can be customized by its content pages.
Figure 22.2 shows the master page used to create the common user interface shown in Figure 22.1. Note that the master page contains the common user interface elements—the title at the top of the page, the TreeView control (and SiteMapDataSource control), the SiteMapPath control, and the links at the bottom of the page—along with a ContentPlaceHolder control. (We’ll look at the steps in creating a master page in greater detail later in this hour.)
With this master page created, the next step is to create an ASP.NET page that inherits from the master page, a topic that we’ll delve into later this hour. After such a page has been created, the Design view for the ASP.NET page shows both the noneditable master page content as well as the editable content regions. Figure 22.3 shows the Design view of the About page.
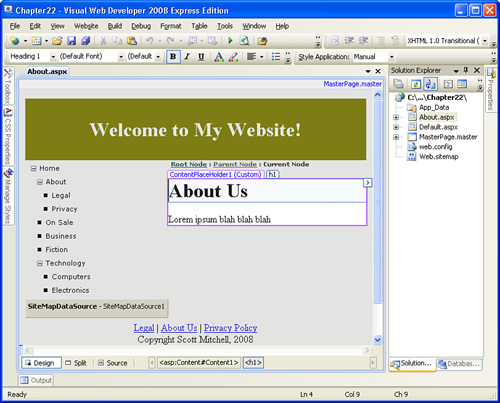
We don’t need to re-create the common page elements—the title, TreeView control, and so on. They are automatically shown in the page’s Design view, inherited from the master page. Although it may not be particularly clear from the figures in this book, these common master page elements are grayed out and cannot be modified by the ASP.NET page. Rather, the only modifiable region on the page is the Content region, which shows up precisely where the ContentPlaceHolder control was added to the master page.
With this master page setup, we can easily adjust the overall look and feel of the site by updating the master page. For example, if we wanted to change the text displayed at the top of the page or wanted to add new links to the bottom of this page, we could edit the master page. After the master page was modified and saved, those content pages that inherited from this master page would immediately show the updated look and feel.
To summarize, defining a sitewide template with master pages involves two steps, which should be done in the following order:
The remainder of this hour examines these two steps in greater detail.
A master page is similar to the ASP.NET pages we’ve been creating throughout this book. Like ASP.NET pages, master pages consist of Web controls, static HTML, and server-side code. The main difference between a master page and an ASP.NET page is that a master page’s purpose is to define a template for the website. As we discussed earlier in this hour, the master page defines both the user interface elements common to all pages that inherit the master page, as well as the regions that are editable on a page-by-page basis.
To get started defining a sitewide template, add a master page to your project using the following steps:
Right-click the project name in the Solution Explorer.
Choose the Add New Item menu option, displaying the Add New Item dialog box.
From this dialog box, choose the Master Page item type.
Choose a name for the master page. By default, the name is
MasterPage.master. Feel free to leave it as this or change it to something else. Just be sure to keep the file extension as.master.Check the Place Code in Separate File check box, if it’s not already checked. As we discussed in previous hours, checking this check box places the master page’s source code portion in a separate file.
Click the Add button to add the master page to your project.
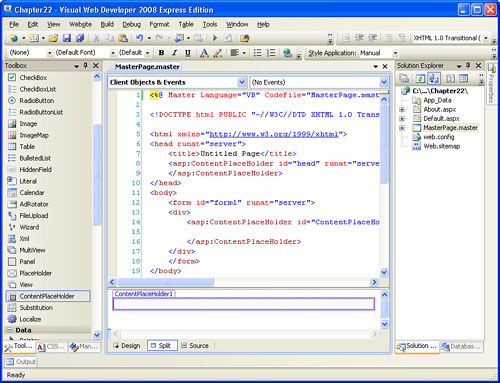
After you add the new master page, the Design view shows a page with a single ContentPlaceHolder Web control (see Figure 22.4). This ContentPlaceHolder indicates the region that can be edited by the ASP.NET pages that inherit this master page. You can have multiple ContentPlaceHolders in your master page. In fact, the page already contains two ContentPlaceHolders: one within the <head> HTML element and one within the Web Form. (The one you see in the Design view in Figure 22.4 is the ContentPlaceHolder in the Web Form; the one in the <head> is not displayed.)
To add a new ContentPlaceHolder, drag the ContentPlaceHolder control from the Toolbox onto the master page.
By the Way
The ContentPlaceHolder Web control can be added only to master pages, not to ASP.NET pages. Therefore, when viewing a master page in Visual Web Developer, you will find the ContentPlaceHolder control in the Toolbox; however, it is not displayed in the Toolbox when working with an ASP.NET page.
Take a moment to view the declarative markup of the master page (see Listing 22.1). If you compare the default declarative markup for a master page to that of a regular ASP.NET page, you’ll see two differences. The first is that the master page starts with a <%@ Master %> directive (line 1), whereas ASP.NET pages start with the <%@ Page %> directive. Furthermore, the master page contains, by default, two ContentPlaceHolder controls: one on lines 8 and 9 and the other spanning lines 14 to 16.
Example 22.1. The Default Declarative Markup for a Master Page
 1: <%@ Master Language="VB" CodeFile="MasterPage2.master.vb" Inherits="MasterPage2" %>
 2:
 3: <!DOCTYPE html PUBLIC "-//W3C//DTD XHTML 1.0 Transitional//EN" "http://www.w3.org/TR/xhtml1/DTD/xhtml1-transitional.dtd">
 4:
 5: <html xmlns="http://www.w3.org/1999/xhtml">
 6: <head runat="server">
 7:     <title>Untitled Page</title>
 8:     <asp:ContentPlaceHolder id="head" runat="server">
 9:     </asp:ContentPlaceHolder>
10: </head>
11: <body>
12:     <form id="form1" runat="server">
13:     <div>
14:         <asp:ContentPlaceHolder id="ContentPlaceHolder1" runat="server">
15:
16:         </asp:ContentPlaceHolder>
17:     </div>
18:     </form>
19: </html>
To create the sitewide look and feel, add the appropriate HTML and Web controls to the master page. Again, you can do this by manually entering the HTML and control syntax through the Source view, or in a more graphical way through the Design view.
Did you Know?
A website project can have multiple master page files, each one defining a different template. For example, a website may be broken into three sections, with each section having its own unique look and feel. In this case we would create three master pages for the site. When creating a new ASP.NET page, we would associate it with the appropriate master page.
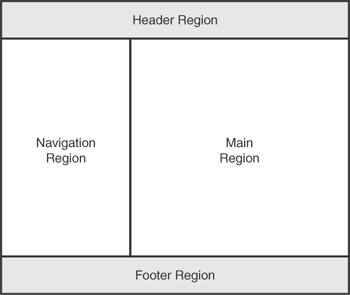
Let’s create a master page that has the look and feel first shown in Figure 22.1—a title at the top, a TreeView control along the left, and so on. This design has each page laid out into four regions:
The header region, which displays the title of the website.
The navigation region, which contains the TreeView control and appears on the left of the page beneath the header region.
The main region, which contains the SiteMapPath control and the ContentPlaceHolder control. This region is located beneath the header region and to the right of the navigation region.
The footer region, which contains the common links—Legal, About Us, and so on—along with the copyright statement.
To provide this page layout, let’s use tables. A table is an HTML element that can be used to arrange a page into various columns and rows. For this site design, we want a table that takes up the entire page with two columns and three rows, with the top and bottom rows spanning two columns. Figure 22.5 illustrates this design concept graphically.
To create such a layout in HTML, you can manually enter the appropriate HTML table markup, or you can use Visual Web Developer. If you prefer entering the HTML by hand, feel free to do so.
If you are not an HTML aficionado and would rather have Visual Web Developer assist with creating the page’s layout, follow these steps. First, go to the master page’s Design view and make sure that the focus is on the <div> element in the Web Form and not on the ContentPlaceHolder control.
Next, go to the Table menu and choose Insert Table. This displays the Insert Table dialog box, from which you can specify the precise table settings, indicating the number of rows and columns, the alignment, the width and height, and so on (see Figure 22.6). Create a table with two columns and three rows. We want the table to fill the width of the page, so check the Specify Width check box, enter 100 into the text box, and select the In Percent option button. Finally, set the Cell spacing to 0 and the Cell padding to 5.

The Insert Table dialog box adds the new table to the page before the ContentPlaceHolder Web control. Because we want the ContentPlaceHolder control in the main region, take a moment to drag the ContentPlaceHolder from beneath the table into the second column in the second row of the table.
The header region is currently divided into two cells. We want to merge these two cells into one so that we can enter the website title here. To accomplish this, select both cells from the Design view. Then right-click the cells and, from the Modify menu option, choose to Merge the cells.
Now enter the site’s title here, such as Welcome to My Website!. I’ve opted to have this title centered, bolded, and displayed using the X-Large font size. These settings can be specified when typing in the website name, through the myriad of formatting options along the toolbar or through the Format menu. Alternatively, you can add a Label Web control for the title and configure its formatting properties to achieve the desired effect.
These settings can also be made to apply to the entire table cell, rather than just the particular piece of text being entered. To tailor the entire header region, perform the following steps:
Click inside the table cell and then go to the Properties window.
Click the
Styleproperty, which displays a set of ellipses.Click these ellipses. This displays the Modify Style dialog box where you can set the font, background, layout, and other options that apply to the entire table row (see Figure 22.7).

For example, to have the header region display white text on an olive background, from the Font tab, select the white color from the color drop-down list, and from the Background tab, choose olive from the background-color drop-down list. To specify the height of the header region, use the height drop-down list in the Position tab. You can also specify font sizes, alignment, and a host of other settings through the Style Builder dialog box.
The purpose of the navigation region is to provide the visitor with a complete listing of the site’s structure, making it easy to quickly move to another page on the site. As we discussed in Hour 20, “Defining a Site Map and Providing Site Navigation,” the ASP.NET TreeView Web control can be used in tandem with a SiteMapDataSource control to display the site’s structure, assuming that there is a properly defined site map. For this hour, I am using the same site map used in Hour 20.
After you have created your site map, add the SiteMapDataSource and TreeView controls to the first column in the second row of the table, configuring the TreeView control to use the SiteMapDataSource.
By default, the content in a table cell is vertically placed in the middle of the cell. If the navigation region’s row is particularly tall, which can happen in pages that include lengthy content in the main region, whitespace will appear between the header region and the TreeView control. In fact, if the main region holds several pages’ worth of content, the visitor may have to scroll down to see the TreeView.
Often the common sitewide elements are formatted so that their position is not affected by the page-specific content. To accomplish this, we need to have the navigation region’s content appear at the top of the cell, rather than in the middle. This is configurable through the table cell’s valign property. To set this property, click inside the cell that makes up the navigation region, go to the Properties window, and set the valign property to top. This causes the navigation region’s content to be vertically aligned with the top of the table cell, regardless of how much or how little content is in the main region.
In addition to the vertical alignment, we should fix the navigation region’s width. If we don’t specify a fixed width, the navigation region’s width will depend on the width of the page-specific content in the main region. To set the width, load the navigation region cell’s properties in the Properties window and set the Width property to 200px.
At this point the only two regions remaining are the main and footer regions. The main region already has the ContentPlaceHolder control (dragged into it after adding the table) but still needs the SiteMapPath control, which shows a breadcrumb. Drag this control from the Toolbox into the main region, placing it above the ContentPlaceHolder control. Finally, set the main region’s table cell’s valign property to top, just as we did with the navigation region. This ensures that regardless of how little content is in the main region, it will appear at the top of the cell.
Finally, add the content for the footer region in the bottommost row. But first merge the bottom row’s two cells, just like we did with the header region. My footer region contains three links: Legal, About Us, and Privacy Policy. I manually typed in these links, although you could opt to use three HyperLink Web controls, if you prefer.
Refer to Figure 22.2 to see the completed master page when viewed through the Visual Web Developer’s Design view.
Did you Know?
Creating an aesthetically pleasing sitewide design can be difficult if you are new to HTML or if you are not artistically inclined. Fortunately, there are many websites that offer pre-designed sitewide templates. One such site is www.OpenDesigns.org, which includes hundreds of free website designs that you can use in personal and commercial web applications.
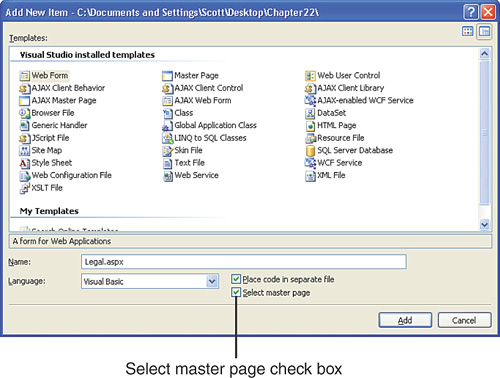
With our master page created, the next step is to create a content page. A content page is an ASP.NET page that inherits from a master page. When creating a content page, we must define the content that belongs in the master page’s ContentPlaceHolder controls. We cannot add any additional content outside these regions. To create a content page, when adding a new ASP.NET page to the project, check the Select Master Page check box (see Figure 22.8).
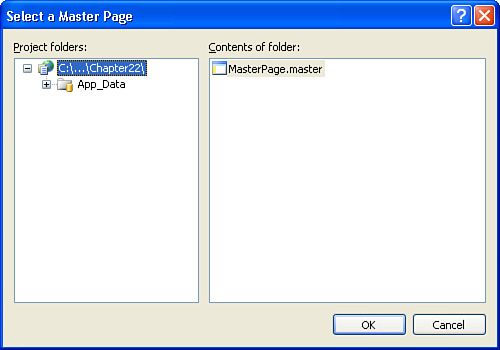
After you check Select Master Page and click the Add button, the Select a Master Page dialog box appears, as shown in Figure 22.9. This dialog box lists the master pages in the website project.
After you choose a master page, the new ASP.NET page’s Design view shows the master page’s sitewide markup as grayed-out, uneditable content (refer to Figure 22.3). The master page’s ContentPlaceHolder controls are replaced with Content controls, which are editable regions whose content is unique to the particular ASP.NET page. You can type directly into the Content region or drag controls from the Toolbox.
If you create the content page before saving the master page, the content page’s Design view displays an error message explaining that the content page has one or more Content controls that do not correspond with ContentPlaceHolders. To remedy this, save the master page file; the content page’s Design view will then refresh and the error message will go away.
Listing 22.2 shows the declarative markup of the new content page. As you can see, the declarative markup for a content page differs substantially from the default markup for a regular ASP.NET page. The <%@ Page %> directive on line 1 includes a MasterPageFile attribute that indicates the path to the master page. And rather than having the typical markup, a content page has, in its place, a Content control for each ContentPlaceHolder control in the associated master page. The Content control’s ContentPlaceHolderID property associates the Content control with a particular ContentPlaceHolder control in the master page.
Example 22.2. The Markup of a Content Page
1: <%@ Page Language="VB" MasterPageFile="~/MasterPage.master" AutoEventWireup="false" CodeFile="Legal.aspx.vb" Inherits="Legal" title="Untitled Page" %>
2:
3: <asp:Content ID="Content1" ContentPlaceHolderID="head" Runat="Server">
4: </asp:Content>
5: <asp:Content ID="Content2" ContentPlaceHolderID="ContentPlaceHolder1" Runat="Server">
6: </asp:Content>
Because our master page has two ContentPlaceHolder controls (head and ContentPlaceHolder1), the corresponding content page’s markup contains two Content controls: Content1, on lines 3 and 4, which is mapped to the head ContentPlaceHolder; and Content2, on lines 5 and 6, which is mapped to the ContentPlaceHolder1 ContentPlaceHolder.
When you visit a content page through a browser, the ASP.NET engine grabs the associated master page’s content. It then fuses in the markup and Web controls specified in the content page’s Content controls into the master page’s corresponding ContentPlaceHolder controls. Because this infusion of master page and ASP.NET page occurs when the page is visited through a browser, any changes to the underlying master page are immediately reflected in its content pages.
By the Way
An ASP.NET page does not lose any functionality when it inherits from a master page. All the examples we have examined throughout this book would have worked the same had we associated a master page with the ASP.NET page.
Creating a new ASP.NET page that inherits from a master page is easy enough: Just check a check box and choose the master page. However, taking an existing, master page-less ASP.NET page and having it inherit from a master page is, unfortunately, not as simple. To take an existing page and have it inherit an existing master page, we must do two things:
Add a
MasterPageFileattribute to the page’s<%@ Page %>directive.Create a Content control for each ContentPlaceHolder control in the master page, with the page’s existing HTML and Web control markup moved into the appropriate Content controls.
The first step is simple enough to accomplish. Start by opening the ASP.NET page that you want to have inherit a master page and go to the Source view. Next, place your cursor in the <%@ Page %> directive and type in MasterPageFile=. At this point, a drop-down list should appear containing the various master pages in your project. Choose which master page file you want to use and press the Tab key. In the end, the <%@ Page %> directive should include an attribute that looks like MasterPageFile="~/masterPageFileName".
With the MasterPageFile attribute specified, the final step is creating a Content control for each of the master page’s ContentPlaceHolders and moving over the appropriate markup. Assuming the existing page already has content, what I do is typically cut all the content inside the Web Form and paste it into Notepad. After I have removed the content from inside the Web Form, I delete all the content in the web page except for the <%@ Page %> directive. (Recall that the Web Form is denoted by <form runat="server">.)
Finally, I go to the Design view of the ASP.NET page. Because the ASP.NET page now inherits the master page, it shows the master page’s sitewide content as noneditable along with the content regions. To create the Content controls, right-click the content regions in the Design view and choose the Create Custom Content menu option. After you have created the Content control for each of the ContentPlaceHolder controls in the master page, go back to the Source view and paste the code saved in Notepad back into the appropriate content regions.
Did you Know?
Because having a new ASP.NET web page inherit a master page is much easier than having an existing page inherit a master page, I recommend that you create a master page when starting on a new site. Keep the master page simple; I usually just have it contain the default ContentPlaceHolder controls.
When creating new web pages for the site, have them all inherit from the master page. At some later point, you can go back to the master page and actually implement the sitewide design. Because all pages inherit the master page, they’ll all immediately reflect the update to the master page.
The ContentPlaceHolder controls in a master page represent the portions of the template that are editable on a page-by-page basis. Typically, these regions are customized in the content page. However, in some circumstances a content page may not want to customize a particular ContentPlaceHolder region, instead falling back on some default value specified by the master page.
For example, imagine that instead of having the title Welcome to My Website! displayed on each page in the header region, you wanted to allow each page to customize this title. However, you suspect that the majority of the pages will probably use the value Welcome to My Website! To accomplish this, you could add a ContentPlaceHolder control in the master page’s header region and specify the default value of the ContentPlaceHolder as the title Welcome to My Website! Then, in the content pages, you could indicate whether the page should use the master page’s default content or specify its own customized content.
To illustrate creating a default value in a master page’s ContentPlaceHolder control, let’s create a new master page called DefaultExample.master that has the same layout as the MasterPage.master master page we created earlier.
By the Way
When adding a master page, make sure that the Select Master Page check box is unchecked; otherwise, you will be creating a master page that is configured to inherit from another master page. Although it is possible to have master pages that inherit from other master pages, this is an advanced topic that we won’t be covering in this book.
Did you Know?
To quickly copy the layout from MasterPage.master to DefaultExample.master, go to the Design view of MasterPage.master. Select all content by going to the Edit menu and choosing Select All. Next, go to the Edit menu and choose Copy. Return to DefaultExample.master’s Design view and select all content in this page and then go to the Edit menu and choose Paste.
Voila! You’ve just copied the content from one master page to another.
In the DefaultExample.master page, replace the text Welcome to My Website! with a second ContentPlaceHolder control. Set this ContentPlaceHolder control’s ID property to HeaderRegion. To specify a default value for the HeaderRegion ContentPlaceHolder, add the default content to the ContentPlaceHolder, much like you would on an ASP.NET page to customize a particular content region. Because we want the default title to still be Welcome to My Website!, type this text into the ContentPlaceHolder in the header region. That’s all there is to it!
A content page can opt to provide custom content for a master page region or, instead, rely on the master page’s default content for that region. To illustrate this, take a moment to add a new content page that inherits from the DefaultExample.master page we just created.
The DefaultExample.master master page has three ContentPlaceHolder controls:
head—. The ContentPlaceHolder in the<head>elementHeaderRegion—. The ContentPlaceHolder we just added in the header region.ContentPlaceHolder1—. The ContentPlaceHolder in the main region.
Because only two of these ContentPlaceHolder controls are in Web Form, you’ll see only two Content controls in the content page’s Design view. The content page’s declarative syntax, however, has Content controls for all three ContentPlaceHolders:
<%@ Page Language="VB" MasterPageFile="~/DefaultExample.master" AutoEventWireup="false" CodeFile="DefaultExample.aspx.vb" Inherits="DefaultExample" title="Untitled Page" %>

<asp:Content ID="Content1" ContentPlaceHolderID="head" Runat="Server">
</asp:Content>
<asp:Content ID="Content2" ContentPlaceHolderID="HeaderRegion" Runat="Server">
</asp:Content>
<asp:Content ID="Content3" ContentPlaceHolderID="ContentPlaceHolder1" Runat="Server">
</asp:Content>
To use the master page’s default content for a region, rather than custom content, you need to remove the associated Content Web control from the ASP.NET page. To use the default content for the header region, delete the Content control whose ContentPlaceHolderID equals HeaderRegion. You can accomplish this by manually removing the Content control syntax from the Source view or by going to the Design view, right-clicking the editable region, and choosing the Default to Master’s Content option. After this Content Web control has been removed from the ASP.NET page, the page will use the default content from the master page (Welcome to My Website!).
By the Way
To stop using the master page’s default content and to create custom content for the page, you need to add back the Content Web control. You can do this manually, through the Source view, or by going to the Design view, right-clicking the content region, and selecting Create Custom Content.
A master page has all the functionality found in an ASP.NET page. That means that it can have Web controls in addition to static HTML. The Web controls in the master page can collect user input or retrieve data from a data source. For instance, the master page created in the “Creating a Master Page” section had SiteMapDataSource and TreeView controls, which queried and displayed the site’s structure based on the site map. Websites that support user accounts often allow visitors to log in from any page on the site. We could accomplish this by adding a Login control to the master page.
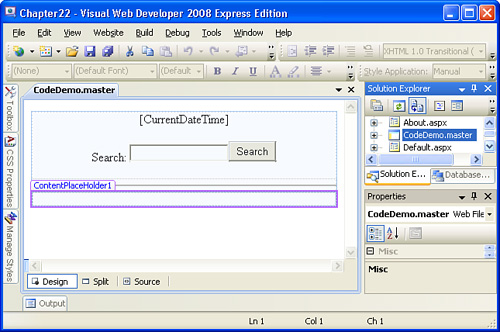
In addition to Web controls and static HTML, a master page can also have a server-side source code portion. This source code portion can contain event handlers for the Web controls added to a master page or code that is to run each time a content page is visited. To illustrate the server-side source code portion capabilities of master pages, create a new master page named CodeDemo.master.
Let’s add a Label Web control that displays the current date and time along with a mechanism to search the Internet from our site. Start by adding the Label Web control above the ContentPlaceHolder. Clear out its Text property and set its ID to CurrentDateTime. Next, type in the word Search and, after that, add a TextBox Web control, setting its ID to SearchTerm. Finally, add a Button Web control after the TextBox, setting its ID and Text properties to SearchButton and “Search,” respectively. After you have completed these steps, your screen should look similar to Figure 22.10.
With these Web controls in place, we’re ready to add the server-side source code for the master page. Start by creating the Page_Load event handler. This event fires each time an associated content page is visited. Add the following code to the Page_Load event handler:
CurrentDateTime.Text = "It is now " & DateTime.Now
For the search interface, when the user enters a search term and clicks the Search button, a postback will ensue, and the Button Web control’s Click event will fire. For this example, let’s have the user search the Internet using Google. This can be accomplished by sending the user to http://www.google.com/search?q=searchTerm. To accomplish this, create an event handler for the Button’s Click event and then use Response.Redirect(url) to send them to Google’s site, passing in the search term through the querystring:
Response.Redirect("http://www.google.com/search?q=" & SearchTerm.Text)Listing 22.3 contains the complete source code portion for the master page.
Example 22.3. The Master Page Has Two Event Handlers
 1: Partial Class CodeDemo
 2:     Inherits System.Web.UI.MasterPage
 3:
 4:     Protected Sub Page_Load(ByVal sender As Object, ByVal e As  System.EventArgs) Handles Me.Load
 5:         CurrentDateTime.Text = "It is now " & DateTime.Now
 6:     End Sub
 7:
 8:     Protected Sub SearchButton_Click(ByVal sender As Object, ByVal e As System.EventArgs) Handles SearchButton.Click
 9:         Response.Redirect("http://www.google.com/search?q=" & SearchTerm.Text)
10:     End Sub
11: End Class
Did you Know?
You can use Google to search just the pages on your site by prepending the user-entered search term with site:yourDomain+. For example, if you wanted to search just www.YourSite.com for the term Terrier, you could use the URL http://www.google.com/search?q=site:www.YourSite.com+Terrier. Therefore, you can allow users to search just your site (versus searching the entire Internet) by changing line 9 in Listing 22.4 to
Response.Redirect("http://www.google.com/search?q=site:www.YourSite.com+" & SearchTerm.Text)
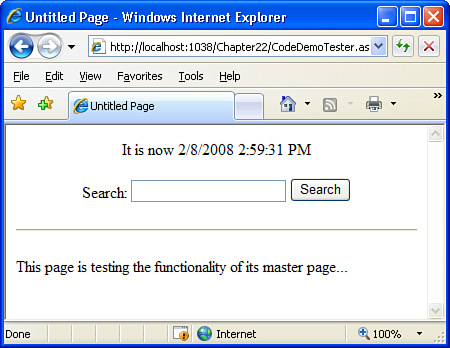
At this point we have created a master page that displays the current date and time along with an interface for searching the Web through Google. Unfortunately, we’ve yet to test this master page’s functionality in a browser. To do so, we must create an ASP.NET page that is bound to this new master page.
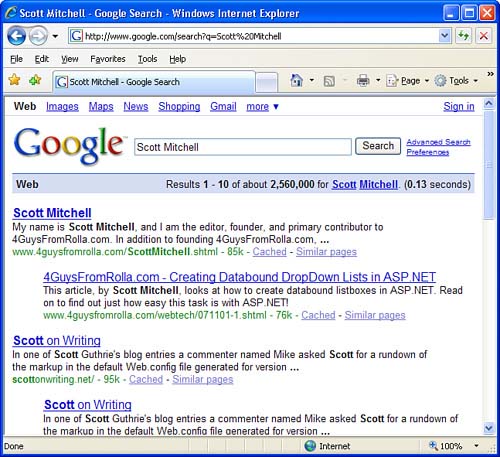
Take a moment to create a new ASP.NET page, using CodeDemo.master as its master page. Add a short blurb to the Content control in the ASP.NET page and then view it in a browser. As Figure 22.11 shows, when visiting the page, you’ll see the current date and time displayed at the top of the page. Furthermore, when you enter a search term into the text box and click the button, you are whisked to Google’s search results for the entered search term. Figure 22.12 shows a user’s browser after he has entered the term Scott Mitchell into the search text box and clicked the button.
When creating a website, designers strive to have all pages share a common look and feel. This includes a consistent color and font scheme along with consistent user interface elements. For example, most designers strive to have navigation controls and login-related controls available on all pages throughout the site. Implementing a consistent, sitewide design with ASP.NET is easy and hassle-free, thanks to master pages. A master page contains both sitewide user interface elements along with regions that can be customized on a page-by-page basis. These editable regions are indicated in the master page by ContentPlaceHolder controls.
After a master page is created, an ASP.NET page can inherit from this master page. This is accomplished by selecting the master page when adding the ASP.NET page to the project. When an ASP.NET page is associated with a master page, it contains a Content Web control for each of the ContentPlaceHolder controls in the master page. The content placed in these editable regions is fused with the master page’s content when the page is viewed through a browser. Because the melding of the master page and the ASP.NET page is performed when the page is requested, any changes to a master page are automatically and instantly reflected in its content pages.
As we saw throughout this hour, Visual Web Developer provides rich design-time support for master pages. Creating a master page is tantamount to creating an ASP.NET page and can be done entirely through the Design view. When an ASP.NET page is associated with a master page, the Design view shows the master page’s sitewide content grayed out, indicating that it cannot be modified on this page.
Can master pages be nested? That is, can a master page inherit a master page? For example, I want a very high-level sitewide look and feel defined by a parent master page. Then, for various sections of the site, I want a sectionwide template that borrows from the parent master page’s look and feel, but defines some settings unique to the section. Is this possible? | |
Yes, nested master pages are allowed. With nested master pages, the “root” master page can have HTML and Web control syntax, along with ContentPlaceHolders. A master page that inherits from that root master page can have only Content Web controls, just like a normal ASP.NET page that inherits from a master page. However, inside these Content Web controls can be additional ContentPlaceHolders. For more information on nested master pages and master pages in general, check out “Master Pages in ASP.NET” at www.odetocode.com/Articles/419.|aspx, as well as Microsoft’s official master page-related documentation, available at http://msdn2.microsoft.com/en-us/library/18sc7456.aspx. | |
Is it possible to have the master page’s content updated in response to some action in a content page? | |
Yes, it is possible for the master page and its content page to interact with one another in a variety of ways. This is a rather advanced topic, however, and beyond the scope of this book. For more information on this concept, refer to “Passing Information Between Content and Master Pages,” online at http://aspnet.4guysfromrolla.com/articles/013107-1.aspx. |
The ContentPlaceHolder control indicates a region in the master page where content pages can optionally define the content. All other content in a master page is not editable by the content page. | |
False. A master page can have an arbitrary number of ContentPlaceHolder controls. | |
Content pages contain a reference to the master page in their | |
To have a newly created ASP.NET page inherit from a master page, check the Select Master Page check box in the Add New Item dialog box. Doing so will bring up a list of the master pages in the project, from which you can select the one to inherit from. | |
If you have an existing ASP.NET page that you want to inherit from an existing master page, start by adding the appropriate | |
An ASP.NET page that inherits a master page can opt to use the master page’s default content for a given ContentPlaceHolder. To accomplish this, remove the ASP.NET page’s Content control(s) that corresponds to the ContentPlaceHolder control(s) for which you want to use the default content. You can do this by manually removing the Content control from the Source view or by going to the Design view, right-clicking the Content region, and selecting the Default to Master’s Content option. | |
True. |
1. | In the preceding hour we looked at how to provide user account support in an ASP.NET website. Commonly, such sites have various user account-related Web controls on every page. Return to the examples from the preceding hour and create a master page that has a header region, left-side region, and main region. In the header region, put the website’s title and the LoginStatus control. (Recall that the LoginStatus control displays a Login link for anonymous users and a Logout link for those who are logged in.) In the left-side region, use a LoginView control. In the control’s Anonymous Template, put a Login Web control; in the Logged In Template, display the message After you have created this master page, take a moment to convert the existing pages in the site to inherit this master page. Furthermore, create at least one new page that inherits from this master page. |
