
Creating new websites and web pages
Opening existing websites
Customizing the editor through Visual Web Developer’s Options menu
Using techniques for laying out HTML content through the Design view
Moving and resizing the assorted windows
Accessing help through the installed documentation
In the preceding hour we looked at the ASP.NET programming model, noting how ASP.NET pages are composed of an HTML portion and a source code portion. Recall that the HTML portion of an ASP.NET web page consists of static HTML markup and Web control syntax; the code portion, separated out into its own file, is implemented as a class with various event handlers.
In the past two hours, you got a cursory look at Visual Web Developer, the development environment we’ll be using throughout this book to build ASP.NET pages. In Hour 1, “Getting Started with ASP.NET 3.5,” you installed Visual Web Developer and received a quick tour of its features. In the preceding hour we delved a bit deeper into Visual Web Developer’s interface, looking at how to create a new ASP.NET website and how to use the Source and Design views and the source code editor.
Because we’ll be using Visual Web Developer extensively throughout this book, it behooves us to take an hour to fully explore this tool. Visual Web Developer is a sophisticated and powerful programming editor, with a large number of features and capabilities. As with any profession, it’s important to have a solid grasp of the tools at your disposal.
When you start Visual Web Developer, you will typically want to do one of two things: either create a new website or open an existing website. A website is a collection of resources: static and dynamic web pages, graphic files, style sheets, configuration files, and so on. In addition to the various files, a website may contain subdirectories, each of which may contain its own set of files and further subdirectories. A website is akin to a folder on your personal computer: It’s a repository for files and subfolders.
To create a new website with Visual Web Developer, go to the File menu and select New Web Site or click the New Web Site icon in the Toolbar. Either of these actions brings up the New Web Site dialog box, shown in Figure 3.1.
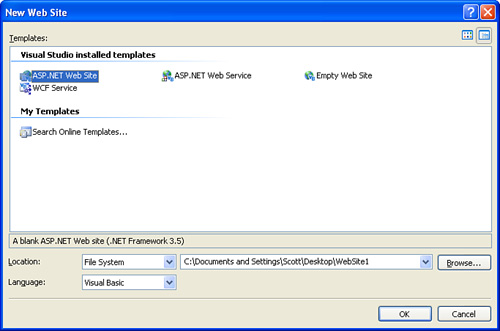
When creating a new website, you can choose among a number of available templates, such as the ASP.NET Web Site template, the ASP.NET Web Service template, the Empty Web Site template, and the WCF Service template. Regardless of what template is selected, a website will be created; the differences among the templates are what default files the template includes with the website. For example, in the preceding hour we saw that creating a new website using the ASP.NET Web Site template creates a website with an App_Data folder and three files: Default.aspx, Default.aspx.vb, and web.config. Creating a website using the Empty Web Site template creates the website but does not add any default folders or files.
Although you can choose from four different website templates, all the examples in this book are created using the ASP.NET Web Site template.
Websites can be located either on your personal computer or on a remote computer. Typically, personal computers do not double as web servers; chances are the personal computer on which you’re working right now does not host websites. Rather, you use your PC for your own ends—surfing the web, checking email, playing games, and so on. Publicly available websites are often hosted through web-hosting companies, which offer always-on computers with a persistent connection to the Internet. These computers’ sole purpose is to host a website; they have web server software running on them, and they essentially sit around and wait for incoming requests. Upon receiving a request for a web page, they render the page and return the resulting markup to the requesting browser.
Often developers place a website on their own personal computer during the creation and testing phases. The site won’t be accessible over the Internet, but that’s okay because the site is not yet ready for the public. When a functional site is complete, it can be moved to a web-hosting company so that the site can be accessed by anyone with an Internet connection. Hour 24, “Deploying Your Website,” looks at choosing a web-hosting company and moving your website’s files from your local computer to the web-hosting company’s.
When you create a new website on your local computer, you can host it in one of two ways:
Through the file system—. With this approach, you provide a directory on your hard drive that serves as the website’s root directory. All of the site’s associated files and folders will be placed in that specified directory.
Through IIS, Microsoft’s web server—. If your personal computer has Internet Information Services (IIS) installed, you can host the website locally through IIS.
To host the site locally through the file system, select the File System option from the Location drop-down list. Next, click the Browse button to the right of the Location drop-down list. This brings up the Choose Location dialog box shown in Figure 3.2.
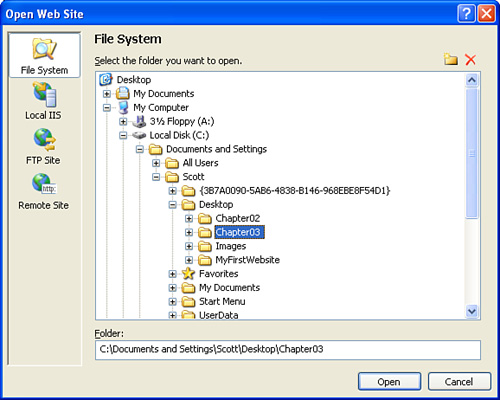
The left column in the Choose Location dialog box lists the various locations the website can be saved to.
By the Way
To host the website on a remote computer, select either the Remote Site or FTP Site for the location and then specify the associated configuration settings. When using an FTP site, you’ll need to provide the FTP server, port, directory, and username/password, if anonymous access is not allowed. Similarly, if you choose to use the Remote Site setting, you’ll need to specify the remote server’s URL and, later, username and password information.
All the websites created throughout this book are located on the local file system.
The setting chosen in the Language drop-down list specifies the programming language used by your ASP.NET web pages’ code portions. Two options are available: Visual Basic and Visual C#. As discussed in the preceding hour, the Visual Basic language is used for the examples throughout this book.
By the Way
If you have a programming background in Java or C/C++, you may be more familiar with Visual C# than Visual Basic. Visual Basic is typically preferred by those with a background in the BASIC language or those new to programming.
If you are interested in learning more about Visual C#, check out Microsoft’s Visual C# Developer Center (http://msdn.microsoft.com/vcsharp/).
To gain practice creating websites in Visual Web Developer, create a new website using the ASP.NET Web Site template. Locate the website on your computer’s file system in a directory of your choice. Set the Language to Visual Basic.
As we saw in the preceding hour, this creates a website with an App_Data folder, a Default.aspx ASP.NET page (with a corresponding Default.aspx.vb file), and a configuration file, web.config. These files are listed in the Solution Explorer, which you can find in the upper-right corner. (If you do not see the Solution Explorer, go to the View menu and choose the Solution Explorer option.)
Now that we’ve created a website, let’s see how to open this website at a later point in time. First, close the website by closing Visual Web Developer altogether, or by going to the File menu and choosing Close Project.
After closing your website, reopen it by going to the File menu and choosing the Open Web Site menu option. This lists the Open Web Site dialog box. This dialog box is nearly identical to the Choose Location dialog box shown in Figure 3.2.
Because you created your website locally through your personal computer’s file system, open the site by selecting the File System icon in the left column and then navigating to the folder where you placed the website. Select the website’s root folder and then click the Open button to open the website.
Opening the website will close the existing opened website (if any) and load the selected website’s contents into the Solution Explorer. At this point you can work with the website as you normally would, creating and editing the web page HTML and source code portions.
A website is a repository of related files and subdirectories. Websites typically contain files of the following types:
Static web pages—. An HTML page is a static web page. Unlike an ASP.NET page, it contains only HTML content—no Web controls and no source code. As its name implies, the content of these types of files is static and cannot be altered based on user input, server-side data, or other criteria.
ASP.NET web pages—. ASP.NET pages are the dynamic web pages in your site. They are implemented as two files:
PageName.aspx, which contains the HTML portion; andPageName.aspx.vb, which contains the source code portion.Image files—. Most websites have various images, logos, and clip art. These image files typically are stored in the website, either in the root directory or in an
Imagessubdirectory.Configuration files—. ASP.NET websites contain a configuration file named
web.configthat provides server-side setting information.Style sheet files—. Style sheets are files that instruct the browser how to format and display different types of content. For example, in your site you might want all content displayed in the Arial font and content within
<h1>tags displayed in italics. You can specify this aesthetic information through cascading style sheet (CSS) rules defined in style sheet files. For more information, refer to www.w3schools.com/css/.Script files—. In addition to server-side source code, a web page may contain client-side script code. This is code that is sent to and runs on the end user’s web browser. Often this script is packaged in a separate script file on the web server, which the browser requests as needed.
This list enumerates the most commonly found file types on a web server, but it is hardly exhaustive. A rock band’s website, for example, might include MP3 files available for download. Additionally, numerous ASP.NET-specific files can be added to your website to provide various types of functionality. We’ll be learning about many of these different ASP.NET-specific file types throughout this book.
After creating a new website or opening an existing one, you can add additional files and folders to the website through the Solution Explorer. From the Solution Explorer, right-click the website name; this brings up the context menu shown in Figure 3.3.
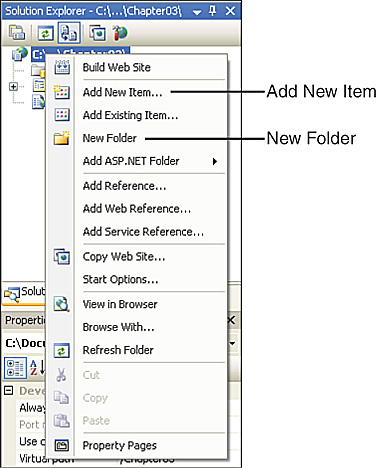
To add a new folder to your website, select the New Folder item from the context menu. To add a new file, choose Add New Item. Selecting Add New Item displays the Add New Item dialog box (see Figure 3.4). The Add New Item dialog box lists the variety of types of files that can be added. Notice that file types exist for each of the popular file types enumerated earlier, in addition to many others.
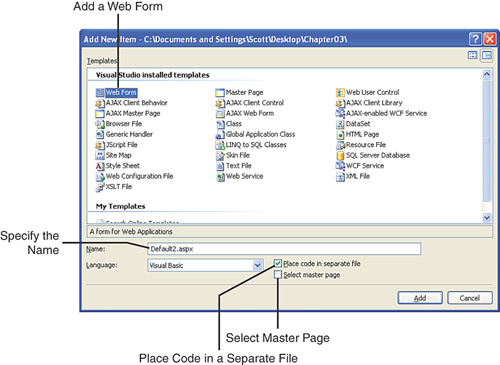
At the bottom of the Add New Item dialog box, you’ll find a series of options. The options displayed depend on what file type you have decided to add. For Web Forms, which are the item type name for ASP.NET pages, there are four options:
Name—. This indicates what the file will be named.
Language—. This dictates the language of the page’s server-side source code portion.
Place Code in Separate File—. This specifies whether the source code portion should be implemented as a second file (
PageName.aspx.vb) or the page’s declarative markup and source code will appear in the same file instead.Select Master Page—. A master page is a sitewide template that can be applied to ASP.NET pages to maintain a consistent look and feel across the site. If you are using master pages, you can check this option to assign a master page to the newly created ASP.NET page.
By the Way
Master pages are a very useful way to create a consistent page layout across all pages in your site. We’ll discuss the benefits of master pages, along with how to use them in your ASP.NET website, in Hour 22, “Using Master Pages to Provide Sitewide Page Templates.”
The Language drop-down list for the ASP.NET page’s source code portion is set to the same language choice you specified when creating the website. However, a single ASP.NET website can have web pages that use different programming languages for their source code portions. I recommend against this approach and encourage you to stick with a single, unified programming language choice across all ASP.NET pages for a given website.
Although ASP.NET pages will work just as well if their source code portion is in the .aspx page in a server-side <script> block or if it is relegated to a separate file (PageName.aspx.vb), keep in mind that all the examples we will be working with in this book use the separate page model. Therefore, when adding a new ASP.NET page to your website, be sure to check the Place Code in a Separate File check box. Doing so will create both the PageName.aspx and PageName.aspx.vb files.
Let’s practice adding a new ASP.NET page to our website. Imagine that in addition to Default.aspx, we need another ASP.NET page named DisplayTime.aspx. To add this page to your website, perform the following steps:
Go to the Solution Explorer and right-click the website name.
Choose Add New Item from the context menu.
From the Add New Item dialog box (see Figure 3.4), select to add an item of type Web Form.
Enter
DisplayTime.aspxfor the page’s Name. Make sure that the Language setting is set to Visual Basic and that the Place Code in a Separate File check box is checked.Click the Add button to create the new ASP.NET page.
You can follow these same steps to add other types of resources to your website. Of course, the options present in step 4 will differ depending on the type of item being added.
Along with adding new content to your website, you can use Visual Web Developer to add existing content. You may already have an image file on your hard drive or an ASP.NET page from another project that you want to include in this project as well. If that’s the case, you can add an existing item by right-clicking the website name in the Solution Explorer and choosing Add Existing Item.
Choosing this option displays the standard file browsing dialog box. From here, you can navigate to the folder on your hard drive that contains the content you want to add, select it, and click the Add button. This copies over the selected item to your website’s directory, making it part of your website.
Along with adding new folders and files, you can also move and delete files from the Solution Explorer. To move files among the folders in your website, drag the file from its existing location to a new folder.
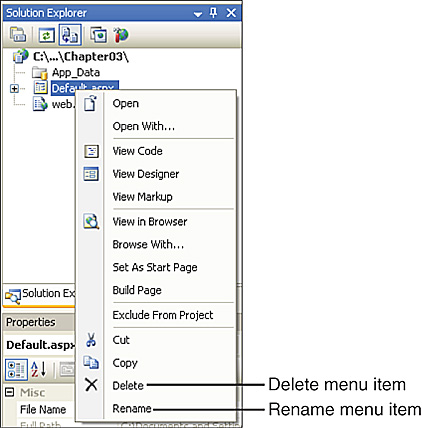
To rename or delete a file or folder, start by right-clicking the item in the Solution Explorer. This brings up the context menu shown in Figure 3.5. As you can see from the figure, Rename and Delete menu items are available. Simply click the appropriate menu item to rename or remove the selected file or folder.
Like any robust programming editor, Visual Web Developer is highly customizable, enabling developers to configure the editor in a way that maximizes their productivity. Not only does Visual Web Developer give you fine-grained control over a variety of settings, but it also provides an easy way to export your unique settings to a single file. You can then re-create your environment at a new computer by importing your settings file. This makes it easy to move your settings from a desktop computer to a laptop; additionally, if you place your settings file on a website or keep it saved on a USB drive or web-based email account, you can easily re-create your development environment at any computer where you end up working!
In this section we’ll examine how to customize Visual Web Developer. The bulk of the customizability is accomplished through the Options dialog box, which is available through the Tools menu. There are literally hundreds of settings, so we won’t have the time to go through each and every one. Instead, we’ll focus on the more germane ones. We’ll also see how to alter the Visual Web Developer panes and their display settings, along with settings that aid with laying out HTML content in the Design view.
By default, the Visual Web Developer Options dialog box shows only the most pertinent options. To see all available options, check the Show All Settings check box.
By the Way
The screenshots throughout this book have been taken using the default Visual Web Developer settings. If you customize the environment to suit your preferences, some disparity may occur between your screen and the screenshots in this book.
The majority of the customizable settings in Visual Web Developer are accessible via the Options dialog box, which you can display by selecting the Options item from the Tools menu. Figure 3.6 shows the Options dialog box when first opened.
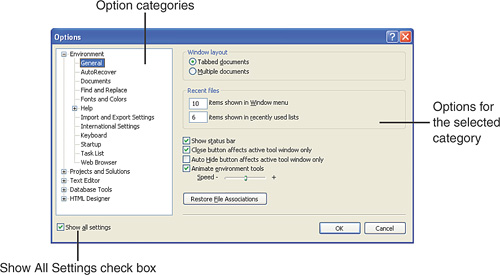
The Options dialog box is broken into various hierarchical categories, which are listed in the left column. Selecting an item from the list on the left displays its corresponding options on the right. As Figure 3.6 shows, the default category selected when opening the Options dialog box is the Environment category.
The Environment category has two settings worth exploring. The first is the AutoRecover setting. While you are working on a website, Visual Web Developer automatically saves copies of modified files every so often, based on a setting you provide (the default is every five minutes). These backup copies are kept around for a specified number of days (seven, by default). The AutoRecover feature protects against losing hours of work due to an unexpected shutdown. If your officemate LeRoy happens to walk past your desk and kick the power cord out of the wall, in the worst case you’ll not have the last five minutes of changes saved (assuming you left the AutoRecover frequency as the default). If you have AutoRecover enabled (which it is, by default), backup copies of your modified files will be saved periodically to the My DocumentsVisual Studio 2008Backup Files<projectname> folder.
The final Environment setting we’ll look at is the Fonts and Colors settings, which is shown in Figure 3.7. The Fonts and Colors settings dictate the fonts, sizes, and colors of the text used in Visual Web Developer. You can alter the fonts and colors for a variety of settings: the Visual Web Developer text editor, the printed output, various debugging windows, and so on. Furthermore, for each variety of setting, there are multiple display items whose font and color can be customized. For example, the default fonts and colors for the Text Editor setting’s Plain Text is black, 10pt., Courier New; its setting for the Selected Text is white with a blue background, 10pt., Courier New.
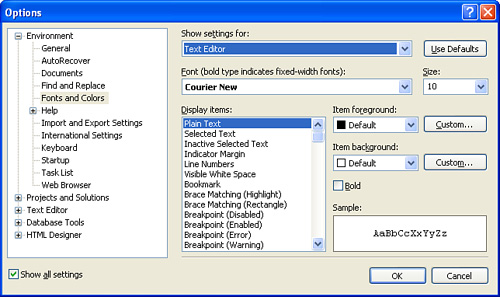
Many developers tweak the Fonts and Colors settings to make it easier to see certain types of tokens in their source code. For example, in the version of Visual Web Developer I use at work, I have Numbers displayed as purple, bold, 10pt., Courier New text, and Strings displayed as turquoise, 10pt., Courier New text.
Another setting in the Options dialog box worth noting is the HTML Designer category. Expand this category and select the General item beneath it. On the right you should see an option titled Start Pages In with three options: Source View, Design View, and Split View. By default, when you’re creating a new web page or opening an existing one, the page is opened in the Source view. If you prefer the Design view or Split view, you can change the default behavior here.
Did you Know?
When you have settled on the particular settings you find most conducive, take a moment to export your savings to a file. To accomplish this, go to the Tools menu and select the Import and Export Settings option. This will take you through a wizard where you can indicate what settings to export along with the filename and location to save the settings.
After you have exported your settings, you can re-create your personalized settings on another computer by importing this settings file. This capability is useful if you develop on both a desktop and laptop, depending on whether you’re onsite or not, or if you are a contractor who moves jobs every few months but wants to maintain a consistent collection of settings.
The Visual Web Developer environment is made up of many windows that provide various tidbits of information. The window we’ve examined in most detail is the Solution Explorer, which lists the files and folders in the website. In the preceding hour, we saw two other windows: the Properties window, which listed the properties for the selected HTML element or Web control; and the Toolbox window, which listed the Web controls and HTML elements that could be dragged onto an ASP.NET page.
These are but three of the many windows available in Visual Web Developer. You can see a complete list of the available windows by going to the View menu.
Windows in Visual Web Developer each have a default position, size, and behavior. The position indicates where on the screen the window is placed and whether it is floating or docked. The Solution Explorer, for example, is in a docked position in the upper-right corner, by default; the Toolbox can be found in a docked position on the left. A docked window is one that’s attached to a margin of the editor. When a docked window is shown, the content it displaces is moved elsewhere on the screen. A floating window is not attached to any margin; it floats above all other windows and content in the editor, covering it up rather than displacing it.
Each window also has a size. You can move your mouse to the margin of the window and click and drag to increase or decrease the window’s width or height. Each docked window also has a behavior: It’s either pinned or unpinned (the unpinned behavior is sometimes referred to as Auto-Hide behavior). A pinned window remains displayed regardless of whether your mouse is over the window. An unpinned window is displayed when you move your mouse over the window; it disappears when your mouse leaves the window’s focus. You can toggle a docked window’s pinned status by clicking the pin icon in each window’s upper-right corner. Typically, I keep the Solution Explorer, Properties, and Toolbox windows pinned because they are commonly used; all other windows I’ll make unpinned so they do not encroach on my screen’s real estate.
In addition to being able to pin and unpin windows, you can also close a window. To remove a window from the screen, simply click the X icon in the upper-right corner of the window.
Did you Know?
If you cannot find a window onscreen where you expect it, you may have moved it or accidentally closed it. You can display the needed window by going to the View menu and selecting the appropriate menu option.
If you do not like the position of a window, you can easily move it. Click on the top of the window and, holding down your mouse button, drag your mouse to the location where you want the window to appear.
ASP.NET is a rich, robust web development technology built on a platform known as the .NET Framework. This platform consists of hundreds of classes that provide the core functionality of the ASP.NET engine. Needless to say, it can take years to have a deep understanding of the framework and its capabilities.
Fortunately, the .NET Framework is well documented, and Visual Web Developer provides a variety of ways to access this help. When you installed Visual Web Developer you were prompted whether to install the MSDN Express Library for Visual Studio 2008. The MSDN Library is Microsoft’s colossal collection of articles, whitepapers, technical documentation, knowledge base content, and frequently asked questions and answers. To view the library, go to the Help menu and choose Search, Contents, or Index. This launches the Microsoft Visual Studio 2008 Documentation program, from which you can browse through the help.
Did you Know?
You can also search the MSDN Library online at http://msdn2.microsoft.com.
Another neat feature of Visual Web Developer is its Dynamic Help. As its name implies, Dynamic Help shows context-sensitive help based on where your cursor is in the source code or HTML portions of an ASP.NET page. For example, if you’re in the Design view and you click a Button Web control in your page, Dynamic Help automatically displays help links with titles such as
Button Class Technical Documentation
Button Web Server Control Overview
How to: Add Button Web Controls to a Web Forms Page
How to: Add ImageButton Web Controls to a Web Forms Page
To display Dynamic Help, select the Dynamic Help option from the Help menu. This displays the Dynamic Help window (which you can resize, position, and pin just like any other window). The Dynamic Help window, if displayed, continually populates with context-sensitive help topics based on your actions in Visual Web Developer.
One of the most satisfying aspects of working with ASP.NET is that a large and friendly online community exists. There are many helpful forums that are great places to ask fellow ASP.NET developers questions when you get stuck. One very popular forum is Microsoft’s MSDN Forums (http://forums.microsoft.com/msdn/). In fact, Visual Web Developer’s Help menu includes a MSDN Forums menu option that, when clicked, loads the forum’s search page. Another excellent forum is the ASP.NET Forums, online at http://forums.asp.net.
Did you Know?
Although a wealth of information is available through the MSDN Library and through Visual Web Developer’s Community and Help menus, a vast array of information is also available online. A great place to start is Microsoft’s official ASP.NET site, www.asp.net, which is home to the popular ASP.NET Forums as well as hundreds of excellent step-by-step tutorials and free “How To” videos.
When searching for ASP.NET resources, consider using Google’s Microsoft-specific search, available at www.google.com/microsoft.html. This customized search page returns only results relating to Microsoft technologies and topics, which can help expedite your search for answers to your questions.
We spent this hour investigating Visual Web Developer in greater detail. It is important that you have a familiarity with this editor because you’ll be using it throughout this book and beyond. Specifically, we looked at how to create and open websites in Visual Web Developer. Websites can be located either locally, on your personal computer, or remotely, with a web-hosting company. After you have created a website, you’ll want to add various files and folders. This is easily accomplished through the Solution Explorer.
In this hour we also looked at customizing the environment through the Options dialog box and by repositioning and resizing windows. We concluded with a quick synopsis of Visual Web Developer’s extensive built-in help system. The Dynamic Help capabilities are especially useful for developers new to ASP.NET.
In this hour and the previous two, we’ve covered a lot of ground. We’ve looked at the fundamentals of ASP.NET and the .NET Framework; installed the .NET Framework, Visual Web Developer, and SQL Server 2005 Express Edition; dissected the ASP.NET programming model; created our first ASP.NET web page, complete with HTML markup, Web controls, and server-side source code; and explored Visual Web Developer. We’re now ready to build a nontrivial ASP.NET web page, which we’ll tackle in the upcoming hour. This exercise will help hammer home many of the key points mentioned through these first three hours.
I want to use a web-hosting company to host my ASP.NET website. How do I determine whether a particular web-hosting company can host my ASP.NET application? | |
The easiest way to ascertain whether a given web-hosting company can host your site is to simply ask. Be sure to tell the company that you are creating an ASP.NET 3.5 website using Visual Web Developer. For your ASP.NET site to be able to run on the company’s servers, the web-hosting company must be running Microsoft’s web server, IIS, along with the .NET Framework version 3.5. If these conditions are met, your site should run just fine. We discuss choosing a web-hosting company and deploying an ASP.NET web application to the web-hosting company’s computers in Hour 24. | |
I have created a website on my local file system with the website located at folder X. I’d like to move the website to folder Y. Is this possible? | |
Sure. To move the site, close Visual Web Developer and then move the website’s folder from its current location to wherever else you’d like it to reside. After you have moved the files, reopen Visual Web Developer, go to the File menu, and choose the Open Web Site option. Browse to the new folder location and click Open. That’s all there is to it! | |
What are some online resources for ASP.NET information? | |
Many free ASP.NET resources are available online. Your first destination should be Microsoft’s official ASP.NET website, www.asp.net. This site has links to virtually every ASP.NET resource site on the Net, along with a very active online forum site (http://forums.asp.net/) that has received more than 2,000,000 posts from hundreds of thousands of users. I run a popular online resource, 4GuysFromRolla.com, which has a messageboard, answers to frequently asked questions, and thousands of ASP.NET-related articles. Some other large and prominent ASP.NET sites include 15Seconds.com, ASPAlliance.com, and ASP101.com. There’s also Microsoft’s ASP.NET Developer Center, available at http://msdn.microsoft.com/asp.net/. |