
Creating multiline text boxes
Creating password text boxes
Specifying the number of columns in a text box
Indicating the maximum number of characters that can be entered into a text box
Changing the look and feel of the text box by changing the font size, font name, and color of the text box
In Hour 9, “Web Form Basics,” we examined how to collect user input through an ASP.NET page. In doing so we created a BMI Calculator that that prompts visitors for two pieces of information: their height and weight. Two TextBox Web controls were used to collect this information.
The TextBox Web control contains a number of properties that specify its appearance. For example, the TextMode property specifies whether the text box consists of a single line (the default) or multiple lines. The Columns and Width properties specifies how wide the text box should be. The various formatting properties—Font, ForeColor, BackColor, BorderStyle, and so on—can be used to enhance the TextBox’s appearance.
As you already know, when an ASP.NET page is visited, its Web controls are rendered into HTML. The Label Web control, for example, is rendered as a <span> tag whose content is the Label’s Text property. The TextBox Web control, as we saw in the preceding hour, is rendered into an <input> tag whose type attribute is set to text.
Text boxes are an ideal user interface element for collecting general user input, such as a person’s name, mailing address, or credit card number.
Did you Know?
For certain types of user input, a text box might not be the best choice. In the next hour we examine other Web controls designed for collecting user input and learn why they are better suited than the TextBox Web control for some situations.
In this hour we examine the various types of text boxes—such as password text boxes and multiline text boxes—as well as how to alter their appearance. Before we begin this exploration, though, let’s practice adding a TextBox Web control to an ASP.NET page and displaying the value the user entered.
To do this, start by creating a new ASP.NET page named TextBoxPractice.aspx. We will add two TextBox Web controls to this page to collect the user’s name and age.
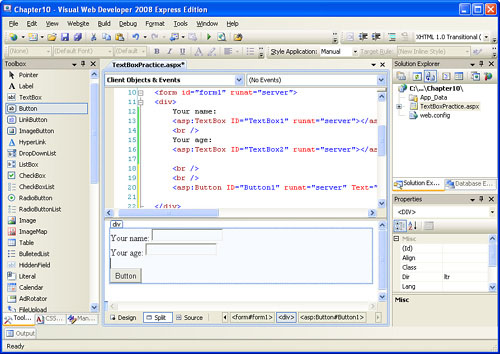
Start by entering the following text to the page: Your name:. Next, drag a TextBox Web control from the Toolbox onto the page. Then enter the text Your age: and another TextBox Web control. Finally, as with all Web Forms, we need a Button Web control. Add this below the two TextBox controls.
Figure 10.1 shows Visual Web Developer after these three Web controls have been added. Take a moment to make sure that your screen looks similar.
Now that we’ve added our three Web controls to the page, let’s set their properties. Start with the first TextBox Web control. Because this Web control is used to collect the user’s name, set its ID property to Name. Set the second TextBox Web control’s ID property to Age.
Finally, set the Button Web control’s ID property to SubmitButton and its Text property to “Click Me.”
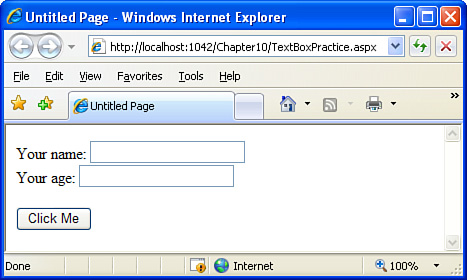
Take a moment to test this ASP.NET page through a browser by going to the Debug menu and choosing Start Without Debugging. Figure 10.2 shows the web page when visited through a browser.
Currently, the TextBoxPractice.aspx ASP.NET page performs no action when the form is submitted. Typically, though, when the user submits information, you will do something with it. You might perform a calculation on the data entered and present some computed value to the user. As we will see in later hours, you may display data from a database based on the input provided by the user.
The best place for processing the user’s input is in an event handler for the Button Web control’s Click event. As we saw in the preceding hour, adding an event handler for the Button’s Click event is easy. Double-click the Button Web control in the Design view, or go to the source code portion and select the Button Web control and the Click event from the left and right drop-down lists at the top. After the Click event handler has been created, all that remains is to write the code to process the user’s input. For this ASP.NET page, let’s simply display the user’s input using a Label.
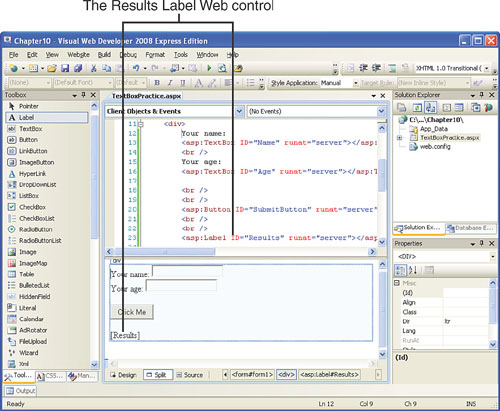
Start by adding a Label Web control to the TextBoxPractice.aspx ASP.NET page. You can add this anywhere in the HTML portion; if you want to follow along with my example, add it beneath the Button Web control. Set the Label control’s ID property to Results and clear out its Text property. Figure 10.3 shows Visual Web Developer after this Label has been added and its properties set.
By the Way
Feel free to set any of the Label’s aesthetic properties, such as Font, BackColor, ForeColor, or others.
With the Label Web control in place, we’re ready to add the code for the Button’s Click event handler. Listing 10.1 shows what the ASP.NET page’s source code portion should look like after you have added the necessary code to the Click event handler. Note that you will need to manually type in only lines 5 and 6; all the other lines of code should already be there, courtesy of Visual Web Developer.
Example 10.1. The Click Event Handler Displays the User’s Name and Age in the Results Label Web Control
1: Partial Class TextBoxPractice
2:     Inherits System.Web.UI.Page
3:
4:     Protected Sub SubmitButton_Click(ByVal sender As Object, ByVal e As System.EventArgs) Handles SubmitButton.Click
5:         Results.Text = "Hello, " & Name.Text
6:         Results.Text &= ". You are " & Age.Text & " years old."
7:     End Sub
8: End Class
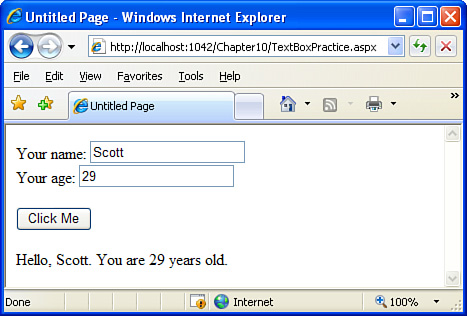
The code in the event handler sets the Results Label’s Text property so that it displays the user’s entered name and age.
Figure 10.4 shows TextBoxPractice.aspx when visited through a browser. The screenshot was taken after a user entered his name and age and submitted the form by clicking the Click Me button.
TextBoxPractice.aspx demonstrates the basics of using TextBox Web controls in an ASP.NET web page. For the remainder of this hour, we will focus on the various properties of the TextBox Web control and see how these properties alter the appearance and behavior of the resulting text box in the user’s browser.
Take a moment to examine the text boxes in Figure 10.4. Note that these text boxes allow for a single line of text. As you likely know from your Internet surfing experience, text boxes come in other forms. The two variants of the text box are multiline and password.
A multiline text box contains more than one row of text. This type of text box is commonly used when a large amount of text may be needed. Consider a news site that allows visitors to leave comments about the various stories and opinion articles published online. Typically, multiline text boxes are used because a user may enter a lengthy comment. (See Figure 10.5 for an example of a multiline text box.)
Password text boxes mask the user’s input with asterisks (*). Password text boxes are useful for collecting sensitive input from the user, such as her password or personal identification number (PIN). The masked input prevents an onlooker from being able to glance over the web user’s shoulder to determine the password or other sensitive information. (See Figure 10.6 to see an example of a password text box.)
The TextBox Web control contains a TextMode property that specifies how the resulting text box is displayed: as a single line text box, as a multiline text box, or as a password text box. As we have seen, the TextBox Web control displays a single line text box by default. In the next two sections, we examine how to have the TextBox Web control render as a multiline text box and a password text box.
Creating a multiline text box involves the following simple steps:
Add a TextBox Web control to the ASP.NET page.
Set the TextBox Web control’s
TextModeproperty toMultiLine.Set the TextBox Web control’s
ColumnsandRowsproperties to specify the number of columns and rows for the multiline TextBox.
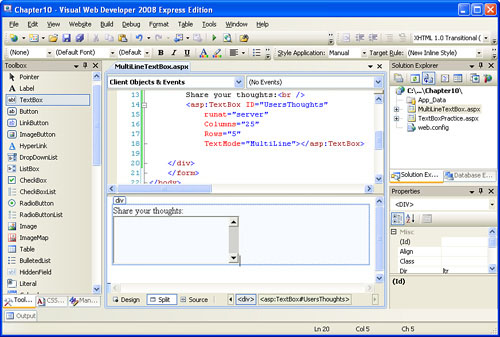
Let’s practice using a multiline text box. Create a new ASP.NET page named MultiLineTextBox.aspx. Next, type the following text into the page: Share your thoughts:.
The first step in creating a multiline text box is to add the TextBox Web control to the web page. So, drag and drop a TextBox Web control from the Toolbox onto the page beneath the “Share your thoughts:” text. Set the TextBox control’s ID property to UsersThoughts.
Next, set the TextBox control’s TextMode property to MultiLine. To accomplish this, select the TextBox Web control so that its properties are loaded in the Properties window. Then scroll down through the list of properties until you reach the TextMode property.
By the Way
By default, the TextMode property is set to the value SingleLine, which creates a standard, single-line text box like the ones shown in Figure 10.4.
Clicking the TextMode property drops down a list of three options: SingleLine, MultiLine, and Password. Select the MultiLine option. At this point, we can adjust the number of columns and rows in the multiline text box by setting the TextBox control’s Columns and Rows properties. Go ahead and set these two properties to values of 25 and 5, respectively.
Figure 10.5 shows Visual Web Developer after these steps have been completed.
By the Way
For practice, you are encouraged to complete the MultiLineTextBox.aspx web page by adding a Button Web control and providing code in the Button’s Click event handler that displays the text the user entered in a Label.
In addition to using the Columns and Rows properties to specify the size of the multiline TextBox, you can also resize the TextBox Web control directly by clicking the TextBox in the designer and selecting one of the resize icons on the bottom, right, or bottom-right corner. Resizing a TextBox in this way adjusts the TextBox Web control’s Height and Width properties rather than its Columns and Rows properties.
The difference between these two methods is that if you set the Height and Width properties, the text box displayed in the user’s browser will have the exact size specified by these properties, regardless of the font used within the text box. In other words, the text box will be the same dimensions regardless of whether its text is displayed in a large- or small-sized font. However, if you specify the size through the Columns and Rows properties, the rendered text box’s dimensions will depend on the size of the font being used for the text box. There will always be the specified number of columns and rows, so if a large font size is used, the text box will be larger than if a smaller font size is used.
Did you Know?
In addition to specifying absolute sizes for the TextBox control’s Width and Height properties, you can also specify relative sizes in terms of percentages. For example, if you want the rendered text box to be as wide as the browser window, set its Width property to 100%. What’s more, when specifying a percentage for the TextBox’s Height or Width properties, its dimensions will dynamically change as the user resizes the browser.
Many web applications require users to create an account before they can enjoy the services of the site. For example, to check your email at GMail.com, you must first sign in by providing your username and password.
The password text box is a variant of the standard text box and is designed to hide the text being entered by the user. With a password text box, each character entered is displayed as an asterisk in the text box. Figure 10.6 shows a password text box that has had the text “My password” typed into it.
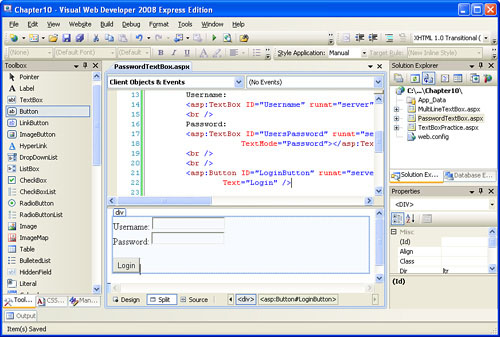
To create a password text box in an ASP.NET web page, we need to add a TextBox Web control and set its TextMode property to Password. Create an ASP.NET page named PasswordTextBox.aspx, type the text Username: into the page, and then add a TextBox Web control. Set this TextBox’s ID to Username. On the next line, type in the text Password: and then add another TextBox Web control. Set this second TextBox control’s ID property to UsersPassword and its TextMode property to Password.
Add a Button Web control beneath these two TextBoxes and set its ID and Text properties to LoginButton and “Login,” respectively.
After you perform these steps, your screen should look similar to Figure 10.7.
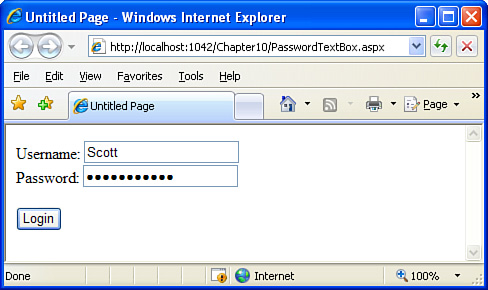
The password text box has some potentially unexpected behavior when viewed through a browser. Visit the page and enter some text into the two text boxes. Note that the username text box behaves like a normal text box, but the password text box has its input masked by asterisks. Figure 10.8 shows the PasswordTextBox.aspx ASP.NET web page when viewed through a browser after values have been entered into the two text boxes.
After you have entered information into the two text boxes, submit the form by clicking the Login button. Clicking the button causes the form to postback. Notice that the text entered into the password text box has disappeared on postback, as Figure 10.9 illustrates. However, the text in the username text box still remains.
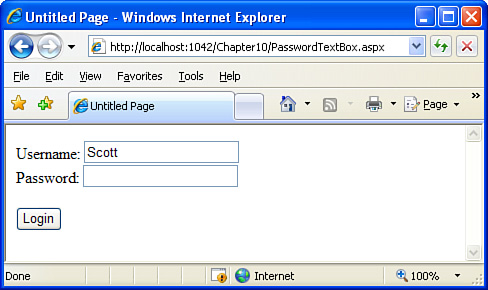
Why did the text in the username text box remain, but the text in the password text box disappear? Recall that when the submit button is clicked, the Web Form is submitted and the data the user entered into the text boxes is sent back to PasswordTextBox.aspx.
When the request for PasswordTextBox.aspx arrives at the web server, the ASP.NET engine is invoked to produce the proper HTML output for the page. The ASP.NET engine determines that the page has been posted back and sets the Text properties of the two TextBox Web controls to the values entered by the user.
With TextBox Web controls whose TextMode property is set to SingleLine or MultiLine, the value of the Text property is expressed in the HTML generated by the TextBox Web control when it is rendered. For example, a single line TextBox Web control whose Text property equals “Scott” and whose ID property equals TextBox1 will render the following HTML markup:
<input name="TextBox1" type="text" value="Scott" id="TextBox1" />
However, when a password text box is rendered, the Text property is not expressed in the resulting HTML for security reasons.
To understand why rendering the Text property for a password TextBox poses a security threat, imagine for a moment that the ASP.NET engine did include the Text property in the rendered markup. If we had a TextBox Web control with its ID property set to TextBox2, its TextMode property set to Password, and its Text property set to password123, the following HTML would be rendered:
<input name="TextBox2" type="text" value="password123" id="TextBox2" />
Now imagine that a user visits a web page where he is prompted for his username and password, and imagine that after he enters his correct username and password, the ASP.NET page displays some information specific to his user account in a Label Web control on the same web page.
If the user gets up from his computer to get a quick drink of water, an unscrupulous co-worker could go to the user’s browser and view the received HTML, which would include the markup:
<input name="TextBox2" type="text" value="password123" id="TextBox2" />
(This assumes password123 was the person’s password.)
The co-worker now knows the user’s password. To help prevent this, the Text property is not rendered for password TextBoxes.
By the Way
Once a month or so, a person will ask the following question on one of the ASP.NET newsgroups or messageboards: “Why is it that when I set a password TextBox Web control’s Text property, it does not appear when I visit the ASP.NET page through a browser?” Now you can answer this type of question!
So far in this hour, we have looked at one property in particular—the TextMode property—which is used to specify whether the TextBox Web control should be rendered as a standard text box, a multiline text box, or a password text box. In addition to this property, there are a number of other TextBox Web control properties. The remainder of this hour examines the most germane ones.
Sometimes you may need to use the TextBox Web control to collect information from users, such as their age or the two-letter abbreviation of the state they live in. In such cases, the users’ input will be only a few characters long. However, as you can see with the Age text box in Figure 10.4, the text box displayed in the web browser is much larger than it needs to be for such cases.
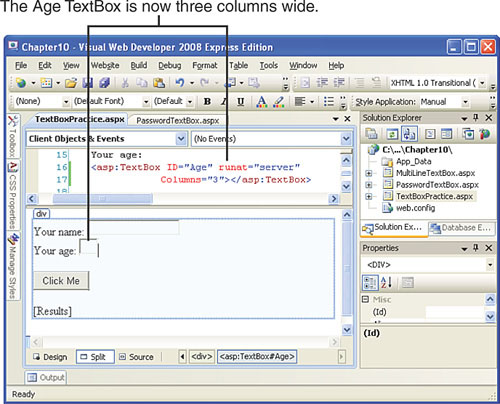
You can specify how many columns wide the text box should be by setting the TextBox Web control’s Columns property. Open the TextBoxPractice.aspx page, which we created in the first example in this hour (see Figure 10.4). Adjust the Age TextBox Web control’s Columns property so that the text box into which the user enters his age is more appropriately sized. Specifically, set this TextBox’s Columns property to a value of 3.
After you set the Columns property to 3, the text box displayed in the designer will shrink from its default width to a width of three columns. Refer to Figure 10.10 for a screenshot of Visual Web Developer after this property has been set.
You can also resize the TextBox through the designer by clicking the TextBox and selecting one of the resize icons on the bottom, right, or bottom-right corner. Doing so sets the TextBox’s Height and Width properties. As discussed at the end of the “Using Multiline Text Boxes” section, the Height and Width properties specify the absolute size of the resulting text box, whereas the Columns property dictates the number of columns to display, making the size of the rendered text box relative to the text box’s font size.
Did you Know?
Be sure to have your TextBox Web controls properly sized for the input you are expecting users to enter. Properly sized text boxes help ensure that users enter the data in the correct format. For example, if you want users to enter a short description about themselves, they will be more apt to enter a shorter description if you provide them with a single-line text box than if you provide them with a multiline text box.
Adjusting the size of the text box by setting the TextBox Web control’s Columns property does not regulate how much text the user can enter. Even if you create a TextBox Web control that’s just three columns wide, the user can still enter hundreds of characters of text.
Sometimes you may want to limit the amount of text a user may enter into a particular text box. For example, sites like eBay allow only 80 characters to be entered when providing feedback about another buyer or seller.
Websites typically limit the number of characters that can be entered into a text box for two reasons. First, it is usually easier to format data for display at a later time by limiting the number of characters that can be supplied by the user. For example, the feedback a user enters at eBay about a buyer or a seller can be viewed by other eBay users in a feedback summary page. This summary page is clean and concise because no one user can enter more than 80 characters of feedback at a time.
Second, sites like eBay use databases to store the information their users enter. When you’re setting up a database, you must specify the maximum number of characters for text fields in advance. Therefore, this feedback limit is in place because of the limit imposed by those who designed eBay’s database tables. (We’ll be examining how to create and use databases later in this book, starting with Hour 13, “An Introduction to Databases.”)
To set a limit to the number of characters that can be entered into a TextBox Web control, set its MaxLength property accordingly. In our TextBoxPractice.aspx example, we may want to limit the Age text box to a maximum of three characters (because it would be impossible for a visitor to have an age greater than 999).
To do so, set the Age TextBox Web control and set its MaxLength property to 3. After you have made this change, view TextBoxPractice.aspx through a browser. Try to type more than three characters into the Age text box—you can’t!
Watch Out!
Although you might think that a MaxLength value of 0 would not permit users to enter information into the text box at all, it means quite the opposite. A MaxLength value of 0 means that no restrictions exist on the amount of information users can enter into the text box.
Advanced users can circumvent the text box restrictions imposed by the MaxLength property. Therefore, the MaxLength property does not guarantee that a user’s supplied input will be less than the MaxLength setting. The Q&A section in Hour 12, “Validating User Input with Validation Controls,” discusses how to ensure that a user has entered no more than a specified number of characters into a particular text box.
Furthermore, the MaxLength property works only with single line and password text boxes. If you set your TextBox Web control’s TextMode property to MultiLine, the MaxLength property is ignored. There is a workaround for limiting the number of characters that can be entered into a MultiLine text box, but it involves the use of the ASP.NET validation controls. This topic is also addressed in the Q&A section in Hour 12.
The Label Web control has a number of aesthetic properties, such as BackColor, ForeColor, Font, and so on. In Hour 8, “ASP.NET Web Controls for Displaying Text,” we examined these various properties, looked at how to specify them, and observed the visual effect they had on the text displayed by the Label Web control.
The TextBox Web control has the exact same set of formatting properties as the Label Web control, which is summarized in Table 10.1.
Table 10.1. The Aesthetic Properties of the TextBox Web Control
Property | Description |
|---|---|
| Specifies the background color of the text box. |
| Specifies the color of the text box’s border. |
| Specifies the style of the text box’s border. |
| Specifies the width of the text box’s border. |
| Specifies the font properties for the text entered by the user into the text box. Recall that the |
| Specifies the color of the text entered into the text box by the user. |
Let’s create a new ASP.NET page called PrettyTextBox.aspx, in which we’ll create a number of TextBox Web controls to observe the effects of various formatting properties. After you create the ASP.NET page, add two TextBox controls.
For the first TextBox, set its BackColor property to yellow. Next, add a border by setting its BorderColor, BorderStyle, and BorderWidth properties to black, dotted, and “5px,” respectively. These settings result in a TextBox with a yellow background and a black, dotted border 5 pixels wide (see Figure 10.11).
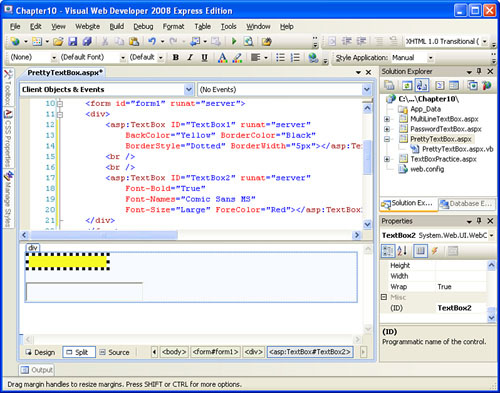
For the second TextBox Web control, set the Font property’s Bold subproperty to True, the Name subproperty to Comic Sans MS, and the Size subproperty to Large. Set the ForeColor property to red. The text typed into this text box will be large, red, and displayed with the Comic Sans MS font.
Figure 10.11 shows Visual Web Developer after these properties have been set. (Some of the color differences may not be noticeable in the figure.)
Take a moment to view the PrettyTextBox.aspx ASP.NET page through a browser (see Figure 10.12). When viewing the page, type some text into the second text box and note that it is red, large, and in the Comic Sans MS font.

In this hour we looked at one of the most commonly used Web controls for collecting user input: the TextBox. The TextBox Web control can be used to create three types of text boxes: a single line text box, a multiline text box, or a password text box. Use the TextBox control’s TextMode property to specify what kind of text box to render.
In addition to the TextMode property, the TextBox Web control contains a number of other properties. The Columns property, for example, specifies the width of the text box in columns. The MaxLength property specifies the maximum number of characters a user can enter into the text box. And like the Label Web control, the TextBox control contains a number of formatting properties, such as BackColor, ForeColor, Font, and so on.
In addition to the TextBox Web control, ASP.NET offers a number of other Web controls for collecting user input. We will look at using drop-down lists, check boxes, and radio buttons in the next hour.
I want to create a text box that allows the user to enter only a certain type of input, such as numbers. How can I do this? | |
In the BMI calculator example we examined in the preceding hour, the user was prompted for his weight and height. Clearly, these inputs must be numeric ones. As we saw, if the user enters some input like Therefore, you might think that an ideal solution would be to create a text box into which the user can enter only numbers. Such masked text boxes, as they are called, are rarely, if ever, used on web pages for a number of reasons. First, although a masked text box would prevent the user from entering something like Second, creating masked text boxes requires a bit of tricky client-side JavaScript programming. Users who have JavaScript disabled in their browser would therefore be able to enter any values into a masked text box. Finally, and perhaps most important, users are not accustomed to masked text boxes on web pages. Therefore, the inclusion of masked text boxes would likely irritate users and lead them to conclude that your website was fundamentally different from the many websites they’re used to. As we will see in Hour 12, it is quite easy to ensure that a user’s text box input conforms to a certain format. (There are, however, masked input ASP.NET controls you can purchase. The nice thing about these third-party controls is that they take care of the tricky client-side JavaScript needed. You just drag and drop them onto your ASP.NET page, much like you would a regular TextBox. I’ve used and have been pleased with the masked input controls available at www.peterblum.com.) | |
Why does the | |
The
Despite this limitation, it is still possible to restrict the number of characters entered into a | |
I have a Web Form with TextBox and Button controls. If I press Enter after typing my input into a text box, the Web Form posts back. But I’ve noticed that in some situations the Button’s | |
If a visitor hits the Enter key while focused in a single line or password text box, the browser submits the form. When the form is submitted, the submit button’s The first scenario is when the Web Form contains only one TextBox. The second scenario occurs when there are multiple Button Web controls on the page. For a more thorough explanation of these scenarios, as well as workarounds, check out “Two Common Pitfalls When Submitting a Web Form Using the Enter Key,” available online at http://aspnet.4guysfromrolla.com/articles/010908-1.aspx. |
1. | For this exercise we’ll create an ASP.NET web page that prompts the user for two integers and then computes and displays the integers’ greatest common divisor. (The greatest common divisor of two integers Because the user needs to provide two integers, you’ll need two TextBox Web controls. Set the As with the BMI calculator example from the preceding hour, you’ll need to create an event handler for the Button Web control’s The greatest common divisor of two integers can be quickly computed using the Euclidean Algorithm. If you are not familiar with the details of this algorithm, don’t worry, the following pseudo code should get you started: 'Assign the maximum of a and b to x and the minimum to y If a.Text < b.Text then x = b.Text y = a.Text Else x = a.Text y = b.Text End If 'Compute the remainder of x / y z = x mod y While z <> 0 x = y y = z z = x mod y End While gcd = y
For more information on the Euclidean Algorithm, check out http://en.wikipedia.org/wiki/Euclidean_algorithm. |
2. | Given two integers Fortunately, computing the least common multiple of two numbers is quite simple after you compute the greatest common divisor of the two numbers. Specifically, lcm(a,b) = (a * b) / gcd(a,b) Therefore, for this exercise you should create a function named As with the previous exercise, be sure to include two TextBox Web controls, a Button Web control, and a Label Web control. The Button Web control’s |