
Finding a web-hosting company
The steps involved in deploying an ASP.NET application
Techniques for uploading your website’s files
Replicating a database with the Database Publishing Wizard and SQL Server Management Studio
Updating the connection string information in
web.config
With the lessons learned through the past 23 hours, you are able to create useful data-driven ASP.NET web applications using Visual Web Developer and Microsoft SQL Server 2005 Express Edition. The only problem is that all the websites we have created in this book have been stored locally, on your own computer. Hosting your website locally has many advantages: you can test while offline; it’s fast; advanced debugging features are available; and it’s secure. The main disadvantage of hosting ASP.NET applications locally is that they can be viewed only from your computer. For someone to visit your site, the user must be sitting at your computer.
Most ASP.NET websites are developed and tested locally. After the website has been completed and thoroughly tested, it is then deployed to a web-hosting company. At this point you have the background to create and test ASP.NET websites locally. All that remains is to deploy the finished application to a web-hosting company so that anyone with a connection to the Internet can visit it.
In this hour we walk through the process of moving an ASP.NET application from your computer to a web-hosting company.
A web-hosting company has a number of Internet-accessible computers for individuals or companies to place their websites. These computers contain web servers that are accessible from any other computer on the Internet. When setting up an account, you can ask the company to register a domain name for you if you don’t already have one. A domain name is the text that a person would enter into their web browser to visit your website. (For example, the domain name of Microsoft’s site is Microsoft.com. For my personal website, I might choose ScottMitchellInfo.com.)
Did you Know?
You can choose only a domain name that has not already been registered by somebody else. To determine whether your desired domain name is still available, visit www.netsol.com, where you can enter a domain name to check on its availability, and register it if it is available.
The benefits of using a web-hosting company to host your site include
A publicly available website—. With a web-hosting company, any visitor who has an Internet connection can visit your website!
Use of a domain name—. You can register a domain name and have it point to your website so that visitors can reach your site through a name like www.mysite.com.
Ability to focus 100% on building your website—. Installing a web server, applying the latest security patches, properly configuring domain names, and so forth can be tricky tasks. By using a web-hosting company, you are paying for this service, which allows you to concentrate on building your website.
By the Way
You can choose from literally thousands of web-hosting companies, ranging dramatically in price, performance, features, support, and other qualities. A great place to start shopping for a web-hosting company is at a website like www.tophosts.com or www.hostindex.com. These websites catalog thousands of web-hosting companies and allow you to search through their database looking for companies that match your price range, feature needs, and so forth.
When you choose a web-hosting company that you’d like to do business with, be sure to contact the company and make certain it supports ASP.NET development.
After your web-hosting account is set up, you can move your site’s web pages and databases from your computer to the web-hosting company’s computers. Then you, or anyone else on the Internet, can visit these pages. For example, if you upload a web page named Default.aspx and your domain name was SamsDogPound.org, anyone could view the page by typing http://www.SamsDogPound.org/Default.aspx into their browser’s Address bar.
Before you can create an account with a web-hosting company, you need to find a company that supports the following:
ASP.NET version 3.5—. Some web-hosting companies focus on non-Microsoft web technologies, such as PHP and JSP, and do not offer web-hosting plans for ASP.NET websites.
Microsoft SQL Server—. If you plan to deploy a data-driven web application, ensure that the hosting plan you buy includes a Microsoft SQL Server database account. Most web-hosting companies do not allow Microsoft SQL Server 2005 Express Edition database files in the
App_Datafolder. Instead, they provide a database server, which is a computer whose sole task is to host databases. To work with databases through your ASP.NET application, you must have access to this server through a database account. Some web hosts charge extra for these accounts.FTP access—. The easiest way to upload files from your computer to the web-hosting company’s is through the File Transfer Protocol, or FTP. Virtually all web-hosting companies provide FTP access, but double-check to ensure that you can use this protocol to upload files to your account.
In my opinion, the easiest way to find a web-hosting company that supports ASP.NET 3.5 and offers database accounts, and allows FTP access, is to check sites such as TopHosts.com and HostIndex.com, which list thousands of web-hosting companies. You can search these sites’ databases for web-hosting companies that meet certain criteria, such as cost per month, geographical location, web server platforms used, database availability, and so forth.
Costs for web-hosting companies can range from a few dollars per month to hundreds or thousands of dollars per month, based on the features provided. Additionally, most web-hosting companies have a setup fee in the $20 to $100 range. On top of the web-hosting costs, you will probably want to register a domain name, which typically costs between $10 and $35 per year, depending on the domain name registrar used.
After you have picked out a web-hosting company and have double-checked that it supports ASP.NET development and offers database accounts, contact the company’s sales staff to create an account.
By the Way: Can I Host a Website from My Personal Computer?
Readers who have always-on broadband connections, such as through a cable modem or DSL, and a static IP address may be able to host a website from their personal computers. For more information on this option, contact your broadband provider.
If you want a public website, I personally recommend that you go with a web-hosting company. Setting up your computer to host a public website can be a difficult process and, if not done correctly, can leave your computer open to a number of security threats. For example, in July 2001 an Internet worm named Code Red spread quickly across the Internet, infecting Microsoft web servers. (A worm is a program that replicates and distributes itself over a computer network.) Specifically, the worm defaced web pages by adding the following text: HELLO! Welcome to http://www.worm.com! Hacked By Chinese! (For more information on the Code Red worm, see www.cert.org/advisories/CA-2001-19.html.) By setting up a public web server on your personal computer, you open yourself up to this sort of attack.
You can neutralize such threats by keeping abreast of the latest security patches from Microsoft, along with gaining the know-how on how to best secure systems. Chances are, the professionals at the web-hosting company have more experience setting up, administering, and securing web servers than you, and therefore it’s likely they can provide a better line of defense.
Deploying an ASP.NET website to a web-hosting company involves the following steps:
Uploading the website files—You need to copy the web pages, image files, and other web content from your computer to the web-hosting company’s computer.
Replicating the database—If your local web application uses a database, you need to replicate your local database’s schema and table on the web-hosting company’s database server.
Updating
web.config—As discussed in Hour 13, “An Introduction to Databases,” the application’s database connection strings are stored in theweb.configfile. These connection strings need to be updated to point to the web-hosting company’s database servers. This includes updating connection string information used by the membership and roles systems.
Keep in mind that deployment is often cyclical; it is not a one-time event. After deploying your website for the first time, you will find bugs or have other features or changes to add. These enhancements should be made locally. After testing these changes, upload the added and modified ASP.NET pages. If any database changes occur, apply these changes to the database on the web-hosting company’s database server.
Let’s create a simple data-driven ASP.NET web application and then look at the precise steps for deploying the sample application to a web-hosting company’s computers.
Create a new ASP.NET application and place it on your computer’s file system. Because some additional steps are needed when deploying an application that uses the membership or roles systems, let’s configure this sample application to use membership. Launch the ASP.NET Web Site Administration Tool. From the Security tab, set the website’s authentication to authenticate users from the Internet. This configures the application to use forms-based authentication and automatically creates the ASPNETDB.MDF database file in the App_Data folder.
By the Way
For a refresher on ASP.NET’s membership system, forms-based authentication, and the ASP.NET Web Site Administration Tool, refer to Hour 21, “Managing Your Site’s Users.”
After configuring the ASP.NET Web Site Administration Tool to authenticate users through the Internet, the Security screen should include a link titled Create user. Click this and add a user account named Admin (see Figure 24.1). Close the ASP.NET Web Site Administration Tool and return to Visual Web Developer.

In addition to supporting user accounts, let’s have the ASPNETDB.MDF database also store application data. Imagine that this sample website was going to be used as an employee directory, enabling visitors to quickly find contact information for the employees at your company. Such an application would need a database table that included a row for each employee, with columns to capture each employee’s name, phone number, email address, and other pertinent information.
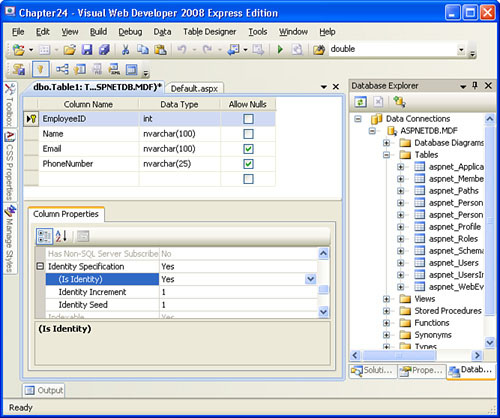
From the Database Explorer, drill into the ASPNETDB.MDF database and add a new table with the following columns:
EmployeeID—. This column uniquely identifies each record, so set its data type tointand disallow Nulls. Also mark the column as an Auto-increment and make it the primary key.Name—. Make this column of typenvarchar(100)and disallow Nulls.Email—. Make this column of typenvarchar(100)and allow Nulls.PhoneNumber—. Make this column of typenvarchar(25)and allow Nulls.
At this point your screen should look similar to Figure 24.2. Save the table, naming it Employees.
Add a handful of records to the Employees table through Visual Web Developer by right-clicking the Employees table in the Database Explorer and choosing the Show Table Data option.
Next, open the Default.aspx page. Let’s build a user interface here to allow visitors to search the Employees table by name. Add the text Search by name: followed by a TextBox and Button control. Set the TextBox control’s ID property to NameSearch and the Button’s ID and Text properties to SearchButton and Search, respectively.
Beneath the Button, add a SqlDataSource control and name it EmployeesDataSource. Configure the data source to return the Name, Email, and PhoneNumber columns from the Employees table.
Click the WHERE button and add a WHERE clause on the Name column. Specifically, set the Column drop-down to Name, the Operator to LIKE, and the Source to Control, choosing the NameSearch option from the Control ID drop-down list (see Figure 24.3). Click the Add button to add the WHERE clause to the SqlDataSource control’s SELECT statement and then click OK to return to the wizard.
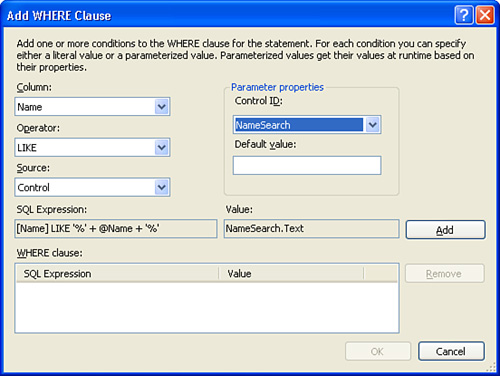
Click the ORDER BY button and select the Name column from the drop-down list so that the results are sorted alphabetically by employee name. At this point the SqlDataSource’s SELECT statement reads:
SELECT [Name], [Email], [PhoneNumber] FROM [Employees] WHERE ([Name] LIKE '%' + @Name + '%') ORDER BY [Name]
Click Finish to complete the wizard.
This WHERE clause returns the list of employees whose Name column value contains the text entered by the user in the NameSearch TextBox control. But what is displayed if the user leaves the NameSearch TextBox empty? By default, the SqlDataSource uses a database Null value when one of its parameters lacks any value, resulting in a WHERE clause of: WHERE ([Name] LIKE '%' + Null + '%'). Concatenating a database Null value with other string characters (such as %) results in a database Null value. Therefore, the WHERE clause is boiled down to: WHERE ([Name] LIKE Null). No columns match this condition. As a result, if the user omits a value from the NameSearch TextBox, no records are returned from the SqlDataSource control.
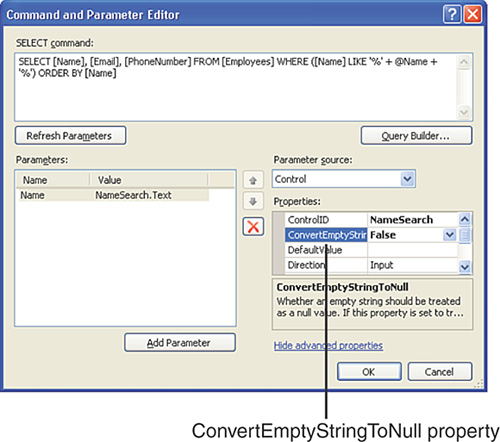
To have the SqlDataSource return all the Employees records when no value is entered into the NameSearch TextBox, we need to configure the parameter so that it does not convert an empty value in the NameSearch TextBox to a database Null value. To accomplish this, select the SqlDataSource to load its properties in the Properties window. Go to the SelectQuery property and click the ellipses to bring up the Command and Parameter Editor. Select the Name parameter from the list of parameters on the left and then click the Show advanced properties link on the right. Set the ConvertEmptyStringToNull property to False, as shown in Figure 24.4, and then click OK to close this dialog box.
With the SqlDataSource control added and configured, add a GridView control to the page, binding it to the EmployeesDataSource control. Configure the GridView to enable paging and sorting.
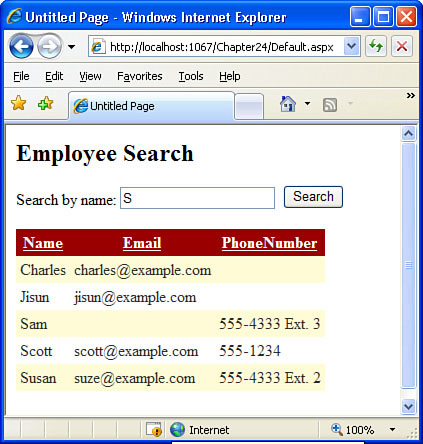
Take a moment to test the page through a browser. When the page is first visited, you should see all the employees listed along with their contact information. You can sort the grid by any of these fields or narrow down the list of employees by typing a name into the NameSearch text box and clicking the Search button. Figure 24.5 shows the results when filtering the list of employees by those that contain the letter “s” somewhere in their name.
At this point, our application is complete, tested, and ready to be deployed! After a web-hosting account has been procured, deployment involves three steps: uploading the website’s files; replicating the database; and updating the connection strings in web.config.
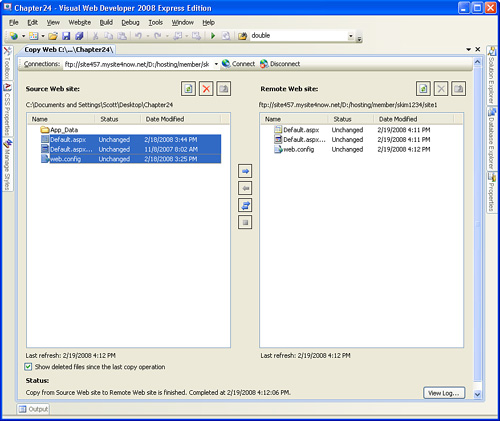
To move files from your local computer to your web-hosting company, go to the Website menu in Visual Web Developer and choose Copy Web Site. This brings up the Copy Web interface, which lists the contents in your website and the contents of a remote site in side-by-side panes. Figure 24.6 shows this screen when a remote website has not yet been specified. The left column lists the contents of the local website—Default.aspx, Default.aspx.vb, Web.config, and the App_Data folder.

To connect to your web-hosting company, click the Connect button at the top of the screen. This brings up the Open Web Site dialog box. Select the FTP Site option and then enter the connection information. If you are unaware of the server, port, directory, and other FTP configuration information, contact your web-hosting company’s support staff.
After supplying the FTP information and clicking Open, the Copy Web screen lists the contents of the remote website. You can copy files between your local computer and the remote website by selecting a file from one column and then clicking the appropriate arrow icon.
When deploying a website for the first time, copy over all files except for the Microsoft SQL Server 2005 Express Edition database files (the .mdf files in the App_Data database). If you are redeploying the site after making additions or changes, you need to upload only the new and modified files.
Because this is the first deployment for this sample web application, upload all the files in the root directory: Default.aspx, Default.aspx.vb, and Web.config. Figure 24.7 shows the Copy Web screen after these files have been copied over.
Did you Know?
You don’t have to use Visual Web Developer to copy files from your computer to the web-hosting company. Any FTP client will suffice. There are many free and commercial FTP clients available. One of my favorites is FileZilla, a free FTP client available at www.FileZilla-Project.org.
As we have seen throughout the latter half of this book, Visual Web Developer and Microsoft SQL Server 2005 Express Edition make it easy to create and manage databases. Traditionally, working with databases required installing and configuring a database server. But with SQL Server 2005 Express Edition, new databases are simply added to the web application’s App_Data folder.
Unfortunately, Microsoft SQL Server 2005 Express Edition introduces security and configuration issues for web-hosting companies. Consequently, few, if any, web-hosting companies support Express Edition. Instead, most require that you transfer your database to their database server.
Moving your database to your web-hosting company’s database server involves replicating the database’s tables and their data. There are a variety of ways to accomplish this:
Start developing on the web-hosting company’s database server—. If you already have procured a web-hosting plan prior to starting development, you can do all your database design on the remote database server. With this setup, your web pages are created on your computer, but they communicate with your web-hosting company’s database server. With this approach there’s no need to replicate the database to the web-hosting company’s database server because it’s already there. The only downside to this approach is that you must be connected to the Internet when developing or testing your application locally.
Ask your web-hosting company for help—. Some web-hosting companies may be willing to replicate your Express Edition database for you if you send them the
.mdffile. Others have tools in place to upload a.mdffile and automatically attach it to the database server.Copy the website using the Database Publishing Wizard—. Visual Web Developer includes a tool to assist with publishing your database file. Using the Database Publishing Wizard you can select a local database to replicate and it will generate a script that contains the SQL commands to create the schema and data. You can then execute this script on the web-hosting company’s database server.
The first two options are the simplest and don’t require any further examination. The third option—using the Database Publishing Wizard—deserves more discussion.
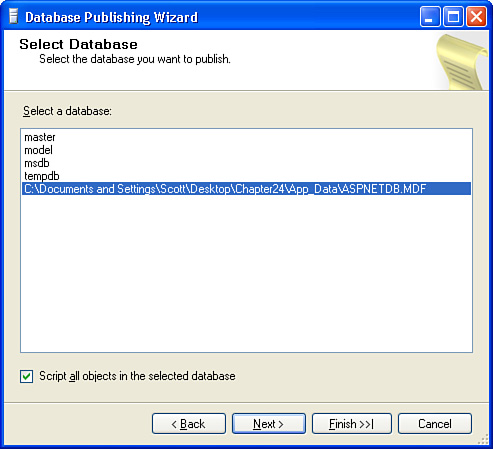
The Database Publishing Wizard is a tool created by Microsoft that is included with Visual Web Developer 2008. To launch it, go to the Database Explorer, right-click on the database to publish, and choose the Publish to Provider menu option. This launches the Database Publishing Wizard.
The Database Publishing Wizard starts by displaying a welcome screen that explains its purpose. The subsequent screen, shown in Figure 24.8, prompts for the database to replicate.
By the Way
By default, the Database Publishing Wizard replicates all database objects to the destination server. If you want to replicate only a subset of database objects, uncheck the Script All Objects in the Selected Database check box shown at the bottom of Figure 24.8. If this option is unchecked, the subsequent screens have you select what database objects to copy over.
After specifying the source database, the wizard asks where to publish the database. There are two options:
Script to File—. This choice creates a script file with the necessary SQL commands to replicate the source database’s structure and data.
Publish to a Shared Hosting Provider—. The Database Publishing Wizard can publish the database changes directly to the remote database server if the web-hosting company supports Microsoft’s SQL Server Database Publishing Services protocol. Check with your web-hosting company to see if they offer this support.
The Script to File option works for any web-hosting company, regardless of whether they support Microsoft’s SQL Server Database Publishing Services protocol. Therefore, let’s look at using this option. Select the Script to File option and choose the location to place the file. Then click Next to review the settings.
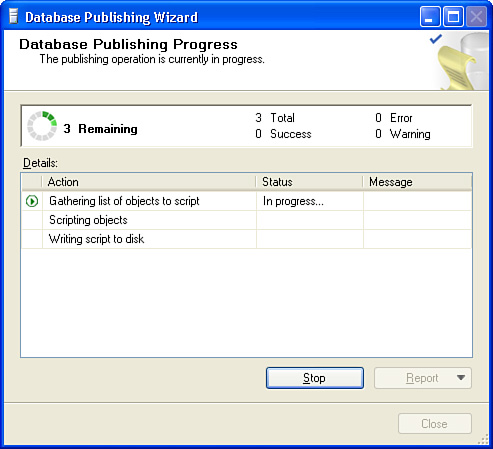
After you have verified that the appropriate database objects are being copied over, click Finish to begin the scripting process (see Figure 24.9).
At this point the Database Publishing Wizard has created the scripts to replicate the source database’s content and data. Our final step is to execute this script file on the web-hosting company’s database servers. The easiest way to execute a script file on a database is to download Microsoft SQL Server Management Studio Express Edition, which is a free application for managing Microsoft SQL Server databases.
Did you Know?
If you have any of the non-Express Editions of Microsoft SQL Server 2005 installed on your computer, chances are you have SQL Server Management Studio installed on your computer. If this is the case, you can use the already installed version and do not need to download SQL Server Management Studio Express Edition.
To download Microsoft SQL Server Management Studio Express Edition, visit www.microsoft.com/downloads/details.aspx?FamilyID=c243a5ae-4bd1-4e3d-94b8-5a0f62bf7796&displaylang=en.
By the Way
The Microsoft SQL Server Management Studio Express Edition download page includes two download options: SQLServer2005_SSMSEE.msi and SQLServer2005_SSMSEE_x64.msi. You’ll likely want to download the first option, as the latter one is for 64-bit systems.
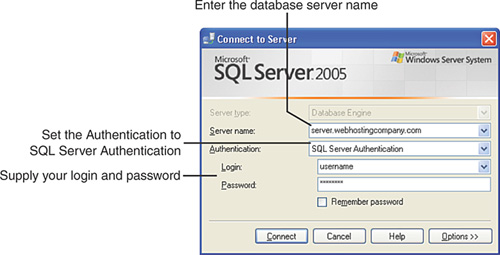
After you’ve downloaded and installed Management Studio, launch it. Management Studio starts by asking you what server to connect to. Go ahead and click Cancel for now—we’ll provide this information later.
Go to the File menu and select the Open child menu. Next, select to open a file and browse to the file created by the Database Publishing Wizard. After selecting the file, Management Studio again prompts for the database server name and credentials. Fill in the server name and credentials needed to connect to the web-hosting company’s database server (see Figure 24.10).
After entering the database server name and your credentials, Management Studio displays the contents of the selected file in a query window. Go to the Query menu and choose Execute to run this query on the database server.
By the Way
It may take anywhere from several seconds to several minutes for the SQL script file to finish executing. The time required depends on how many database objects were created by the Database Publishing Wizard, how many records were in these tables, the processing power of the database server, and other related factors.
To verify that the database has been replicated on the web-hosting company’s database server, go to the File menu and choose the Connect Object Explorer file option. This redisplays the Connect to Server dialog box shown in Figure 24.11. Reenter your credentials and click Connect.
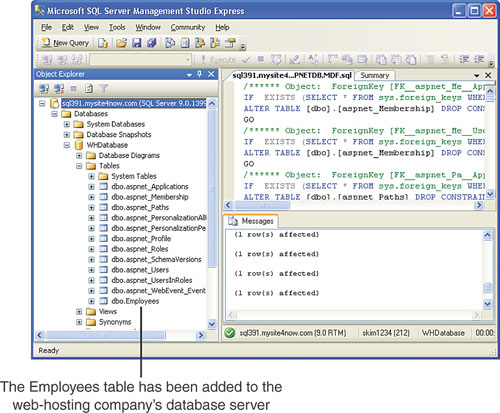
The Object Explorer lists those database objects on the server that you have permission to examine. Drill down into the Databases folder and into your database. Expand the Tables folder. You should see the same set of Tables on the web-hosting company’s database server that is on your local database.
After the database has been replicated, the final step is to update the connection string settings in web.config so that they point to the web-hosting company’s production server. You need to make these changes on the web.config file on the web-hosting company’s computer. To accomplish this, modify the web.config file on your computer and then upload it to the web-hosting company through the Copy Site screen. After uploading the web.config file to the web-hosting company, you may undo the changes so that the local web.config file’s connect strings still point to the local SQL Server database in the App_Data folder.
The connection string value in web.config should look similar to the following:
Data Source=.SQLEXPRESS;AttachDbFilename=|DataDirectory|ASPNETDB.MDF;Integrated Security=True;User Instance=True
Replace this string with the connection string information provided by your web-hosting company. The web-hosting company will provide you with a database server, a database name, and a username and password. If the database is a SQL Server 2005 server, use the following connection string value:
Data Source=databaseServer;Initial Catalog=databaseName; User Id=username;Password=password;
For alternative databases, such as SQL Server 2000 or SQL Server 2008, consult www.ConnectionStrings.com for sample connection strings. If you have trouble formulating the correct connection string, contact the web-hosting company’s support for assistance.
Did you Know?
In addition to updating web.config on the web-hosting company’s computer, you can also update your local web.config file to point to the remote database. Doing so means that when developing and testing your website locally, you will be interfacing with the web-hosting company’s database server. This has its advantages—during development you get to see real data—and perils—because the data is the live data, users may be upset if you accidentally delete a record.
If your web application uses the membership or roles systems, you will need to update the web.config at the web-hosting company to include an additional connection string setting. By default, the membership and roles systems use a hard-coded connection string named LocalSqlServer to connect to the database where user account and role information is stored. This connection string points to the ASPNETDB.MDF database in the App_Data folder. The remote web application, however, does not have an App_Data folder; the user accounts and roles systems are instead stored on the database server.
We need to update the LocalSqlServer connection string to point to the database server. If you forget to do this, you will get an error message when visiting a page that attempts to work with user accounts or roles.
Currently, the <connectionStrings> section in web.config looks similar to the following:
<connectionStrings>
    <add name="ConnectionString" connectionString="connectionString"
        providerName="System.Data.SqlClient" />
</connectionStrings>
We need to add two additional XML elements within the <connectionStrings> element:
A
<clear />element—. This clears out the hard-coded connection string names, includingLocalSqlServer. This should appear as the first markup within the<connectionStrings>element.An
<add />element—. Use this to create a custom connection string value forLocalSqlServer.
After making these additions, your web.config file’s <connectionStrings> section should look like the following:
<connectionStrings>
    <clear />

    <add name="ConnectionString" connectionString="connectionString"
        providerName="System.Data.SqlClient" />

    <add name="LocalSqlServer" connectionString="connectionString"
        providerName="System.Data.SqlClient" />
</connectionStrings>
The connectionString values in the two <add /> elements should be the same, pointing to your database on the web-hosting company’s database server.
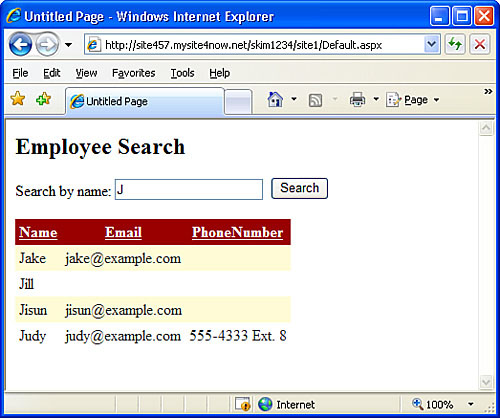
After uploading your ASP.NET files and replicating the database, visit the remote site. If you have already purchased a domain name and pointed it to your web-hosting company’s computers, you should be able to visit the site by entering www.YourDomainName.com. If you do not yet have a domain name, your web-hosting company can provide you with a temporary server name, which might be something like www.WebHostingCompany.com/AccountName.
Figure 24.12 shows the uploaded website when viewed through a browser. Note the URL in the browser’s Address bar—http://site457.mysite4now.net/skim1234/site1/Default.aspx. We’re no longer visiting the website locally! It is now accessible to any user on the Internet.
Did you Know?
If you get an error when visiting a page on the production server, ASP.NET shows a rather unhelpful error page that lacks any information as to the cause of the error. This uninformative error page is used because it is a security risk to divulge error details to a web visitor because it may highlight a potential vulnerability in your application. To override this default behavior, add the following markup within the <system.web> section of web.config:
<customErrors mode="Off" />
Alternatively, you can configure your ASP.NET application to automatically email you the details of an error whenever one occurs. For more information on this approach, check out http://msdn2.microsoft.com/en-us/library/aa479332.aspx.
ASP.NET applications are usually developed and tested locally and then deployed to a web-hosting company when completed. By deploying the site to a web-hosting company, any person with an Internet connection can visit the site. Deployment involves three steps: uploading the website’s files, replicating the database, and updating web.config.
When uploading the website’s files, all files except for the Microsoft SQL Server 2005 Express Edition database files need to be copied up. This includes .aspx pages, .vb pages, web.config files, image files, and so forth. Visual Web Developer’s Copy Web Site option makes it easy to transfer files from your computer to the web-hosting company’s.
The hardest step in the deployment process is replicating the local database to the web-hosting company’s database server. The easiest approach is to simply start database development on the remote database or to have a web-hosting company that will import your Express Edition database file into their database server. Barring that, you need to use the Database Publishing Wizard and SQL Server Management Studio. The Database Publishing Wizard generates the SQL scripts to create the necessary database objects and data in the remote database. Use Management Studio to execute this script on the web-hosting company’s database server.
Learning how to deploy an ASP.NET site is like learning anything else—it’s hard and slow-going the first couple times through, but after some practice it becomes easier. If you get stuck, the best resource is your web-hosting company’s support staff—you’re paying them, in part, for their expertise and help. Another great resource is the Configuration and Deployment forum at http://forums.asp.net/26.aspx.
I have deployed my website and would now like to add new users accounts through the ASP.NET Web Site Administration Tool. How do I do this? | |
Unfortunately the ASP.NET Web Site Administration Tool is designed to work only on local sites. You cannot use this tool to manage user accounts, roles, and authorization rights on a remote site. The good news is that many ASP.NET developers have created their own Web Site Administration Tool-like applications. One of my favorite ones is from Dan Clem. The complete source code along with instructions on how to set up and use it can be found at http://aspnet.4guysfromrolla.com/articles/052307-1.aspx. |