
In this hour, we will cover
The different fields available for the GridView and DetailsView controls
Displaying hyperlinks, check boxes, and images in the GridView and DetailsView controls
Using wildcards in the SQL
WHEREclauseUnderstanding data binding and the data-binding syntax
Over the past five hours we’ve covered a number of data-related topics. In Hour 13, “An Introduction to Databases,” we talked about the structure and purpose of databases and looked at how to create a SQL Server 2005 Express Edition database using Visual Web Developer. Next, in Hour 14, “Accessing Data with the Data Source Web Controls,” we saw how to get data from the database to an ASP.NET web page through ASP.NET’s data source controls. In particular, we focused on the SqlDataSource control, which is designed for accessing data from a database. And in the preceding three hours we examined a variety of ASP.NET controls designed to display and modify the data retrieved from a data source control.
However, a number of data-related topics didn’t fit naturally into any of the previous hours. This hour examines some miscellaneous data-related topics. Hour 19, “Using Templated Data Web Controls,” examines the ListView and FormView controls and concludes our examination of ASP.NET’s data capabilities.
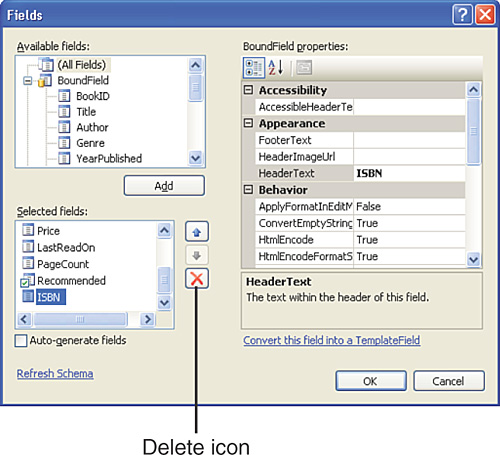
As we saw in Hour 15, “Displaying Data with the Data Web Controls,” when a SqlDataSource control is bound to a GridView, a BoundField is added to the GridView for each database column specified in the SqlDataSource control’s SelectCommand. We can edit the GridViews fields by going to the smart tag and clicking the Edit Columns link. As we have seen in past hours, this brings up the Fields dialog box (see Figure 18.1). The bottom-left corner of the Fields dialog box lists the current fields of the control; from here we can reorder, remove, or configure the assorted BoundFields.
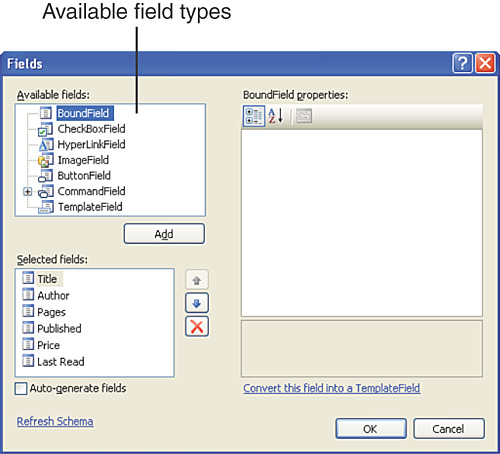
The BoundField is not the only type of field. A total of seven field types exist. Each field type renders a different interface. As you already know, the BoundField displays the values of a specified database column either as plain text or in a TextBox Web control, depending on whether the data is in read-only, edit, or insert mode.
Another field type that we’ve used in past hours is the CommandField, which provides an interface for the end user for inserting, editing, selecting, and deleting data. The CommandField can show any combination of insert, edit, select, and delete buttons; you can indicate which of these you want present through the ShowInsertButton, ShowEditButton, ShowSelectButton, and ShowDeleteButton properties. When you use the GridView’s smart tag to turn on support for inserting, editing, selecting, or deleting, a CommandField is automatically added with the appropriate properties’ values set accordingly.
The seven field types are displayed in the upper-left corner of the Fields dialog box (see Figure 18.1). Table 18.1 lists the seven field types along with a brief description of each.
Table 18.1. The GridView and DetailsView Can Be Composed of a Number of Fields of Differing Types
Field | Description |
|---|---|
BoundField | Displays a corresponding data source control column’s value as text or in a text box when being edited or when inserting a new value. When binding a GridView or DetailsView control to a data source control through the smart tag, a BoundField is automatically created for each column in the associated data source control. |
CheckBoxField | Renders a check box whose checked state depends on the value in a specified data source control column. Useful for displaying the value of a |
HyperLinkField | Creates a HyperLink control whose |
ImageField | Renders as an Image Web control whose |
ButtonField | Renders as a Button Web control. Useful if you have some action you want the user to be able to initiate on a record-by-record basis other than editing, deleting, or selecting. (Those functions are already provided by the CommandField.) |
CommandField | Renders the interface for inserting, updating, deleting, or selecting records. Automatically added when enabling any of those functionalities through the control’s smart tag. |
TemplateField | Allows for a mix of static HTML markup, Web controls, and data binding syntax. In Hour 16, we used TemplateFields to customize the editing interface for the GridView. |
We’ve already looked at using the BoundField, CommandField, and TemplateField. Over the next few sections we’ll examine the CheckBoxField, HyperLinkField, and ImageField.
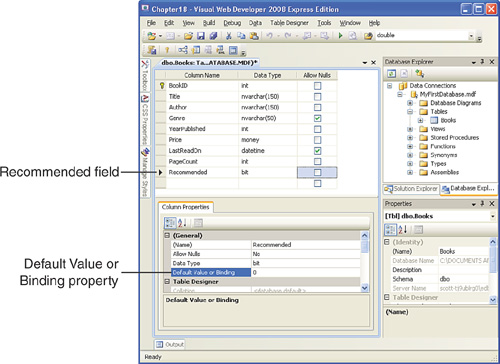
As we discussed in Hour 13, a database table is composed of a number of columns, each of which has a data type that indicates what types of values can be stored in the column. The Title column in the Books table, for example, has an nvarchar(150) data type, meaning that it can store strings with up to 150 characters; the LastReadOn column has a datetime data type, meaning it can store date and time values. One database column data type that we’ve yet to use in the Books table is the bit data type. A column that has a data type of bit can store one of two values: 0 or 1. Typically, a bit column is used to store a Yes/No or True/False type value.
Let’s take a minute to add a bit column to our Books table. Go to the Database Explorer in Visual Web Developer, drill down to the Books table, right-click its name, and choose the Open Table Definition option. This brings up the list of columns that make up the table. Next, add a new column named Recommended and choose a Data Type value of bit. Because the table contains existing data, this column either must allow Nulls or we must provide a default value. Let’s use the latter approach.
First, uncheck the Allow Nulls check box. We need to specify a default value for this column. In the Column Properties pane, search for the property titled Default Value or Binding in the General section. Then put in the default value there. Let’s use a default of 0. Take a minute to ensure that your screen looks similar to Figure 18.2 and then save the table changes.
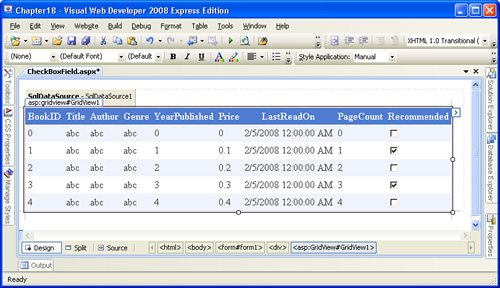
Now that we’ve added this new column, create an ASP.NET page that displays all rows and all columns in an editable GridView. As soon as you bind the GridView to the SqlDataSource control through the GridView’s smart tag, the Recommended field in the GridView is shown as a series of check boxes. Visual Web Developer is smart enough to note that a particular column being bound to the GridView is a bit column. For such columns, it automatically uses a CheckBoxField instead of the standard BoundField (see Figure 18.3).
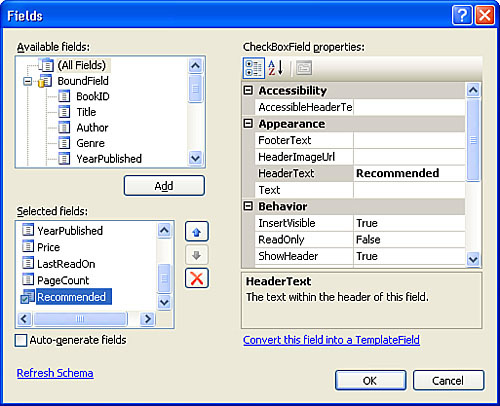
To see that the Recommended field is indeed a CheckBoxField, go to the GridView’s smart tag and click the Edit Columns link, bringing up the Fields dialog box. As Figure 18.4 shows, from the bottom-left corner listing of the fields in the GridView, the Recommended field is a CheckBoxField. Selecting the Recommended field loads its properties on the right. As with the BoundField, you can customize the CheckBoxField’s appearance through the properties in the Styles section.
Take a moment to test this ASP.NET page through a browser. When you visit the page, each row in the Recommended field is displayed as a disabled check box. When a particular row is edited, the editable row’s check box is enabled, allowing the end user to change the check box’s value. This functionality is made possible thanks to the CheckBoxField.
With the addition of a Recommended field, users visiting your site can see both what books are in your bookshelf and what books you heartily recommend. A visitor who notes that the books you read and like are similar to the books he reads and likes might be interested in buying some of the books you recommend that he has yet to read. To help streamline this process, you could add a link titled “Buy” in each book row that, when clicked, would whisk the user to some online bookstore, displaying the details of that particular book.
Adding such functionality through the GridView (or DetailsView) is possible and quite simple thanks to the HyperLinkField. As its name implies, the HyperLinkField displays a field of HyperLink Web controls. When visited through a browser, the HyperLink control renders as a link that, when clicked, takes the visitor to a specified URL. With the HyperLinkField field, we can set the Text and NavigateUrl properties of the HyperLink control based on database values so that the text and URL of the rendered link for each row in the GridView is based on the values of the columns of the database record that was bound to that row.
If this doesn’t make much sense yet, don’t worry; an example should help. Because we want to add a “Buy” link to each row in a GridView that, when clicked, sends the visitor to an online bookstore, our first order of business is to determine what online bookstore to use and what the URL for viewing the details for a particular book on that site looks like. For this exercise, let’s use www.isbn.nu as the online bookstore. isbn.nu doesn’t sell books directly; instead, it links to a variety of online bookstores, helping the visitor find the lowest price. With isbn.nu, the URL http://www.isbn.nu/ISBN displays the details for the book with the specified ISBN value.
By the Way
The ISBN of a book is a 10- or 13-digit number that uniquely identifies the book. Typically, the ISBN can be found on the back cover of a book.
To provide such a link, we need to store the ISBN for each of the books; therefore, we need to add an ISBN column to the Books table. Because a book’s ISBN can be up to 13 characters, create the ISBN column using the nvarchar(13) data type. We don’t want to allow Nulls, but because there’s already data in the Books table, we’ll initially need to allow Nulls for this new column until we have a chance to provide values for the ISBN column for the existing rows. Take a moment to add this new column.
After adding the ISBN column, edit the table’s data (right-click the Books table in the Database Explorer and choose Show Table Data). Enter an ISBN for each of the books, omitting any hyphens (see Figure 18.5). The ISBN for the five books in the Books table are as follows:
Visual Studio Hacks—9780596008475
Create Your Own Website—9780672329265
The Number—0375508805
The Catcher In The Rye—0316769487
Fight Club—9780805076479

After you’ve supplied the ISBN values for all the records in the Books table, return to editing the table’s definition and uncheck the Allow Nulls check box for the ISBN column.
Next, create an ASP.NET page with a SqlDataSource that retrieves all the columns and rows from the Books table. Add a GridView control and bind it to the SqlDataSource. At this point the GridView displays the value of the ISBN column using a BoundField. We need to replace this BoundField with a HyperLinkField. To accomplish this, go to the Fields dialog box.
The lower-left corner of the Fields dialog box lists the fields currently being used by the GridView, one of which is an ISBN BoundField. Remove this field from the GridView by selecting it and clicking the Delete icon to the immediate right of this list, as shown in Figure 18.6.
You can also delete any other BoundFields that you aren’t interested in displaying. For this ASP.NET page, let’s not bother showing the BookID, YearPublished, or LastReadOn BoundFields.
Watch Out!
If you are working with an editable GridView or editable or insertable DetailsView, you cannot blindly remove BoundFields from the data Web control because the SqlDataSource control is configured to save these values as well.
If you do not want certain fields displayed when editing or inserting data, be sure to configure the data source control not to return those column values. For more discussion on this issue, refer to the “Marking Fields as Read-Only” section in Hour 16, “Deleting, Inserting, and Editing Data.”
We’re now ready to add the Buy HyperLinkField. From the Available Fields list in the upper-left corner, scroll down and select the HyperLinkField option and then click the Add button. This will add a HyperLinkField to bottom of the list of fields in the lower-left corner. Take a moment to move this HyperLinkField to the top of the list so that it is displayed in the far left of the GridView. We now need to set the HyperLinkField’s properties, indicating what the rendered link’s text and URL values should be.
The HyperLinkField’s text and URL values can be static or dynamic. A dynamic value differs for each row in the GridView based on the data bound to that particular row; a static value is the same among all rows. For our task we want a static text value—Buy—and a dynamic URL value, varying on each book’s ISBN.
If you want to set the text or URL values to static values, use the Text or NavigateUrl properties. The Text property can be found in the Appearance section of the properties list; NavigateUrl is located in the Behavior section. Because we want the link’s text to be Buy for all rows, set the Text property of the HyperLinkColumn to Buy.
To specify a dynamic value for the text or URL values, we need to use two properties. For the text, we can use the DataTextField and DataTextFormatString properties; for the URL, we can use the DataNavigateUrlFields and DataNavigateUrlFormatString properties. These four properties are found in the Data section of the HyperLinkField’s properties. The properties work in tandem in the following manner: the DataTextField or DataNavigateUrlFields properties specify what database column values are used in the text or URL of the rendered link; the DataTextFormatString or DataNavigateUrlFormatString properties can be used to surround the database value with static text. With the DataTextFormatString and DataNavigateUrlFormatString properties, the string {0} is used to inject the dynamic value.
For our example, we want the URL to be dynamic based on the book’s ISBN; therefore, set the DataNavigateUrlFields property to ISBN. Because we want the URL to be http://www.isbn.nu/ISBN, use http://www.isbn.nu/{0} as the value for the DataNavigateUrlFormatString property. This instructs the HyperLinkColumn to inject the current row’s ISBN value at the {0} position, resulting in a properly formatted hyperlink.
After you set these properties and click the OK button in the Fields dialog box, your screen should look similar to Figure 18.7. Note that the GridView now has a Buy HyperLinkField at its far left and that the BookID, YearPublished, and LastReadOn BoundFields have been removed.

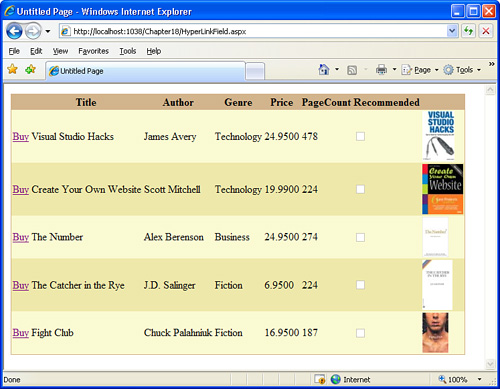
View the ASP.NET page in a browser. Each row in the rendered GridView contains a Buy link that, when clicked, will whisk you to isbn.nu. For example, clicking the Buy link for Create Your Own Website will take you to http://www.isbn.nu/9780672329265. Notice how the ISBN value for this book—9780672329265—is injected into the URL of the link precisely where the {0} string was placed in the HyperLinkField’s DataNavigateUrlFormatString property.
Did you Know?
You can have the URL value of the HyperLinkField include multiple values from database columns. To do so, specify each database column name you need in the DataNavigateUrlFields, separated by commas. Then, in the DataNavigateUrlFormatString, use {0} to inject the value of the first column in the column list, {1} to inject the second column’s value, {2} to inject the third’s, and so on. The DataTextField, however, can only include one database column name.
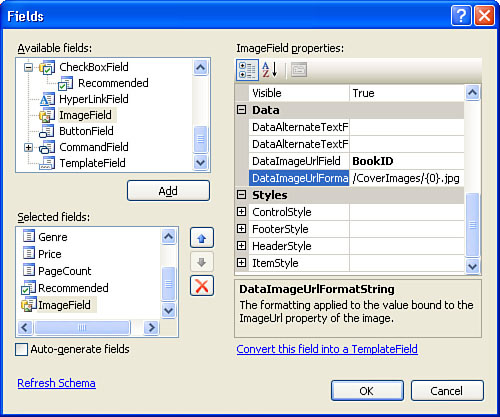
The ImageField is designed to display an image whose URL is based on a database value. The ImageField injects an Image Web control, which renders as an HTML <img> element. Like the HyperLinkField, the ImageField has a pair of properties that can be used to specify a database column and a format string: DataImageUrlField and DataImageUrlFieldString.
Let’s augment the GridView we created in the “Displaying Hyperlinks with the HyperLinkField” section to include an ImageField that displays each book’s cover. The first step is to find the cover images and save them to your computer. The isbn.nu website lists a small cover image at www.isbn.nu/ISBN. Visit the isbn.nu site for each of the books in the database. Right-click the cover image and save it to your website’s root folder, naming the file BookID.jpg. For example, save the cover image for Visual Studio Hacks using the filename 1.jpg; for Create Your Own Website, use 2.jpg, and so on.
After you have saved the cover images to your computer, add an ImageField to the GridView using the following steps:
After step 3, your Fields dialog box should look similar to the one in Figure 18.8. After verifying this, click the OK button and then view the ASP.NET page through a browser. You should see the thumbnail images for each of the book’s covers, as shown in Figure 18.9.
In previous hours we saw how to use the SqlDataSource’s wizard to add WHERE filter expressions to limit the results returned by the database. When creating a filter expression through the SqlDataSource control’s wizard, recall that we must specify three things:
The database column the filter expression applies to
The filter expression operator—
=,<>,<,<=,>, and so onThe filter value, which can be a hard-coded value or based on some external value, such as the value of a Web control on the page
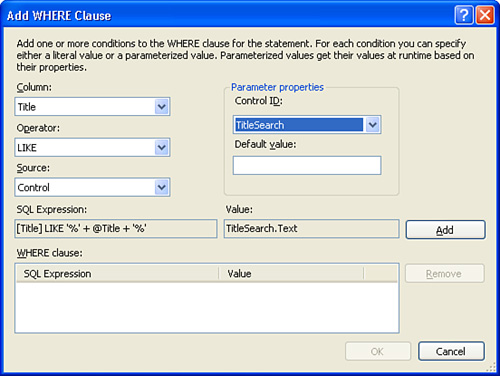
One of the operators that we’ve yet to look at is the LIKE operator. The LIKE operator uses wildcards around the parameter value and works only with string or date/time database columns. We can use the LIKE operator to build an interface for the user to search the Books table, returning all rows where the Title column value contains some user-entered search term.
Let’s create a page to demonstrate this filter expression operator. Before adding a SqlDataSource control to this page, first enter the text Search for books by title:, followed by TextBox and Button Web controls. Set the TextBox Web control’s ID property to TitleSearch and the Button control’s ID and Text properties to SearchButton and “Search,” respectively. The user interface we’ve just added will allow the user visiting our page to enter a search term into the text box. Upon clicking the Search button, the page will post back and the GridView will display those books with matching titles.
Now that we have the user interface implemented, the next step is to add the SqlDataSource and GridView controls. Configure the SqlDataSource control to return all columns from the Books table. Add a WHERE clause filter expression on the Title column using the LIKE operator based on the TitleSearch control (see Figure 18.10).
Watch Out!
The LIKE operator can be applied only to string (nvarchar, nchar, char, or varchar) or date/time columns.
After you add this filter expression and return to the wizard’s Configure the Select Statement screen, the wizard’s proposed SELECT statement should look like
SELECT * FROM [Books] WHERE ([Title] LIKE '%' + @Title + '%')
Note that the WHERE clause uses the LIKE operator in conjunction with wildcard characters (%) to return all records whose Title column value contains the value of the @Title parameter. This @Title parameter value will be set to the value of the Text property of the TitleSearch TextBox control.
Complete this page by adding the GridView control and binding it to the SqlDataSource. When the page is first visited through a browser, no records will be shown because the user has yet to enter a value into the text box. Similarly, if the user enters a search term that does not appear in any of the books’ titles, no books will be returned by the SqlDataSource. These two scenarios may confuse the end user. To help alleviate any confusion, enter a helpful message into the GridView’s EmptyDataText property. As we’ve discussed before, this value of the EmptyDataText property is displayed when no records are returned by the GridView’s associated data source control. Also feel free to tailor the GridView’s columns as you see fit; I used the column configuration from our ImageField discussion earlier in this hour.
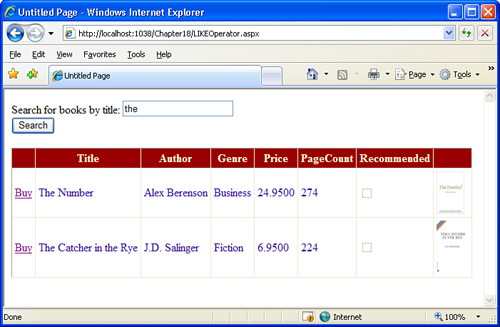
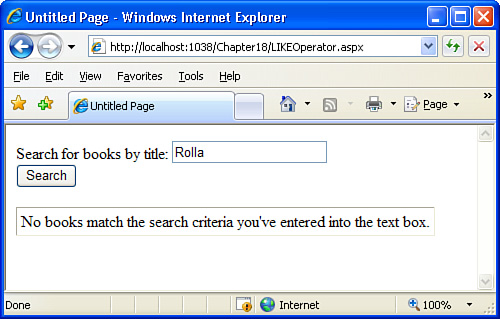
After setting the EmptyDataText property, take a moment to test this page in a browser. Figure 18.11 shows the page the user searches on the term “the”. This produces two results: The Number and The Catcher in the Rye. When a user enters a search term that is not in any title, such as “Rolla”, no results will be returned by the SqlDataSource control, and the GridView will display the value of its EmptyDataText property (see Figure 18.12).
Data binding is the process of tying a property of a Web control to the value of a database column; this process happens automatically all the time with the data Web controls. When we’re using BoundFields, CheckBoxFields, or ImageFields, the GridView or DetailsView control handles all the data binding for us behind the scenes. For example, the BoundField uses a Label Web control and automatically binds the Label’s Text property to the corresponding database column; with a CheckBoxField, a CheckBox Web control is used, and its Checked property is data bound to the corresponding database column.
In Hour 16 we saw how, when creating an editable GridView or DetailsView, the BoundFields rendered a TextBox Web control whose Text property was set to the value of the field’s corresponding database column. Sometimes we may need to customize the editing interface, adding validation controls, changing the properties of the TextBox Web control, or replacing the TextBox control with other Web controls altogether.
As we saw in Hour 16, this customization can be accomplished using a TemplateField. There are two ways to add a TemplateField: by adding a new TemplateField to the GridView or DetailsView, just like we added a HyperLinkField and an ImageField earlier in this hour; or by converting an existing BoundField into a TemplateField. In situations where you need to customize the editing interface for a BoundField, I encourage you to convert an existing BoundField into a TemplateField rather than deleting the BoundField and then adding a new TemplateField. Converting a BoundField to a TemplateField automatically performs a number of steps for you. Specifically, it creates the ItemTemplate and EditItemTemplates for the TemplateField, with a data-bound Label control in the ItemTemplate and a data-bound TextBox control in the EditItemTemplate. If you add a TemplateField manually, you’ll need to add the Label and TextBox controls and configure the data binding yourself.
ASP.NET supports two flavors of data binding: one-way and two-way. One-way data binding takes a specified database column’s value and binds it to a specified Web control property. Two-way data binding can not only assign a database column’s value to a Web control property, but can also do the inverse: It can take the value of a Web control’s property and assign it to the value of a data source control parameter.
One-way data binding is used when working with a nonmodifiable data Web control. When we’re using a data Web control that supports editing, inserting, or deleting, two-way data binding is used instead.
When working with BoundFields, CheckBoxFields, HyperLinkFields, or ImageFields, you do not need to concern yourself with the differences between one-way and two-way data binding; all the intricacies are automatically handled by the various fields. However, when adding data-bound Web controls to a TemplateField, you need to specify whether the data binding should be one-way or two-way. If the Web control is used only to display the information, use one-way data binding; if the Web control is also used to collect user input and save those values back to the database, use two-way data binding.
If you add a TemplateField manually or want to replace a converted TemplateField’s Label or TextBox Web control with a different control, you’ll need to specify the data bindings for the new controls you add to the TemplateField (including whether the data bindings are one-way or two-way). The data binding simply ties a particular property of the Web control to the field’s corresponding database column.
To practice working with data bindings and custom TemplateFields, let’s create an editable GridView with a customized editing interface. Specifically, we’ll create a GridView that lists the BookID, Title, and Genre columns from the database. By default, the BookID field will be read-only, and the Title and Genre fields will have a TextBox Web control for their editing interface. However, when editing a GridView row, we might want to instead have the Genre field displayed as a DropDownList with all the existing genres. To accomplish this, we’ll need to convert the Genre BoundField into a TemplateField and replace the TextBox Web control in the EditItemTemplate with SqlDataSource and DropDownList controls. In doing so, we’ll need to use data binding to tie the DropDownList control’s SelectedValue property to the value of the edited book’s Genre column.
Let’s not get too far ahead of ourselves here. Before we worry about creating a customized, data-bound editing interface for the Genre field, let’s first create an editable GridView that uses the default editing interface. Recall from Hour 16 that this involves first adding a SqlDataSource control configured to support updating. Because we want to allow the user to edit only the Title and Genre fields, in the SqlDataSource’s wizard, be sure to bring back only the BookID, Title, and Genre columns, as shown in Figure 18.13. Also, don’t forget to click the Advanced button and check the Generate INSERT, UPDATE, and DELETE Statements check box.
Next, add a GridView to the page and bind it to the SqlDataSource control. Check the Enable Editing check box in the GridView’s smart tag. Take a moment to view the page through a browser, editing the value for a particular book. Note that when you click the Edit button, the editing interface shows a text box for both the Title and Genre fields (see Figure 18.14).
Let’s now look at how to customize the Genre field so that it displays a DropDownList of the current genre values in the table, rather than using a TextBox control. To start, go to the Fields dialog box and convert the Genre BoundField into a TemplateField. This automatically creates an ItemTemplate with a data-bound Label Web control and an EditItemTemplate with a data-bound TextBox. In fact, if at this point you retest your page through a browser, there will be no discernable difference from the editable interface in Figure 18.14.
To change the Genre field’s EditItemTemplate, go to the GridView’s smart tag and click the Edit Templates link. This displays the template editing view of the GridView, with the smart tag listing the available templates. Choose the EditItemTemplate. You should see a TextBox Web control in the EditItemTemplate; this is the data-bound TextBox control that was added automatically when we converted the Genre BoundField to a TemplateField. Because we no longer want to use a TextBox in the editing interface, delete this Web control.
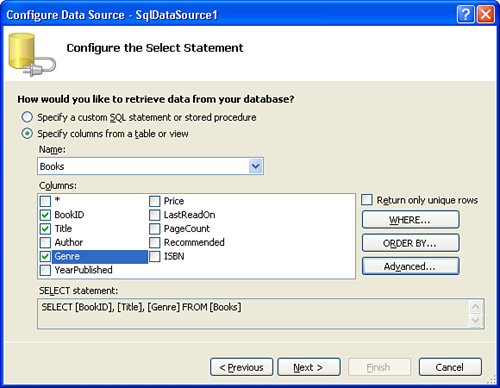
We now need to add a DropDownList to the EditItemTemplate that lists the genres in the Books table. To accomplish this, we need to first create a SqlDataSource control that retrieves the unique list of genres. This can be added directly to the Genre field’s EditItemTemplate. After adding the SqlDataSource to the EditItemTemplate, set its ID property to GenreDataSource. Next, run through the wizard, returning just the Genre column and checking the Return Only Unique Rows check box, like we did in the preceding hour when using a DropDownList to filter the GridView results by genre.
After configuring the GenreDataSource SqlDataSource control, add a DropDownList to the EditItemTemplate. Click the Choose Data Source link in the DropDownList’s smart tag and bind it to the GenreDataSource control, with the Genre column serving as both the field to display and the value field. After you’ve added both the SqlDataSource control and the DropDownList to the EditItemTemplate, and configured both, your screen should look similar to Figure 18.15.

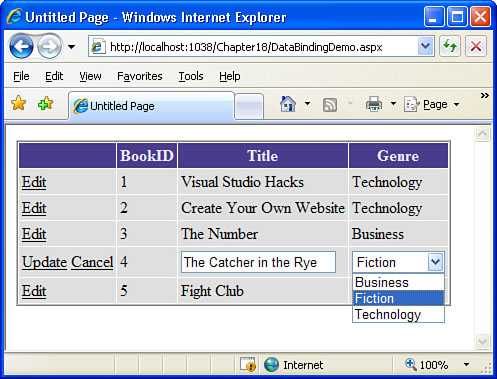
Test the ASP.NET page through a browser. When you edit a particular row, the Genre field is displayed as a drop-down list with the various genre values in the Books table (Business, Fiction, and Technology), as shown in Figure 18.17. However, notice that the first item of the DropDownList is selected, regardless of the edited book’s actual Genre value. That is, if you edit Visual Studio Hacks, which has the genre Technology, the drop-down list has the Business genre selected. Furthermore, if you save the edits, by clicking the Update button, a value of Null is saved for the book’s genre, regardless of what option you’ve selected from the drop-down list.
What’s going on here? What we’ve yet to do is implement data binding on the DropDownList control in the EditItemTemplate. Right now the DropDownList doesn’t know the value of the row’s Genre column, nor does it provide its selected value to the GridView’s SqlDataSource control when the data is updated. We need to have the DropDownList properly data bound to have this interaction occur correctly.
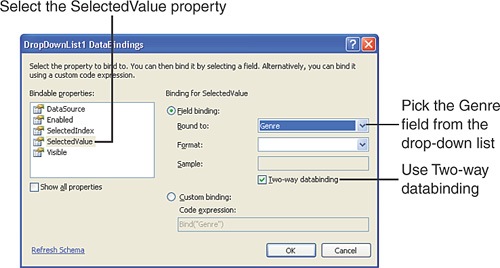
Return to Visual Web Developer and go back to the Genre field’s EditItemTemplate. Open the DropDownList’s smart tag and click the Edit DataBindings link. This displays the DataBindings dialog box, from which you can tie together the DropDownList’s properties and the column values returned by the GridView’s SqlDataSource control. Because we want the DropDownList’s selection to be based on the Genre column value, select the SelectedValue property from the list on the left and pick the Genre field from the drop-down list on the right, as shown in Figure 18.16. Because the SelectedValue value also dictates the value of the edited book’s Genre value, make sure that the Two-way Databinding check box is checked.
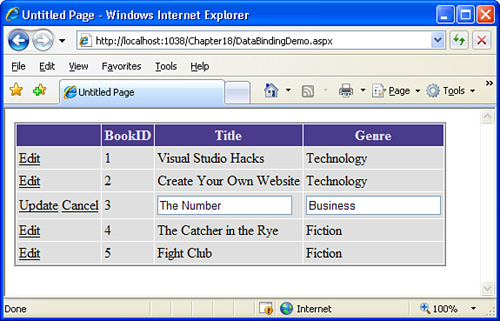
After binding the SelectedValue property to the Genre column, revisit the page in the browser. This time the item in the DropDownList is properly set to the book’s Genre value, and when you save the edits, the selected DropDownList value is saved. Figure 18.17 shows the ASP.NET page in action.
Watch Out!
Because the DropDownList in the Genre EditItemTemplate lists the unique genres that already exist in the Books table, you can lose options from the DropDownList. For example, The Number is the only book that is in the Business genre. If we edit this book and change its genre to Fiction, the next time we edit a row, the genre drop-down list will have only two options: Fiction and Technology.
As discussed in previous hours, ideally we would implement the concept of genres as a separate table in the database, giving the Books table a foreign key to this genre table. With that approach, we’d have a well-defined set of available genres and not lose existing genre choices based on a user’s actions.
Visual Web Developer makes it very easy to specify the data bindings for a Web control. As Figure 18.16 showed, the DataBindings dialog box allows us to pick one of the Web control’s properties, specify the database column to bind it to, and indicate whether to use one-way or two-way data binding. These steps, although done through the Design view, can also be performed through the Source view.
It’s always worthwhile to see how actions in the Design view affect the page’s declarative markup, so let’s take a moment to peruse the Source view. Listing 18.1 shows the Genre TemplateField’s declarative markup.
Example 18.1. The Genre TemplateField’s Declarative Markup
 1: <asp:TemplateField HeaderText="Genre" SortExpression="Genre">
 2:     <EditItemTemplate>
 3:         <asp:SqlDataSource ID="GenreDataSource" runat="server"
 4:             ConnectionString="<%$ ConnectionStrings:ConnectionString %>"
 5:             SelectCommand="SELECT DISTINCT [Genre] FROM [Books]"></asp:SqlDataSource>
 6:         <asp:DropDownList ID="DropDownList1" runat="server"
 7:             DataSourceID="GenreDataSource" DataTextField="Genre"  DataValueField="Genre"
 8:             SelectedValue='<%# Bind("Genre") %>'>
 9:         </asp:DropDownList>
10:     </EditItemTemplate>
11:     <ItemTemplate>
12:         <asp:Label ID="Label1" runat="server" Text='<%# Bind("Genre")  %>'></asp:Label>
13:     </ItemTemplate>
14: </asp:TemplateField>
The TemplateField contains an ItemTemplate and an EditItemTemplate. The ItemTemplate is defined on lines 11 through 13; the EditItemTemplate, on lines 2 through 10. The EditItemTemplate contains two Web controls: a SqlDataSource named GenreDataSource on lines 3–5 and a DropDownList control on lines 6–9. The effects of the data binding performed in Figure 18.16 are shown on line 8: The DropDownList control’s SelectedValue property has been bound to the Genre column using SelectedValue='<%# Bind("Genre") %>'.
I find it a lot quicker and easier to use the Design view to specify the data bindings for controls in TemplateFields, but do realize that a one-to-one correspondence exists between what we do through the Design view and the page’s declarative markup.
In this hour we looked at a hodgepodge of data-related topics, starting with an examination of the fields available for use with the data Web controls. The three fields we looked at were the CheckBoxField, HyperLinkField, and ImageField. The CheckBoxField is automatically used when binding a bit column to a GridView or DetailsView. The HyperLinkField renders a link, and the ImageField renders an image. Both the HyperLinkField and ImageField have pairs of properties that allow us to associate a database field value with the properties of the fields’ corresponding HyperLink or Image controls.
We also looked at how to use WHERE clause filter expressions with wildcards. This technique is useful if you want to allow the user to search for a particular substring within a database field. This hour concluded with an examination of data binding. Although the data Web controls natively handle data binding for us most of the time, if we add a TemplateField or want to use a Web control other than the TextBox in the editing or inserting interface, we need to bind the appropriate database column values to the appropriate Web control properties. We can accomplish this by clicking the Edit DataBindings link in the smart tag of a Web control in a TemplateField.
In the “Displaying Hyperlinks with the HyperLinkField” section, we learned that the HyperLinkField’s URL value can be constructed using multiple database values by setting the | |
No, the HyperLinkField supports multiple column names only in its URL portion. The | |
In the “Using Wildcards in a | |
Yes, this would be possible. You would need to add multiple SELECT *
FROM [Books]
WHERE ([Title] LIKE '%' + @Title + '%') AND
([Author] LIKE '%' + @Author + '%') AND
([Genre] LIKE '%' + @Genre + '%')Note that the three conditions in the To accomplish this, you’ll have to craft the | |
What if I want to display an image (or hyperlink), but I need more control over the way the image or hyperlink is rendered than the ImageField or HyperLinkField grants? For example, what if I want to have two images in the field, or I want some nonlinked text to appear after the hyperlink? | |
For simple links and images, the HyperLinkField and ImageField work wonderfully. However, if you need greater flexibility in the appearance of these fields, you’ll need to use a TemplateField instead. You can convert the HyperLinkField or ImageField into a TemplateField and then customize the ItemTemplate as needed. |
1. | In this hour we looked at one example that used a HyperLinkField and an ImageField to display a |
2. | In this hour we added a |
3. | In the “Specifying the Data Bindings for a Web Control” section this hour, we created an editable GridView that used a DropDownList for the |