
In this hour, we will cover
How user input is gathered through HTML
What a Web Form is
Using a Web Form in an ASP.NET web page
Identifying properties of Web Forms
Collecting user input in an ASP.NET web page
Examining how the Web Form persists the state of its Web controls
To create a useful web application, we must be able to somehow collect user input and return to the user a web page customized to the input entered. For example, search engines like Google accept a user’s search term and then display a page with the results based on the search query. Sites like Amazon.com read a shopper’s credit card numbers so that they can correctly bill shoppers for their purchases.
HTML was designed with these needs in mind, as evidenced by the various HTML elements designed to aid in collecting user input. The HTML <input> element, for example, can be used to display a text box, check box, radio button, or drop-down list. After the user enters information into these <input> elements, the HTML <form> element specifies the web page that the input should be sent to.
With ASP.NET we do not need to enter such HTML elements directly. Rather, we use the appropriate Web controls, which, when rendered, produce the necessary HTML elements. If we need a text box on our ASP.NET page, instead of adding an <input> HTML element, we add a TextBox Web control. Similarly, instead of using the HTML <form> element, our ASP.NET web pages use Web Forms. We’ll discuss Web Forms and their semantics in this hour.
Imagine that we wanted to create a web page that calculated a user’s Body Mass Index, or BMI.
By the Way
The Body Mass Index is a ratio of a person’s height to weight. BMI is commonly used as a quick determination of whether one is underweight, at a healthy weight, overweight, or obese. For more information about BMI, see www.cdc.gov/nccdphp/dnpa/bmi/.
To determine someone’s BMI, we need to know his height and weight. For the time being, imagine that we want to create this web page without using HTML instead of ASP.NET’s Web controls to generate the text boxes needed for collecting the user’s height and weight.
When HTML was designed, two elements were created to facilitate collecting user input. These two HTML elements are the <form> element and the <input> element. Although a thorough understanding of these elements is not needed for collecting user input in an ASP.NET web page, having a strong grasp on the concepts of how user input is collected from a web page is important. Therefore, let’s briefly examine the <input> and <form> elements and see how they work in conjunction to allow a web page to collect user input.
The <input> element can be used to create a text box, a radio button, a check box, or a button. The <input> element’s type attribute specifies what type of user input control is displayed in the user’s web browser. For example, if you wanted to create an HTML web page that contained a text box, you could use the following HTML:
<input type="text">
To display a check box, you would use
<input type="checkbox">
By the Way
We will not delve into the HTML specifics for collecting user input in this book. For more information on this topic, check out www.w3schools.com/html/html_forms.asp.
Because our web page needs two text boxes—one for the person’s height in inches and one for the person’s weight in pounds—we use two <input> elements, both with type="text".
Listing 9.1 contains the preliminary HTML web page for our BMI calculator. Keep in mind that this page is far from complete!
Example 9.1. Our First Draft of the BMI Calculator
1: <html>
2: <body>
3:   <h1>BMI Calculator</h1>
4:   <p>Your Height (in inches): <input type="text" name="height" /></p>
5:
6:   <p>Your Weight (in pounds): <input type="text" name="weight" /></p>
7: </body>
8: </html>
Listing 9.1 displays two text boxes, one for the user’s height and one for weight. The <input> elements on lines 4 and 6 each contain a name attribute. The name attribute is needed to uniquely identify each <input> element. As we will see in the next section, “Passing the Input Back to the Web Server Using the <form> Element,” the <input> element’s name attribute is used when sending the contents of the various <input> elements back to the web server.
Figure 9.1 shows the code in Listing 9.1 when viewed through a browser.

In addition to the two text boxes, we need some way for the user to indicate to the web browser that she has completed entering her data. To accomplish this, a submit button is used. A submit button is a button that, when clicked by the user, indicates to the web browser that the user has finished entering her input. The HTML for a submit button is as follows:
<input type="submit" value="Text to Appear on Submit Button">Listing 9.2 contains the HTML from Listing 9.1, but augmented with the submit button (line 8). Figure 9.2 shows the HTML from Listing 9.2 when viewed through a browser.
Example 9.2. Our Second Draft of the BMI Calculator
 1: <html>
 2: <body>
 3:   <h1>BMI Calculator</h1>
 4:   <p>Your Height (in inches): <input type="text" name="height" /></p>
 5:
 6:   <p>Your Weight (in pounds): <input type="text" name="weight" /></p>
 7:
 8:   <p><input type="submit" value="Calculate BMI" /></p>
 9: </body>
10: </html>

Recall from our discussions in Hour 1, “Getting Started with ASP.NET 3.5,” that when a user requests a web page from a web server, the web server sends the web page’s HTML to the user’s browser, which is then rendered in the browser. For the browser to receive this HTML, the web browser and web server must communicate with one another, but after the web browser has received the HTML from the server, this communication ends.
The key point to take away from this discussion is that a physical, logical, and temporal disconnect exists between the web server and the web browser. The web server has no idea whether the user is still viewing the page or entering information into the page’s text boxes, check boxes, or other inputs.
Because of this disconnect between the web browser and the web server, the web browser needs some way to let the web server know the values the user entered into any input fields. This is accomplished via the HTML <form> element.
The <form> element contains within it the <input> elements used to collect the user input, as well as the submit button. When the <form> element’s submit button is clicked, the form is said to have been submitted. When a form is submitted, a specified web page is requested by the browser, and the data entered into the various <input> elements within the <form> are sent to this web page.
This description of the <form> element leaves two questions unanswered:
When the
<form>is submitted, how does it know what web page to send the contents of its<input>elements to?How, exactly, are the contents of the
<input>elements sent to this web page?
We can answer these two questions by examining the action and method attributes of the <form> element. The action attribute specifies the URL that the browser is directed to after the <form>’s submit button is clicked. Therefore, it is the value of the action attribute that indicates the web page that is visited after the <form> is submitted.
The contents of the <input> elements are compacted into a single string and are sent in a specific format. Precisely, the format used is as follows:
InputName1=InputValue1&InputName2=InputValue2&...&InputNameN=InputValueN
Here, InputName1 is the value of the first <input> element’s name attribute, and InputValue1 is the value the user entered into this <input> element. InputName2 is the value of the second <input> element’s name attribute, and InputValue2 is its value, and so on. Note that each <input> elements name and value are separated by an equal sign (=), and each pair of names and values is separated by an ampersand (&).
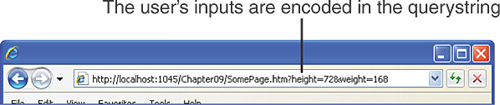
The method attribute determines how this string of <input> element names and values is sent to the web server. The method attribute can have one of two values: GET or POST. If method is set to GET, the contents of the <input> elements are sent through the querystring. The querystring is an optional string that can be tacked on to the end of a web page’s URL. Specifically, if a website URL has a question mark in it (?), everything after the question mark is considered the querystring.
You have probably seen web pages whose URL looks like
http://www.example.com/somePage.htm?Name=Scott&Age=21
Here, the contents after the question mark are considered the querystring.
If method is set to POST, the <input> elements’ contents are sent through the HTTP headers, meaning there is no querystring tacked onto the end of the URL.
By the Way
Whenever a web browser requests a web page, it sends HTTP headers in addition to the requested URL. These are simple strings of text. One such HTTP header is the User-Agent header, which sends information on the type of browser making the web request.
When the method attribute is set to POST, the HTTP Post header is used to send along the contents of the <input> elements. When this information is placed within the HTTP Post header, the querystring is left uncluttered.
Let’s augment Listing 9.2 to include a <form> element that contains action and method attributes. Listing 9.3 is this augmented HTML page.
Example 9.3. A <form> Element Has Been Added
 1: <html>
 2: <body>
 3:
 4:   <form method="GET" action="SomePage.htm">
 5:     <h1>BMI Calculator</h1>
 6:     <p>Your Height (in inches): <input type="text" name="height" /></p>
 7:
 8:     <p>Your Weight (in pounds): <input type="text" name="weight" /></p>
 9:
10:     <p><input type="submit" value="Calculate BMI" /></p>
11:   </form>
12:
13: </body>
14: </html>
The <form> element—spanning from line 4 to line 11—encloses the two <input> elements that generate the two text boxes and the submit button <input> element. The <form>’s action attribute is set to SomePage.htm, and the method attribute is set to GET.
When the user visits the HTML page shown in Listing 9.3, he will be presented with two text boxes and a submit button, as was shown in Figure 9.2. After the user enters his height and weight and clicks the submit button, the web browser requests the web page, as follows:
SomePage.htm?height=heightEnteredByUser&weight=weightEnteredByUser
Figure 9.3 shows the web browser’s Address bar after the user has visited the HTML page generated by Listing 9.3 and has entered the value 72 for height and 168 for weight.
By the Way
SomePage.htm would likely read the values in the querystring, perform some calculation on these values, and then display the results to the user. Starting in the “Dissecting ASP.NET Web Forms” section, we’ll see how to programmatically process user input in an ASP.NET page.
If the <form>’s method attribute on line 4 in Listing 9.3 is changed to POST, when the user submits the form, she is still directed to SomePage.htm, but no information will be passed through the querystring. Rather, the names and values of the <input> elements—height=heightEnteredByUser&weight=weightEnteredByUser—will be hidden from sight, passed through the HTTP headers instead.
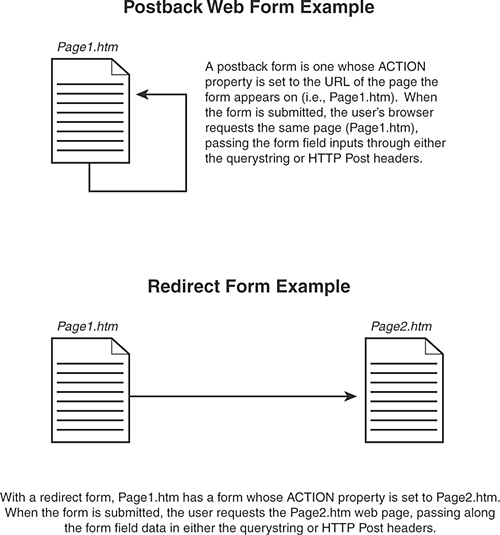
As we saw, the <form>’s action attribute specifies the web page that the browser requests after the <form> is submitted. In Listing 9.3, this web page was SomePage.htm. Such forms are typically called redirect forms because, when submitted, they redirect the user to a different page.
Imagine, though, what would happen if the action property were set to the same URL as the page that contains the <form> element. Suppose we create an ASP.NET web page called PostbackFormExample.htm that has the following HTML:
<html>
<body>
  <form method="POST" action="PostbackFormExample.htm">
    <p>What is your age? <input type="text" name="age" /></p>
    <p><input type="submit" value="Click to Continue" /></p>
  </form>
</body></html>
When the user first visits PostbackFormExample.htm, she will be shown a text box labeled “What is your age?” Underneath this text box, she will see a submit button titled Click to Continue. After entering her age into the text box and submitting the <form>, what will happen? Because the method attribute is set to POST, the <input> text box’s data will be sent via the HTTP Post header. Because the action attribute is set to PostbackFormExample.htm, the user will be sent back to PostbackFormExample.htm (but this time with information passed in through the HTTP Post header).
Such <form>s are called postback forms because they use the POST method and because when the <form> is submitted, the user is sent back to the same page. With a postback form, the <form>’s <input> elements’ data is posted back to the same web page.
Figure 9.4 shows a pictorial representation of both a redirect form and a postback form. Note how the postback form sends the contents of its <input> elements back to itself, whereas a redirect form forwards the contents to a different web page.
Collecting user input in an ASP.NET page is much simpler than the techniques discussed in the preceding section. To collect user input, the ASP.NET page must contain a Web Form. A Web Form is a Web control that has the following syntax:
<form runat="server">
  ...
</form>
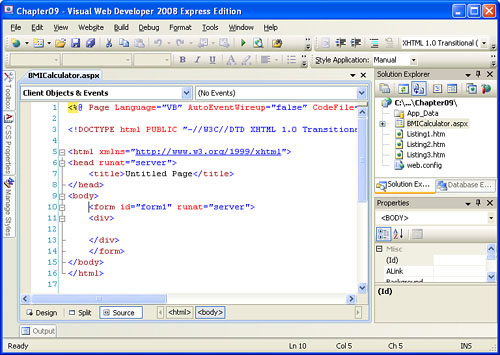
When you create a new ASP.NET page in Visual Web Developer, a Web Form is automatically added. To demonstrate that this is the case, let’s create a new ASP.NET page, one that we’ll build on throughout the remainder of this hour. Name this new ASP.NET page BMICalculator.aspx.
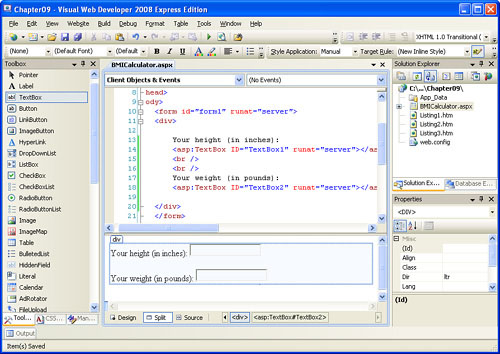
After the new file is created, go to the Source view if you are not already there, and inspect the HTML that was automatically injected into this page. As Figure 9.5 shows, the HTML portion already contains a Web Form (the <form runat="server"> on line 10).
In an HTML web page, user input is collected using a number of <input> elements, which can provide a variety of input media, such as text boxes, check boxes, radio buttons, and so on. Additionally, a <form> must encase these <input> elements and have its method and action properties specified.
With an ASP.NET page, collecting user input is much simpler. As we’ve seen already, we need a Web Form, which Visual Web Developer has already added for us. In addition, we need the Web controls into which the user will enter his input.
For example, if we want to provide the user with a text box to enter his input, we would use a TextBox Web control. If we want to have the user enter his input via a radio button, we would use a RadioButton Web control. These various Web controls must be placed within the Web Form.
Earlier in this hour we looked at creating an HTML page to collect user input for a BMI calculator. The BMI calculator needs to collect two bits of information from the user: height and weight. These two pieces of information can be provided via two text boxes. Therefore, let’s add two TextBox Web controls to our BMICalculator.aspx ASP.NET page.
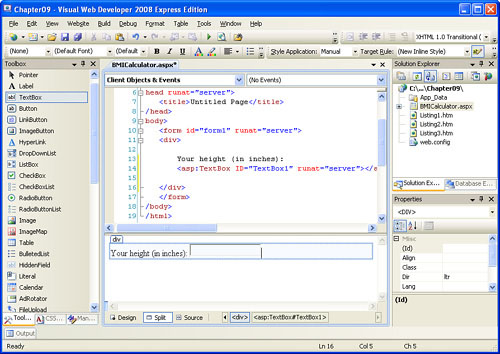
Before you add the first TextBox Web control, though, type in the title to precede the TextBox Web control: Your height (in inches):.
After you’ve typed in this text, drag and drop a TextBox Web control from the Toolbox onto the designer. Figure 9.6 shows the Visual Web Developer after adding this first TextBox Web control.
Now add the title for the second TextBox Web control. Specifically, enter the text: Your weight (in pounds):. After entering this text, drag a TextBox Web control onto the page. Take a moment to ensure that your screen looks similar to Figure 9.7.
At this point we have added two TextBox Web controls to the ASP.NET page. We are still missing one Web control, though. Recall from our earlier discussion that the browser needs to know when the user has completed entering his input. This was accomplished in the HTML web page in Listing 9.2 by adding a submit button.
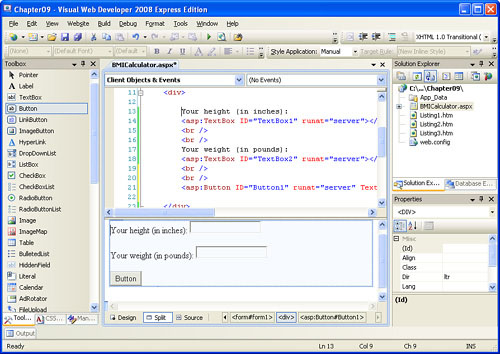
We need to add a submit button to our ASP.NET page as well. To accomplish this, drag and drop the Button Web control from the Toolbox onto the page, placing it beneath the two TextBox Web controls.
Figure 9.8 shows the designer after the Button Web control has been added.
The next step is to set the properties of these various Web controls. The Button Web control, for example, is currently displaying the text “Button,” which we can change to a more descriptive message by changing the Button Web control’s Text property. Also, the ID properties of the three Web controls are still set to their default values, which are not very descriptive.
Take a moment to change the properties of these Web controls. Change the Button control’s ID property to CalculateBMI and set its Text property to Calculate BMI. After you change the Text property, the text appearing on the Button in the designer should change as well.
Next, change the ID properties of the two TextBoxes to Height and Weight.
Let’s examine the BMICalculator.aspx’s user interface through a browser. Go to the Debug menu and choose Start Without Debugging. This launches a web browser and directs it to BMICalculator.aspx. The output you see should be identical to that shown in the designer in Figure 9.8.
After you have visited the ASP.NET web page through your browser of choice, take a moment to view the HTML that was sent to your browser. Listing 9.4 shows the source code received when visiting BMICalculator.aspx through a browser.
Example 9.4. The Browser Receives <form> and <input> Elements
 1: <!DOCTYPE html PUBLIC "-//W3C//DTD XHTML 1.0 Transitional//EN" "http://www.w3.org/TR/xhtml1/DTD/xhtml1-transitional.dtd">
 2:
 3: <html xmlns="http://www.w3.org/1999/xhtml" >
 4: <head><title>
 5:     Untitled Page
 6: </title></head>
 7: <body>
 8:     <form name="form1" method="post" action="BMICalculator.aspx" id="form1">
 9: <div>
10: <input type="hidden" name="__VIEWSTATE" id="__VIEWSTATE" value=" /wEPDwULLTExNTc2NTI3OTlkZJ14lafYUKkP1ite6Wd2kKJ1mR/d" />
11: </div>
12:
13:     <div>
14:         Your height (in inches):
15:         <input name="Height" type="text" id="Height" /><br />
16:         <br />
17:         Weight (in pounds):
18:         <input name="Weight" type="text" id="Weight" /><br />
19:         <br />
20:         <input type="submit" name="CalculateBMI" value="Calculate BMI" id="CalculateBMI" />
21:     </div>
22:
23: <div>
24:
25:     <input type="hidden" name="__EVENTVALIDATION" id="__EVENTVALIDATION" value=" /wEWBALG+8PhBgLzj/DXAQLUj/DXAQL5loSvCu1r+ovlIsichSbzWaNft98Nba69" />
26: </div></form>
27: </body>
28: </html>
The first thing to notice from Listing 9.4 is that the Web Form and Web controls produce roughly the same HTML that we crafted by hand in Listing 9.3. This is a powerful concept because it makes our job as ASP.NET developers easier. We do not to have to worry about HTML specifics. Rather, we can focus on building our page’s user interface by adding the necessary Web controls to our page.
By the Way
ASP.NET’s Web control model relieves developers from having to know HTML details. Rather, ASP.NET developers can focus on creating the user interface as they see fit (by dragging and dropping controls onto the designer), and working on the source code portion of their ASP.NET web pages.
Before we move on, I want to point out three important concepts illustrated in Listing 9.4. First, notice that the Button Web control is rendered as a submit button (line 20). That means that when this button is clicked, the <form> will be submitted.
Next, note that the Web Form in our ASP.NET web page is rendered as a postback <form> element (line 8). (Recall that a postback form is one that has its method attribute set to POST and its action set to its own URL.) This means that when the user clicks the Button Web control, the <form> will submit, causing the page to be reloaded.
By the Way
As Listing 9.4 shows, ASP.NET Web Forms are rendered as postback forms. The terms postback and posted back are used to describe the process of a Web Form being submitted. For example, you might say, “Clicking the Button Web control causes a postback,” or “There was an error when the page posted back.”
Finally, pay attention to the <input> elements on lines 10 and 25. They are hidden <input> elements (note that their type attributes are set to hidden), meaning that they are not displayed in the browser. These hidden <input> elements are produced when the Web Form is rendered and provide information used by the ASP.NET engine when the Web Form is submitted. A thorough discussion of these hidden <input> elements accomplish is an advanced topic that we will not discuss in this book.
While you have BMICalculator.aspx loaded into your browser, take a moment to fill some values into the two text boxes and then click the Calculate BMI button. What happens? At first glance, it may appear that nothing happened. The same web page is shown, and the text boxes contain the values you entered.
However, something has happened. Specifically, when you clicked the submit button, the <form> was submitted. Because this <form> is a postback form, the same web page was reloaded, which is why you still see the same web page in your browser. In fact, the HTML markup sent to your web browser has changed, but ever so slightly. If you view the HTML received by your browser after entering some data into the text boxes and submitting the form, you’ll see that the TextBox Web controls’ rendered <input> elements now contain a value attribute containing the input you entered into the text box.
To better understand what has just happened, take a look at Figure 9.9. This figure shows BMICalculator.aspx after the values 72 and 168 have been entered into the height and weight text boxes and the submit button has been clicked.
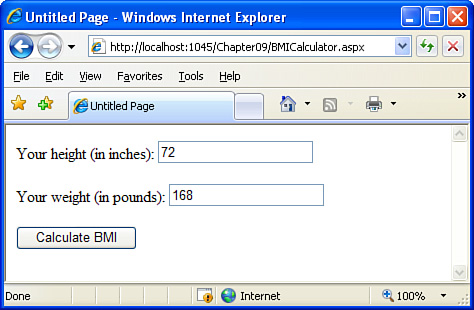
The HTML sent to the browser in Figure 9.9 is shown in Listing 9.5. Note that the HTML in Listings 9.4 and 9.5 is nearly identical, the only exception being that the <input> elements on lines 15 and 18 of Listing 9.5 differ from lines 15 and 18 of Listing 9.4. Specifically, the <input> elements in Listing 9.5 have a value attribute set to the value entered into each respective text box (see Figure 9.9).
Example 9.5. The HTML Received by the Browser After the Form Has Been Submitted
 1: <!DOCTYPE html PUBLIC "-//W3C//DTD XHTML 1.0 Transitional//EN" "http://www.w3.org/TR/xhtml1/DTD/xhtml1-transitional.dtd">
 2:
 3: <html xmlns="http://www.w3.org/1999/xhtml" >
 4: <head><title>
 5:     Untitled Page
 6: </title></head>
 7: <body>
 8:     <form name="form1" method="post" action="BMICalculator.aspx" id="form1">
 9: <div>
10: <input type="hidden" name="__VIEWSTATE" id="__VIEWSTATE" value=" /wEPDwULLTExNTc2NTI3OTlkZJ14lafYUKkP1ite6Wd2kKJ1mR/d" />
11: </div>
12:
13:     <div>
14:         Your height (in inches):
15:         <input name="Height" type="text" value="72" id="Height" /><br />
16:         <br />
17:         Weight (in pounds):
18:         <input name="Weight" type="text" value="168" id="Weight" /><br />
19:         <br />
20:         <input type="submit" name="CalculateBMI" value="Calculate BMI" id="CalculateBMI" />
21:     </div>
22:
23: <div>
24:
25:     <input type="hidden" name="__EVENTVALIDATION" id="__EVENTVALIDATION" value=" /wEWBALG+8PhBgLzj/DXAQLUj/DXAQL5loSvCu1r+ovlIsichSbzWaNft98Nba69" />
26: </div></form>
27: </body>
28: </html>
To understand why the TextBox Web controls rendered different HTML markup after the form was submitted (Listing 9.5) than before (Listing 9.4), let’s step through the sequence of steps that transpires in the ASP.NET engine on postback.
The TextBox Web control has a Text property. If this property is set to some value, the HTML rendered by the TextBox Web control is different than if this property is not set at all. If the Text property is not set, the HTML rendered by the TextBox Web control is simply
<input name="ID" type="text" id="ID" />
where ID is the value of the TextBox control’s ID property.
For example, on line 15 in Listing 9.4 you can see that the first TextBox Web control, whose ID property is set to Height, produces the following rendered markup:
<input name="Height" type="text" id="Height" />
If, however, the Text property is set to some value, the value attribute is included in the TextBox control’s rendered markup like so:
<input name="ID" type="text" value="Text" id="ID" />
where Text is the value of the TextBox control’s Text property.
When the BMICalculator.aspx page was first visited, the Text property of the TextBox Web controls was not set, as evidenced by the HTML markup produced (see lines 15 and 18 in Listing 9.4). When the user enters some values into these two text boxes, such as 72 in the height text box and 168 in the weight text box, and then submits the form, the Text properties of the TextBox Web controls are set to the values entered by the user. Then, when the TextBox Web controls are rendered, they include a value attribute whose value corresponds to the input entered by the user (see lines 15 and 18 in Listing 9.5).
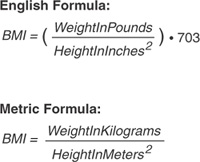
Note that when we enter values into the text boxes and submit the form, the web page is reloaded (because we’re using a postback form) and the values entered into the text boxes are persisted across the postback. Although this is fine and good, we still need to provide code to actually perform the Body Mass Index calculation. The BMI calculation is quite simple and is shown in Figure 9.10.
The code required for this calculation is fairly straightforward and is shown in Listing 9.6.
Example 9.6. The Code for the BMI Calculation
 1: 'Find out the person's height and weight
 2: Dim UsersHeight as Integer = Height.Text
 3: Dim UsersWeight as Integer = Weight.Text
 4:
 5: 'Calculate the person's BMI
 6: Dim BMI as Decimal
 7: BMI = (UsersWeight / (UsersHeight * UsersHeight)) * 703
 8:
 9: 'Output the BMI value
10: LabelWebID.Text = "Your BMI is " & BMI
On line 2 an Integer variable named UsersHeight is declared and assigned the value of the Height TextBox control’s Text property. Following that, an Integer variable named UsersWeight is declared and assigned the value of the Weight TextBox control’s Text property. Next, on line 6, a Decimal variable named BMI is created; it is then assigned the person’s BMI as defined by the formula in Figure 9.10 (see line 7).
By the Way
The code in Listing 9.6 outputs the BMI to a Label Web control, but we have not yet added a Label to our ASP.NET page. Take a moment to do so. Set the Label control’s ID to an appropriate value and then have the BMI calculation assigned to its Text property. Refer to the preceding hour for more information on the Label Web control.
Clearly, this code must appear in our ASP.NET web page’s source code portion, but where? We want this code to run whenever the user submits the form. The form is submitted when the Button is clicked. Therefore, this code should execute when the Button Web control’s Click event fires.
To add a Click event handler for the button, double-click the Button Web control in the Design view. This takes you to the page’s source code portion with the appropriate event handler created. Now add the code from Listing 9.6 inside the Click event handler.
After you have added this code, view the ASP.NET page through a browser. When you first visit the page, you should see two empty text boxes and a button labeled Calculate BMI; Figure 9.11 shows the browser when the page is first visited.

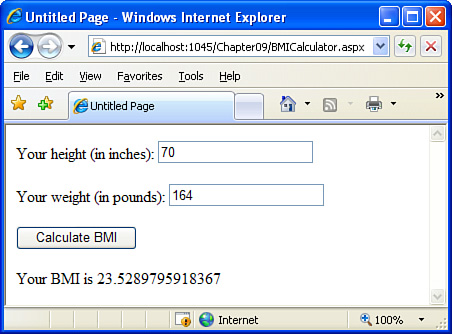
Now enter some appropriate values into the two text boxes and click the Calculate BMI button. If you enter my height and weight—70 and 164—you should see the output shown in Figure 9.12.
Did you Know?
To determine what the various BMI ratings mean, visit http://nhlbisupport.com/bmi/bmicalc.htm. Briefly, a healthy BMI range is between 18.5 and 24.9. Persons with a BMI of 25.0 to 29.9 are considered overweight, whereas a BMI over 30 indicates obesity. (BMI conclusions can be inaccurate for athletes and the elderly.)
Watch Out!
If you omit entering values for your height or weight or enter noninteger values into these text boxes, you will get an error when submitting the page. Similarly, if you enter a negative value for your weight, the computed BMI will be a negative number itself.
In Hour 12, “Validating User Input with Validation Controls,” we’ll examine how to use a special kind of Web control that ensures a user’s input is in an acceptable form and within acceptable boundaries.
In this hour we examined how user input can be collected in an ASP.NET web page. We started by examining the HTML elements needed to collect user input, which include a number of <input> elements for each text box, check box, radio button, or drop-down list; and a <form> element, inside which the <input> elements must be enclosed. Additionally, a submit button is needed.
With ASP.NET web pages, we do not need to worry about creating these HTML elements by hand. Rather, we can use appropriate Web controls, such as the TextBox Web control for displaying a text box, a CheckBox Web control for displaying a check box, and so on. To collect a user’s input, these Web controls must be placed inside a Web Form. A Web Form, as we saw, is a Web control of the following form:
<form runat="server">
  ...
</form>
Visual Web Developer automatically generates the declarative markup for a Web Form when creating a new ASP.NET page.
In addition to Web controls to collect the user’s input, a Button Web control should be added in the Web Form. The Button Web control is rendered as a submit button. When clicked, the form is submitted via a postback. If you have source code that you want to execute whenever the Web Form is submitted, you can place it in the Button Web control’s Click event handler. To add a Click event handler, double-click the Button Web control from the Design view.
Now that we have seen how an ASP.NET page can collect user input and perform calculations on this input, we’re ready to examine the Web controls for collecting user input in much finer detail. In the next hour we’ll focus on examining the TextBox Web control. Following that hour, we’ll look at collecting a user’s input using the DropDownList, RadioButton, and CheckBox Web controls.
Sometimes when I refresh my browser on a web page with a form, I receive the message | |
Recall that there are two ways a form can submit its values: through the querystring or through the HTTP Post headers. When a postback form is used, the form uses the HTTP Post headers and submits the form to the same URL. (Refer to Figure 9.4 for a graphical depiction of how postback forms work.) When you ask your browser to refresh the page after you have submitted a postback form, the browser doesn’t know whether you want to refresh without resubmitting the user’s inputs or if you want to refresh by resending the HTTP Post headers. Therefore, it asks if you want to resend the form information. You may also notice this behavior when clicking the Back button to return to a page that has been requested via a postback. | |
Why do ASP.NET Web Forms use postback? Why not direct the user to another page or pass the information along in the querystring? | |
ASP.NET Web Forms use postback forms over alternative methods for a number of reasons. The most important is that postback forms allow the ASP.NET Web controls to maintain their state across postbacks. Recall that when a user enters a value into a TextBox Web control and submits the form, the ASP.NET page is posted back and the TextBox Web control’s Additionally, the HTTP Post headers are used rather than the querystring because often a large amount of data is being passed back in the Post headers. Some older browsers have a limit on the amount of information that can be passed through the querystring. Furthermore, it would be unsightly to have such a mangled querystring. |
A form with its | |
Because the information is passed in the querystring, it is obvious that the form’s | |
Postback forms are forms whose Redirect forms are ones whose (Refer to Figure 9.4 for a graphical representation of the differences between postback forms and redirect forms.) | |
ASP.NET Web Forms use postback forms. |
There are no exercises for this hour. Web Forms, by themselves, are quite useless. To make Web Forms useful, we need to add Web controls designed for collecting a user’s input. In the next hour, “Using Text Boxes to Collect Input,” we’ll see how to use the TextBox Web control to collect user input. At the end of this next hour, we’ll work on a number of exercises that examine the use of Web Forms.