
Hour 22 Beyond the Basics: PHP in Expression Web 2
What You’ll Learn in This Hour:
![]() How to install PHP on your computer
How to install PHP on your computer
![]() How to configure and use the Expression Development Server to test PHP scripts locally on your computer
How to configure and use the Expression Development Server to test PHP scripts locally on your computer
![]() How to create a PHP-based email form
How to create a PHP-based email form
![]() How to use PHP to test whether form fields are filled out and that the email was successfully sent
How to use PHP to test whether form fields are filled out and that the email was successfully sent
Introduction
If you have surfed the World Wide Web for any length of time you have probably noticed that not all web pages have the .html suffix. When you visit more advanced sites you’ll often see that the filenames in the address bar end with .asp, .php, or any number of other suffixes. All these file types hint at the server-side technology used to generate the pages.
Although HTML (Hypertext Markup Language) is a great code language with a wide variety of applications, it is capable of making only static pages. A static page is one where the designer or developer inserts all the content and it remains the same until someone manually edits the file. In contrast, most large websites including news sources, blogs, social networks, and so on consist of dynamic pages. A dynamic page is one where the page itself contains only the framework and content is gathered from other sources such as databases, other sites, or visitor input. The one thing all of these dynamic pages have in common is that they all use some form of server-side scripting language to generate their content.
One of the most prevalent and popular open source server-side script languages is PHP,. PHP is a direct competitor to Microsoft’s application framework, ASP.NET, and until recently they have often been mutually exclusive because the Windows Server support for PHP has been unreliable and slow forcing, many web hosts to remove the option altogether. However, with the release of Windows Server 2008, full PHP support is now available on Microsoft servers as well, giving you the choice of using ASP.NET or PHP. Parallel to this, Expression Web 2 was equipped with PHP support giving designers and developers the ability to build sites and applications without looking elsewhere for their PHP scripting.
As you learned in Hour 20, “Get Interactive with Forms,” the type of server hosting your site determines what kind of server-side scripts you can use. In Hour 20, you built an email form that utilized FrontPage Server extensions for its functionality. This form would require a Windows Server architecture to work. In this hour, you learn how to use the new PHP features built into Expression Web 2 to create a PHP version of the same form that can be used in sites hosted on a Linux server.
PHP: An Introduction
PHP is a code language used to create dynamic web pages; that is, pages whose content is generated by the web server rather than stored in the pages themselves. Advanced PHP pages are little more than a framework with a bunch of design elements and boxes populated with content as the visitor clicks different buttons. You could say it is an extremely advanced version of the Dynamic Web Template where the template is the page itself and the content comes from a database or other external sources.
PHP can also perform other tasks such as processing form results, submitting content to databases, and editing files. To get an idea of just how powerful PHP is, consider that the vast majority of the millions upon millions of blogs floating around the Internet these days run off PHP. Because of this, many new PHP applications customized for blogging are developed every day.
The power of PHP lies in its capability to work alongside standard HTML code. That means you can choose whether you want to place your PHP scripts in a separate file or place them within your HTML pages inside the HTML code. In practical terms, that means you can create an HTML page with dummy content and when you are finished with the layout, you can replace the placeholder content with a PHP script that grabs the real content from an external file, database, other website, RSS (Really Simple Syndication) feed, or a form. To make the file with the PHP script work, it has to have the extension .php rather than .html, but even so all the HTML code renders normally. In fact, if your site is hosted on a server with PHP installed, you can save all your HTML files as .php files without any difference in how the pages display in a browser.
What Does PHP Stand for Anyway?
If you look up the definition of PHP, you get the following explanation: “PHP” is a recursive acronym for “PHP: Hypertext Processor.” But that really doesn’t explain anything because the long version of the acronym contains the acronym itself! This phenomenon is referred to as a recursive acronym and is fairly common in the geeky world of programming. More than anything, the use of recursive acronyms in programming is a tongue-in-cheek way of dealing with the fact that for the most part these acronyms really don’t mean anything. In PHP’s case, however, the acronym originally had a meaning: PHP used to stand for Personal Home Page tools (without the “t”), but as the language morphed into a more advanced programming language this description became obsolete and the new recursive acronym was adopted in its place.
For more examples from the geeky world of recursive acronyms take a look at the list found here: http://en.wikipedia.org/wiki/Recursive_acronyms
Installing PHP on Your Computer to Test PHP Scripts
Because PHP is a server-side script, pages with PHP code will not work properly if you test them in your browser as you have with HTML pages. This is because unlike HTML, which renders in the browser, PHP renders in the server and it sends the resulting information to the browser for display. One way to work around this problem is to upload your PHP files for testing on a web server that has PHP installed and test them live, but that is a cumbersome and ineffective method requiring time, a live Internet connection, and available server space. Another way to approach the issue is to run a web server with PHP installed on your local network. This solution is common in larger companies but is not feasible (or economical) for smaller companies and those just starting out with web design.
The ideal solution would be if you could test your PHP scripts locally on your computer in the same way that you have been testing your HTML pages. To answer this call, Expression Web 2 comes equipped with an application called the Expression Development Server. This application within the application is a program that emulates a web server and lets you preview pages with server-side scripting as if it a real web server were hosting it.
The Expression Development Server can preview ASP.NET as well as PHP scripts, but for the PHP scripts to function properly you first have to install PHP on your computer. PHP is free open source software that you can legally download and install on your computer.
1. In your web browser, go to www.php.net/downloads.php to find the latest release of PHP (pt the latest stable PHP release is version 5.2.6) (see Figure 22.1).
Figure 22.1 The PHP website found at www.php.net provides new as well as old versions of PHP for download.

2. Download the zipped package found under Windows Binaries and save it on your computer.
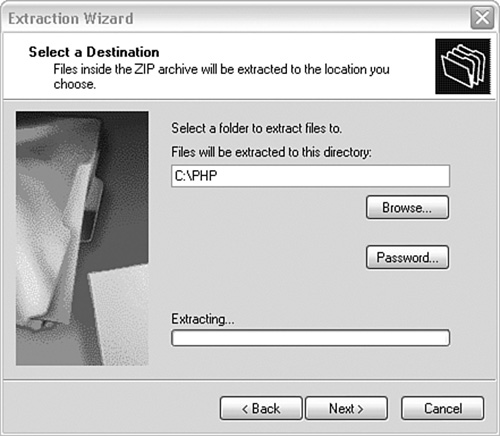
3. When the download of the zip file is complete, extract the archive to a new folder called PHP directly under C:. You can extract the file using any zip-compatible software or by right-clicking the archive, selecting Extract All, and following the Extraction Wizard (see Figure 22.2).
Figure 22.2 Extract the contents of the zipped archive you downloaded to C:PHP.
4. Open the new folder and find the file called php.ini-recommended. Select the file and make a copy of it by pressing Ctrl+C and then Ctrl+V. That way you have the original file as a backup if something goes wrong.
5. Right-click the new file and select Rename from the context menu. Change the name of the file to php.ini. This file contains all the configuration settings for PHP on your computer.
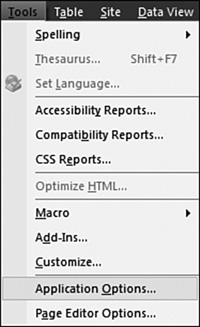
6. Open Expression Web 2 and select Tools, Application Options on the menu bar (see Figure 22.3).
Figure 22.3 Application Options are under Tools on the menu bar.
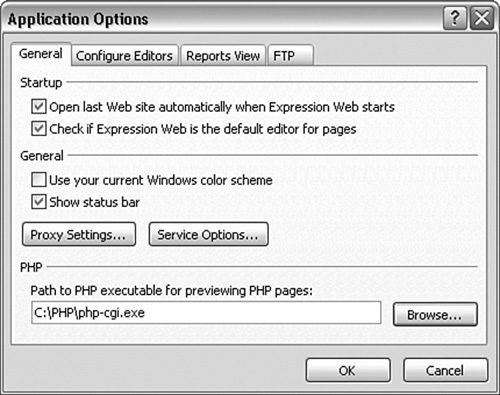
7. In the PHP section at the bottom of the Application Options dialog, use the Browse button to navigate to the location where you installed PHP (C:PHP) and select the file named php-cgi.exe (see Figure 22.4). Click OK to apply the changes.
Figure 22.4 You need to tell Expression Web 2 where the php-cgi.exe file is located for the program to be able to use it to preview pages.
Now PHP is installed on your computer and once you restart Expression Web 2 it will use this installation of the program when testing PHP pages.
![]()
As you learned earlier, you can place PHP script directly inside the code of an HTML page or in a dedicated file. When a browser opens a file containing PHP code, the browser looks for special PHP tags called delimiters that define which portion of the code is PHP and which is not. The regular HTML code then processes normally while the code inside the PHP delimiters goes to the server for interpretation.
Using PHP and HTML to Create a Contact Page
PHP is a fairly simple code language when you know how to read it. But for a novice it can be rather intimidating. Therefore let’s create some basic examples of how you can use PHP alongside HTML to build a contact page.
1. Create a new page from the mykippleMaster.dwt Dynamic Web Template and save it as contact.php either by changing the Save As type or simply changing the file extension manually.
All PHP code has to be contained within PHP delimiters. Unlike the regular HTML tags you have used earlier, all PHP content is included inside the tag itself; that is, between the < and > brackets rather than between two tag sets. The standard syntax for PHP code is <?php ?> where the PHP code goes in the space between.
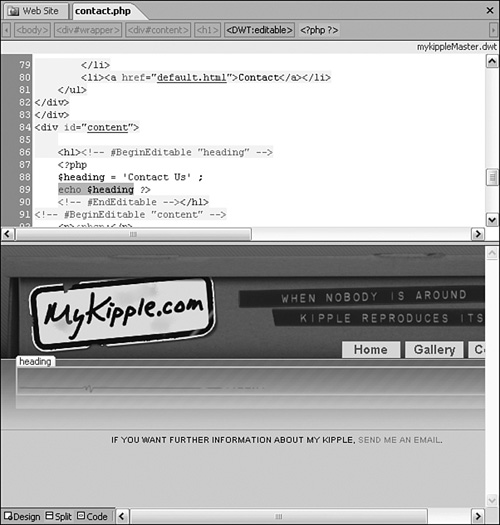
Expression Web 2 not only has full IntelliSense support for PHP but also has a series of common PHP scripts built into the Insert menu for easy access and use. Many of these code segments come equipped with the beginning and end delimiters. The most basic command of any code language is the one that prints a line of text on the screen. In PHP, this command is echo. So, to insert a heading using PHP, you need to insert the echo command.
2. In Code view, erase the (heading) text and place the cursor in the heading editable region.
3. Select Insert, PHP submenu on the menu bar and choose Echo (see Figure 22.5). This inserts the PHP delimiters as well as the echo command.
The echo command display any text inserted inside quotation marks as regular HTML text in a browser:
4. With the cursor placed after the echo command (in green) in Code view, enter ″Contact Us″ with the quotation marks included (see Figure 22.6).
Figure 22.5 Expression Web 2 has a set of built in PHP scripts accessible from the PHP submenu under Insert.
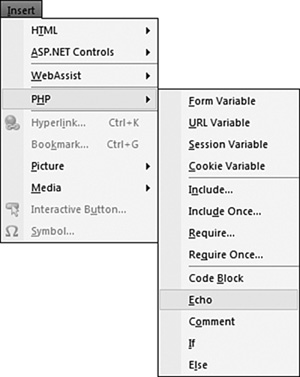
Figure 22.6 You insert the echo command with delimiters and a value in Code view, but they do not show up in Design view.

If you have installed PHP on your computer, you can now save and preview the page in your browser. If PHP installed and configured properly, the page appears with the text Contact Us in the header.
Try it Yourself
Use PHP Variables to Display Content
Using PHP you can define variables that display using the echo command. You can define these variables with the PHP command, somewhere else on the page (such as the head), or even in a separate file or database.
To define a variable, you give it a name that starts with a dollar sign ($). The name must start with a letter and can only consist of letters, numbers, and underscores. It is also important to know that PHP is a case-sensitive language.
1. Place the cursor before the echo command in Code view and press Enter to create a new line. Insert the following line of code: $heading = ’Contact Us’;. The first part of the code ($heading) is the name of the variable. The content of the variable is contained within single quotation marks and the semicolon marks the end of the variable definition just as in CSS.
To call a variable to display, all that’s needed is to insert the variable name after the echo command.
2. Press Enter to move the echo command to a new line and delete the ″Contact Us″ text. In its place, insert the variable name $heading (see Figure 22.7).
Figure 22.7 A variable replaces the echo text.
Save and test the page in your browser, and you see that it looks the same as before.
PHP in Design View
You probably have noticed by now that the results of the PHP code do not appear in Design view. This is because Design view is a web browser emulator and does not have a web server simulator connected to it. As a result, the only way of previewing your PHP code is to test it in your browser locally through the Expression Development Server, on a local web server, or on a live web server on the World Wide Web.
Creating an Email Form Using PHP
In Hour 20, you created an email form using the built-in functionalities of Expression Web 2. This email form generated an email sent to a specified address by way of the FrontPage Server extensions on the web server. But not all web servers have FrontPage Server extensions installed, and on those servers the email form only generates code errors. If your site is hosted on a Linux server, a PHP-based email form is a rock-solid alternative.
Creating the Form
The first step is to create a new email form for the contact page.
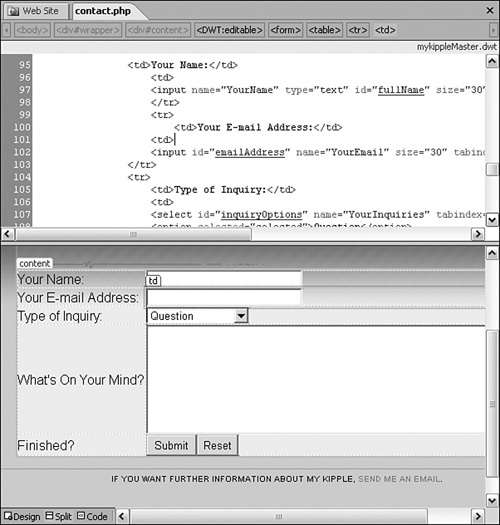
1. With the contact.php page in Split view, remove the <p> and </p> tags in the content editable region. Go to the Form Controls on in the Toolbox task pane and insert the Form control.
2. Place the cursor inside the new form area in Design view and select Table, Insert Table on the menu bar to open the Insert Table dialog. Set Rows to 5 and Columns to 2. Under Specify Width, check the In Pixels radio button and set the width to 625.
3. Insert the names for each of the five form boxes in the left columns. From top to bottom they are Your Name:, Your E-mail Address:, Type of Inquiry:, What’s On Your Mind?, and Finished?.
4. In the first right cell, insert an Input (Text) control. Click the box to highlight it in Code view. Find the Name value and change it to YourName.
When you click the Submit button on a form, all the form fields are sent to the browser memory. To identify which content comes from which form field, you need to give each form field a unique name. You can do that from the Tag Properties task pane or with the help of IntelliSense in Code view.
5. With the Input (Text) control still selected in Design view, find the Name variable in the Tag Properties task pane. Give the box the name fullName (see Figure 22.8).
Figure 22.8 You can use the Tag Properties task pane to define all available variables for any form control.
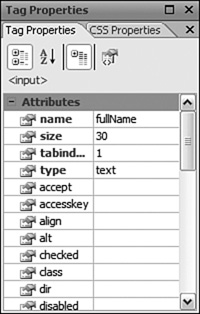
6. Use the Tag Properties task pane to set the tab index to 1 and the size to 30.
7. Insert a new Input (Text) control in the next cell below and use the Tag Properties task pane to set its name to emailAddress, size to 30, and tab index to 2.
8. In the third right cell, insert a Drop-Down Box control. Right-click the Drop-Down Box and select Form Field Properties from the context menu to open the Form Field Properties dialog.
9. In the Drop-Down Box Properties dialog, use the Add button to create five choices: Question, Comment, Suggestion, Kipple Story, and Random Thought. Set the initial state for Question to Selected and the other choices to Not Selected.
10. Use the Tag Properties task pane to set the name to inquiryOptions and the tab index to 3.
11. In the fourth right cell, insert a Text Area. Use the Tag Properties selector to set cols to 55, name to thoughts, rows to 8, and tab index to 4.
12. In the bottom right cell, insert an Input (Submit) button and an Input (Reset) button. Use the Tag Properties selector to change their values to Submit and Reset, respectively. Set their tab index orders to 5 and 6.
You now have an email form that looks the same as the one you created in Hour 20 (see Figure 22.9). But as with the other form, this one does nothing until you attach some functionality.
Making the Form Work
When the visitor clicks the Submit button in the email form you just created, four strings of text with the names fullName, emailAddress, inquiryOptions, and thoughts are created and sent to the browser. In the form in Hour 20, code inserted by Expression Web 2 intercepted the strings, and all the necessary actions performed by that code was instead done by the FrontPage Server extensions. Now you want to re-create those same functions using PHP instead.
Figure 22.9 The email form is built.
To perform the actions needed to send the email to the desired address, you are going to make a new PHP file that contains the code that writes and sends the email.
1. Create a new PHP file by selecting File, New on the menu bar and choosing PHP under the General option.
2. Delete all the code in the new file so that it is completely blank and save it as emailProcessor.php in the Contact folder.
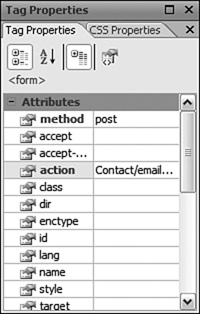
Now you need to send the information from the contact.php file to the new file. By default the Form form control has a built-in action triggered by the onclick event attached to the Submit button. You are going to use this action to send the contents of the form to the new file.
3. With the contact.php file open in Design view, click anywhere inside the form and select the <form> tag from the Quick Tag Selector.
4. In the Tag Properties task pane, click the action tag to activate it and click the … button. Doing so opens the Select File dialog. Navigate to the Contact folder and select the emailProcessor.php file. Click Open to set the action (see Figure 22.10). Save contact.php.
Figure 22.10 By setting the action attribute of the form to a file, you send the information from the form to that file.
Now you need to set up the PHP functions that generate the email.
5. Open the emailProcessor.php file in Code view. Place the cursor at the top of the page and click Code Block in the PHP submenu options under Insert on the menu bar. Doing so inserts the PHP delimiters <?php ?>.
6. With the cursor between the delimiters, press Enter several times to create some space.
To get a PHP script to send an email, you use the mail() function. The syntax of this function is as follows:
mail(to,subject,message,headers,parameters)
Of these, the to, subject, and message variables are mandatory whereas the headers and parameters variables are optional. For the email form you are creating, you will be using the to, subject, message, and headers variables.
Figure 22.11 IntelliSense helps you keep track of the many variables necessary when using PHP functions.

To help you remember the order, IntelliSense displays a ScreenTip with the different sections as you insert them.
7. On a new line, type mail(). This brings up the IntelliSense ScreenTip for the mail() function (see Figure 22.11).
8. IntelliSense asks for the names of each of the variables, but you haven’t created the variables yet. To keep track of what the different variables are supposed to contain, enter the function of each variable as its name and end the line with a parenthesis and a semicolon. When finished the line of code should look like this: mail($to, $subject, $message, $header, $parameter);.
The next step is to create new variables that contain either predefined information or information received from the form.
9. First you need to create a $to variable to tell the program where to send the email. Create a new line above the mail() function and enter the variable name $to followed by your email address, like this: $to = ’[email protected]’;.
When an HTML form is submitted, all the contents are sent using a method called POST. To capture that content, you need to use a form variable. A form variable looks like this:
$_POST[];
The original variable name is inserted in single quotation marks between the two brackets.
10. Create a new line. The $subject variable should contain the choice the visitor made in the Type of Enquiry field in the form. The name of that field was inquiryOptions. To insert that content into a variable, you have to create a form variable: $subject = $_POST[’inquiryOptions’];.
Skip the $message variable for a moment. The $header variable can have several different headers, including From, Cc, and Reply-to. In this case, you want the From header to match the email address of the sender.
11. Create a new line. Set the $header variable to receive the content from the emailAddress form field: $header = $_POST[’emailAddress’];.
Now all that is missing is the message, or body, of the email. Before you create the $message variable you need to learn a few more things about PHP syntax. First, PHP allows you to mix straight text and code as much as you want. Second, to make a line break in PHP, you need to insert the line break code, which is a backslash followed by a lowercase n, like this:
. PHP understands that this is a line break even if it is sandwiched between two lines of text or other code without spaces.
For the emails generated from your website to make as much sense as possible, it is a good idea to space the content properly. Ideally you want your email body to look something like this:
From: Sender Name
Sender e-mail address: [email protected]
Regarding: The selection made from the drop-down box.
Message entered in the box goes here.
12. The $message variable will be somewhat different from the rest of the variables. Start by making the variable: $message = ’’;.
13. On the first line of the email body, you want the text From: followed by the name of the sender. Place the cursor between the two single-quotes and enter From: $fullName
.
14. On the next line you want the text Sender e-mail address: followed by the email address. The sender’s email address was stored in the $header variable in step 11. Directly after the
, without any space between, enter Sender e-mail address: $header
.
15. The third line of the email body should read Regarding: and have the selection the visitor made from the drop-down box. This information was stored in the $subject variable in step 10. Directly after the last piece of code you inserted write Regarding: $subject
. Note the double line shift to create a space between the sender info and the message.
16. Finally you want the actual message to appear below the rest of the content. The word Message: should also appear on its own line. Directly after the last
, enter Message:
$thoughts
.
The entire variable should now read:
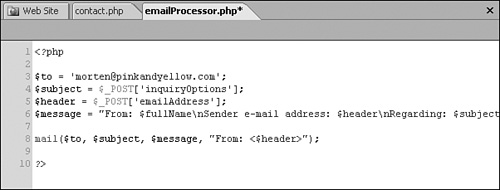
$message = “From: $fullName Sender e-mail address: $header Regarding:
$subject Message: $thoughts ″;
17. To make the sender’s email address appear in the From field in your email reader, you need to make a small change to the mail() function: Replace $header with ″From: <$header>″.
18. Because you will not be using the $parameter variable, remove it from the mail() function.
The final code, as shown in Figure 22.12, generates emails laid out exactly as the earlier example from the contents of the email form (see Figure 22.12).
Figure 22.12 The finished emailProcess or.php file as it appears in Code view.
I’m Not Receiving Any Emails from the Form!
If you test the page in your browser and try to send an email to yourself, you quickly discover that nothing happens. This is because in addition to having PHP running on your computer, the email() function requires a working email server. To test this functionality, you need to upload the contact.php and emailProcessor.php files to a server with working email functionality.
Added Functionality
There are still a couple of things to add before the email form is complete. For one, the visitor has no way of knowing whether the email was sent. Additionally, the form currently sends an email even if there is no information entered. You can fix both these issues by adding some simple PHP code.
Creating Landing Pages for Success and Failure
As a courtesy to your visitor, you should always tell her whether the email was sent. You can do so by using “landing pages” that the browser navigates to depending on whether or not the email was sent.
In the project files for this hour, you will find three HTML files called success.html, failure.html, and error.html. Import all three files into the Contact folder in your site.
PHP is actually a programming language you can use to create small programs that behave according to your input. One of the many things you can do with PHP is define a set of conditions that have to be met for some specific action to occur and also say what happens if the conditions are not met.
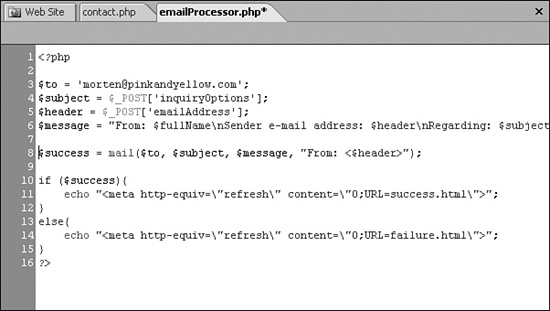
1. If the email is sent successfully, you want the browser to be redirected to the success.html page. To do this, you use the echo function in conjunction with an HTML meta tag called Refresh to redirect the browser. On a new line, enter echo “<meta http-equiv=″refresh” content=″0;URL=success.html″>″;. The Refresh meta tag can be used to delay the redirection to a new page. The delay, measured in seconds, is defined by the content variable. The backslashes in front of the quotation marks tell the PHP interpreter that they are not PHP code but HTML.
2. Likewise if the email is not sent you want the browser to be redirected to the failure.html page. On a new line, type echo “<meta http-equiv=″refresh” content=″0;URL=failure.html″>″;.
3. To let the server know when to say the email was sent, you first have to define what you consider a success. In the case of the email form, a success would mean that the mail() function executed properly. To define the mail() function executing properly as a success, place the cursor at the beginning of the line that has the mail() function and enter $success =.
Now that you have a way of measuring whether the email was sent and you have the resulting actions for what should happen in either case, you need to make a small program that tells the server when to do what. This is done by using the if and else statements. Like the names suggest, the if statement checks whether a certain condition is met. If it is, the attached action takes place. The else statement kicks in whenever the if condition is not met. In this case, you want the if condition to be the $success variable. If it is met, the success.html page should display and if not, the failure.html page should display.
4. Create a new line above the redirect meta tag that leads to the success.html page and enter if ($success){.
5. Create a new line directly below the redirect meta tag and close the curly bracket }.
6. Create a new line under the last one and enter else {. Close this curly bracket on a new line after the redirect meta tag that leads to the failure.html page.
Figure 22.13 shows the emailProcessor.php file as it appears in Code view with the new conditional redirects added. The browser now directs to either the success.html or failure.html pages depending on whether the email is sent.
Figure 22.13 Add the conditional redirect tags to tell the visitor whether the email was sent.
Creating a Filter to Stop Empty Messages
The easiest way to weed out nonsense emails and accidental clicks is to set up the email form so that if the visitor doesn’t enter an email address, the message is not sent. To do this you need to test whether the $header variable (which contains the contents of the emailAddress field from the form) is empty.
1. Create a new line above the $success variable. To see whether the $header variable is empty, enter if ($header ==″″) {. (In programming, a single equal sign means is the same as, whereas two equal signs mean is identical to.)
2. If the $header variable is empty, the browser should be redirected to the error.html page where the visitor is told to enter an email address. Create a new line and enter echo “<meta http-equiv=″refresh” content=″0;URL=error.html″>″;.
3. Insert one more line and enter exit; to stop the script from executing further. Close the curly bracket }.
The final version of the emailProcessor.php file should now look like this:
<?php
$to = ’[email protected]’;
$subject = $_POST[’inquiryOptions’];
$header = $_POST[’emailAddress’];
$message = ″From: $fullName
Sender e-mail address: $header
Regarding:
$subject
Message:
$thoughts
″;
if ($header==″″) {
echo ″<meta http-equiv=″refresh″ content=″0;URL=error.html″>″;
exit;
}
$success = mail($to, $subject, $message, ″From: <$header>″);
if ($success){
echo ″<meta http-equiv=″refresh″
content=″0;URL=success.html”>″;
}
else{
echo ″<meta http-equiv=″refresh″
content=″0;URL=failure.html″>″;
}
?>
To sum up, here is what happens step by step: When the visitor enters information into the email form and clicks the Submit button, the different variables are sent to the emailProcessor.php file. From here each value is given a variable name and inserted in various sections of the email body. Then the script tests to see that an email address was entered. If no email address was entered, the browser is redirected to the error.html page. Otherwise the script continues on to send the email. If the email is successfully sent, the browser is redirected to the success.html page. If for some reason the email was not sent, the browser is redirected to the failure.html page.
Summary
If you want to move beyond static pages and add dynamic content and true interactivity to your sites, you have to employ server-side scripting. And when it comes to server-side script languages many argue that PHP reigns supreme. Even though PHP is technically a direct competitor to Microsoft’s own application framework, ASP.NET, Expression Web 2 comes equipped with an extensive range of tools to create, write, edit, and deploy PHP-based pages.
To test your PHP scripts locally on your computer, you first need to install PHP. In this hour, you learned how to install this free open-source software and set up Expression Web 2 so that it deploys when you test your scripted pages through the Expression Development Server.
One of the major benefits of PHP is that the scripts can live alongside HTML code, which means you can build your pages as you normally would and substitute your static content for dynamic content without breaking HTML. It also means that even with PHP scripts installed, you still have full control of the layout and functionality of your pages through the use of tags, CSS, and the other techniques you learned by reading this book.
In this hour, you learned about basic PHP scripts and saw how a script can insert content into a page. You built an email form based on PHP that can be uploaded to a Linux server (the form from Hour 20 works only on Microsoft servers). Using PHP scripts, you went beyond simply generating an email and created conditional rules that sent the visitor to different pages depending on whether the email was sent. Finally you created a conditional rule that tested whether the visitor inserted an email address before submitting the form.
PHP is an advanced coding language and in this hour you got only a fleeting glimpse of what can be done with it. By using the PHP tools in Expression Web 2, including the full IntelliSense support, you are well equipped to dive into the world of server-side scripting. If you want further information about PHP including tutorials, visit the official PHP website at www.php.net or the W3C schools at http://www.w3schools.com/PHP/.
Q&A
Q. When I tested my PHP page in the browser after installing PHP, the address in the address bar changed to http://localhost: and some number. What happened to my original address?
A. When you run a page through the Expression Development Server, the application creates a temporary simulated server on your computer. The address changes because the page is not merely read from its original location as it is when you test an HTML page but is rendered through the server. Thus the browser is displaying the server output and because the server is hosted on your computer, it is a local host.
Q. When I tested the email form using the Expression Development Server, all I got was a page displaying the PHP code.
A. This problem could be caused by two different things. Either you didn’t change the suffix of the contact page to .php but left it as .html, in which case the Expression Development Server will not deploy and the page will be rendered as straight HTML, or PHP is not running properly. First check that your contact page is named contact.php. If so, make sure you followed all the steps when installing PHP on your computer.
Workshop
The Workshop has quiz questions and exercises to help you put to use what you just learned. If you get stuck, the answers to the quiz questions are in the next section. But try to answer the questions first. Otherwise you’ll only be cheating yourself.
Quiz
1. What is the difference between the e-mail form you created in this hour and the one you created in hour 20?
2. How does the browser know what part of a PHP page is PHP code and what should be considered standard HTML?
Answers
1. The e-mail forms you created in the two hours are virtually identical. The difference lies in how the data or information generated from the forms is handled once the visitor presses the Submit button. In the form created in this hour the data is sent to a PHP file that parses the information and creates an e-mail message that is sent to the defined address. In the form from hour 20 the data is processed by the FrontPage Server Extensions on the server and the e-mail is generated by them. One of the biggest distinctions between the two is that while the PHP functions are contained in a separate file in this example, the FrontPage Server Extensions code is contained within the form code itself.
2. One of the many benefits of PHP is that it can live along side regular HTML code without any problems. When the browser opens a PHP page it reads all the regular HTML code as it normally would and only sends the PHP code contained within the PHP delimiters <?php ?> to be processed by the server before being displayed. This way the server only helps out when needed and the browser does the rest of the work. In the extreme this means that you can create PHP pages that contain nothing but HTML and the browser will read them as if they were HTML pages.