
Hour 12 Styling with Code: Fully Immersed in CSS
What You’ll Learn in This Hour:
![]() How to read CSS code
How to read CSS code
![]() How inline styles differ from other styles
How inline styles differ from other styles
![]() How to apply styles, classes, and IDs to tags in Code view
How to apply styles, classes, and IDs to tags in Code view
![]() How to create external style sheets and apply them to multiple pages
How to create external style sheets and apply them to multiple pages
Introduction
In Hours 10, “Bringing Style to the Substance with Cascading Style Sheets,” and 11, “Boxed In Part 2: Knee Deep in CSS,” you learned how to create styles and apply them to content in Design view. But that’s just half the story. To fully grasp what CSS (Cascading Style Sheets) is all about, you need to go to the source and learn how to read the code.
Fortunately CSS code is quite simple to learn, especially when you have Expression Web’s many CSS tools at your beck and call whenever you get confused. Just as in Design view, you have full access to the CSS task panes when you are working in Code view and all the tools you used in the past two hours are available for use in the same way.
The main purposes of this hour are to go beyond the basics and learn how styling really works and how to create, apply, and modify styles without using the tools every time. Because although the tools Expression Web provides are excellent, they are sometimes cumbersome to use, especially if you are making quick minor changes and already know what to do. Other benefits to using Code view are that you have more control when it comes to the placement and attribution of tags and you can get a better overview of what is happening to your code. On top of that you get a much clearer picture of the meaning of the phrase separating the style from the content.
In addition to learning how to read, write, and dissect CSS code, this hour will cover how to create separate style sheets and apply them to multiple files. You will also see how easy it is to move styles from one file to another and apply a style created in one file to other files without having to re-create it. By the end of this hour, you will have the necessary tools and understanding to use CSS not only as a styling tool but also as a platform to create visually stunning websites with clean and concise code that looks the same across most if not all browsers and platforms.
Introducing CSS: The Code Version
In the last two hours, you created a series of styles, classes, and IDs. In this hour, you will inspect and expand on these so if you didn’t do all the tasks in earlier hours, you should replace the default.html file and the myDesk.html file with the final ones from Hour 11.
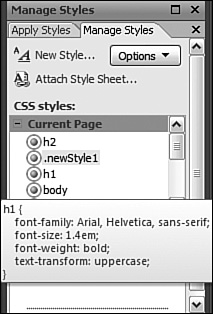
To work, CSS requires two sets of code: the styles themselves and the tags to which the styles are attached. Let’s take a closer look at the styles themselves as they appear in code form. Expression Web 2 gives you multiple ways of viewing the CSS code. By far the easiest way of doing so is simply to hover over the style in question in the Manage Styles task pane. When you do so, a ScreenTip opens to display the entire style code in a pop-up window (see Figure 12.1).
Figure 12.1 Hovering the mouse pointer over a style in the Manage Styles task pane brings up a ScreenTip that displays the CSS code for that style.
With the default.html file open, hovering over the h1 style gives you the following output:
h1 {
font-family: Arial, Helvetica, sans-serif;
font-size: 1.4em;
font-weight: bold;
text-transform: uppercase;
}
This is a typical style. It consists of the style name followed by a set of curly braces. The braces contain all the actual styling code: Each attribute followed by its respective values after a colon. A semicolon separates the attributes.
As you can see, the CSS code Expression Web 2 generates is very easy to read. In fact the only reason why each attribute is on a separate line is for readability. If you wanted to, you could remove all the line breaks and write the entire style on one line, but as you can see it would be much harder to read:
h1 {font-family: Arial, Helvetica, sans-serif; font-size: 1.4em; font-weight: bold; text-transform: uppercase;}
![]()
Because of the limited physical width of this book the entire line doesn’t fit on one single line when printed. Normally if you look at the line in Expression Web 2 it would appear on one line. Just like in this book there are times when CSS confined to a single line is arbitrarily divided into multiple lines by the application you are using to look at the code. Even so the style works the exact same way. The information you should walk away with here is that it is the semi-colons that define when a line of code ends, not the line breaks.
Now that you know what the CSS code looks like, the next logical question is, “Where is it located?” If you paid close attention when you created the styles in the last two hours, you might already have a good idea. Directly under the Selector box in the New and Modify Style dialog was the Define In box, which was set to Current page. That means all the styles you created so far are stored in the same page as the content—more specifically at the top of the page inside the <head> tag. The <head> tag contains functional but nonvisual content and information about the current page.
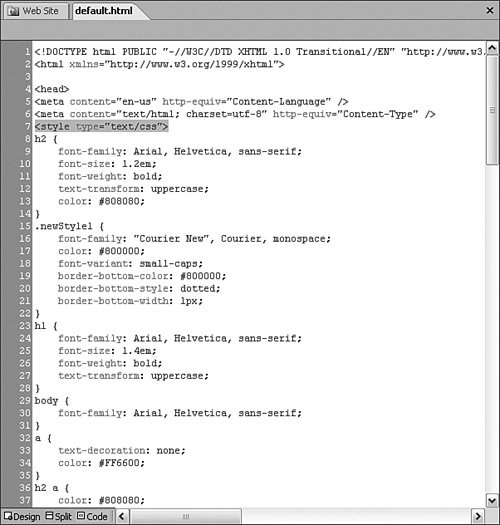
To see where the styles are stored, switch to Code view and scroll to the top of the page. Directly under the <meta> tags is a tag that says <style type=″text/css″>. You can find all the styles within this tag (see Figure 12.2).
In Hour 8, “Cracking the Code—Working in Code View,” you were introduced to the Code View toolbar. Now is a good time to use it. To get an idea of how much code Expression Web 2 created for you when you created the styles, place your cursor on any of the lines with CSS code and click the Select Tag button on the Toolbar. This highlights all the CSS code. But reading this code can still be quite daunting. Currently you have 12 styles defined and many style sheets have several hundred styles or even more.
To find a particular style in Code view, all you have to do is click the style in question in the Manage Styles task pane and Expression Web 2 highlights the style for you. You can even use the arrow keys to navigate between styles for quick and easy access to the particular style, class, or ID you want to work on.
Figure 12.2 You can find the CSS code at the top of the default.html page inside the <head> tag in Code view.
The Value of Separation
Throughout this book there have been several mentions of the styles being separate from the content. Now, for the first time, you see what this means in real life: The style code is quite literally separate from the rest of the content in the page. There are several reasons for this. First, keeping the styles separate means that style code does not clutter the content portion of the page. Second, it makes it easier to make changes to both the styles and the content because they are easily distinguishable. Last, it means that you don’t have to insert styling code in the page whenever you add new content.
When you add CSS code to the head of an HTML page, the browser reads it and applies it to whatever content it finds below. In practical terms, it works kind of like a coin sorter. If you just dump various coins in a bucket, they have no order. But a coin sorter sorts, separates, and puts each different coin size in its own collector. In HTML, the CSS code becomes the different coin slots and as the content flows through the filter, the different kinds of content fall into their appropriate slots. So rather than sorting each piece of content individually by applying styles directly to it, CSS works as a template from which all the content sorts simultaneously.
Understanding Inline Styles
But what is a rule without an exception? In Hour 10 you created an inline style that applied to just one section of the page. You removed that inline style and replaced it with a class in Hour 11, so you need to make a new one. But this time you will see what goes on in the code and, through that, learn how the inline style gets its name.
1. With the default.html page open in Split view, scroll down to the bottom of the page and place the cursor anywhere inside the last paragraph. Click the New Style button to create a new style and use the drop down menu to set the selector name to (Inline Style).
2. In the Font category, set the font-size to 0.8em and the font-variant to small-caps. In the Block category, set text-align to center. Click OK to apply the new inline style, the result of which you can see in Figure 12.3.
Figure 12.3 You can use inline styles to create specialized styles for small segments of content that should appear different than the regular content.
The last paragraph of the page changes appearance after you apply the inline style. But what matters is what happened in Code view. Look at the tag for this particular paragraph:
<p style=″font-size: 0.8em; font-variant: small-caps; text-align: center″>
Rather than creating a new style and adding it to the list at the top of the page, Expression Web 2 added this style inside the tag of the affected paragraph. The style is in the same line as the content—hence the name inline style. This explains not only why the style you just created affects only this particular paragraph but also serves as a good example of why you should always try to keep your styles separate from your content. Just imagine what your HTML code would look like if every tag had to contain the necessary style attributes! With that said, inline styles are useful if you need to apply a special style featured only once in the entire page or site.
Creating a New Style in Code View Using IntelliSense
In Code view, you can make direct changes to the CSS code or create new styles with the help of IntelliSense. In this example, you create a new img style from scratch to give the image the appearance of having a white background with a gray border.
1. With the myDesk.html page open in Code view, find the <style> tag and place the cursor directly after the end bracket of the tag. Press Enter to create a new line.
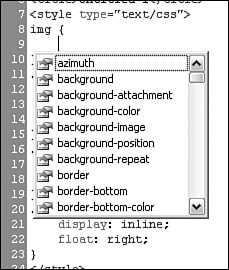
2. To create the new style, type im and IntelliSense suggests img. Press the Enter key to accept img, press the spacebar, and type a beginning curly bracket {. In response, IntelliSense automatically moves you to the next line, inserts the end curly bracket on the line below, and brings up a list of all available attributes that apply to the img tag (see Figure 12.4).
Figure 12.4 IntelliSense automatically closes any bracket you start and gives you a list of the available attributes.
3. To create five-pixel padding around the image, type pa. IntelliSense suggests padding. Press Enter to complete the word.
4. IntelliSense now opens a ScreenTip to tell you what kind of information the padding attribute requires. Because you want five-pixel padding on all four sides, you can type 5px and be done with it. If you want different values for each side, follow the ScreenTip and type, for example, 5px 4px 4px 10px. Complete the line by entering a semicolon and pressing Enter to create a new line.
5. To create a border, you need to set three attributes: border-style, border-width, and border-color. To help you remember this, IntelliSense reminds you and helps you set all three variables on one line: On the new line, type border:. This opens the ScreenTip for the border attribute. IntelliSense now asks you for the values it needs. First up is border-width. Type 1px and press the spacebar. The ScreenTip automatically jumps to the next variable, border-color, and opens a drop-down menu of colors for you. Pick the gray color and press the spacebar. IntelliSense now asks you for the border-style (see Figure 12.5). Select solid from the drop-down menu and finish the line with a semicolon. The two new lines should read padding:5px; and border: 1px gray solid;.
Figure 12.5 Depending on which variable is required, IntelliSense will provide a drop-down menu of options for you to choose from. In this case, it provides a list of colors for the border-color variable.

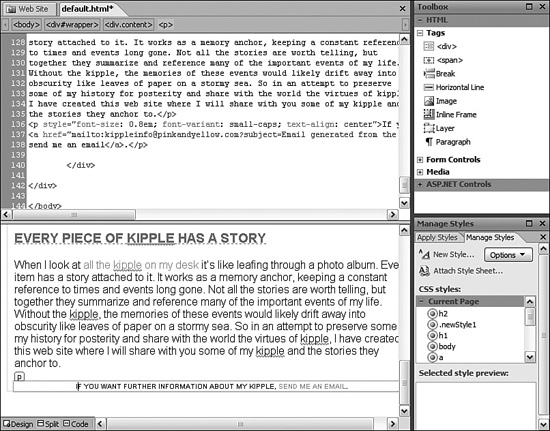
To see the effects of your changes, click anywhere inside Design view to apply the changes and scroll down to see the image. The thumbnail now has a one-pixel solid gray border and five pixels of white padding. This example shows you how easy it is to write and make changes to CSS code in Code view and also how IntelliSense works with you to simplify the code-writing process.
Applying Classes to Tags in Code View
In Hour 11, you learned to apply special styles to certain content with the use of classes. In one example, you used classes to change the position of the Kenny thumbnail in the myDesk.html page. This example provides a good basis for learning how Expression Web 2 applies classes to tags in Code view. If you open myDesk.html in Split view and click the Kenny thumbnail, the relevant code highlights in Code view (see Figure 12.6).
<img alt=″Kenny figure″ height=″147″ src=″Images/KennyOriginal_small.jpg″
width=“100” class=“alignCenter” />
Inspecting the tag code you see that a new attribute at the end: class=″alignCenter″. This is how Expression Web 2 applies classes to tags, whether they are selectors, spans, or divs. To change the class, all you have to do is edit the class name in Code view. In Hour 11, you learned how to create two more alignment classes, and if you did so you can change the class name to either alignLeft or alignRight and immediately see the changes in Design view. Adding a class to an existing tag is just as easy: Simply type the word class before the end bracket of the beginning tag and IntelliSense gives you a drop-down list of all available classes.
Figure 12.6 The img tag for the thumbnail highlights in Code view when you click the image in Design view.
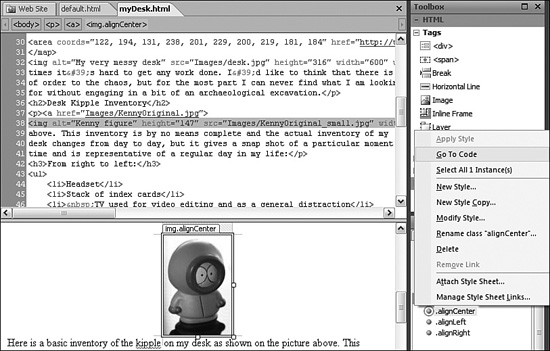
To see the CSS code for the class in Code view, right-click the class in the Manage Styles task pane and select Go to Code. No matter where you are in the program, this function takes you straight to the relevant CSS code in Code view.
Using Divs and Spans to Separate Content
This chapter touched on both the <span> tag and the <div> tag earlier and now it’s time to take a closer look at these separators. The main difference between the two is that span is an inline separator, whereas div is a block separator. In other words, span’s display attribute is inline by default, whereas div’s display attribute is block. You saw the difference between the two when you used the .centerAlign class to center the thumbnail earlier: The inline value means that the content, although separated from the surrounding content, is still on the same line as the rest. In contrast, the block value creates a block or box on its own line that holds only the content inside the tag.
The default.html page contains two instances of the <span> tag that you created to highlight the words kipple in the first paragraph and homeopape in the block quote. If you find the words in the Design portion of Split View, and click them, you can see the corresponding <span> tags and how they are applied:
<span class=″newStyle1″>"kipple"</span>
As you can see, the class application is no different in the span tag than in any other tag. But because you were just starting to learn how to create styles, you didn’t give the class a proper name, so it has the nondescript name newStyle1. It’s important to give all your styles, classes, and IDs proper descriptive names so that you know what they do. But how do you do so without afterward going into the code and manually changing all the references to the style?
Renaming Styles and Applying the Change to All Tags in a Page
When you work with large pages or sites, you often run into situations in which you need to rename a style, class, or ID. The problem is that Expression Web 2 already applied these elements to many tags within your pages and if you change the name of the style, class or ID, all the references have to change as well. To help simplify this process and save you from the trouble of tracking down every reference to your now changed style, class, or ID, Expression Web 2 can make all the substitutions for you.
1. With the default.html page open in Split view, navigate both the Code and Design view so that you can see both span instances you created earlier (kipple and homeopape).
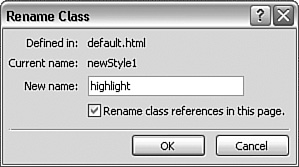
2. In the Manage Styles task pane, right-click the .newStyle1 class and select Rename Class “newStyle1” from the context menu. This opens the Rename Class dialog.
3. In the Rename Class dialog, give the class the new name highlight. Be sure to enable the Rename Class References in This Page box and click OK.
Figure 12.7 The Rename Style, Class, and ID dialogs give you the option of renaming all references to the renamed element in the current page or in all pages affected by it.
When you click OK not only does Expression Web 2 rename the class, it also changes the references to the class in the page, as you can see in Code view. Changing all the references to a style, class, or ID to correspond with a name change extends to external style sheets, meaning that when you learn how to create an external style sheet and apply it to multiple pages, Expression Web 2 changes all references to the changed name throughout all these pages for you, even if they are not open!
In Hour 11, you used divs to create blocks that separated and sectioned the contents of the page. default.html now has three divs: one outer box with the ID wrapper and two inner boxes with the header and content classes. To see how Expression Web 2 applies those divs, click the heading in Design view to see all the tags applied to it. By clicking the <div#wrapper> tag in the Quick Tag Selector, all the content affected by the tag highlights both in Code and Design view. To find only the beginning tag, click the Find Matching Tag button on the Code View toolbar. As you can see, the application of an ID is very similar to that of a class: <div id=″wrapper″>.
Because divs box in larger sections of content, it can be hard to see exactly where they apply and how much content they contain. You already saw how to use the Quick Tag Selector to highlight all the content affected by a tag. Another way is to use the Select Tab button on the Design View toolbar. If you need to see where the end </div> tag is located, click the Find Matching Tag button again and Code view jumps to the end tag.
Creating Divs in Code View
As you experienced in Hour 11, dragging and dropping divs into Design view can be quite tricky. A much easier and more effective way of applying divs is to use Code or Split view because in Code view you can see exactly what content you are wrapping and place the beginning and end tags in the precise location you want them. You already inserted three divs in the default.html page and now you are going to insert the same divs in the myDesk.html page.
1. With the myDesk.html page open in Split view, click the heading to navigate both views to the top of the page.
2. From the Toolbox task pane, drag an instance of the <div> tag into Code view and place it directly over the line that reads <h1>My Kippled Desk</h1>. This creates a beginning and an end div tag: <div></div>.
3. Highlight and cut out the </div> end tag by pressing Ctrl+X. In Code view, navigate to the bottom of the page. There you can see that the </body> tag is now red with a yellow background, indicating that the code is broken. Paste the </div> tag you just cut out into the line directly above the </body> tag. If you click an element on the page, you can see that the <div> tag is now present in the Quick Tag Selector.
4. Now you are going to box in the header content. Find the beginning div tag you just inserted and add a new line directly underneath it. Drag and drop a new <div> tag into the new line or enter <div> manually. IntelliSense creates the end tag for you to keep the code from breaking. Again highlight and cut out the end tag. Because this page doesn’t have a descriptive section, the header should contain only the heading, so place your cursor at the end of the line containing the heading and press Enter to create a new line. Paste the </div> end tag you cut out into this new line or enter </div>.
5. To wrap the rest of the content in another div, add a new line directly underneath the one with the </div> end tag you just inserted and create a new <div> tag. Cut out the end tag and place it at the bottom of the screen above the first </div> end tag you inserted.
The myDesk.html page now has three divs just as the default.html page does. But the classes and IDs you used to style the divs are still in the default.html file. To apply them to myDesk.html as well, you need to create an external style sheet.
Creating External Style Sheets
By far the most powerful feature of CSS is that it gives you the ability to create styles, classes, and IDs stored in one central location and applied to many different pages or entire sites. This is where the Sheets part of the name Cascading Style Sheets comes from.
An external style sheet is a dedicated file with the extension .css that contains only style code. Until now you have inserted all the style code you created into the head of your HTML pages, but doing so limits their application to that particular page. Now you are going to move the styles from the HTML page to a new style sheet so that you can apply the same styles to multiple pages.
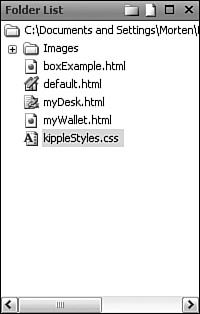
To create an external style sheet, you first have to create the .css file itself. The easiest way to create a .css file is to right-click in the Folder List task pane, and then select New, CSS in the context menu. This creates a new file named Untitled_1.css. In most cases the style sheet name is simply styles.css, but it is often a good idea to be more specific in naming to ensure that you know which site each sheet belongs to. After creating the new file, give it the name kippleStyles.css as shown in Figure 12.8.
Figure 12.8 It’s usually a good idea to give your .css files site-specific names to make sure you know where they belong.
Opening the new CSS file, you can see that it is completely empty. That is because unlike HTML and other markup files, a CSS file doesn’t need any code other than the actual styles to function. And because it’s a new file, there are no style definitions yet.
The next step is to attach the style sheet to your pages by using the Attach Style Sheet button in the Apply and Manage Styles task pane. With the default.html page open, click the Attach Style Sheet button to open the Attach Style Sheet dialog (see Figure 12.9).
Figure 12.9 The Attach Style Sheet dialog lets you attach an external style sheet to the current page or all pages in the site using either the link or import method.
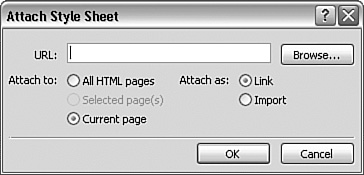
From here you can browse to the style sheet you want to attach and choose whether you want to attach it to all the pages in your site or just the current page. (The Selected pages option becomes available if you highlight a series of pages in the Manage Folders task pane before opening the Attach Style Sheet dialog.) You also have the choice of whether to attach the style sheet using the link method or the import method. They produce nearly the same results, but use the Link option for the most consistent results.
Browse and select the kippleStyles.css file you just created, select Attach to All HTML Pages and Attach as Link. This attaches the new style sheet to all the HTML pages within your site by inserting the following line of code in the <head> tag:
<link href=″kippleStyles.css″ rel=″stylesheet″ type=″text/css″ />
The attached style sheet now appears in the Manage Styles task pane under the styles embedded in the current page (see Figure 12.10).
Moving Styles To and From the External Style Sheet
After attaching the external style sheet to all the pages in your site, the styles set in the kippleStyles.css file affect all the pages instead of just one. You have already created many styles in different pages, but they are stored in the head of each page and not in the style sheet. The obvious way to solve this is to cut and paste the code out of the pages and into the style sheet, but this method is both cumbersome and prone to error. Expression Web 2 provides a better solution in the form of the Manage Styles task pane.
![]()
For this exercise it is a good idea to close the Toolbar task pane and let the Manage Styles task pane cover the entire height of your screen. You can always reset the task panes later.
Figure 12.10 The newly attached style sheet appears in the Manage Styles task pane underneath the locally embedded styles.
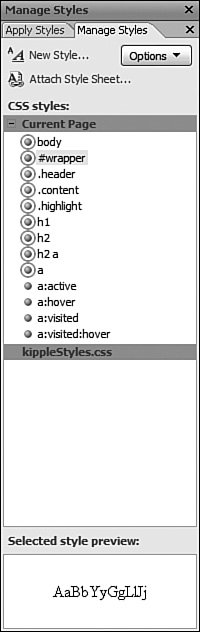
1. With the default.html file open, click and drag the body style from the Current Page area down to the kippleStyles.css area. When you let go, the style appears below the kippleStyles.css heading.
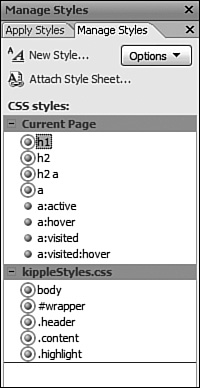
2. Using the same method, move the rest of the styles, classes, and IDs from the Current Page area to the kippleStyles.css area (see Figure 12.11).
Figure 12.11 You can move styles, classes, and IDs from the current HTML file to the new .css file by dragging and dropping them into the new file area in the Manage Styles task pane.
3. When you finish moving all the styles, classes, and IDs to the kippleStyles.css area, scroll to the top of default.html in Code view. Note that all the style code is gone. All that is left is the <style> tag. In the Manage Styles task pane, right-click any of the styles and select Go to Code. The new kippleStyles.css style sheet opens, and you can see that all the code previously housed in the head of the HTML file is now in the style sheet.
4. Open myDesk.html. Note that the styles you just moved from default.html now appear under kippleStyles.css in the Manage Styles task pane for this page. Using the same technique, move the styles from myDesk.html to kippleStyles.css.
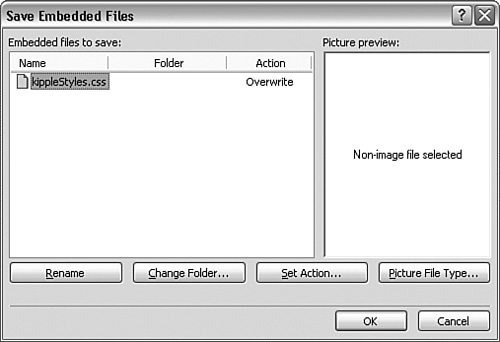
5. Press Ctrl+S to save the changes. This opens the Save Embedded Files dialog, which asks whether you want to save the changes to the kippleStyles.css file (see Figure 12.12). Click OK.
Figure 12.12 When saving an HTML file after making changes to styles contained in an external style sheet, Expression Web 2 always opens the Save Embedded File dialog to ask whether you want to save the changes made in the style sheet as well.
The kippleStyles.css file now contains all the styles from both default.html and myDesk.html. Expression Web 2 still applies the styles to the content of those pages, and they appear the same in Design view and in any browser you preview them in.
Inspecting the code in kippleStyles.css you can see that the order of the styles corresponds with the list of styles in the Manage Styles task pane. If you change the order of the styles in the task pane, the code reorganizes in the same manner. This is because the order of styles in the style sheet is relevant to the cascade: The lower in the sheet the style is, the more weight it has in deciding what the content should look like.
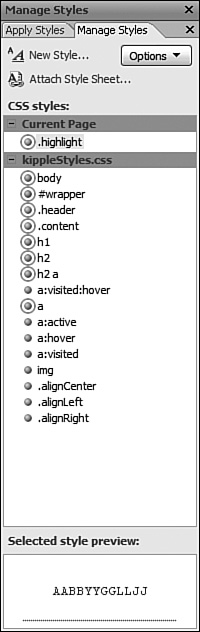
In some cases a style, class, or ID applies to only one page. In that case, it is a good idea to keep the element in the relevant page rather than in the style sheet. For example, in default.html you created a class called highlight that applied to two words as an inline style. Now the style sheet contains this class, but because only the default.html page uses it, the class should be only in that file. To return this particular class back to its original location, simply open default.html and drag and drop the .highlight class back to Current Page (see Figure 12.13).
Figure 12.13 The final style structure of default.html
![]()
If you want to keep a style, class or ID in both style sheets you can use the same drag-and-drop technique to copy them. To do so, simply press and hold the Ctrl key on your keyboard while dragging and dropping the element. Just keep in mind when you do so that you will now have two styles with the same name and the one in the style sheet that is listed furthest down in the cascade has precedence.
Applying External Styles to a Page
Styles nested in an external style sheet act in the same way as styles nested in the current document. Therefore Expression Web 2 applies them in the same way. Earlier in this hour you created a series of divs to section out the content in the myDesk.html page. Now that you have attached the external style sheet, you can apply the same IDs and classes you used to change the layout of default.html to change the layout of myDesk.html.
1. With the myDesk.html file open in Split view, click anywhere inside the page in Design view and click the first <div> tag in the Quick Tag Selector to select the div that wraps all the content. This highlights all the content in both Code view and Design view.
2. In the Manage Styles task pane, right-click the #wrapper ID and select Apply Style from the context menu (see Figure 12.14). The tag in the Quick Tag Selector and in Code view changes to <div#wrapper> and the wrapper ID is applied.
Figure 12.14 Applying a style from an external style sheet is no different from applying a style nested within the file itself.
3. In Code view, move the cursor one line down to select the next <div> tag, right-click the .header class in the Manage Styles task pane, and select Apply Style. The tag changes to <div.header> and the .header class is applied.
4. In Design view, click anywhere inside the content contained in the last div and select the <div> with no class or ID in the Quick Tag Selector. In the Manage Styles task pane, right-click the .content class and select Apply Style. The tag changes to <div.content> and the .content class is applied. Save the file and preview it in your browser (see Figure 12.15).
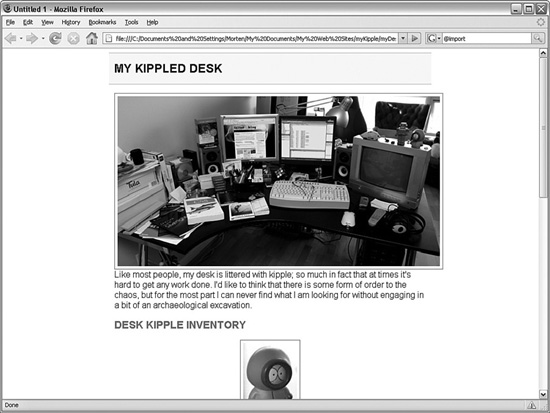
By previewing the page in a browser, you can see the styles you created for default.html applied to myDesk.html. But there is a problem: The large image of the desk seems to be protruding to the right. This is because the image itself is 600 pixels wide and you added both padding and a border to the img property itself and padding to the .heading class. There are two ways to solve this problem: reduce the size of the image or change the width of the wrapper ID. In this case, the second option is the easiest.
Figure 12.15 The layout IDs and classes created for default.html applied to myDesk.html. It looks consistent when previewed in a browser.
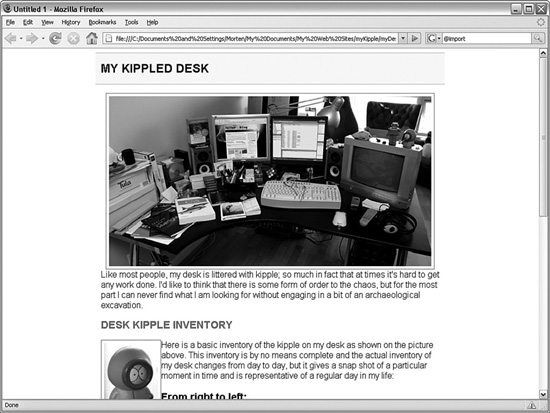
To change the width of the wrapper ID, right-click it in the Manage Styles task pane (it doesn’t matter what file you currently have open in Expression Web 2) and select Modify Style. Under the Position category change the width value to 650px. Save the style change and preview the page in the browser. Now the image fits within the text area but floats to the left. To solve this problem, simply select the image in design view and apply the .alignCenter class. Finally apply the .alignLeft class to the Kenny thumbnail and the layout of the myDesk.html page is complete (at least for now). Because you changed the width of the #wrapper ID now nested in the kippleStyles.css file, the change also applies to the default.html page when you open it in a browser (see Figure 12.16). That way you can keep the look of the entire site consistent when you make changes.
Figure 12.16 The subtle changes to the #wrapper ID and the application of the .alignCenter and .alignLeft classes to the images make a big difference in the way the browser displays the page.
Summary
Even though Expression Web 2 creates proper standards-based CSS code out of the box, understanding the CSS code can make your life as a designer a lot easier. In fact, in many cases, it makes more sense to work directly with the code rather than to use the tools in the application. Fortunately you can choose either way and customize your work process depending on the task.
In this hour, you learned how to build a CSS style using code and how to edit it in Code view with the help of IntelliSense. You also learned how to insert spans and divs in your page from Code view, and why doing so is often easier than doing it in Design view. In addition you saw how inline styles differ from other styles and where the name inline stems from. You also learned how to rename both inline and other styles without going through all the code and renaming each instance afterward.
Most importantly you learned how to completely separate the styles from the content by creating an external style sheet and how this makes styling groups of pages or an entire website much easier. Understanding this process is fundamental; it dramatically reduces your workload and makes changing and upgrading the look and feel of large websites an easy and straightforward process.
By the end of this hour, you began to realize the true power of standards-based web design and the use of HTML and CSS. In upcoming hours, you will use this knowledge to turn up the “wow” factor of the myKipple site by creating advanced layouts and menus.
Q&A
Q. When I try to apply an inline style to a single word it is applied to the entire text block instead. What am I doing wrong?
A. When you create an inline style the new style is applied to the closest tag. That means that unless you have separated the single word from the rest of the block using the <span> tags, the inline style will be applied to the block tag. To apply the inline style to a single word you have to wrap it in <span> tags first and then create the new inline style.
Q. I followed the tutorial to create divs in code view but everything looks the same as it did before!
A. When there is a problem with content being wrapped with <div> or <span> tags and nothing looking any different the answer is usually answered by the following three questions: Does the <div> or <span> actually wrap anything? A common mistake when inserting these elements is to forget to place the end tag at the end of the content. This is because both IntelliSense and other tools automatically place the end tag right after the beginning tag before the content. The second question is, do the tags close properly? You may have forgotten to paste the end tag in after cutting it out or you may have placed it in the wrong spot. If so the code will be broken and you should see the little warning sign in the Status bar and find highlighted code further down in the document. Finally did you actually apply the class or ID to the tag? If you click on the content that should be styled by the class or ID and the Quick Tag Selector reads <div> or <span> without the class or style attached you need to apply the style or ID to make everything work properly.
Workshop
The Workshop has quiz questions and exercises to help you put to use what you just learned. If you get stuck, the answers to the quiz questions are in the new section. But try to answer them first. Otherwise you’ll only be cheating yourself.
Quiz
1. What is the difference between a <span> tag and a <div> tag?
2. What are the two main methods used to make new styles, classes and IDs you have been introduced to?
3. What is the benefit of moving styles to an external style sheet?
Answers
1. The <span> tag is an inline tag meaning that if applied to content in a line the content stays on the same line. The <div> tag on the other hand is a block tag meaning it creates a new block or line that the content it wraps is placed on. For this reason <span> is used to highlight words or elements while <div> is used to group sections.
2. You now have two methods of creating styles: You can use the New Style button on the Apply and Manage Styles task pane and create a new style through the dialog or you can create a new style from scratch in Code view with the help of IntelliSense.
3. By placing your styles in an external style sheet you can now use the same styles to control the look of several pages. It also means you can make changes to one style and see those changes applied to all the pages it is attached to without ever opening them.
Exercise
Using the techniques you learned, change the layout of the myWallet.html page by adding divs and styling them with IDs and classes to match the default.html and myDesk.html pages.