
Hour 4 Building the Home Page—A Look Behind the Curtain
What You’ll Learn in This Hour:
![]() How to read and edit basic HTML code in Code view
How to read and edit basic HTML code in Code view
![]() How to import text from Microsoft Word and other documents
How to import text from Microsoft Word and other documents
![]() How to clean up imported code using Code and Design views
How to clean up imported code using Code and Design views
![]() How to use Find and Replace to edit many instances of code at the same time
How to use Find and Replace to edit many instances of code at the same time
Introduction
In Hour 3, “A Website Is Really Just Text—Build One in 5 Minutes,” you built a basic web page using functions similar to those in a word processing program. But that is just half the story: In web design, what happens behind the curtain is what really matters. It’s time to learn some basic HTML and see how the code affects the content. To do this, you build the basic structure of the home page of the My Kipple site.
Opening and Editing an Existing File Using Code View
If you haven’t already done so, open the default.html file you worked on in Hour 3. The MyKippe site should open automatically when you open Expression Web 2. If not, you can find it by selecting Open Site from the File menu or from the drop-down menu of the Open icon on the Common toolbar (see Figure 4.1).
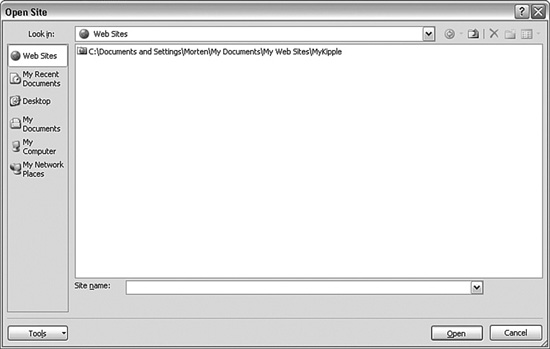
The Open Sites dialog lists all the sites created in Expression Web 2 (see Figure 4.2). When you create or define a website in Expression Web 2, the program automatically generates a shortcut to facilitate easy access to this list. If you can’t find the project on this list, you can navigate to it as you normally would. If you followed the directions in Hour 3, the project is in the My Web Sites folder under My Documents.
Figure 4.1 The drop-down menu under the Open icon on the Common toolbar gives you quick access to open files and sites without having to go to the Main menu
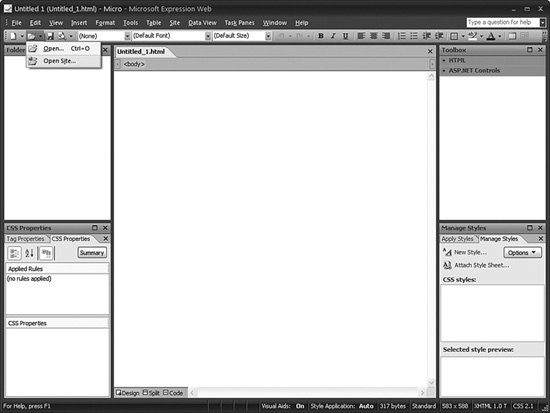
Figure 4.2 The Open Site dialog displays all the websites you have created in Expression Web 2. Here seen with the My Kipple project.
![]()
The Open Sites dialog isn’t restricted to local sites. You can also use it to open and manage external websites both through HTML (Hypertext Markup Language) and FTP (File Transfer Protocol) as long as you have the necessary access codes. In fact you can use Expression Web 2 to make changes to live websites in real time.
Before going any further, let’s look at what is happening in the page’s code. Select Split view using the button at the bottom of the pane to reveal both Code view and Design view. Click anywhere on the heading and then click the h1 tag on the Block Selection box. This highlights the content affected by the h1 style in both Design view and Code view (see Figure 4.3). In Design view, you see a box with a gray striped-out area above and below. The gray areas are the default margins for the h1 style. In Code view, you see the text buffered or wrapped on both sides by code tags. These tags tell the browser to display the text in the h1 style.
Figure 4.3 When clicking on an object in either Code or Design view that object is highlighted in both for easy reference.
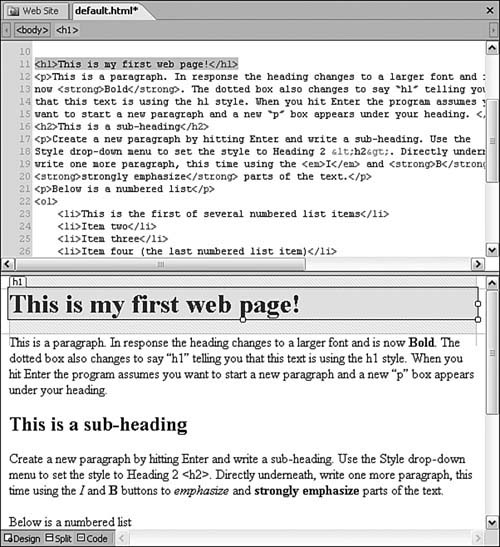
HTML is a basic code language that can be summarized in one simple rule: Everything is wrapped between a beginning and an end tag. All beginning tags consist of a less-than bracket <, the tag name and/or function, and a greater-than bracket >. End tags look much the same, but with the addition of a forward slash / before the content. In this example, <h1> tags wrap the heading like this:
<h1>This is my first web page!</h1>
You now have two ways of changing the style of your content. You can use the style drop-down menu as you learned in Hour 3 or you can go into Code view and change the style manually. Try changing the <h1> and </h1> tags to <p> and </p>, and see what happens in Design view.
![]()
To use Design view to see changes you made in Code view, you have to click inside the Design view area. This is because as you change the code in Code view, you are temporarily breaking the code. Rather than trying to display broken code, Expression Web 2 waits for you to tell it when you finish editing before it refreshes the WYSIWYG (What You See Is What You Get) editor.
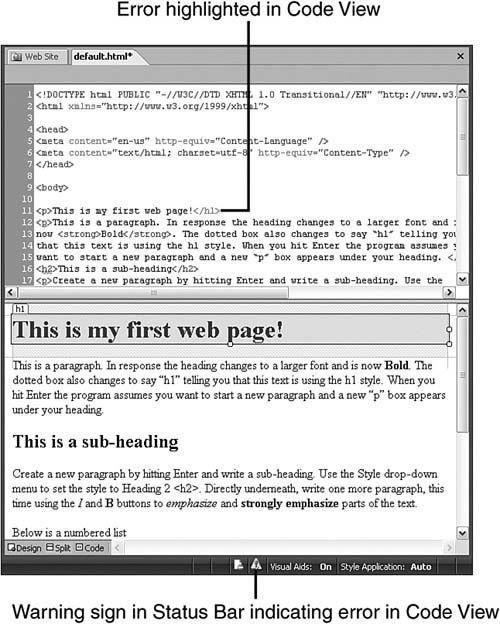
Notice that when you change the beginning tag, Expression Web 2 highlights the end tag in yellow and red to tell you that your code is broken (see Figure 4.4). Likewise the status bar on the bottom of the workspace puts up two warning signs: The first one tells you that it detects an HTML incompatibility; the second one tells you that it detects a code error.
Figure 4.4 When Expression Web 2 discovers a code error it highlights the error with a yellow background and red text as well as showing a warning sign in the Status Bar.
By studying the code, you see that all the different styles you applied in Hour 3 are actually the same type of tags:
![]() Heading 1
Heading 1 <h1>
![]() Heading 2
Heading 2 <h2>
![]() Paragraph
Paragraph <p>
![]() Italicized (emphasized)
Italicized (emphasized) <em>
![]() Bold (strongly emphasized)
Bold (strongly emphasized) <strong>
![]() Bullet (unordered) list
Bullet (unordered) list <ul>
![]() Numbered (ordered) list
Numbered (ordered) list <ol>
![]() List item for both lists
List item for both lists <li>
The </body> tag, which wraps all the content, tells the browser that this is the content to display. The <head> tag contains all the meta information that is available to the browser but that the browser does not displayed within the page. Meta information includes the page title displayed at the top of the window, info about the designer, and so on. Finally the <html> tag, which tells the browser that the following content is written in the HTML language, wraps both the <head> and <body> sections. Scroll to the bottom of the Code view and you can see the </body> and </html> tags that close the page.
Importing Styled Text from a Document
What is a website if not a source of information? You need some real content to work with. Right now the default.html file contains whatever text you inserted during Hour 3. The next step is to introduce some real content. In most cases, you will either be provided with or write your own content in some form of word processing software. Your first instinct is probably to cut and paste this content straight into your page. The problem is that word processors attach a large amount of invisible styling code to their documents—code that becomes very difficult to work with after import into an HTML file. To get rid of most of this superfluous code, Expression Web 2 can import this content and translate basic layout and styling for you. It’s not a perfect solution, but it’s far better than cutting and pasting.
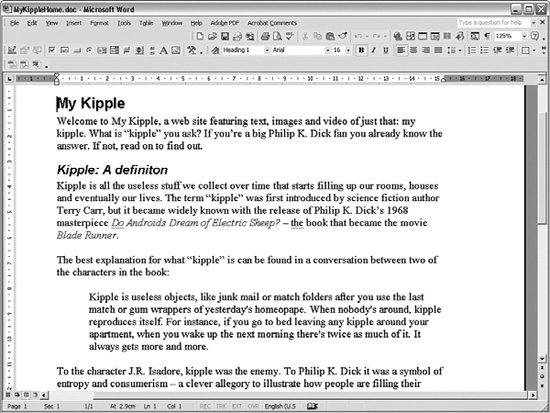
In the set of files you downloaded from the book site is a Microsoft Word document called MyKippleHome.doc (see Figure 4.5). Open this document in Microsoft Word and you see a standard document with headings, subheadings, and some text.
The next step is to move all this content over to the default.html file and translate the styling to standards-based code. To import the content, you use the File command.
Figure 4.5 MyKippleHome.doc as it appears in Microsoft Word.
Try it Yourself
Add the Insert File Command to the Common Toolbar
Expression Web 2 is loaded with functions, many of which are not part of the standard toolbars. The Insert File command is one such function. But because you’ll use it often in real life, add an Insert File command button to your toolbar.
1. Select Add or Remove Buttons and Customize under the Toolbar options as explained in Hour 1, “Get to Know Microsoft Expression Web 2.” Alternatively, select Tools, Customize from the menu bar.
2. With the Commands tab selected, click Insert under Categories.
3. Scroll to the bottom of the Commands menu and find the File option with a paperclip icon next to it (see Figure 4.6).
4. Click the File option and drag it to the far right side of the Common toolbar. Release the mouse button and the paperclip appears on the toolbar next to the Font Color button (see Figure 4.7). Close the Customize dialog.
Before inserting new text, delete all the old content from the default.html file. In Design view, highlight all the content and press the Delete button on your keyboard. You should now have a blank page in Design view and the basic framework of an HTML file in Code view.
Figure 4.6 From the Customize dialog you can add new functionality like the Insert File command to your toolbars.
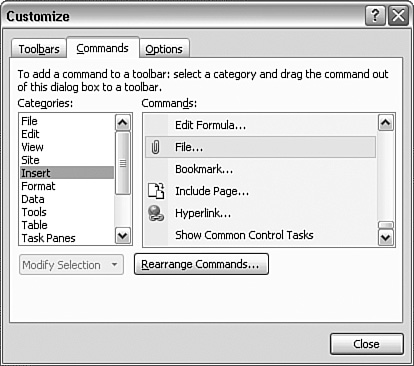
Figure 4.7 When you add new functions to the toolbars they will appear in the first open space to the right.
![]()
To import the content of the MyKippleHome.doc file into your project, click the Insert File button you just added to the Common toolbar. This opens a standard Select File dialog. Browse to the location where you saved the MyKippleHome.doc file. By default, the Insert File command looks for HTML files. But if you click the Files of Type drop-down menu, you see the program supports a long list of file types including Rich Text Format (.rtf), many different versions of Microsoft Word documents (.doc), Microsoft Excel worksheets (.xls), WordPerfect documents (.wpd), and many more. Simply clicking All Files (*.*) shows you all the available files. Select the MyKippleHome.doc file and click Open.
![]()
Depending on the version of Microsoft Word installed on your computer, a warning saying Microsoft Expression Web 2 needs a converter to display this file correctly. This feature is not currently installed. Would you like to install it now? might appear the first time you use the Insert File command. If you click Yes, Expression Web 2 asks you to insert the Microsoft Office CD and install some new components. If you don’t have the Office CD handy, simply click No. Because of a quirk in the program, the function still works the way it should but you see the same warning every time you use the function until you install the necessary components.
Cleaning Up Imported Text
Although the new imported content looks the same in Design view as it did in Microsoft Word, the code tells a different story (see Figure 4.8). By highlighting the heading at the top of the document, you see that the code is no longer as clean as it was earlier:
<font FACE=″Arial″ SIZE=″5″><b>
<p>My Kipple</p>
</b></font>
Figure 4.8 Although the new content looks right in Design View, the content imported from the word document is littered with “bad” code that is not standards based.
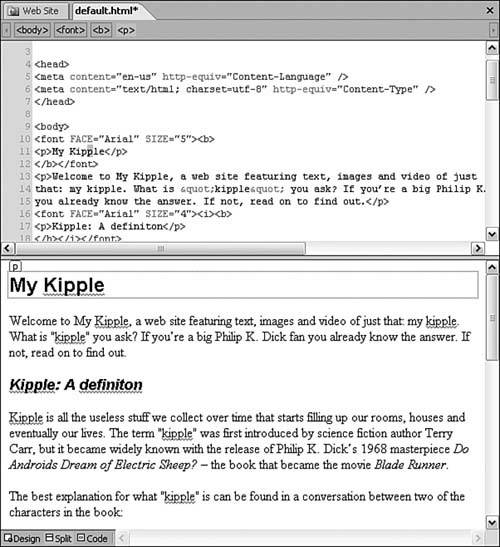
You can see that rather than setting the heading to the h1 heading style, the font type and font size are set with two commands: FACE and SIZE. Although this way of styling content works, it is both cumbersome and messy and creates a lot of extra work for anyone who wants to change the content later. For instance, if you have several headings like this throughout your document, you have to insert all that style code every time you add a new heading. As you will see when you start adding more advanced styling to your document, this way of defining the look of your text is also limiting. Furthermore the font element is deprecated meaning it is no longer supported by the W3C and should be avoided if at all possible.
You need to get rid of all this extra code and to clean up the new document. To do this, you can make use of both Design view and Code view. First attach the proper styles to the content. As you can see when you click the heading, Expression Web 2 defines it as a paragraph with some extra styling attached. To fix this, simply set the style to Heading 1 <h1> by using the Style menu as you did before. Use the same technique to set the three subheadings to h2. HTML has a dedicated tag, blockquote, for indented or highlighted paragraphs. Select the indented paragraph and use the Style menu to restyle the paragraph with Block Quote.
Now that all the sections have the proper tags, you can start deleting all the unnecessary code. In Code view, take away all the code before and after the heading tags. Afterward each heading should look like this:
<h1>My Kipple</h1>
Next you need to get rid of all the extra code attached to the indented section. Because the Block Quote style automatically indents the paragraph, all the other tags are now unnecessary. Right now you have this:
<dir>
<dir>
<span LANG=″EN-CA″>
<blockquote>Kipple is useless objects, like junk mail or match folders
after you use the last match or gum wrappers of yesterday's homeopape. When
nobdy's around, kipple reproduces itself. For instance, if you go to bed
leaving
any kipple around your apartment, when you wake up the next morning there's
twice as much of it. It always gets more and more.</blockquote>
</span>
</dir>
</dir>
With the superfluous <dir> and <span> tags deleted the section should now read
<blockquote>Kipple is useless objects, like junk mail or match folders after you
use the last match or gum wrappers of yesterday's homeopape. When
nobody's around, kipple reproduces itself. For instance, if you go
to bed leaving any kipple around your apartment, when you wake up
the next morning there's twice as much of it. It always gets more
and more.</blockquote>
Finally, change the italicized and bolded words to emphasized and strongly emphasized. You can either do this manually by replacing each individual tag in Code view or in Design view by highlighting each section and clicking its respective emphasis button twice—once to get rid of the old code and once to insert the new code. This document has only a few emphasized and strongly emphasized sections, so it’s easy to make the changes manually. But because you often have to work with larger documents with many such instances, Expression Web 2 has a dedicated function to do all this work for you.
Try it Yourself
Use Find and Replace to Change Multiple Tags at Once
Find and Replace is a great tool to find content and make multiple changes to a document with only a few mouse clicks.
1. Open the Find dialog by clicking Edit, Find on the menu bar or by using the shortcut Ctrl+F. Click the HTML Tags tab.
2. In the Find Tag area, enter i or select it from the drop-down menu. Under Replace Action, select Change Tag from the drop-down menu. Doing so opens a third option called To. Enter em or select it from the drop-down menu (see Figure 4.9).
Figure 4.9 The HTML Tags tab under the Find and Replace dialog can be used to make document-wide changes to specific tags.
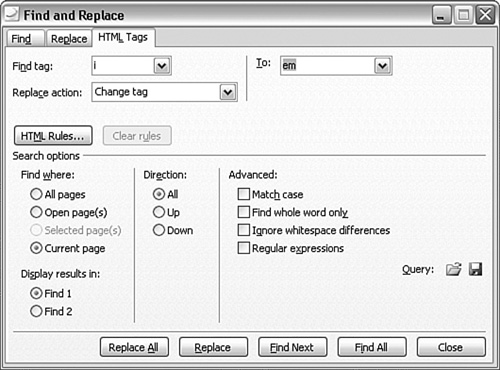
3. Click either Replace All if you are confident you want to replace all the tags, or click Find Next and then Replace for each instance. When you do so, the program replaces both the beginning and end tags throughout the document.
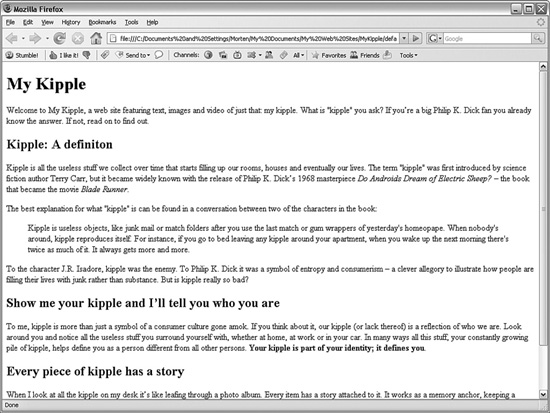
You have now successfully imported and converted the contents of a Word document to standards-based code (see Figure 4.10). The final step is to save the page on top of your old one (Ctrl+S) and test it in multiple browsers to ensure that it looks the way it’s supposed to.
Figure 4.10 The new default.html file as it appears in Firefox.
Summary
In this hour you took a trip behind the scenes and learned a bit about how an HTML page works. You saw that the code boils down to wrapping the content in a beginning and an end tag and that changing these tags can be done from Code view and Design view and also by using Find and Replace. You also learned how to import text content from external files and clean up the code so that it works properly. In Hour 5, “Get Connected—Building Hyperlinks for Navigation and Further Exploration,” you’ll create a second page and add hyperlinks to your pages to make them interactive.
Q&A
Q. When I imported the content from the Word document, there was all this extra code attached to the heading to make it larger and bold. How come simply adding the <h1> tags has the same effect?
A. All browsers interpret predefined styles in HTML in much the same way. All these styles are available from the Styles drop-down menu. If you don’t specifically define these styles in your document, they display according to their default parameters. In later lessons, you will learn to change the default styles to your specification and to make new styles.
Q. Why can’t I simply cut and paste the content from a Word document straight into my web page?
A. A word processor, such as Microsoft Word, inserts a large amount of hidden style code in documents. When you copy and paste text from these programs, all of that code quite literally tags along. One example of this is simple line breaks. When you press the Enter key in a word processor, you are actually inserting two line break codes rather than one. So, when you copy and paste the content to Expression Web 2, an extra line of empty space appears between each paragraph and you have to delete them manually. There are many ways of getting around this problem. One is to copy the content into a pure text editor such as Notepad first and copy it from there into Expression Web 2. But this approach can cause a lot of confusion and extra work because it strips away all the style information and gives you only plain text. There is nothing technically wrong with cutting and pasting content from word processors to Expression Web 2, but it creates a lot of extra work.
Workshop
The Workshop has quiz questions and exercises to help you put to use what you just learned. If you get stuck, the answers to the quiz questions are in the next section. But try to answer them first. Otherwise you’ll only be cheating yourself.
Quiz
1. Why should you use the Import File feature when importing content from an external file?
2. In Code view, how do you tell the browser to treat one line of text differently from another?
Answers
1. Other applications such as word processors apply styling such as font type and size to each individual object. When you cut-and-paste this content into your web page all this styling content comes along with it causing the markup to become cluttered with unnecessary code. The Import File feature strips away most of this extra code and makes it easier for you to format the content properly for the web.
2. To separate and group content HTML uses tags. Any content placed between a beginning and an end tag is considered by the browser to be styled by this tag and its attributes and is displayed accordingly. When you apply a particular style to content in Design view you are really wrapping this content in specific tags.
Exercise
Find a Word document you already have on your computer or write a new one. Make sure it has several headings and subheadings along with bold and italicized content and a few lists. With the default.html file open in Expression Web 2, choose Save As under File and select a new name like myTest.html and save it. Delete all the content in your new file and import the content from the Word document. Clean up the code so that it has only styles you can find in the Styles drop-down menu, and all bold and italicized content is strong and emphasized instead. Save the file and test it in your browser to verify that it works properly.