
Hour 23 Beyond the Basics, Part 2: Building a Site with ASP.NET
What You’ll Learn in This Hour:
![]() How to use an existing ASP.NET site as a base to build a new site
How to use an existing ASP.NET site as a base to build a new site
![]() How an ASP.NET master page works and how to edit it
How an ASP.NET master page works and how to edit it
![]() How an ASP.NET web form or page works and how it relates to the master page
How an ASP.NET web form or page works and how it relates to the master page
![]() How dynamic sites use source files to distribute content to different pages
How dynamic sites use source files to distribute content to different pages
![]() How to use CSS and HTML techniques to modify an existing ASP.NET site
How to use CSS and HTML techniques to modify an existing ASP.NET site
Introduction
In Hour 19, “Dynamic Web Templates,” you learned about Dynamic Web Templates (DWTs) and how to use them to create an easily updateable website with a consistent look. Then in Hour 22, “Beyond the Basics: PHP in Expression Web 2,” you got a first glimpse of how server-side scripting can be used to create websites with highly advanced dynamic content and interactivity. Now you are going to put the two together to make a website controlled by a master page layout and filled with dynamic content.
Even though Expression Web 2 comes equipped with script support and basic tools for PHP authoring, it is nothing compared to what the application offers when it comes to Microsoft’s server-side script language, ASP.NET. Expression Web 2 is built around ASP.NET and offers extensive and unprecedented authoring and deployment tools and support for novice as well as advanced users.
As with PHP, the core concept of ASP.NET is to leave the generation of the content of the page to the server so that the designer or developer needs to do only minimal changes to files for maximum results. Likewise, ASP.NET code can live alongside regular HTML to simplify authoring. As a result, by deploying ASP.NET scripts you can perform the same actions (populating text fields, sending and receiving information from forms, and so on) you did in Hour 21, “Working with Flash and Silverlight,” and many others as well.
Because building an ASP.NET-based site from scratch requires a relatively high level of programming know-how and skill, rather than building it from scratch you will use a prebuilt site provided by Microsoft to learn about ASP.NET and how it works.
![]()
To run an ASP.NET website, you need a server that supports this scripting language. In other words, your site has to be hosted on a Microsoft server. Before you start working with ASP.NET it is vital that you ensure that your server supports this language, otherwise you are wasting your time.
Getting a Jump Start by Using a Starter Kit
Building ASP.NET applications from scratch can be quite intimidating for a novice. To help with the learning process, Microsoft has created a set of Starter Kits that you can download from the Expression website. The kits contain fully working and fully customizable sites that utilize regular as well as advanced scripts to create highly functional and great-looking sites. In this hour, you will use the Design Portfolio Starter Kit to get a better understanding of what ASP.NET is and how Expression Web 2 can help you build sites employing this technology in a fast and efficient manner even without a firm understanding of the code language itself.
Try It Yourself
Downloading and Installing the Starter Kit
The Expression website features learning tools such as videos, articles, tutorials, and downloads to help you get started using the different applications in the Expression Suite. For Expression Web 2, the Starter Kits can be a great help when taking your first steps with ASP.NET.
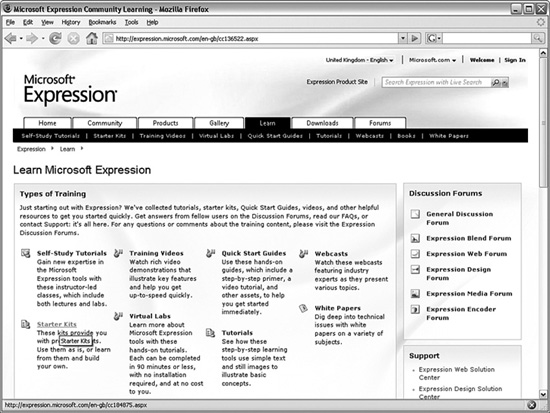
1. In your web browser, go to http://expression.microsoft.com and click on the Learn tab (see Figure 23.1).
2. Click on Starter Kits and you are taken to the Expression Starter Kits page. As of this writing the page has only two starter kits, both for Expression Web. Download the Design Portfolio Starter Kit to your computer.
3. Extract the contents of the zip archive you just downloaded (called ExpressionWebPorfolioStarterKit.zip) to a folder of your choice. The extracted folder will contain a folder called Expression Portfolio Starter Kit and a Microsoft Word document. The folder contains a new folder called Portfolio Starter Kit and a Microsoft Word document that is identical to the one in the first folder.
Figure 23.1 The Expression website found at http://expression.microsoft.com is a great source for learning tools all the programs in the Expression Suite.
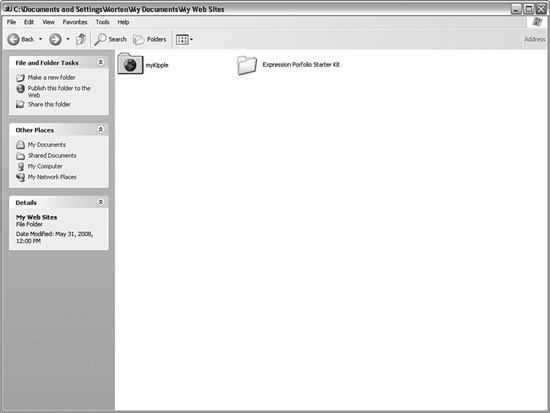
4. Move the Expression Portfolio Starter Kit folder to your Web Sites folder (see Figure 23.2).
Figure 23.2 My Web Sites folder as it appears with the MyKipple project as well as the new Expression Portfolio Starter Kit folder.
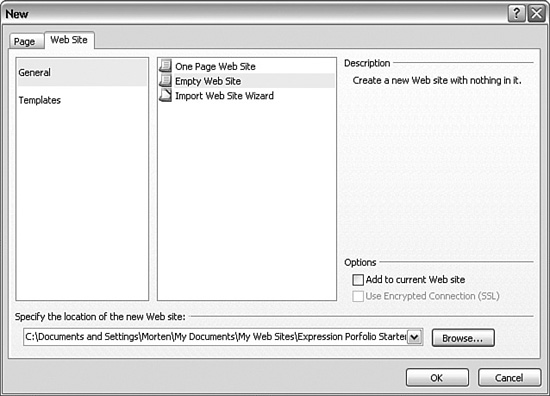
5. Open Expression Web 2 and select File, New, New Web Site from the menu bar. In the New dialog, select Empty Web Site under General and use the Browse button to navigate to the Portfolio Starter Kit folder under the Expression Portfolio Starter Kit folder. This is the location of all the necessary files (see Figure 23.3).
Figure 23.3 Create a new empty website located in the folder you just installed. This lets Expression Web 2 know that there is a site in the folder.
![]()
The site link must be to the Portfolio Starter Kit folder and not the Expression Portfolio Starter Kit folder or the site will not work properly.
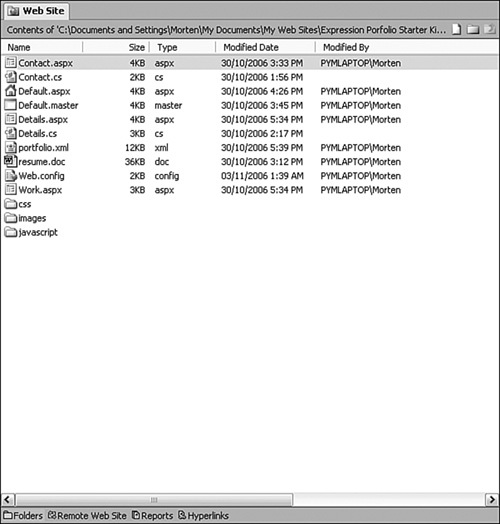
As you can see from the Folder List task pane and the Web Site view, the Portfolio Starter Kit has a long list of pages and assets already installed (see Figure 23.4). Now that the site is properly linked from within Expression Web 2, you can open the pages, make changes, and test the site from within the program through Expression Development Server.
The ASP.NET Master Page
Looking at the list of files in the Portfolio Starter Kit, the file that sticks out the most is arguably the most important one: Default.master. This file can be compared to a highly evolved version of the Dynamic Web Template, but this comparison hardly does it justice. The ASP.NET master page is the control center for the entire site. And whereas the DWT merely provided its child pages with static and styling content, the master page provides functionality as well as sitewide control.
Figure 23.4 The Portfolio Starter Kit contains several pages along with assets that together make up the functionality of the resulting site.
In Hour 19 you learned that when you build a page based on a DWT, the code content of the DWT is copied over to the new page. As a result every time you make a layout or style change in the DWT, all the associated pages have to be updated and have their code changed. In contrast, the ASP.NET master page is the source of all the layout and styling code. So, instead of this code being copied over to each individual child page, the children go back to the master page for layout, styling, and other common elements and contain only the info for the individual page contents. In other words, this is a truly dynamic site where all the files are generated from one central location.
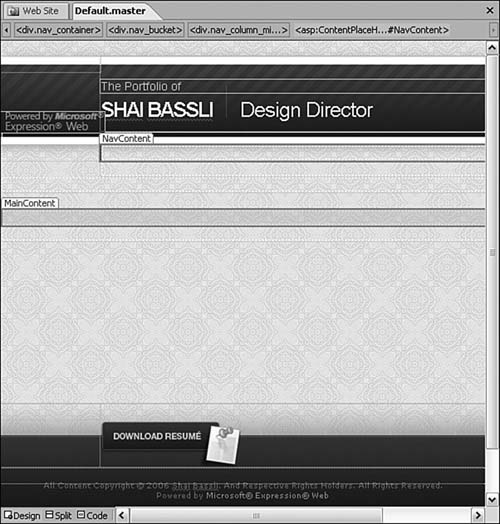
To understand how this works, open the Default.master page in Design view. At first glance it looks like any other HTML page, but if you look closer you will see two areas highlighted by a faint purple outline. By clicking on them you will see that they are named NavContent and MainContent, respectively (see Figure 23.5). Each is a ContentPlaceHolder, the ASP.NET equivalent of the editable regions of the DWT.
The ContentPlaceHolders (also called content regions) . work in much the same way the editable regions work in a DWT: When a page is generated from the master page, only the areas within the content regions can be edited; the master page controls everything else. But unlike the pages generated by the DWT, you have no way of editing the code outside of the content regions in each individual page because the code is present only in the master page.
Figure 23.5 The NavContent and MainContent Content-PlaceHolder s are highlighted with a purple outline. In this image both are highlighted simultaneously for visual reference.
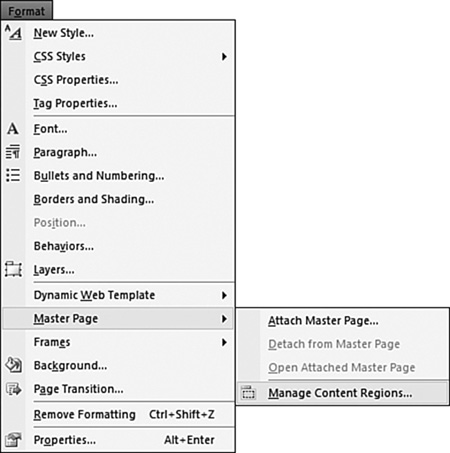
Managing the content regions is done the same way that you managed the editable regions: Under Format on the menu bar is a submenu called Master Page, and within that submenu is the Manage Content Regions option (Figure 23.6).
Figure 23.6 You can manage the content regions from the Manage Content Regions option found in the Master Page submenu under Format on the menu bar.
In the Manage Content Regions dialog (see Figure 23.7) you can add, rename, and remove content regions with the click of a button. In addition, you can use the dialog to navigate to the different content regions. This option is especially useful when your layout has many regions and you are confused about where a certain region is placed. The Go To option works only in Design view.
Figure 23.7 The Manage Content Regions dialog can also be used to quickly navigate to a particular region in Design view.

The Master Page in Code View
When switching to Split view, the first thing you’ll notice is that all the contents of the .master page are placed in a form. You can see this because wherever you click inside the page, the two first tags on the Quick Tag Selector are always <body> and <form#form1>. That’s because all ASP.NET sites that use .master pages consist of ASP.NET web forms that are populated. This will all make more sense in a few minutes.
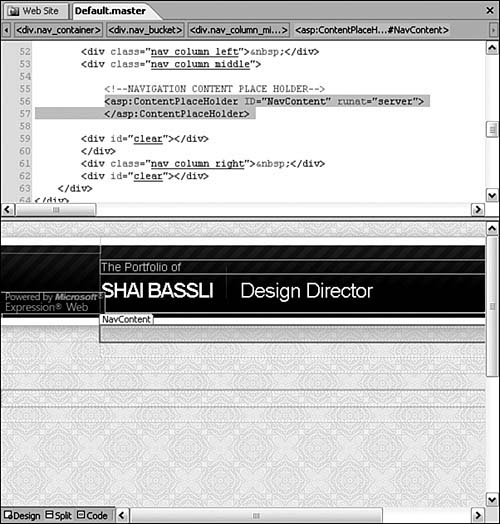
Looking at the code, you will see that for the most part it looks like any other HTML page. But if you click on one of the content regions in Design view you will see that the corresponding tags are somewhat different from what you have encountered before (see Figure 23.8).
The <asp:ContentPlaceHolder ID=″NavContent” runat=″server” > tag is the ASP.NET master page equivalent of the <!-- #BeginEditable “heading” --> tag of the DWT with a few major differences. Whereas the DWT tag worked solely as a helper for Expression Web 2 to know what regions were to be editable, the ASP.NET tag is an actual functional part of the page just like any other tag. It tells the browser that the tag is an ASP function and that within it there will be ASP.NET-generated content. In addition it gives the area a name in the form of an ID and tells the browser where the script should run (on the server).
Figure 23.8 The NavContent Content Region in Design view with the corresponding code.
Try It Yourself
Change a Content Region
The ASP.NET content regions work in much the same way as the DWT editable regions and you can edit them in the same way in the master page. By default the Portfolio Starter Kit has three content regions: head, NavContent, and MainContent. But if you look at the head editable region in Code view you will see that it is empty and the title tag is in a noneditable part of the page. As with the MyKipple project, you want the title, keywords, and description tags to be inside an editable region so that they can be customized for each individual page.
1. In Code view, find the ContentPlaceHolder tag for the head content (it should be on line 9).
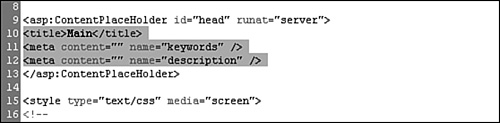
2. Create a new line between the beginning and end tags and cut and paste the <title>Main</title> tags from line 7 into the new line (see Figure 23.9).
Figure 23.9 The <title> tag is moved into the head content region.

3. Press Enter to insert a new line underneath the <title> tags and create a new <meta> tag like this: <meta content=” “ name=″keywords” />. This tag will be filled with the keywords inserted in the Page Properties dialog of each individual page.
4. Insert a third line and create a new <meta> tag for the page description: <meta content=” “ name=″description” /> (see Figure 23.10).
Figure 23.10 The head content region now contains the title, keywords, and description of the page.
When you save the master page, you will notice that unlike when you made changes to the Dynamic Web Template in Hour 19, you are not asked whether you want to update the files related to the master page. This is because rather than copying all the code over into each individual page, the pages created from the master page are built dynamically by the browser when they are displayed. Therefore the updates happen instantly when the browser opens the pages.
ASP.NET Content Pages
As with the Dynamic Web Template, the master page only serves as the framework that tells the browser what the pages of the site should look like. To create the actual site, you need content pages. In the Portfolio Starter Kit are four such content pages: Contact.aspx, Default.aspx, Details.aspx, and Work.aspx.
Open the Default.aspx page in Design view. The page looks the same as the Default.master page, but if you click around inside it you will see that you can place your cursor inside only the two editable regions, NavContent and MainContent. The NavContent area contains the navigational buttons for the page, whereas the MainContent area contains all the individualized page content. The NavContent is editable because the site is designed so that the button for the current page looks different from the other buttons. To set up the buttons for each page individually is an easy way of doing this.
Content Pages in Code View
The Default.aspx page looks the same as the Default.master page (except for the content of course) in Design view, but Code view is a different story. If you switch to Split view, you will see that the code for the page contains only the link back to the Default.master file off the top followed by the contents of the content regions. None of the styling, layout, or other code is present in this file. Only when you look at the code of a content page does the concept of web forms truly begins to make sense:
In plain English each .aspx page is an advanced web form, just like the email form you created in Hour 20, “Getting Interactive with Web Forms,” and Hour 22, “Beyond The Basics: PHP In Expression Web 2.” This form, when opened in a browser, submits its contents to the .master page, which is then displayed with the contents inserted. In fact the actual page itself exists only when the server puts the content (the .aspx file) and the template (the .master) file together and then send it to the browser. Just like in The Matrix when the little boy bends the spoon with his mind, the answer to the question “Where is the page?” is “There is no page!”.
Websites like the Portfolio Starter Kit site are commonly referred to as dynamic websites because the pages are created dynamically on demand by the browser and the server when the visitor opens them. In contrast, a static site consists of pages that have already been built and visitors simply download them to their browser when the pages are opened.
Try It Yourself
Give the Page a Title, Description, and Keywords
Even though the Default.aspx page is in fact just a web form that contains only the individual contents of the page, it is still edited just like the other web pages you have been working with whether it be HTML or PHP.
As you can see in Code view, even though you made alterations to the head content region in the master page, there is no corresponding content region in the web form. To be able to define the content for the head region, you first have to create a new content field in the web form.
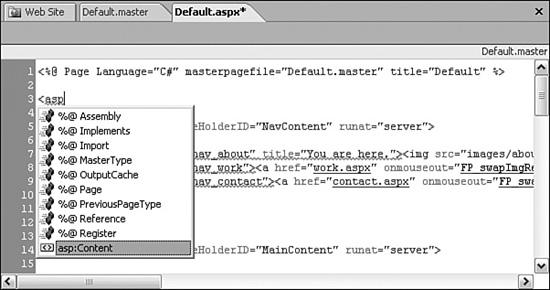
1. With the Default.aspx page in Split view, navigate the Code view section to the very top and place the cursor on line 2. Press Enter twice to create some space.
2. Place the cursor on line 2 and type <asp.IntelliSense will immediately suggest <asp:Content, which is what you want. Press Enter to insert the code (see Figure 23.11).
3. Press the spacebar and IntelliSense pops up a new menu suggesting ContentPlaceHolderID. Press Enter to insert the code.
4. The cursor is now placed inside the quotation marks. Type head and use the right arrow key or End to get to the end of the line.
Figure 23.11 IntelliSense has full support for ASP.NET and is a great tool when writing and editing .aspx pages.
5. Press the spacebar again and IntelliSense provides a new menu of suggested code. Use the arrow keys to select runat and press Enter to insert the code. Now IntelliSense offers only one option, server, which is the correct one. Press Enter again.
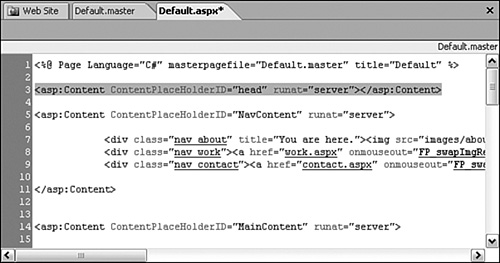
6. Finally close the tag with a > and IntelliSense automatically inserts the corresponding closing tag (see Figure 23.12).
Figure 23.12 The ContentPlace HolderID tag for the head region is inserted with the help of IntelliSense.
After the content region has been inserted, you can make changes to the head tags using the Page Properties dialog.
7. In Design view, right-click anywhere inside the content regions and select Page Properties from the context menu (if you click anywhere else nothing will happen).
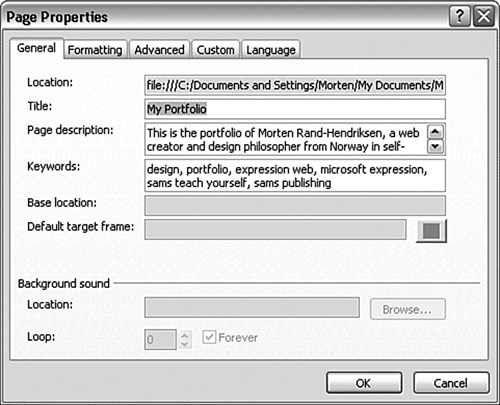
8. In the Page Properties dialog, change the Title to My Portfolio or anything else you want. Create a description for the page as well as some keywords and click OK to apply the changes (see Figure 23.13).
Going back to the top of the page in Code view, you can see that the title has been changed in the first line whereas the keywords and description have been inserted into the content region you just created. Now when a browser opens the page, the title, description, and keywords are inserted into the correct regions in the master page.
Figure 23.13 With the head content region inserted, you are free to edit the title, description, and keywords for the site using the Page Properties dialog.
Getting Data from External Sources
One of the major benefits of creating dynamic websites is the ability to gather content from external sources and display it in the current page without actually having to place it there. By using an external source for your content you can use one source to populate multiple pages with different layouts at different times. When a change is needed, all you have to do is change the source file and all the dynamic pages that get their content from it will automatically be updated too.
To see this process in action, preview the Default.aspx page in your browser. When you press F12 or choose Preview in Browser from the File menu, Expression Development Server is engaged and a virtual server displays the ASP.NET site as if it were hosted on a web server.
On the right side of the About page, under Featured, are three thumbnails representing projects. When you hover the mouse over each of them, a larger version appears with name, description, and a link to further reading about that project. If you click on the Work button you see the same thumbnails again, only this time there are nine of them arranged in three rows and columns (see Figure 23.14). Although the layout of the thumbnails in the two pages is dramatically different, all are gathered from the same source.
Back in Expression Web 2 you will see that the featured thumbnails are replaced by broken image links (a small square with a red x in them). This is because, as with PHP, Design view is unable to display the results of server-side ASP.NET scripts. Nevertheless, by clicking on the images, you can see the code that generates them (see Figure 23.15).
Figure 23.14 The About and Work pages both feature external data from the same source displayed in different ways.
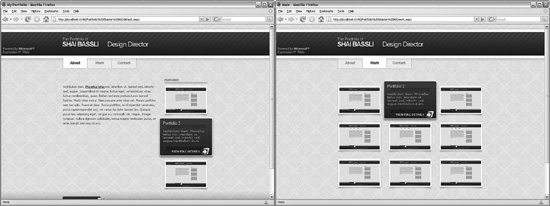
Figure 23.15 In place of the actual thumbnails that appeared when you previewed the page in a browser, by clicking on the Featured section you get the ASP.NET code that gets the content from the external source.
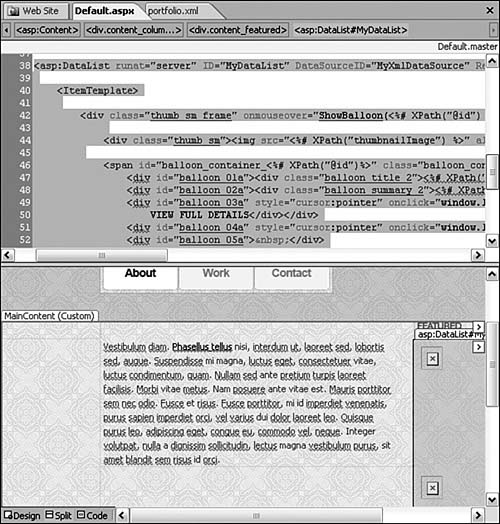
The code put in place to display the thumbnails and all their functionality is quite complicated, but even with little to no experience with programming you can still figure out what is going on. Take a look at the first line of code in the block:
<asp:DataList runat=″server″ ID=″MyDataList″ DataSourceID=″MyXmlDataSource″ RepeatLayout=″Flow″ RepeatDirection=″Vertical″>
In plain English, it reads, “Here follows a data list to be created by the server. The name of the data list is MyDataList and it will contain items provided by a source named MyXmlDataSource. The list items will be repeated in the vertical direction.”
The code that follows, wrapped in the <ItemTemplate> tag, describes the look and behavior of each of the list items and the server will cycle through this list for each of the items as they are placed on the page when it is displayed.
But there is still one question left unanswered: Where do the data and images come from? All we know so far is that the source is called MyXmlDataSource. To find the source, use the Find feature: Place the cursor anywhere in Code view and press Ctrl+F. In the Find dialog, type myxmldatasource and click Find. Doing so takes you to the next place where MyXmlDataSource is mentioned:
<asp:XmlDataSource ID=″MyXmlDataSource″ DataFile=″portfolio.xml″
XPath=″portfolio/portfolioItem[@featuredItem=’true’]″ runat=″server″>
It is in this line of code you find the source of the list: a file called portfolio.xml.
Go to the Folder List task pane and open the portfolio.xml file. As you can see, this is a pure data file that contains a series of variables defined for each item in a list. The variables include name, summaryDescription, fullDescription, webSiteAddress, fullSizeIimage, and so on. Using this information in conjunction with the different web forms of the site, the browser and the server can build multiple different layouts and pages.
Try It Yourself
Modify the External Source for Immediate Sitewide Effects
By modifying the portfolio.xml file and adding a few image files to your project, you can make dramatic changes to the Portfolio Starter Kit site in a snap. In this example you are going to change one of the portfolio items to the MyKipple project.
1. In the project files for this hour are three image files called mykippleFront_lg.jpg, mykippleFront_sm.jpg, and mykipplecontact_lg.jpg. Import them into the images folder in the project.
2. In the portfolio.xml file go to line 5 and change the name value to MyKipple.com.
3. On the next line remove the dummy summaryDescription and insert a short description of the project, something like This is the end result of the project I made by reading this book.
4. Go to the next line, remove the dummy content, and insert a new fullDescription. This one should be substantially longer than the summary.
5. Change the webSiteAddress to http://www.mykipple.com.
6. Change the fullSizeImage to images/mykippleFront_lg.jpg.
7. Change the thumbnailImage to images/mykippleFront_sm.jpg.
8. Under detailImages, remove two of the entries and change the two other to images/mykippleFront_lg.jpg and images/mykipplecontact_lg.jpg.
9. Save the file (see Figure 23.16).
Figure 23.16 The portfolio.xml file with the first list item changed to the MyKipple.com project.

Without making any changes to any of the other pages, open Default.aspx in your browser. As you can see, the first portfolio item has been changed to the MyKipple.com project. The same is true for the Work page. And if you click on the View Full Details option, a new page appears and displays all the info about the project.
Personalizing and Styling an ASP.NET Site
Now that you have seen how advanced the functionality of the Portfolio Starter Kit is, you might want to use all or part of the site as a basis for your own website. But to do this you need to personalize and customize the site so that it reflects you and your company and doesn’t look like the many other sites built from the same files. Doing this might seem like a daunting task but you shouldn’t be too surprised to learn that even though this site uses ASP.NET, the look and feel of the site is still firmly based in the same CSS (Cascading Style Sheets) techniques you have learned through reading this book. In fact, if you have a lot of time and patience, you can actually make the Portfolio Starter Kit look exactly like the MyKipple.com site!
Making changes to a dynamic site is a bit trickier than making changes to one with static pages because not all the information is contained in the same file. But by keeping your tongue straight in your mouth (as we say in Norwegian), you can make quick changes for maximum effect: You just need to know where to make them.
Changes that affect all pages across the site should be made in the .master file. Changes that should appear only in individual pages should be made in the .aspx files using HTML. Finally changes to content provided by external data sources such as .xml files or databases should be made in the respective sources. To find out whether a certain item in a page is generated from an external data source, open the page in Design view and see if the content appears. If it does, it is HTML based. If doesn’t show up, but is replaced by a tag or block of code, it is generated from an external source.
Try It Yourself
Make Sitewide Changes
Not surprisingly, layout and style changes that should affect all the pages on the site are made by modifying the master page.
1. Open the Default.master page in Design view.
2. In the header of the page, highlight the name and change it for your name or the name of your company. Also change the title to your title or the tag line for your company.
3. Scroll down to the bottom of the page and find the footer. Change the contents so that the copyright is attributed to you or your company.
4. Highlight your name or the name of your company in the footer, and use the Insert Hyperlink dialog to turn it into a hyperlink pointing to your website.
Because the design of the site is created using regular CSS, you can make changes to the site by modifying the CSS. Now you can use your CSS skills to change the look of the header.
5. In the lesson files for this hour is an image file called newTop.jpg. Import this file into the Images folder.
6. To find out what style controls the header background, place the cursor anywhere inside the header and click on each of the tags in the Quick Tag Selector from right to left checking the corresponding style in the Manage Styles task pane. By clicking on each of the styles in the task pane and looking at the previews, you will discover that the background is defined by the .name_container class. Right-click on this class and select Modify Style from the context menu.
7. In the Modify Style dialog, go to Background and change the background-image to the new file you imported in step 5, newTop.jpg. Click OK to apply the change.
8. You might have noticed that regardless of what you write, the first letter of the title in the header is capitalized. To change this, click on the title to see what style is affecting it. Click on the <span.title> tag in the Quick Tag Selector and go to the CSS Properties task pane. Here you can see that text-transform is set to Capitalize. Using the CSS Properties task pane, change text-transform to lowercase (see Figure 23.17).
Figure 23.17 Because the master page is controlled by CSS you can change the design of the site by using the Modify Styles task pane, the CSS Properties task pane, or even by editing the style sheet directly in Code view.

9. Save the master page and the attached CSS file. Preview any of the pages in your browser and you will see that the changes have been applied to the site as a whole.
Now that you know how to make changes to the look of the site, it’s time to look at how you can make changes to the content of the different pages within the site. Making changes to the individual pages contained in the Portfolio Starter Kit allows you to further personalize the site and is also a necessary step to ensure that the people who visit the site get the message you want to convey. This is particularly true for the Contact page.
Try It Yourself
Configure the Contact Form
The final page of the Portfolio Starter Kit is a contact form much like the one you created in Hour 20, “Get Interactive with Forms.” To personalize the contact page, you need to make changes to two files: Contact.aspx and Contact.cs.
1. Open the Contact.aspx page in Design view.
2. Each of the web forms (pages) in the site has some page-specific content. This content is created and styled using the same techniques you have used throughout this book. At the top of the MainContent region is a mailing address and an email address. Change these to your name, mailing, and email address as you would in any other HTML page.
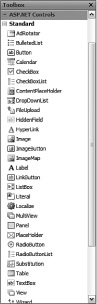
Below the addresses is the email form. This form was created using the ASP.NET form controls, not the HTML form controls you used in earlier hours. The ASP.NET form controls are in the Toolbox task pane in the Standard submenu under ASP.NET (see Figure 23.18).
Figure 23.18 Although they look similar, the forms in the ASP.NET site are made using the ASP.NET form controls found under ASP.NET in the Toolbox task pane.
3. If you look through the code of the Contact.aspx page, you will notice that there is nowhere to input the email address the email should be sent to. This information is stored in the Web.config file. Open the Web.config file and find the EmailTo attribute on line 11. Change the value to your email address. You can also change the default subject line if you want.
4. Save both pages.
Summary
As websites become more advanced and you start looking for added functionality, ASP.NET gives you options that are far outside of the scope of straight HTML. With this server-side script language, you can make highly advanced dynamic websites with increased interactivity and features that are sure to impress any client.
ASP.NET is Microsoft’s server-side scripting language and as such it is an integral part of Expression Web 2. But because it is a server-side script language, it requires a whole new set of skills that reach far beyond the scope of this book. For this reason you were introduced to the Portfolio Starter Kit, an ASP.NET-based website designed by Microsoft to give new designers a first look at ASP.NET, and used it to learn the basics of how these sites work.
An ASP.NET site is different from everything you have encountered so far in this book because unlike the regular HTML and PHP pages and even those generated from a Dynamic Web Template, the individual pages of an ASP.NET site exist only when a visitor opens them. In other words, rather than being stored on the server as individual fully programmed pages, the contents of an ASP.NET site are stored in web forms (files with the suffix .aspx) and external data sources such as XML files. When the visitor opens one of these forms, the browser and the server work together to put the contents of the form into the layout of the master page, and look through the form to see whether other content should be sourced from external data sources. It all sounds very complicated, but when you are working with larger websites with hundreds or even thousands of pages, this type of structure combined with a database to hold all the external content is far more feasible than making each page individually.
In this hour, you learned the basics of how an ASP.NET site works and what makes it different from other static sites. You learned how to edit the master page to change the content regions that can be defined for the individual pages. And even though it is based on ASP.NET, the layout of the master page is still nothing but HTML and CSS.
You also learned how to change the contents of individual web forms and how they interact with the master page to create a complete page. In addition you took a closer look at how external data files are used as sources to generate content for multiple pages, and you saw how easy it is to change these external data sources for immediate and sitewide results. Finally you learned how to customize the project to work as a basis for your own web portfolio or another project.
Now you have the basic skill set to customize the Portfolio Starter Kit site and make it your own. Even if you don’t want to use it as a basis for your own or a client website, the project is an excellent tool to learn more about how ASP.NET works and how you can employ it to create richer and more interactive web experiences for the visitors.
The Expression website has a second Starter Kit, called Partner Portal Starter Kit, which introduces you to elements such as login control, calendar controls, and style sheet switches. This starter kit is not covered in this book but it is based on the same principles as the Portfolio Starter Kit. You can apply the same techniques learned in this hour to personalize it as well.
Q&A
Q. The Porfolio Starter Kit doesn’t work! I can open it in Expression Web 2 but when I try to preview it all I get is a weird error message. What is going on?
A. Unlike a web site built using static HTML pages, a dynamic web site like the Portfolio Starter Kit has a specific folder and file structure that must be maintained for everything to work properly. If you are getting an error message when previewing the page in your browser, it is most likely because you didn’t set the correct folder as the site folder when you first created the site. As was stated earlier, the site link must be to the Portfolio Starter Kit folder and not the Expression Portfolio Starter Kit folder, or the site will not work properly.
Workshop
The Workshop has quiz questions and exercises to help you put to use what you have just learned. If you get stuck, the answers to the quiz questions are in the next section. But try to answer the questions first. Otherwise you’ll only be cheating yourself.
Quiz
1. Whatis the primary difference between a static HTML based site and a dynamic ASP.NET based site?
Answers
1. As the name suggests, the static HTML site consists of a series of pages that are static, meaning they can only be changed by editing the content manually on the server. The dynamic ASP.NET site on the other hand consists of a series of pages that are populated by the server when they are opened. They get their content from different sources and are updated by changing the sources rather than the pages themselves. This way you can make sweeping changes to many pages by altering their data sources. Dynamic pages can also gather content from sources outside of the current web site.
Exercise
In this hour you learned to insert a new title, description, and keywords in the Default.aspx page. Open the three other .aspx pages, insert the necessary content regions, and give each of them an individual title, description, and appropriate keywords. Keep in mind that the Details.aspx page will display the full information from the portfolio.xml data source, so the description and keywords need to be generic enough to describe all the different projects.
Edit the portfolio.xml file to create new portfolio items. To do so you also need to add new image files to the Images folder. The easiest way to do this is to open existing image files in your favorite image editor, replace the contents of these files with new content, and save them with new and descriptive names just as was done with the images for the MyKipple project.