
HOUR 10
Designing a Network
What You’ll Learn in This Hour:
• How to determine the user requirements for the network
• How to define the major functions of the network
• How to determine the type of network needed to satisfy the users’ requirements
• How to write the specifications for the network’s operations
In the previous hour, we examined how an organization and your project team can use best practices to develop the strategies and policies for building or upgrading a computer network. In this hour, we look at more detailed issues related to creating a network, including how to define the network’s capabilities, establish the network blueprint, and design the network.
For this discussion, we once again assume you’re the lead network designer and head up a group of talented computer network specialists.
![]()
Please keep in mind this important point: These next six hours (10–15) are written primarily with the scenario that you, as the lead network designer, and your staff are tasked with creating a network (or networks) from scratch. However, in today’s world, most companies already have computer networks up and running. Obviously, these networks won’t be created; they’ll evolve from “older” networks—perhaps ones that are no longer meeting the requirements of the user community. Thus, many of the ideas in these hours also pertain to altering, upgrading, and enhancing an ongoing system.
Advances in network hardware and the progress in using standardized communications protocols have made the overall process of connecting communications devices a much easier task than in the past. In addition, the industry has learned from its mistakes, and sets of best practices of documented experiences have proven to be effective in building and managing computer networks.
Notwithstanding this good news, creating an effective and efficient network entails considerably more than assembling the various hardware and software components. Why? Because the issues of, say, capacity, response time, throughput, ease of use, reliability, and security can’t be resolved by simply attaching machines together and loading them up with off-the-shelf software packages.
Networks must also be designed to fulfill the needs of their users. Thus, any network worth its salt is tailored to its user base. With this important idea in mind, let’s begin our discussion with an examination of six steps to build a network that will fulfill its job description: satisfying its users. The steps follow:
1. Identify the uses of the network.
2. List which tasks execute on which computers.
3. Select the type of network: to centralize or not to centralize.
4. “Draw” the network.
5. Write the specification.
6. Build the network.
Step 1: Identify the Uses of the Network
What do the users do who will use the network? Do they work with networks from home but also have to ensure the rest of the family has access to constrained computer resources? Are your users members of a consulting firm who use computers to handle job requests, client tracking, and billing? Are they members of a department of a large corporation who must use company web pages to interact with their customers? All these users have different requirements from a network.
No matter what your organization does, its network must accomplish one task to be considered successful: Ensure that whatever the requirements are, they can done better, faster, and more efficiently by using a computer network. If the network doesn’t do that, it will be a failure, regardless of the quantity and quality of technology deployed.
The first order of business is to determine why your organization requires a network. For the balance of this discussion, we will focus on a mid-scale or large organization. However, keep in mind that the same ideas apply to a small business, but perhaps not with quite as much formality.
The first task of step 1 leads to the desks of the senior managers of the organization. Make an appointment to meet with them and talk about (a) what the organization’s core business is now and (b) how they want to change or improve the operations that support the core business.
These meetings shouldn’t involve a broad discussion of what networks can do but a more specific discussion of what a network can do for the company. You need to pin down the core purpose of how a new network or a network upgrade will make the company a more productive place.
Any questions you pose should be open ended; try to see if the managers have a vision related to the company’s future, and try to understand what that vision is and what its ramifications are in relation to computer and networking technologies.
![]()
Interviewing key managers or corporate officers will supply you with much more information on a company’s goals and purposes than the corporate mission statement. Mission statements are often designed for the company customers and are particularly tailored for company brochures. The better you understand the company and its reason for being, the better you can plan and implement the network.
After you’ve interviewed the senior executives, it’s time to work with the folks on the production floor and in the cubicles. Sit with them and find out what they do. Be up-front about the purpose of your visit; it will help break down suspicion that you’re there to increase their workload! If possible, work alongside employees to see what they do and how they do it. This exercise will provide you with valuable information about the nature of their work and how they use the company’s data.
There’s no substitute for getting into this level of detail. The network designers can’t design a network if they don’t know the nature of work the network must perform. On more than one occasion, I’ve watched highly trained technicians put together a set of networks with almost no input from the user community. Not surprisingly, none of these networks performed satisfactorily to their customers.
During this time, it’s helpful to ask the employees what would make their jobs easier. Don’t fish for computer-related improvements; instead, fish for concrete answers, such as, “If I could find a way to track all the phone conversations everyone has with Mr. X, I would be better prepared when he calls me.” Clearly, whatever gives rise to this kind of response doesn’t necessarily require a computer (a public notebook could also work quite well in this example), but it offers insight into another question: What data and information should this conceptual network (or network enhancement) process to satisfy this user’s specific need? Such a question can be parlayed into part of the network specification, which is discussed later in this hour.
The goal of these interviews is to understand (a) how the organization functions and (b) what information its employees need to support these functions. The next part of step 1 is optional, but you might find it helpful: distilling these organizational issues into a list of action items that will improve the operations of the enterprise. Following are some of the points that might result from this analysis:
• Increased responsiveness to customers
• Easier access to customer data
• More up-to-date information (and identifying this information)
• Better capability to handle an increase in business
• Greater flexibility in order handling
These ideas represent typical organizational goals; they’re generic descriptions of many companies’ objectives. It’s likely the responses you receive and the list you create will be more specific than these items and will address the issues that the employees face each day.
After you have completed your interviews and distilled the information in a document that lists the core issues affecting what purposes the network must fulfill, you’re ready to quantify the network. By quantification, we mean you can examine specific issues pertaining to the resources that will serve the user base.
For example, your design team should determine how many users the network must support. Don’t mistake this number for the number of computers, routers, servers, and so on needed for the network; that’s the next question, and the two aren’t the same thing. One computer can adequately serve multiple users if they don’t have to interact with it on a constant, real-time daily basis. The one-computer-per-desktop model works for many offices—particularly in cases in which users work constantly on productivity software, including word processing, database, and spreadsheet applications, but it doesn’t hold true everywhere. For example, in a factory floor shop, one computer used for laser-based barcode inventory control might serve 20 to 30 users. A healthcare practice might have a few public computers so that doctors can key their patient reports, but they probably wouldn’t be dedicated systems. Instead, each doctor would log on, briefly enter a report, and then go on to the next patient.
Whatever the situation, determine how many users the network will serve. Nearly every network will grow over time, so keep expandability in mind. However, also keep in mind that initially you need a count of current users and those who will need to access network services when the network is first rolled out.
After you have determined how many people will be using the network, look at who those users are. Are they management who will use the computer primarily for administrative purposes such as memo writing and messaging; will they be office workers; or will they be people on a production floor? This analysis is an important part of the process because it leads to the next question: How many computers will the network have initially? Stated another way: How many computers will have only one user, and how many will be shared by many users?
After you and your team have determined how the users will interact with the network, you can determine how many computers the network will have. It’s a relatively simple matter: Look at how the users will interact with the network and determine whether the ratio of computers to users is one-to-one or one-to-many. If it’s a one-to-one ratio, the user count equals (or, in client/server networks, is just shy of) the number of computers. If it’s a one-to-many ratio, it’s likely that computers will be allocated according to job function. In other words, if a group of users access a computer only for checking work in and out with a barcoding system (common in some manufacturing settings) or for checking in parts picked in a warehouse, the network will deploy only as many computers for that group as will concurrently use them.
So, if a single user queues up at a time, one computer will do. If 10 users queue up and their tasks take time (say, more than half-a-minute each), you might recommend several computers for this group. Once again, the number of computers you allocate to user groups will depend on the users’ needs. As with anything else, think it through and try to “rightsize” your design (that is, design enough capacity but not too much or too little).
Step 2: List Which Tasks Execute on Which Computers
The second step in the network-design process seems obvious: Know which aplications and tasks have to be performed at each of the computers on your network. Unfortunately, it isn’t quite as straightforward as it might appear: This step is less about following the workflow trail than it’s about continuing the rightsizing process.
In networking, rightsizing is a process that starts early on and continues after the rollout of the system. It starts with knowing the physical limits of your network (how many users, how many computers), but it doesn’t end there. It isn’t enough to know how many systems are out there; you also have to know how powerful each computer should be and what each computer should be capable of.
For example, the barcoding computers mentioned at the end of the step 1 section don’t have to be very powerful; they’re doing one task that doesn’t require much processing horsepower or memory. Nor do they need soundcards or high-end video adapters.
On the other hand, some users will need all these things and more. Let’s look at a couple of hypothetical cases that illustrate how to determine the quantity of horsepower and the range of features a given network system will require.
The Many-User Computer
Computers used by many users can be built minimally, as in the warehouse barcode example. Conversely, they can be built with all the bells and whistles. As with any other system, the features depend on the application. Here are some of the possibilities related to computer configuration:
• Simple task: Simple computer—A computer, such as the one that would be involved in the warehouse barcode example, wouldn’t need a fast processor, a large amount of memory, or a big hard drive. Because video quality and sound capability aren’t an issue, a legacy computer already available at the company would suffice. In case of new hardware, a minimum configuration system will likely provide more than enough power. Because it’s difficult to buy a computer with less than a certain CPU speed and memory capacity, you could go with a bargain-basement model in terms of features. Notwithstanding this minimalist approach, you’ll still need to configure the computer hardware to run the barcode software and the appropriate OS.
• Complex task: Powerful computer—Although multiuser computers deployed in a warehouse or manufacturing environment might not require a high-end configuration, you will run into situations in which you have to configure computers that will be accessed by numerous users. Because of the tasks they perform, they will likely require a powerful and feature-rich configuration. For example, you might deploy a kiosk computer that requires sound and multimedia capabilities and is configured with a touch screen.
• Multiple tasks: Single user computer—Single-user computers generally occur in office environments. No matter the job title, many people have become knowledge workers because their currency is dealing with information, including formatting, managing, and analyzing data. Depending on the nature of their jobs, they tend to require higher-end computers, but they also have widely varying connectivity requirements. For example, some workers might be able to leave their work behind at the end of the day and require no remote access; others might require access from home; still others might require two or more computers to be able to do their jobs. Again, as in the other scenarios listed here, you must determine the tasks that will be accomplished on the computer and then configure the computer hardware so that it will run the OS and application software allowing the individual to be productive.
Even knowledge workers will require different classes of computers. Some users might be able to do their job with minimal configurations, whereas others—the “power users”—require computers that can run more complex software applications, such as simulation models. Users who travel might require a laptop configuration that gives them power on the road but also supplies them with all the capabilities they would need from a desktop computer when they’re in the office.
As you can see from the discussion in this section, you and your team must spend time determining what people will be doing with their computers and how these computers must provide them with the technology to get their jobs done. You can’t just configure a generic computer for every user; you must make sure that each computer is configured with the appropriate features and power to meet the users’ requirements.
Step 3: Select the Type of Network: To Centralize or Not to Centralize
Another issue is how centralized the network administration and security must be for the network to run effectively. Typically, the centralization issue is related to scale and the nature of business (that is, the nature of the data and its overall importance to the business). Small businesses with only a few users who need to share data and other resources (such as printers) typically do not require a centralized network, nor do they require a separate server or Network Operating System (NOS), which can be a great cost saver for a small office or company. Let’s look at peer-to-peer networks, and then we’ll discuss centralized server-based networks.
Peer-to-Peer Networks
Peer-to-peer networks, which are supported by most desktop OSs such as Microsoft Windows and the various distributions of Linux, allow users to share directories and folders with each other with little interaction from a network administrator. Each resource is secured by its own password (which can include printers and other devices). In terms of network management, each user becomes the administrator of his own computer. In terms of security, peer-to-peer networks might not be secure because people often supply their passwords to co-workers. However, in an environment in which the data shared by these workers isn’t of a highly proprietary or sensitive nature, users can easily communicate and collaborate on the network.
For example, Microsoft Windows (both the Professional and Home versions) provides a Network Setup Wizard that walks a user through the process of configuring a small peer-to-peer network. Figure 10.1 shows the Network Wizard Setup screen where you define the name of your network. In the Windows environment, a small peer network is referred to as a workgroup.
FIGURE 10.1 Microsoft Windows XP provides a Network Setup Wizard for creating a peer network.
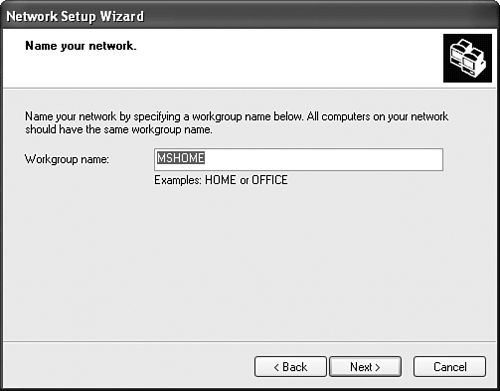
Not only does the Network Setup Wizard make it easy to connect to other users who are running Windows, but a disk can be created during the network setup process that allows you to bring other versions of Windows into the network configuration.
The wizard can help you set up the following items:
• Connecting to the Internet through a dial-up or broadband connection
• Sharing an Internet connection with other computers (on a home network)
• Setting up a computer name, computer description, and workgroup name
• Setting up file and printer sharing
![]()
Most desktop OSs support peer networking capabilities. Although these networks are easy to get “up and running,” they can be a security problem because users control the various security levels placed on shared files, as well as the procedures for interworking with the Internet.
Server-Based Networks
The alternative to the peer-to-peer network is the centralized network. This arrangement uses a server or servers to centralize the administration of the network. This model also provides for centralized security. Users log on to an authentication server and, once on the network, they can only access resources assigned to them by the network administrator.
In terms of network scale, you will likely find the server-based model is the better solution when you go beyond 10 users. However, it isn’t necessarily the number of users who dictate the client/server model, but the level of security required to protect the company’s automated information systems.
Client/server networks are more secure than peer networks. Their files are usually stored in a central location and are backed up on a regular basis. As stated, an administrator controls user access to data and software.
Server-based networks often entail the installation of more than one kind of server. Following are some commonly used servers:
• File server—A file server’s job is to provide a central location for the company’s data. The network administrator can assign different levels of access to each file contained on the file server. Some users can have full access (meaning that they can even delete files on the file server), whereas other users might only be able to access a file or files in a read-only mode (meaning that they can’t edit the file).
• Print server—A print server hosts a printer or printers on the network. It not only allows the network administrator to control print jobs, but it also provides the memory and hard drive space to spool print jobs in the print queue as each print job waits to be printed.
• Communication server—A communication server provides a communication platform for the network. For example, Microsoft Exchange supplies an email, calendar, and contacts platform allowing users to communicate and share appointment, address book, and meeting information. Other examples of communication server software include Lotus Notes and Novell GroupWise.
• Application server—An application server hosts applications, including specialized data associated with an application. Application servers provide the backend processing power to run complex databases and other applications. User computers require a client application to access the services that the application server provides. Microsoft SQL server and Oracle are two examples of client/server database environments.
• Web server—A web server can host internal and external corporate websites. Even companies that do not deploy a web server on the Internet can use a web server internally, allowing network users to view and share information.
• Mail server—A mail server provides users with electronic mail boxes, including mail lists, buddy lists, storage for old mail, and storage for pending and received mail.
• Authentication server—This server allows legitimate users to log on to the network. Each network OS supplies authentication servers.
A number of other specialized server types—for example, DNS and DHCP servers—can also be deployed on a network. We will look at these specialized servers in Hours 16 and 17.
File Servers and Security
Requiring users to log on to the network and use file servers to store and “serve up” data enhances the level of security for a network. As mentioned, file servers allow network administrators to assign access rights down to the file level (meaning below the folder or directory level, which is a limitation for peer networks). Typically, file server security for PC-based OSs follows some simple rules:
• Inheritance—Security inheritance works similarly to financial inheritance; what a parent has can be inherited by a child unless it’s blocked by third parties. In security inheritance, a user gets access to a particular directory (for example, F: DIRECTRY). Whatever access a user has to F: DIRECTRY is inherited by any and all subdirectories of F: DIRECTRY (for example, F: DIRECTRY ONE, F: DIRECTRY TWO, and so forth). Inheritance is a useful tool to ensure that a user has as much access as she requires to a given part of the server’s disk.
• Access rules—In general, users are limited to three levels of access to a given file or directory on a file server:
• No Access—Users cannot access the file or directory.
• Read-Only Access—Users can access the contents of a file or directory but cannot modify it.
• Read-Write Access—Users have the rights to access and modify files and directories.
Various NOSs enable additions to these three basic access rights, but it should be possible to ensure reasonably good security using only these three rules.
Easier Backup
One benefit to storing network files on a centralized server is this: You can back up the files simply by duplicating the server’s hard drive to tape or some other media. Here’s an example of this operation.
Assume that your network has 50 user workstations. If all the users store their files on their workstations, you’ll have to back up all or part of their hard drives to ensure that no data is lost if a system crashes. Further, suppose that all users have 100 megabytes (MB) of files on their workstations’ hard drives (for many users, a conservative estimate). Backing up this quantity of files across the network for this many users could take 10 or 12 hours and present a formidable coordination challenge.
By contrast, backing up a server’s hard drive with an attached tape drive or some other backup device can take as little as an hour or so. Clearly, backing up files from a single server to another storage device takes less time and is more controllable than the scenario of coordinating 50 users’ activities.
A tape drive system is an attractive option for backing up an enterprise’s database files. Tape media allows for an extended archival of data at a reasonable cost. As mentioned in earlier hours, tape access is sequential in that the read/write heads do not move across the tape (as in a random access hard disk drive). In addition, after the data has been accessed, the tape must be rewound.
However, for disk backup, you’re not concerned with reading any particular record, so the issue of sequential versus random access is not an issue. In addition, high-speed can achieve transfer rates of 80 megabytes per second (MBps).
Several varieties of tape drives are available:
• 4 millimeter (mm) digital audio tape (DAT) drives that handle up to 8 gigabytes (GB) of storage
• Digital linear tape (DLT) that handles 20–40GB of storage
• Advanced intelligent tape (AIT) that backs up as much as 60GB per tape
Some tape drives handle only one tape at a time. However, devices called tape changers can handle whole libraries of hundreds or thousands of tapes. The kind of tape drive you select depends on what your needs are today and what you expect them to be in the foreseeable future. Remember that the amount of data that seems huge today could seem a pittance tomorrow.
Easier Configuration Management
Storing files on a server offers compelling advantages. However, there’s more to centralized management of a network than simply storing files on a server. As a guideline, if you have more than 10 workstations, it’s necessary to find a way to inventory the hardware, audit the software on the hard drive, install new software, and ensure that the workstation adheres to configuration standards.
Configuration management is the art (or science) of using a central console to ensure user workstations have the correct hardware and software installed and the software and hardware is set up according to standards. For large computer facilities, configuration management of software is a complex operation. It’s usually supported by a large database with a proprietary front end that allows a network administrator to view and modify the configurations of users’ workstations. Most management software requires each system to implement an agent (a piece of software that interacts with the administrative database) on the workstation. Often, agents can be installed automatically as a user logs in to the network.
However, there’s a payoff for mastering the intricacies of configuration management software. Network administrators who install and use configuration management software report they have better control over their users’ workstations. They can inventory the network quickly and install and upgrade software for many users simultaneously. In addition, they can set up alarms that register unauthorized tampering, which helps keep the theft of hardware and unauthorized employee installed software under control. In the long run, the “hassles” of configuration management will reap dividends for your company.
A variety of manufacturers—including McAfee, Microsoft, Tivoli, IBM, Digital, Hewlett-Packard, and others—make high-quality configuration management tools. Many packages are modular, so you don’t have to purchase the whole package to get the services you need.
Choosing a Topology
Regardless of the choice for a client/server or peer setup, you will be required to select a topology. Because peer networks are by practice used to keep the overall cost of the network down, many companies end up using a hub or switch to configure a simple Ethernet star network.
Keep in mind that the network topology is usually determined by the network architecture that is deployed and not the client/server or peer models being used. Most local area networks (LANs) now use some flavor of Ethernet, whereas wide area networks (WANs) employ Asynchronous Transfer Mode (ATM) or Multiprotocol Label Switching (MPLS). The points are (a) a physical topology is often part-and-parcel of the communications protocols, and (b) the choice of a client/server or peer arrangement has no bearing on the physical network topology.
Step 4: “Draw” the Network
By the time you reach step 4, you should know the following:
• The purpose of the network
• The specifics of the network’s use (which users do which tasks)
• The “quantity” of both users and computers
• Whether the network will be centralized or decentralized
• The network topology
After you know these basics about the “conceptual” network, you’re ready to go to the whiteboard. Get a set of markers in at least four or five colors, go to the whiteboard, and then start drawing your network.
Try It Yourself
The first drawing you make is the logical diagram. It details the applications that operate on workstations and the resources that the workstations must access.
1. Start by drawing a workstation for each type of user (for example, one warehouse floor computer, one analyst’s computer, one accounting computer, one secretary’s computer, and so on). Just make a circle for each computer, drawn in a line across the top of the whiteboard or page (see Figure 10.2).
FIGURE 10.2 The first stage of the logical network diagram
![]()
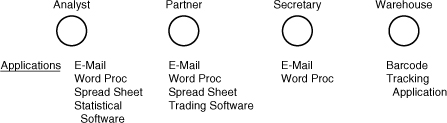
2. Underneath each computer, list the applications the machine has to run (see Figure 10.3). This could include word processing, spreadsheets, email, scheduling, and more for a user’s desktop computer, or a single application for a dedicated machine, such as a factory or warehouse inventory computer or an in-office computer dedicated to routing email.
FIGURE 10.3 The second stage of the logical network diagram, showing the applications needed
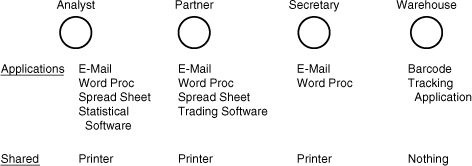
3. Make a list of the resources each workstation computer will share. In general, peer networking has a lot of these shared resources (such as printers, scanners, shared modems, and so on); client/server networks will have fewer shared resources. No matter whether you’ve elected to use client/server or peer, add these resources to your diagram (see Figure 10.4).
FIGURE 10.4 The third stage of the logical network diagram, showing the shared resources
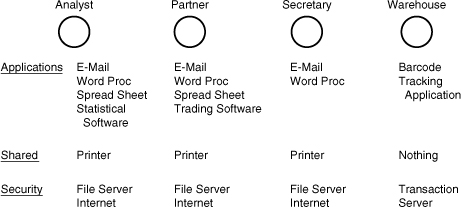
4. If the system will participate in a network-wide security scheme, note which group of users has login access to the various pieces of the system (see Figure 10.5). For example, business desktop users can log in to the file server, warehouse supervisors can log in to the transaction server, and administrators can log in to anything anywhere. This step helps ensure you provide the correct levels of security.
FIGURE 10.5 The fourth stage of the logical network diagram, showing security concerns mapped
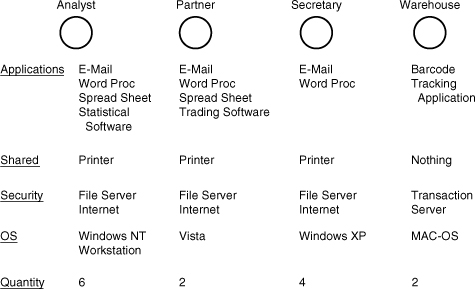
5. Add the workstation OS to the bottom of the list (see Figure 10.6). The OS is usually something like Windows Vista, a Linux flavor, or Mac OSX.
Although UNIX can be used as a client, outside of academic computing centers and high-end engineering workstations, it is not common as a workstation OS. If you have more than one workstation OS, ensure that you have more than one computer drawn; each workstation OS should be shown on a separate machine.
FIGURE 10.6 The fifth stage of the logical network diagram, showing the OS for workstations

6. Add the quantity of each type of workstation to the bottom of the list (see Figure 10.7).
FIGURE 10.7 The sixth stage of the logical network diagram, showing the quantities of each type of workstation
7. Next, draw lines from each workstation type to each system that the workstation type requires access to. In other words, if an accounting PC requires file storage resources on a file server, select a colored marker, draw a line between the two systems, and write the name of the resource the workstation client will use. If a workstation has a shared printer, ensure that other systems using it are connected to it by drawing lines of a different color than the first. If a router provides connectivity between the network and the workstations but must first route data through a server, draw that full path as well in yet another color.
Make certain each connection documents the network protocols that will carry the traffic. Today, most networks use a single protocol stack, the Internet Layers 3, 4, and 7 running on top of the Ethernet Layers 1 and 2. But multiple protocols can also run side by side on a network. If you’re not certain which protocol a particular service will use, put a question mark next to its connection line and make a note to find out as soon as possible which protocols will work there. Remember: Finding out what you don’t know is almost as important as finding out what you do.
For a review of this aspect of the process and the various protocol stacks used in LANs and WANs, you might want to refer back to Hours 3 and 6.
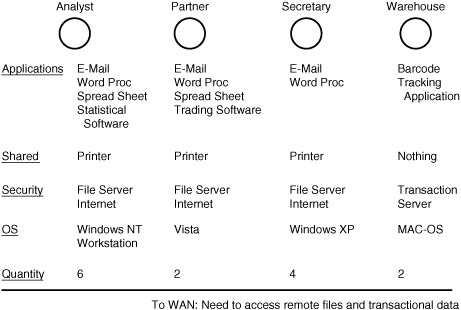
When you have completed this exercise, you’ve successfully created...abstract string art! Actually, you’ve created a set of dependencies you can use to determine which computers need access to which resources (see Figure 10.8). Copy what you’ve done on the whiteboard into your notebook for future reference.
FIGURE 10.8 An example of a finished logical network diagram
After you’ve determined the various resources to be shared (which was probably rendered much simpler by drawing it than by trying to create a comprehensive list), you’re ready for the next great task: drawing the physical network.
Try It Yourself
Drawing the physical network really isn’t as difficult as it might appear. If you already know which clients have to be connected to specific resources and which topology you’ll be using, you’re halfway there. Let’s assume that we are going to deploy an Ethernet network, because it’s the most commonly deployed local network architecture.
1. Start by drawing the physical center of your network, such as a router or a hub. If you’re deploying a network of any size, a router would be more practical. Routers are now priced such that it makes sense to take advantage of their greater capability to control bandwidth. Indeed, you might find it difficult to purchase hubs that are configured with a high density of ports.
![]()
The use of routers allows the network designer to segment a larger network into smaller subnetworks. I highly recommend subnetting your network, a topic introduced in Hour 3, “Getting Data from Here to There: How Networking Works,” in the section “Alternatives to the Conventional Address.”
If a large network using Ethernet is not subnetted, traffic can experience excessive delays as the network nodes contend for use of the media. This situation is common on collision detection networks, such as Ethernet. By breaking the network into smaller subnets, routers can be deployed to regulate traffic flow. Also, the physical topology of the network does not prevent a network from being segmented.
The downside to subnetting is its increased complexity, but this situation is outweighed by the benefits. In addition, subnetting can enhance security as well as the management of Internet names and addresses.
2. Draw as many boxes as you need for additional switches or hubs that you will use. Then connect lines between the switch and the segments; each of these lines represents the cable that connects the ancillary switches (or most likely routers) to the central switch.
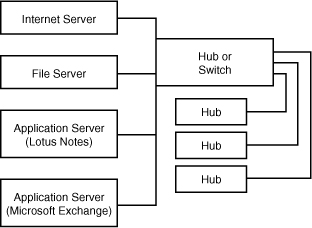
3. Next, draw the servers and mark them as connected directly to the switch (see Figure 10.9). A server connected to a switch offers compelling advantages in terms of performance at the workstation because the server has a direct connection to the port to which the workstation is connected. This holds true even if a workstation is connected through a secondary switch or hub connected to a switch port; the collision domain of individual switches or hubs is usually fairly small, so there isn’t much competition for bandwidth.
FIGURE 10.9 The completed connectivity diagram
4. Refer to the drawing of the logical network and do some analysis. Look at which workstations require access to which servers, and try to group them.
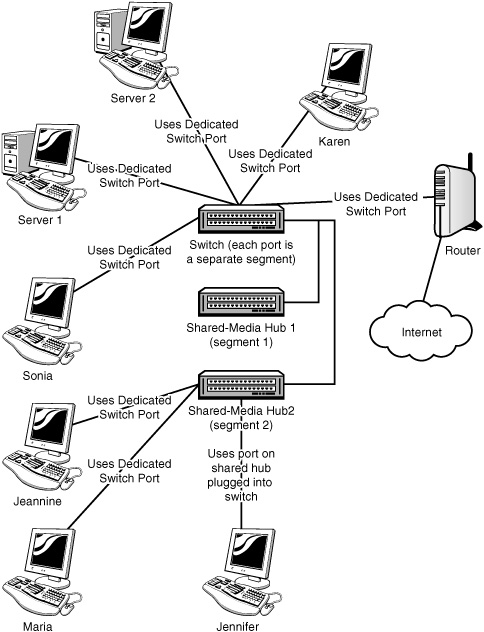
5. After you analyze the relative bandwidth requirements of your users, you’re ready to start figuring out which class of user has to connect to which device. Take the time to think about this issue. If users don’t have sufficient bandwidth initially, they will have network problems and consequently lose faith in the network. It’s important to roll out systems that work for the users; otherwise, the network has no credibility. Figure 10.10 provides an example of using a centralized switch and hubs providing connections for each segment.
Now that you’ve drawn your network both logically and physically, you have a body of work you can use to see whether what you’ve done makes sense. One of the benefits of working graphically is that you can begin to see how your users are grouped based on common access. If you begin seeing patterns in how users work and you’re using a switch, you might elect to extend the pattern and formalize it. For example, all accountants need to have access to the inventory data, so the user group called Accountants is granted that right globally.
FIGURE 10.10 The physical network drawing (simplified to a small user base for purposes of illustration)
After you’ve made changes to your network drawings based on patterns you’ve discovered (such as to segment or not to segment your network), you’re ready to start drawing the workstations and connecting them to the appropriate network device (such as a hub or router port). When you do this, note how many of each type of computer are connecting to each port; that way, you can ensure that you connect only as many workstations to each hub as each hub has ports.
When this process is complete, you’ll have a set of drawings that provide you with connection-oriented data you might otherwise have missed. These drawings will enable you to quantify the number of hub and switch ports you’ll need for your network.
Step 5: Write the Specification
If you’ve gotten this far, it’s fair to say you’ve come a long way! You now have enough information about your users and the conceptual network to write a document that includes the following:
• The purpose of the network
• The specifics of the network’s use (which users do which tasks), which now translates into the user community’s requirements for the network
• The overall schemes for a client/server or peer-to-peer model and the use of communications protocols
• The network topology, which now is quite specific, as suggested in Figure 10.10
You also have a pair of diagrams portraying the logical and physical connections the network requires. Pat yourself on the back—you deserve it. You’ve created the basis for an initial specification document, which enumerates all the preceding points and includes the diagrams.
After you’ve created the specification document, you’re ready to meet with other users to look over the plans and ensure all the bases are covered.
Now’s the time to write the specification for the network. The specification document should take into account all the points in the preceding section and list, quite specifically, the various uses of the network. Specifications don’t have to be long, but they must be complete and clear; as English teachers are prone to say, “It should be as long as it needs to be—but no longer.”
The purpose of a specification document is twofold: to limit the scope of the network design and to provide a reference document for network administrators.
A sound specification document helps limit the insidious process called scope creep (a process whereby the scope of a job “creeps” bigger and bigger while the job is in progress). This is why it’s so important to get buy-in from the overall user community. If users keep demanding new features (“let’s just add this one new feature; it’s not much, and it won’t slow things down”), the network might never be built. However, if the network builder can point to the specification document and ask whether the feature is included, he might be able to build the base network before beginning to add further features.
The other purpose of a specification document is to ensure the network builder and subsequent network administrators have a reference guide to the underlying design of the network. It’s surprising how easy it is to forget the basic specs of a network if you’re not confronted with them every day. The specification document provides a reference for the details that can easily be forgotten.
The specification document should include, at least, the following information:
• Why is the enterprise building the network in the first place?
• What will the network be used for; that is, what applications must it support?
• How many people and computers will the network support?
• Will the network be peer or client/server?
• What is the network architecture (such as Ethernet)?
• What are the response time and throughput requirements for the network?
• What are the security requirements for the network, including information on the access rights of the users?
• What are the reliability requirements for the network?
• If possible, include a section on growth, including a projected increase in users and/or traffic. The section should map out a general strategy for handling this growth and the implications for the user community if the strategy is not supported (not funded).
Anything that concerns the network user community (and you and your staff!) is fair game for this document. You’ll also have something to refer to when the going gets confusing. The more detailed the specification document is, the more useful it will be to your users and to your job security.
Write a specification with care, and take your time. Review the document frequently to ensure it contains the depth of information needed to send out vendor bids. Try to avoid using buzzwords. As much as acronyms can ease discourse for people who are conversant with them, they do very little except increase technophobia in users who don’t know what they mean. And that’s important, because when you’re done writing the specification, it’s going to be reviewed by users, among others.
Meeting (Again) with Users
When the specification is complete, set up a meeting with the people whose work will be affected by the network. This group will include users, managers, and senior-level people, as well as a technology consultant or in-house IS (if either of these positions exists).
![]()
If you’ve been meeting with the users on a regular basis, which is essential, the specification review should be a rather unexciting affair. The best network designers are not necessarily the most technically gifted. For certain, they must be bright and creative, but they must also have sufficient social skills to foster rapport with the users.
Let’s posture here that you’re the leader of the team for building the network. From the onset of the project, you should have been meeting on a regular basis with the users—from the top level to the folks on the factory floor or at the desks. If they see you coming through the door, and they don’t much bother to look up, you’re on the right track. If they say, “What brings you here?,” I can say with assurance that your so-called final specification review meeting is not going to be pleasant.
Get to know your users and their work. Get in their back pocket. I promise it will pay enormous dividends to you and to them.
Use the information you’ve acquired at the meeting to revise your network specifications. Give revised copies of the specification to the attendees, and get them to provide approval of the specification as articulated in that document. Getting concerned parties to sign off on a specification can save you untold hours of grief later in the process. Among other benefits, it helps inhibit scope creep.
Step 6: Build the Network
After you’ve diagramed the network and written and (perhaps) revised the specifications for the network, you’re ready to build the network. An important step in building the network is purchasing the hardware that will make up the network.
Computer hardware is evolving at a rapid pace, so the recommendations you might have collected relating to hardware purchases could be overtaken by marketplace innovations—even if only a short time has passed. You need to spend time researching the hardware you’ll deploy: the servers, client computers, and network connectivity devices.
![]()
Selecting the hardware and software for a network entails a lot of research and patience. Keep in mind interoperability and expandability. Check out Hour 11, “Selecting Network Hardware and Software,” for more information.
After you’ve settled on the hardware and software, you’re ready to begin building the network. The next hour describes several strategies for selecting the specific pieces for a computer network (which you can review when you write the specification document described in this hour). Hour 12, “Assembling a Network,” will provide guidance for building the network.
Summary
In this hour, we examined the process by which your network is designed. We learned how to determine the user requirements for the network and how to define its major functions. We also learned how to analyze the user needs to determine the type of network that will satisfy those needs. Finally, we learned how to write specifications for the network’s operations. In the next several hours, we’ll work through some of the specific parts of designing your network, including selecting the network hardware type, the NOS, and the network protocol.
Q&A
Q. Why is it important to identify the intended use of a network at the outset of the design process?
A. Doing so ensures the network is built to serve the organization’s needs.
Q. Why is an open, user-oriented examination and discussion of network plans useful?
A. This examination allows you and your design team to measure the function of the network in relation to users’ needs and to ensure that the planned network can accomplish the functions outlined earlier. It also allows you to establish buy-in from network users and corporate officers.
Q. What are the six steps to build a network?
A. The six steps are as follows:
1. Identify the uses of your network.
2. List which tasks execute on which computer.
3. Select the type of network: to centralize or not to centralize.
4. “Draw” the network.
5. Write the specification.
6. Build the network.