HOUR 12
Assembling a Network
What You’ll Learn in This Hour:
• Preparing to assemble the networking hardware
• I/O and IRQ concepts
• How to install adapter cards
• How to set up a wiring closet
By this hour, we’ve acquired a solid understanding of the operations of computer networks. We’ve covered the fundamentals of network hardware, software, and protocols. We’ve focused on how to establish the user requirements for a network, as well as how to design the network.
You’ve already learned how to identify network hardware, and in this hour, you and your design team will pull it all together and deal with how to plug pieces of the network together.
This hour will familiarize you with installation processes for the hardware you’ve read about in preceding hours. It is not a comprehensive guide; such a treatise would require an entire book. Rather, it’s intended to introduce you to the process of “putting the network together.” Armed with the information you’ll learn this hour, you’ll be able to confidently engage the vendors.
Before Installation
Although computer hardware might look robust and impervious to damage, it’s not. Computer and network electronics powered by electricity can, paradoxically, also be damaged by electricity. Although your computer hardware is likely powered by 120-volt wall current, don’t assume that the motherboard or hub actually uses that much electricity. Most computers and networking equipment use 5 volts or so at the motherboard. Static electricity can build up to 20,000 volts or so and can wreck computer equipment by burning up the delicate wiring inside a silicon chip.
So that you don’t inadvertently burn up some expensive piece of computer equipment while working on it, this section describes a few precautions you should take before installing the network—for your own safety and the integrity of the computer and networking equipment.
First, take measures to prevent electrical damage to yourself and the computer:
• Wear a wrist strap when you’re working on a computer. A wrist strap is a small device that connects you (usually one of your wrists) to the computer. This simple device ensures you and the computer have the same electrical potential. In layman’s terms, it means you won’t be transmitting static to the computer and burning up parts while you’re installing them. Wrist straps are available at computer stores for a few dollars. Use them.
• Always shut the computer’s power off before working on it. This idea is common sense, but stories abound about people opening up the case to a computer while its central processing unit (CPU) is busily engaged in adding and subtracting. Installing an adapter card in a computer that’s powered up is pretty well guaranteed to burn up the card, the card slot, and (often) the motherboard itself.
• Always unplug the computer before you open it to install equipment. Again, this might seem like common sense, but surprisingly few people think of it. It’s a corollary to the preceding direction, and it ensures the power is off. In addition to the near certainty that you’ll damage computer equipment by working with it while it’s on, you’re also taking a chance of harming yourself. Electrical shocks are neither pleasant nor particularly good for your health.
Next, take precautions while you’re opening the computer’s case and, say, installing adapter cards:
• If you’re opening the case and the top doesn’t come off easily, don’t force it. Forcing a computer case may damage the box and its contents. Granted, the plastic envelopes that encase computer components (and other modern electronic products) challenge the most avid box shredder. Nonetheless, force will merely strengthen the case against you...so to speak.
• If you have to disconnect anything, mark all the cables and their associated connections. This exercise makes reassembling a disassembled computer much simpler. You can use a marker to label the cables, and you can draw some diagrams depicting which cables connect to which devices. The best way to mark connections is the one that helps you reconnect what you disconnected. Masking tape and a Sharpie marker are your friends!
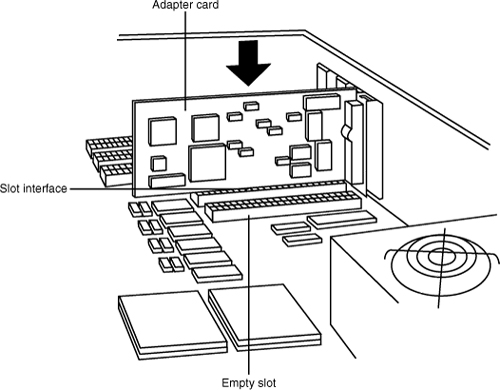
• When you’re installing adapter cards, make sure the adapter card and the adapter card slot have the same interface. In other words, don’t put a PCI card into an ISA slot or vice versa. Doing so can damage the computer, the adapter card, and (more often than not) your company’s budget.
• Don’t use force to fit adapter cards into slots. This is a sure-fire way to damage the card and void the warranty. If a card doesn’t fit, pull it out and look at it. Is it the correct slot interface? Is the metal strip on the back of the card (the “slot cover”) in the way somehow? Close examination can often enable you to figure out why a card won’t fit. Sometimes it’s necessary to bend the bottom of the metal strip to fit—other times, the card just has to be rocked in slowly and gently. This process can be tedious, but it prevents cracked motherboards. You’ll learn more about the process of installing adapter cards in the next section, but this precaution deserves to be repeated because it has caused more equipment failures than all the static in the world.
• Use proper tools. Have a good Phillips screwdriver and a nutdriver set, if possible. Tweezers are useful for picking up small parts. A small pair of needle-nose pliers can come in handy as well. If your tools are magnetized, either demagnetize them (heat works) or replace them—magnetism and computers just don’t go together. And of course, to repeat what was said previously, use a wrist strap.
Working on networking equipment need not be difficult if you’re careful. It’s mostly a matter of developing what writer Robert Pirsig calls a mechanic’s feel: a sense of respect for the physical properties of an object and an understanding of how much force is enough. It’s common sense; don’t force anything. If you do, something is probably wrong to begin with.
Installing Adapter Cards
Adapter cards are inescapable, particularly in the Intel-compatible computer world. Because not all computers come with built-in networking (although that’s changing), at some point, you’re going to have to take a deep breath, open a computer case, and plunge inside to install a network adapter card.
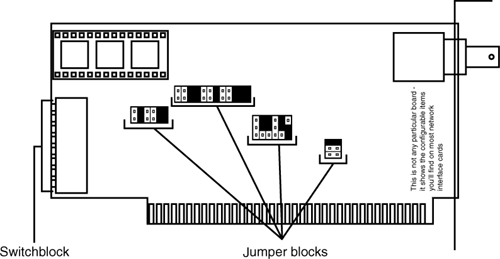
You should be aware of two things related to network cards and other device cards that you might install in a computer: input/output (I/O) addresses and interrupt requests (IRQs). Because most expansion cards are now plug-and-play (meaning the operating system, or OS, configures them automatically), you don’t have to worry about manually setting I/O or IRQ settings. However, if you have to troubleshoot a malfunctioning card or are dealing with older hardware, it doesn’t hurt to understand the basics of these settings.
I/O addresses for network cards generally range from about 200h (decimal 512) to about 380h (decimal 896). 200h is a hexadecimal (base 16) number. Again, plug-and-play cards will take care of this for you. Table 12.1 provides a list of common I/O addresses.
TABLE 12.1 Commonly Used I/O Addresses

Most network cards use addresses outside the common list of addresses. But watch out! Some network cards might use memory address 0360. Although this address doesn’t seem to conflict with anything, unfortunately, sometimes the software device driver takes up too much space. When this happens, the software device driver can take from 0360 all the way to 0380 in memory, which conflicts with the printer port at 0378.
When a device, such as a network card or a video card, has to get the full attention of the computer system, it uses an IRQ. An IRQ is a request that the system stop whatever else it’s doing at the moment and give its attention to the device requesting attention. Table 12.2 provides a listing of common Intel-based IRQ settings.
TABLE 12.2 Common Intel-Compatible IRQ Settings

The important thing to remember when you install a network card is to try not to use the memory address or IRQ that other cards or the motherboard are using. If you do, the card will not work.
Now that you have a basic understanding of how I/O and IRQs work, let’s install a NIC into a computer.
See? Cards aren’t so difficult to install after all. If you take a bit of time to do it correctly the first time, you can prevent the majority of headaches from damaged hardware. It’s worth your while to look at your computer’s manual and determine which slots have the same interface as the adapter card you want to install. If the computer has more than one slot with an interface that matches your adapter card’s interface, use whichever slot is open—no slot is preferable to any other.
Working with Wiring
After the network cards are installed, the next step is dealing with the wiring (unless you’re working with a wireless network setup). The next sections focus on some of the issues related to wiring your network. It’s basically a hands-on version of the wiring concepts you learned in Hour 5, “Network Concepts.”
Most of the back end of a network (such as servers, hubs, switches, and routers) should be behind locked doors. It isn’t because contact with the equipment is hazardous (it’s not); it’s that you don’t want just anyone to have access to your servers and connectivity equipment. Just innocent curiosity could bring your whole network down, and there’s always the chance of malicious intent and sabotage.
As a result, it’s a good idea to set up a wiring closet if you’re building a network to serve an enterprise—whether that enterprise is a business, a town hall, a library, or whatever. And a wiring closet doesn’t have to take up a lot of space, it just needs to be secure; it’s perfectly acceptable for a wiring closet to simply be a centrally located closet that authorized personnel can access to install electrical power and route cables. A lot of the time, the phone closet can double as a wiring closet without too much difficulty. In some cases, the wiring closet might also double as the server closet, so you might want to secure a space that will also allow only authorized personnel to deploy racks that contain your servers and other connectivity devices.
The basic wiring closet usually contains several items:
• A set of 110 blocks—A 110 block is a device, usually mounted on a wall, that has a row of RJ-45 jacks on it. Each jack is connected to a wire that runs out to a network wall jack elsewhere in the office. 110 blocks are also called patch panels (see Figure 12.3). You can install and terminate your own patch panels. (It’s pretty easy, in fact.) Because the wires that connect to the contacts on the back of the panel are color coded, it’s difficult to make a mistake. Nonetheless, specialized tools are involved, and it’s wise to learn from someone who already knows how to do it. Be advised that the punch-down block (as the 110 block is also called) is fast being replaced by cable runs that directly connect to switches, hubs, and other devices.
FIGURE 12.3 A patch panel or a 110 block

• One or more switches or hubs—Switches or hubs (which you might also hear referred to as concentrators) tend to be stored in the wiring closet for two reasons. First, they’re generally pretty small—they can fit in a briefcase if an ethically impaired person has the mind to steal one. Second, they make great listening devices; if a network card set up in a special way called promiscuous mode is plugged in to the concentrator, it’s possible to read every data packet passing over the network. Because this represents a huge security risk, it’s best to lock switches or hubs (see Figure 12.4).
FIGURE 12.4 A typical switch or hub

• Wiring bundles—Because the wiring closet is where all your office network wiring converges, you’ll usually have a bundle of cables connected to the 110 block. Wiring bundles represent one end of what can be an arduous task: running cables up hill, down dale, across ceilings, and down walls. If you have a lot of wiring to do, it’s often better to let a professional pull and terminate your network wiring. Doing so reduces the aggravation factor quite a bit, and if anything is wrong with the cable, the installer will warrant it. In home networking situations (or a small office), you might be involved in pulling your own wiring though walls or ceilings.
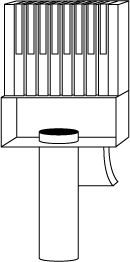
• Patch cords—Patch cords are the cables that connect the 110 block to the switch or hub (see Figure 12.5). You need one patch cord to connect one port on the 110 block to one port on the switch or hub. You’ll only need patch cords if you decide to include a 110 block in the closet. Patch cords are sometimes referred to as rat tails.
Wiring closets aren’t absolutely necessary, but they do make life easier and more secure. And (for neat freaks) the best part of a wiring closet is that it keeps the messy part of the network behind closed doors.
FIGURE 12.5 An RJ-45 connector—a typical patch cord (or network cable end) used for 10BASE-T or 100BASE-T

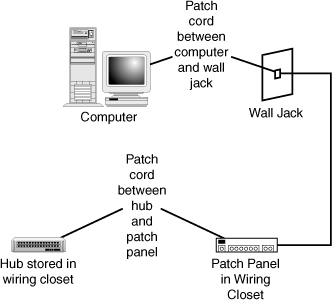
Connecting a star topology network is easy after the wiring between the 110 block/patch panel and the jacks in offices have been installed. You simply have to plug a patch cord between the computer’s 100/1000BASE-T network jack (it’s on the network card you installed earlier) and the 100/1000BASE-T outlet in the wall, and then you must ensure that the corresponding port on the patch panel is connected to the concentrator (see Figure 12.6). It’s really simple, which is why it’s a great design.
FIGURE 12.6 How computers are connected in a wiring closet/office jack situation

A Word About Wireless Networking
Obviously, the alternative to wired networks is a wireless network. Wireless networks can provide users a free run of the office because of the radio frequency technology used by wireless network cards and access points to communicate. Wireless networks also provide an excellent option for the home office, especially when trying to pull wire in the home would entail tearing down drywall.
In purchasing wireless technology, there are issues with interoperability between devices. There are also issues related to the range provided by wireless implementations, which can actually relate to building concentration. Finally, there’s the issue related to security, a topic covered in Hour 20, “Security.”
Summary
The physical hookup of a network is one of the least significant hurdles to successful networking. At the same time, in many people’s eyes, it is the most daunting part of the process. In my estimation, the best way to become proficient with hardware installation is simply to do it. Use old computers (they’re often pretty inexpensive) and work with them. Make mistakes; you’ll learn from them. And in the end, you’ll be more successful.
Q&A
Q. When installing adapter cards in a computer, what do you want to avoid?
A. You don’t want to damage the card either by handling it too roughly or by applying static shock. Both can damage a card badly enough to make it wholly inoperable.
Q. Why should a wiring closet be close to the center of an office space (if it’s possible)?
A. Keep the wiring closet central to the installation to avoid having to deploy additional switches, repeaters, or other devices to extend the network.


