
HOUR 16
Microsoft Networking
What You’ll Learn in This Hour:
• The Microsoft logical network structure
• Installing and configuring a Microsoft server
• Configuring clients and network protocols
• How resources are shared on a Microsoft network
• Managing a Microsoft server
• The future of Windows Server 2003
• Introduction to Windows Server 2008
Although not one of the first big players in the Network Operating System (NOS) market, Microsoft has been in the networking business since the early 1980s. Early networking efforts, such as the development of NetBEUI and OS/2, were collaborative efforts with IBM. LAN Manager was an early effort at Microsoft to develop an NOS.
In 1992, Microsoft launched Microsoft Windows NT (New Technology) Server. The most widely used version in this line is Microsoft Windows Server 2003, which we examine in this hour. We will also look at how Microsoft’s directory service provides the logical networking structure and how a server running Microsoft Windows Server 2003 shares resources and is managed.
In this hour, we examine the major steps in setting up a server using Windows Server 2003. We learn how to install and configure the server, how to set up the procedures to allow users to share resources, and how to protect users from each other’s potential intrusions. We complete the hour with an introduction to Windows Server 2008. Our emphasis is on Windows Server 2003 because it is still the prevalent Microsoft server produced in the marketplace.
Microsoft’s Logical Network Structure
When Microsoft Windows NT Server 4.0 became available in the marketplace, Microsoft had a hit on its hands. The Microsoft NOS made huge inroads into the worldwide server market.
Despite the fact that Windows NT Server 4.0 gained a large market share, it supplied a “flat” directory services model for managing users and resources. The basic administrative unit for the Microsoft network was the domain (and still is, but in a slightly different context, so read on). A domain can be defined as a collection of servers (although a domain only needs one server), client machines, users, and other network resources that a domain controller manages. The domain controller is a server running the Windows NOS, and it’s responsible for user authentication and maintaining the database of user accounts and resources.
![]()
When a Windows NT domain grew a great deal or an administrator wanted to add some redundancy to the domain user database, backup domain controllers (BDCs) could be deployed on the network. These servers, also running the NT 4.0 NOS, could authenticate users and replicate the user database with the main domain controller.
In the case of Windows NT, the domain model did not provide a branching hierarchy such as was provided by Novell’s NetWare Directory Service (NDS). So, the domain model provided a “bucket” or container, in which an organization stored information about its network computers, users, and resources. This model worked just fine. According to Microsoft, a single domain could handle more than 10,000 users.
However, the domain model did prove to be unwieldy on large networks (from a management perspective) because the network had to be divided into different domains or separate containers that shared resources using trusts. A trust (which is still used in the Windows networking environment) is a relationship between two domains that enable the domains to share resources.
With each domain having its own domain controller (and backup domain controllers), not to mention trusts with other domains, network administrators had a lot of issues to deal with in managing a network using this domain structure. Imagine a number of containers connected by garden hoses. Your job is to keep the water level equal in all the containers. Now, perhaps you can understand what it was like (and still is like on NT networks) to try to balance bandwidth, user access, and resource availability on a domain-based network.
In large Windows NT implementations, Microsoft urged network administrators to use the Master domain model. This consisted of a domain that contained the users and groups, which then had trust relationships with domains that contained network resources; these domains were referred to as resource domains.
With the release of Microsoft Windows 2000 Server, Microsoft abandoned the flat domain model and made the Active Directory the new logical hierarchy for Microsoft networks. Active Directory provides a tree structure that allows you to create a branching logical structure for your network that can contain multiple domains. The domain still serves as the basic unit of the Microsoft network structure, and a domain controller still manages each domain. (With Active Directory, multiple domain controllers can be deployed in a domain.)
The next largest unit in the Active Directory structure is a tree. A tree consists of a root domain, which is the first domain that you bring online. Trees can contain multiple domains, including the root domain. Domains that are added to the tree are considered child domains, as shown in Figure 16.1). All domains in the tree have implicit transitive trusts with the other domains in the tree. Transitive trusts create a two-way street between domains, meaning that they share each other’s resources equally.
FIGURE 16.1 The Active Directory structure provides for a tree that contains a root domain and child domains.
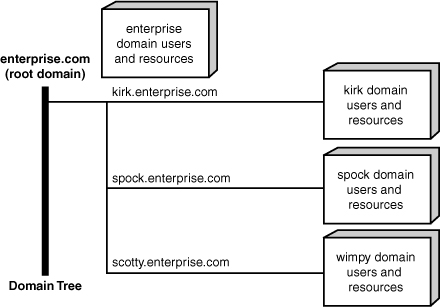
To create a Microsoft network, you need to bring a domain controller online and create the root domain for the Active Directory tree. Large networks can deploy multiple trees. And, of course, multiple trees can exist, which constitutes a forest. (Yes, it’s called a forest.) Let’s look at issues related to installing and configuring a Microsoft server running Windows Server 2003, which is the most widely used version of Microsoft’s powerful NOS. (Its eventual successor, Windows server 2008, is examined later in this hour.)
Installing and Configuring a Microsoft Server
Microsoft Windows Server 2003 requires a minimum hardware configuration to run (as does any software). The minimum hardware requirements and recommendations from Microsoft are listed here for the standard version of Windows Server 2003:
• CPU speed—133MHz (at least 550MHz is recommended)
• RAM—128MB (256MB recommended as a minimum, which isn’t very much)
• Disk space for setup—1.5GB
• CD-ROM drive—12X
• Monitor—Super VGA capable of providing 800×600 resolution
The minimum hardware won’t get you very far, particularly when you’re going to add a lot of users and services to the network. You should go with a processor in excess of 4GHz and load your machine with the maximum RAM. You also want to have SCSI drives on your server so that you can take advantage of different RAID implementations that help protect server data and system files.
Not only must you meet the minimum hardware requirements to successfully install and run Windows Server 2003, but you must have a server that provides hardware proven to be compatible with the NOS. If you’re going to use the server in a true production environment in which you must supply mission-critical services to network users, your server hardware must come right off the Microsoft Windows Server 2003 Hardware Compatibility List (HCL). A copy of that list is available at www.microsoft.com/windowsserver2003/default.mspx.
![]()
Windows Server 2003 (R2) is available in different editions: Express Edition, Workgroup Edition, Standard Edition, Datacenter Edition, and Enterprise Edition. However, be careful about these names and selections, because they might change after this book’s publication. Previous releases also include the Web Edition. Standard is considered the entry-level edition of the NOS. The Enterprise Edition supports more processors and server clustering and is considered the workhorse for large networks. The Datacenter Edition provides advanced clustering features and is only available through Microsoft’s Datacenter program. The Web Edition is actually a scaled-down version of the NOS and is designed to serve as a web server only. Another edition of Server 2003, Windows Small Business Server 2003 Standard Edition, includes Windows Server 2003 and a number of Exchange Server 2003 services. All editions now support 32- or 64-bit architectures.
When you have a server with the appropriate hardware in place, you’re ready to install the Windows Server 2003 software. The server software offers the ability to perform a clean install or upgrade earlier versions of the operating system. It’s best to start with a clean system if possible. Although time-consuming, this allows you to configure all server settings from scratch, particularly security settings as they relate to this particular version of the OS.
Existing domains and forests (in the case of Windows 2000 Server upgrades) must be prepared for upgrade using a utility called addprep that is contained on the Windows Server 2003 CD-ROM. If you’re going to upgrade, you should spend some time researching the upgrade process. The subject is beyond the scope of this book. I recommend you study Microsoft’s Security Configuration Wizard (SCW), a tool for reducing the attack surface of computers running Windows Server 2003 with Service Pack 2 (SP2). The package provides system requirements, installation instructions, and instructions for troubleshooting simple problems. If you’re interested, check out http://technet.microsoft.com/en-us/library/cc757109.aspx.
Let’s take a quick look at the installation process. We can then learn how to configure a server as a domain controller and other roles such as a file server.
![]()
The installation and configuration process for Microsoft Windows Server 2003 is straightforward and can probably be categorized as “easy.” But this doesn’t mean that you should bring your server online before you plan your network. Create a network diagram and think about how you want to grow the network and the domains over time. For more about writing network specifications, see Hour 10, “Designing a Network.”
The Installation Process
A clean installation of Windows Server 2003 on a server-class computer is straightforward and allows booting from the CD-ROM drive. Once the server has booted to the Windows Server CD-ROM, you’re walked through a text phase that allows you to specify (and create if necessary) the drive partition that will contain the operating system. You’re also provided with an opportunity to format the partition.
Windows Server 2003 supports three file systems: FAT, FAT32, and NTFS. FAT is a legacy from DOS, and FAT32 was first available with the Windows 95 OS. NTFS is the newest version of the NT file system that provides greater security for files with support for file system recovery. You need to go with NTFS as the file system for your server because the Active Directory requires it.
After you’ve taken care of the target partition for the NOS, the server boots into a Windows-like environment that walks you through the remainder of the installation. You can set additional networking settings during the process, such as adding network protocols; the default is TCP/IP. By default, the server is also assigned to a workgroup named WORKGROUP.
It’s a good idea to go with all the defaults during the installation process. It’s easier to change settings after the NOS is fully installed on the server. After the installation is complete, the system reboots, and you’re allowed to log in to the server using the administrative password that you set during the installation process. When you have the server up and running, you can configure it for particular roles and services. Let’s look at some of the configuration options.
Configuring a Windows 2003 Server
Configuring a Windows 2003 server as a domain controller, file server, or to provide other services, such as remote access, Domain Name System (DNS), or Dynamic Host Configuration Protocol (DHCP) is straightforward. In fact, Windows Server 2003 provides the Manage Your Server window (it opens the first time you run the NOS), which can help you add, remove, and manage all the server’s different roles. Figure 16.2 shows the Manage Your Server window, which lists the current roles filled by the server. This window also makes it easy to add new roles.
FIGURE 16.2 The Manage Your Server window makes it easy to configure your Windows 2003 server.
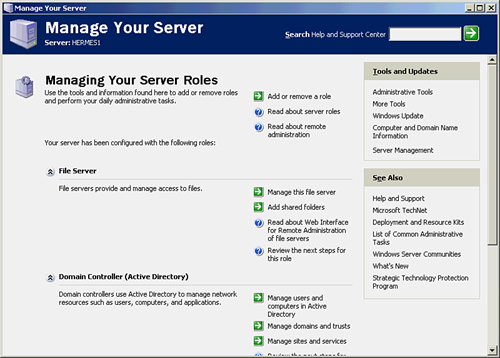
For example, if you want to make the server a domain controller (which would be necessary to create a new root domain for the network), you can select the Add or Remove a Role link in the Manage Your Server window. This starts the Configure Your Server Wizard, which lists all the possible roles for a server, such as file server, print server, domain controller, and DNS server.
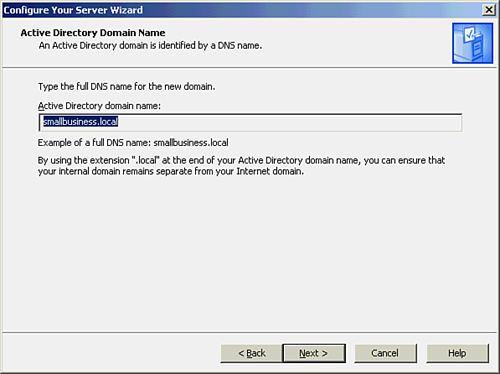
To add a role, all you have to do is select the role in the Configure Your Server Wizard window and click Next. In the case of making a server a domain controller, the Configure Your Server Wizard walks you through the steps of making the server a domain controller in a new forest and tree. During the process, you’ll have to supply a full DNS domain name for the root domain you’re creating. Figure 16.3 shows the wizard screen that asks for the Active Directory Domain Name.
FIGURE 16.3 The Configure Your Server Wizard makes it easy to add roles to the server.
If a service, such as DNS or DHCP, is not currently available on the network, the wizard can configure the server to provide that type of service. After the process is complete, the new role (in this case, domain controller) is added to the Manage Your Server window, making it easy to manage a particular role. For example, after you add the domain controller role, you can quickly start the different Active Directory tools, such as the Active Directory Users and Computers snap-in, directly from the Manage Your Server window.
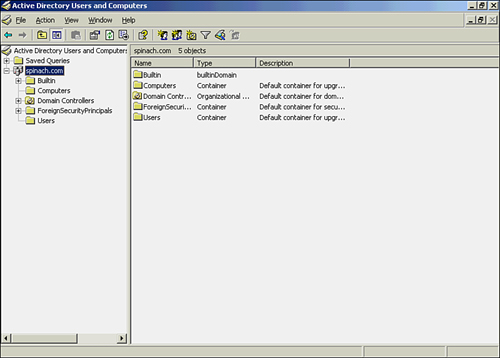
The Active Directory Users and Computer snap-in is used to manage Active Directory objects such as users, groups, and computers. Figure 16.4 shows the Active Directory Users and Computers snap-in. You’ll find that all the Windows server utilities have the same look and feel as this particular snap-in because all the tools run in the Microsoft Management Console. This provides a common interface for managing the server.
FIGURE 16.4 The Active Directory Users and Computers snap-in is used to manage users, groups, and computers in the domain.
Obviously, you must create a user account for each user who will access resources on the network. Clients are added using the Active Directory Users and Computers snap-in.
After you set up a domain, you have to add client computers to it. Let’s look at how you configure Windows clients for domain membership and configure their network protocols so that they can talk to the domain controller.
![]()
You can configure Windows Server 2003 for many network services, such as DNS and DHCP. It can provide terminal and remote services to client computers both on the network and over remote connection. All the details related to configuring and managing a Windows server are beyond the scope of this book. For more information, see Sams Teach Yourself Microsoft Windows Server 2003 in 24 Hours by Joe Habraken.
Configuring Windows Clients for Domain Membership
Configuring Windows clients to participate in a domain requires you to make them domain members. You also have to make sure that the client is configured with at least one of the network protocols configured on the server. This shouldn’t be an issue because Windows Server 2003 is configured with TCP/IP by default, as is Microsoft Windows XP Professional.
Adding Client Computers to the Domain
A domain client can be running any of the different versions of Windows, from the current Vista to Windows XP Professional; to Windows 98; and all the way back to Windows for Workgroups 3.11 (even MS-DOS). However, let’s focus on adding a more recent computer to the network because, in terms of implementations, this would be a prevalent operating system of choice for your clients.
For users who already have a valid user account in the Active Directory to log on to the network using one of your network client computers (those that are running Windows NT 4, Windows 2000, or Windows XP Professional), the computer itself must also be added to the domain. You can add the computer to the Active Directory in two ways. First, you can add it on the server using the Active Directory Users and Computers snap-in. Second, you can add the client by changing the computer’s current membership on the Computer Name tab on the System Properties dialog box. The second method requires you to run around to each of the client computers or provide users with the administrative rights to add their computers to the domain (which probably isn’t that great of an idea in terms of network security).
Try It Yourself
In this section, we will look at how you add a computer to a Windows domain using the Active Directory Users and Computers snap-in.
1. Click the Start menu, point at Administrative Tools, and then select Active Directory Users and Computers.
2. In the snap-in tree, click the Computer node.
3. Right-click in the snap-in Details pane on the right side of the snap-in. On the shortcut menu that appears, point at New and then select Computer. This opens the New Object-Computer dialog box, as shown in Figure 16.5.
FIGURE 16.5 Enter the name of the computer that’s being added to the domain.
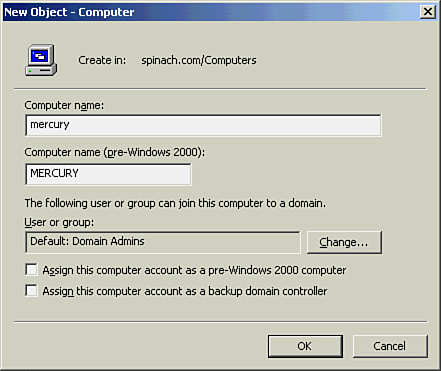
4. Enter the computer’s name in the Computer Name box.
5. Click OK to add the computer to the domain.
The computer is now part of the domain. Users can log on to the domain via the computer.
![]()
To add a client to the domain from the client computer, log in as the administrator and then right-click the My Computer icon on the Start menu or the Desktop. Select Properties from the shortcut menu that appears. On the Computer Name tab of the Properties dialog box, click the Network ID button. The Network Identification Wizard opens, walking you through the steps of adding the computer to the Active Directory. If you aren’t logged in as a domain administrator, you have to provide the name and password for an account that has the rights to add a computer to the domain to complete the process.
Configuring Network Protocols in Windows
You already know from earlier discussions in this book (such as Hour 5, “Network Concepts”) that if two computers are required to communicate over your network, they must be configured with the same network protocol. TCP/IP is the de facto standard in terms of networking protocols. The latest versions of the Microsoft NOS (Windows Server 2003 and 2008) and the Microsoft client (Windows XP Professional) are configured for TCP/IP by default. They are, however, configured to receive their IP addresses and subnet masks (as well as the primary DNS server IP address and other IP-related settings) from a DHCP server. (DHCP is discussed in more detail in Hour 15, “Connecting to the Internet: Key Supporting Operations.”)
You can access your network connection in both Windows XP and Windows Server 2003 via the Network Connections icon in the Control Panel. Right-clicking any local area connection (typically, clients have only one NIC; servers can have multiple NICs, particularly if they’re acting as routers, firewalls, or supplying the Internet connection to a small network) allows you to open the Properties dialog box for that connection. Figure 16.6 shows the Local Area Connection Properties dialog box for a Windows XP network client.
FIGURE 16.6 The Local Area Connection Properties dialog box shows the installed protocols and allows you to configure protocols such as TCP/IP.
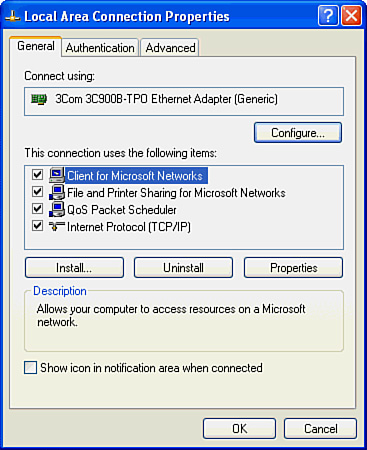
You can add protocols to the connection’s properties by clicking the Insert button and then selecting a new protocol. Because Windows no longer supports NetBEUI, your only real alternative to TCP/IP is NWlink, which is the Microsoft implementation of Novell’s IPX/SPX.
Configuring a network protocol, such as the Internet Protocol (TCP/IP), is just a matter of selecting the protocol in the Properties dialog box and then clicking the Properties button. Figure 16.7 shows the default settings for TCP/IP on a Windows XP network client.
FIGURE 16.7 By default, Windows XP clients are configured to get their IP address dynamically from a DHCP server.
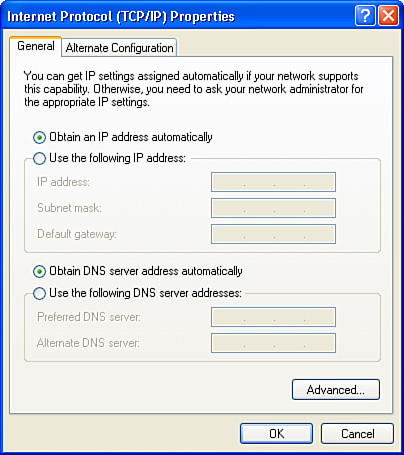
Notice that the client is configured to get its IP address and subnet mask dynamically, meaning from a DHCP server. To assign the client a static IP address, select the Use the Following IP Address option button. You must then supply the IP address, subnet mask, and default gateway (which is a router interface). You also need to provide information, such as the primary DNS server.
![]()
When you configure a network server for TCP/IP, you should assign the server a static IP address. This is essential for servers that act as domain controllers or provide services, such as DNS or DHCP; even file servers should typically be assigned static IP addresses.
After you’ve set the static IP address for the client or set up the client to receive its IP information dynamically from a DHCP server, you can click OK to return to the Local Area Connection Properties dialog box. Then, click OK to close it.
Sharing Folders and Printers on the Network
After you’ve configured your server, created user accounts, and connected clients to the domain, the next step is to set up procedures to share files and other resources such as printers. On a small network, you can also configure a domain controller as a file server or print server or to offer services such as DNS or DHCP. On larger networks, you’ll deploy specialized servers to take care of one or more services.
On a Microsoft network, file or printer servers don’t have to be configured as domain controllers. They’re merely member servers and are configured much the same way as a network client. You must add them to the domain using the Active Directory Users and Computers snap-in and configure them for the appropriate network protocol (which, again, in most cases will be TCP/IP).
Adding a role to a member server running Windows Server 2003 was discussed earlier in this hour. You can use the Configure Your Server Wizard to configure a member server as a file server or a print server. In both cases, the wizard allows you to specify the files or the printer that will be shared on the network.
You can also share folders and drives on a server using Windows Explorer. A shared resource such as a particular folder or a drive partition is referred to as a share. You can secure a share using share permissions. On a Microsoft network, you can also secure shares (down to the file level) using NTFS permissions. NTFS permissions are available on drives that have been formatted with the NTFS file format. NTFS permissions allow you to secure a resource down to the file level.
To add a share to a file server using Windows Explorer, locate the folder (or create a new one). Right-click the folder in the Windows Explorer window and select Sharing and Security on the shortcut menu that appears. This opens the folder’s Properties dialog box with the Sharing tab selected, as shown in Figure 16.8.
FIGURE 16.8 Share a folder via the folder’s Properties dialog box.
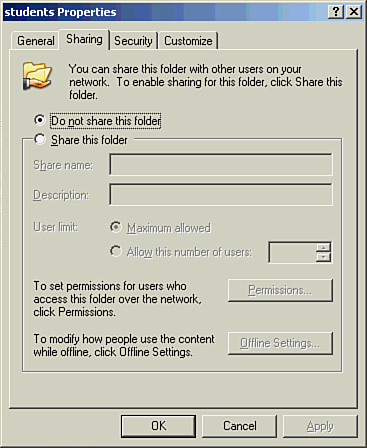
All you have to do is select the Share This Folder option button and then supply a share name for the folder. When you have pre-Windows 2000 Professional clients on the network, make sure that the share name is 15 characters or less, or these legacy clients won’t be capable of seeing the share when they browse the network. The Sharing tab also allows you to set permissions related to the folder, such as read/write permissions.
After you’ve set the share properties, you can close the dialog box (just click OK). The share will now be on the network.
![]()
Administrators can set up hidden shares that network users can’t view using My Computer or Windows Explorer. When you create the share, follow the share name with a $ sign. Only administrators can see these “hidden” shares on the network.
Sharing a printer on a Windows network is as simple as creating a share. After the printer has been installed on the server (both directly attached printers and network printers can be managed by a Windows print server), it can be shared by adding the print server role to the server using the Configure Your Server Wizard.
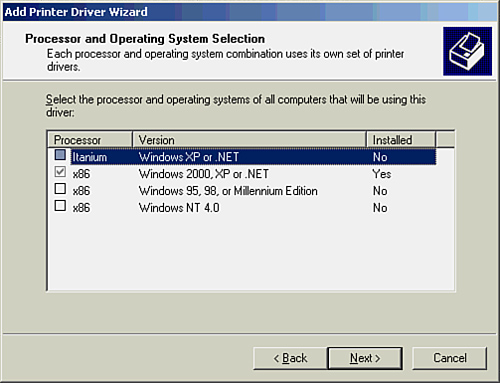
Although you can also share a printer via the printer’s Properties dialog box, the Configure Your Server Wizard helps you locate the printer, such as a remote printer. It also runs an Add Printer Driver Wizard ensuring that the print drivers needed by network clients can be downloaded from the print server when the client attaches to the printer. Figure 16.9 shows the Add Printer Driver Wizard screen where you select the operating systems running on the network that will need a driver for the printer.
FIGURE 16.9 When you share a printer, you can specify the print drivers that should be available for network clients.
You can use a particular print server to manage printers that are directly connected to the network. (Most laser printers have their own NICs for directly connecting to the network infrastructure.) Keep in mind that the print server must spool the print jobs, so the server needs to have ample RAM and hard drive space. You don’t want a print server to be a potential bottleneck on your network.
Managing a Microsoft Server
You’ve already seen the Active Directory Users and Computers snap-in, which is a good example of one of the Microsoft management utilities that runs in the Microsoft Management Module window. There are snap-ins for managing domain trusts, subnets, and specific services, such as DNS, DHCP, and Routing and Remote Access.
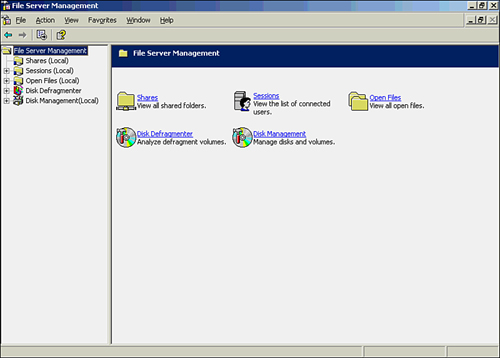
Because we’ve already discussed creating shares and deploying a file server, let’s look at the File Server Management snap-in. This tool allows you to see a list of users attached to the file server and lists which files are being accessed. You can also use the snap-in to quickly create new shares and even back up the file server. Figure 16.10 shows the File Server Management snap-in.
FIGURE 16.10 The File Server Management snap-in
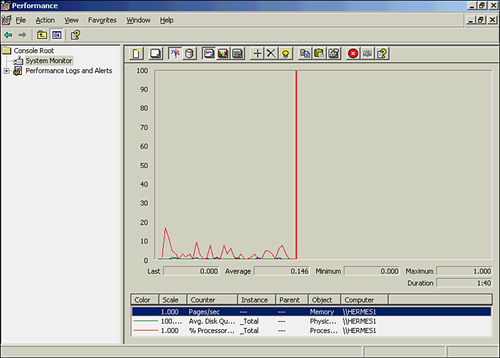
Various other tools and utilities are required to manage a Windows server. For example, you can monitor server and system performance using the System Monitor. The System Monitor allows you to add objects to its window that supply you with counters related to specific hardware performance on the server.
For instance, you could monitor such things as virtual memory or paging use on the computer (when this graph spikes, it’s time to add more RAM to the server) or monitor the processor by looking at the % Processor Time. Figure 16.11 shows the System Monitor snap-in window. It can provide statistics in a graph, histogram (similar to a bar chart), or report view. Figure 16.11 shows the graph view.
FIGURE 16.11 The System Monitor allows you to monitor server hardware usage.
You’ll find that managing a server not only requires that you keep a tab on the various services you’re running on the network, but entails that you keep an eye on how servers are performing as well.
![]()
Whenever you bring any type of new servers online, you should use a performance and monitoring tool to record baseline performance settings for the server’s hard drive, memory usage, and processor. Baselining and performance monitoring are discussed in Hour 22, “Network Troubleshooting.”
Future of Windows Server 2003
In March 2007, Microsoft released Service Pack 2 (SP2) for Windows Server 2003. It includes previously released patches for security, reliability, and performance improvements. SP2 also offers Microsoft Management Console 3.0 and support for WPA2. In addition, it boasts improvements to its earlier IPSec and MSConfig software. Finally, SP2 adds features allowing for faster processing of packets. However, as of June 2008, no additional service packs are offered for Windows Server 2003.
Windows Server 2008
Windows Server 2008, which was released on February 27, 2008, is the most recent offering from Microsoft for NOSs. Because of its recent deployment, it doesn’t yet have a large user base.
Windows Server 2008 is founded on the same platform as the new Microsoft operating system Vista. It builds on the features of Windows Server 2003 and provides an assortment of enhancements to each of the Windows Server 2003 operations discussed in this hour. If you’re familiar with the 2003 release, you’ll be comfortable with the 2008 offering. The Sams series offers a detailed tutorial on this software: Sams Teach Yourself Microsoft Windows Server 2008 in 24 Hours by Joe Habraken.
Summary
Although you might not think that setting up and configuring a Windows server is easy, don’t be deceived by the fact that the tools appear to be easy to use. You may find it easy to just key-in a value into a window, but keying-in the correct value might not be quite as easy. The overall level of understanding and experience to appropriately configure a Microsoft network and keep it up and running is quite high. We’ve only scratched the surface in terms of server management and Microsoft networking in this hour. Many information resources are available at www.microsoft.com. Also, check out www.informit.com for both hands-on and reference books related to Windows Server 2003.
Q&A
Q. In a domain that has multiple domain controllers, is it possible to “decommission” a domain controller and use it for another purpose without reinstalling the Windows NOS?
A. Windows Server 2003 makes it easy to promote and demote servers as far as the domain controller role is concerned. If you have more than one domain controller and want to repurpose a server, you can remove the Active Directory from the computer without reinstalling the server NOS.
Q. How should I approach protecting network shares in terms of assigning permission levels?
A. Although you can assign permissions for a share to each user, the best way to assign permissions is to create groups in the Active Directory (such as accountants or sales), where the members of the group need the same type of permission level for the share. You can then assign the permission level to the group, saving you a lot of time and keeping your assigned permissions better organized.
Q. As far as a quick look at how a server has been configured, where’s the best place to get this information?
A. The Manage Your Server window provides a quick view of the roles that have been assigned to a server, such as domain controller, file server, and DNS server. The Manage Your Server window also offers quick access to the Configure Your Server Wizard, which allows you to modify the server’s configuration.