Hour 1. Getting a Refresher on JavaScript, HTML5, and CSS3
What You’ll Learn This Hour:
• How JavaScript, HTML, and CSS fit together
• The different DOM objects
• How to read and write modern JavaScript patterns
• Asynchronous programming in JavaScript using promises
• JavaScript, HTML, and CSS features and differences in Windows Store apps
• The new semantic elements inside the HTML5 markup
• The new audio, video, canvas, and svg elements in HTML5
• CSS selectors for styling HTML elements
This hour serves as a refresher on JavaScript, HTML, and CSS. Here we spend time looking at each piece of the HTML5 puzzle and seeing how everything fits together. We delve into some of the good parts of JavaScript. We examine the different patterns we can use to keep our code from polluting the global space. We also look at asynchronous programming and the promise pattern.
As we dig into HTML, we look at the new semantic elements that have been added, along with the new audio and video elements. We also see how we can work with the new graphics elements, such as canvas and SVG. We also discuss custom data attributes in HTML5.
Finally, we wrap up the hour by talking about CSS3. We look at many of the selectors at our disposal so we can select and style the elements in an HTML document. So buckle your seatbelt: We have a lot of ground to cover this hour. This hour is mainly review, but even if this is all old hat to you, take some time to look through the material; a few things work differently when writing a Windows Store app.
Understanding How Each Piece Fits Together
The different parts that make up HTML5 can be confusing. Some folks think HTML5 is a single technology, as HTML 4 was. Others treat HTML5 as more than just the markup changes from HTML 4. They consider it to also include CSS3, JavaScript, and the Document Object Model (DOM) objects. Regardless, it’s important to know how JavaScript, HTML5, and CSS3 work together.
JavaScript and the Document Object Model
JavaScript and manipulation of the DOM is a large part of HTML5 application development. Without it, we would have only rather unappealing static content. JavaScript has C-type syntax that makes people think they know the language. JavaScript is not designed like other languages with a C syntax, such as Java, C#, C++, and C. It looks familiar, so many people do not bother learning the language; they think they already know it. Then when the code they write does not produce the results they expect, they blame the language. The language has plenty of issues, but it is widely used (even successfully) by many people who have no idea how the language actually works.
Brief History on JavaScript
Brendan Eich of Netscape created JavaScript. At that time, it was called Mocha. Later, it became LiveScript before being renamed JavaScript. In December 1995, Sun Microsystems and Netscape announced JavaScript in a press release. In March 1996, JavaScript was released to the world in the Netscape Navigator 2.0 web browser. In November 1996, Netscape delivered JavaScript to the European Computer Machine Association (ECMA) International standards body for standardization. In June 1997, the language standard ECMA-262 was created. The language was called ECMAScript. The latest standard, ECMAScript Language Specification 5.1, was created in June 2011.
In recent years, Douglas Crockford’s book JavaScript: The Good Parts laid the foundation for writing JavaScript without stomping all over global space. It discusses patterns we use in this book. If you aren’t familiar with them, I highly recommend grabbing a copy of that book. I also point out some of the parts we are using in the book as we continue on our journey.
The DOM
Many objects exist, including JavaScript objects, browser objects, Core DOM objects, and HTML DOM objects. We can write a lot of JavaScript code without having to understand the differences between these objects, but having this knowledge can prove helpful. Much of what JavaScript gets blamed for are actually issues with the DOM API. The end result doesn’t matter a great deal because we still need to deal with all these components.
Core DOM Objects
Core DOM objects include the Node, NodeList, NamedNodeMap, Document, Element, and Attr objects. In the Core DOM, the document contains comments; it also contains elements, which contains attributes. Both elements and attributes can contain text. Elements can contain other elements.
Browser Objects
Browser objects include the Window, Navigator, Screen, History, and Location objects. JavaScript provides access to all these objects when developing for the web. Although we are developing native applications, Windows 8 uses the Internet Explorer 10 (IE10) engine to run our code. Thus, we still have access to the browser objects in our code.
Most of the API remains the same between website development and Windows Store app development. However, certain DOM APIs have modified behaviors, and some are not allowed. The following link has a nice table stating the differences:
http://msdn.microsoft.com/en-us/library/windows/apps/Hh700404.
JavaScript Objects
JavaScript objects include the Array, Boolean, Date, Math, Number, String, RegExp, and Global objects. These objects are actually part of JavaScript and are present whether we are writing code for the web, a Windows Store app, or the server with technologies such as NodeJS.
HTML DOM Objects
HTML DOM objects enable us to get, change, insert, and remove HTML elements. The HTML DOM objects follow:
When we think about HTML, these are the objects we think about. Some folks group the objects in this list with the browser objects or even count them among the JavaScript objects. When doing web development, a developer doesn’t need to think about separating these objects too much. However, recognizing each distinct group and the objects that comprise each group is beneficial. For server-side JavaScript development using technologies such as NodeJS, knowing what is and is not available becomes more important.
As we cover making Windows Store apps, we demonstrate that although we have access to most of these objects, some are not present, for reasons that will become clear later. Other objects are present, but their functionality is altered. Fortunately, most tasks work just as we expect.
You can read about all of these objects in great detail on the W3Schools website, at http://w3schools.com/jsref/default.asp.
In general, the term DOM refers to the concept of the core objects in relation to the browser objects and HTML objects.
HTML-5 Markup
Most of the time, when we hear HTML, our minds think about the markup. After all, HTML stands for HyperText Markup Language. The markup consists of elements or tags, such as <html>, <body>, <h1>, and <div>. As we create our application pages, we put our page content into this markup, structured as we want. Some inherit assumptions govern how the content will be styled based on the tags but styling is not the job of the markup language. Instead, the markup defines the content of the document.
CSS3
Cascading Style Sheets (CSS) determine how the HTML markup is displayed. These styles are typically stored in separate files, as they are in this book. HTML markup has a style element that could contain the CSS styles, but we do not use that element in this book; we keep both our HTML content and our CSS styling information separate from our JavaScript code. Before style sheets came along in HTML 4.0, HTML tags were created for styling. Elements such as <font> were created, and updating every page of a website became a maintenance nightmare when a font family, size, or color needed to change. CSS saved a lot of work because the style could be associated to the HTML tags; then the style data in the CSS file could be changed once, and every page and element that referenced that style then was updated.
Don’t use the <font> element; HTML5 no longer supports it. CSS is the appropriate way to style HTML content.
Working with JavaScript in Windows Store App Development
All modern browsers support JavaScript that is based on the latest ECMAScript 5.1 standard. This includes IE10, which Windows 8 uses as the engine to run JavaScript and HTML Windows Store apps.
Variable Scope and the Global Space
The biggest flaw with JavaScript is the fact that everything lives in global space—clobbering existing objects with our own is easy. Setting undefined to something entirely different is even possible. This causes all kinds of issues. Getting multiple JavaScript libraries to work alongside each other can be problematic when everyone is playing in the global space. Collisions occur and code does not function as expected.
If the var keyword isn’t used when creating a variable, the variable is put into global space. Variables declared with the var keyword are instead put into local scope. When developing applications for the Windows Store, never put variables into global scope; declare all variables with the var keyword.
Anonymous Functions
JavaScript includes anonymous functions, or functions without names. Typically, when a function is created, it appears as follows:
function myGlobalFunction() {
var data = "This is my global function";
}
An anonymous function, on the other hand, looks like this:
var anon = function () {
var data = "This is my anonymous function";
}
The anonymous function is assigned to the local variable anon. If we didn’t assign a variable to this function, we could never call it. To actually call the function, we write:
anon();
Looking into Callbacks
Many times, anonymous functions are used when needing to do callbacks in JavaScript. A callback is a mechanism that tells the code that, when it is done executing, it must immediately call back some other piece of code. Typically, a function is passed to a callback, but an anonymous function can be created instead.
For example, when adding an event listener to an element with a variable name of button, we could write the following code, with the function name passed into the event listener function:
button.addEventListener("click", doButtonClickedAction);
function doButtonClickedAction(evt) {
//handle button clicked event
}
But the same code can be used with an anonymous function:
button.addEventListener("click", function (evt) { /* handle click */ });
Styling is not optional! In JavaScript, the opening curly brace must be on the same line as the function declaration. This is important because JavaScript inserts semicolons if it runs into a problem while parsing the code. Instead of just failing with a syntax error, it backs up and places a semicolon where it finds a newline character. The idea was to help programmers who didn’t understand where the semicolons went (or simply forgot to put one in place), but it resulted in unexpected results. So even if your preference is to have the opening curly brace on a separate line, it really isn’t valid in JavaScript. Also make sure that you actually put semicolons in your code—don’t rely on JavaScript’s Automatic Semicolon Insertion (ASI) to do it for you.
Examining Self-Executing Anonymous Functions
Developers use several coding patterns when writing code in JavaScript. These include the singleton pattern, module pattern, revealing module pattern, lazy function definition, and self-executing anonymous functions, among others.
These coding patterns keep the vast majority of our code out of global space. To turn an anonymous function into a self-executing anonymous function, simply wrap the function in parenthesis and then add another opening and closing parenthesis to the end, followed by a semicolon:
(function () {
var data = "This is a self-executing anonymous function.";
})();
Everything in JavaScript is an object, so we can always group objects using parenthesis. Functions are objects; thus, functions—even anonymous ones—can be grouped. After the grouping operators are applied to the anonymous function, we can execute the function immediately with the parenthesis on the end. We know that if we want to execute the anon variable from the “Anonymous Functions” section, we can just call this:
anon();
We can also call this:
(anon)();
This executes the function after having the grouping operator (parenthesis) applied. In the same way, we can have the anonymous function execute when it is declared.
Before writing Windows Store apps, I preferred this pattern:
(function (myObject, undefined) {
//private property
var isSomething = true;
//public property
myObject.something = "something";
//public method
myObject.padLeft = function (str, len, pad) {
str = Array(len + 1 - str.length).join(pad) + str;
return str;
};
//private method
function doIt(item) {
}
//check to see if myObject exists in global space
//if not, assign it a new Object Literal {}
//also, nothing is passed as second parameter
//so undefined above will truly be undefined regardless
//if some other code set it to something else
})(window.myObject = window.myObject || {});
The idea is that to create a single variable in global space called myObject. But within the namespace, we can create public and private functions along with public properties. This anonymous function takes two parameters, myObject and undefined. We pass values to the parameters in the last line:
window.myObject = window.myObject || {}
We set window.myObject to what it was set to before (if anything). If it wasn’t set to anything, we set it to a new object with the curly braces. We do this so we can split up our JavaScript code into multiple files. In the early days, JavaScript programmers simply wrote all their code in a procedural manner in a single code file. Each HTML file was split out, but a single mammoth JavaScript file referenced all the pages. By having the code set the namespace to itself, we can have multiple JavaScript files (at least one per HTML page) and know that we will have a valid object when we start calling functions on that namespace. If the namespace isn’t set up on that request, window.myObject would be undefined. By using the || operator, we tell JavaScript to set this object to the first value if it is present and, if it isn’t, to then set the object to the second value. In this case, it initializes as a new object. The previous code is shorthand for the following code:
if (window.myObject === undefined)
window.myObject = new Object;
We don’t pass anything to the second parameter of the self-executing function. This enables us to make sure that the parameter undefined is actually undefined and not some other value that another library set it to.
JavaScript does not have a concept of namespaces. However, to avoid the bad practice of putting everything in global space, a common practice is to refer to a global object as a namespace. We cover this in more detail in Hour 4, “Creating WinJS Namespaces, Classes, and Custom Controls.”
The comments inside the self-executing anonymous function show how we can declare private variables and private functions as well as public properties and public functions. To declare something public, we just need to assign the functions to the object we set up (myObject):
//public property
myObject.something = "something";
Using Object Literal Notation to Expose Public Properties and Methods
We have already seen JavaScript’s object literal notation in action. In the previous section, when we set window.myObject = {}, we set it to a new object using object literal notation. The empty pair of curly braces is simply a way to “new up an object.” For example, the following code creates a new object and then sets a property and the data associated with the property:
var objectLiteral = {};
objectLiteral.someProperty = "Some data";
objectLiteral.moreData = "Not enough data";
We could write the same code the following way:
var objectLiteral = {
someProperty: "Some data",
moreData: "Not enough data"
};
Besides being a little more compact, it is a notation that can really grow on a person. Object literals can also solve the global space issue. This is because the object literal, too, can be self-executing. The following example produces the same result as the self-executing function in the previous section:
var myObject = function () {
//private property
var isSomething = true;
//private method
function doIt(item) {
}
return {
//public property
something: "something",
//public method
padLeft: function (str, len, pad) {
str = Array(len + 1 - str.length).join(pad) + str;
return str;
}
};
}();
Then code could use this by simply calling
var data = myObject.something;
Microsoft handles the global space issue by using both self-executing anonymous functions and JavaScript’s object literal notation. Hour 2, “Trying Out File | New | Project,” shows both examples.
You may have noticed that this looks a lot like JavaScript Object Notation (JSON). Douglas Crockford, who created the JSON standard, based it on JavaScript’s object literal notation. JSON is a lightweight data-interchange format that is more restrictive than JavaScript object literal notation, in that the keys must be wrapped in quotes. JSON also is a text format. The entire structure is a string. JSON and object literal notation are purposely similar, but knowing how they differ can be important.
Understanding JavaScript Promises
Much of the Windows RT API calls are asynchronous calls. Microsoft required any potentially long-running function (anything over 50 milliseconds) to be an asynchronous (or async) call. Microsoft is serious about keeping Windows Store apps fast and fluid. We talk more about this in Hour 5, “Understanding Microsoft Design Style Principles.” For now, it is important to understand that one way Microsoft helps app developers create fast and fluid apps is by exposing the API in asynchronous calls. In fact, when asynchronous functions are available, no synchronous counterparts exist to accomplish the same functionality. This way, as developers, we can “fall into the pit of success” by doing the right thing; our apps cannot block the UI thread.
In JavaScript, we utilize these asynchronous functions in the API by using promises. The CommonJS (http://commonjs.org) group is working on the standard of promises, at http://wiki.commonjs.org/wiki/Promises. Microsoft has implemented promises in the Windows Library for JavaScript. We discuss this library in Hour 3, “Exploring the Windows Runtime (WinRT) and Windows Library for JavaScript (WinJS).” Promises make it much easier for JavaScript developers to work with asynchronous calls.
When we need to access any long-running functionality, such as reading the contents of a file from disk, we need to be aware that the task at hand may take awhile. In such times, we need to kick off the task of opening a file and reading it in while immediately passing back control to the main UI thread. After the file has been opened and its contents read, we can process the file in the callback function. Promises enable us to have the callback occur in the same place in code by using the then or done statement:
storageFile.openAsync(Windows.Storage.FileAccessMode.read).then(
function (stream) {
//process stream of data
});
The previous code example includes a variable called storageFile that we call the Windows Runtime function openAsync. All asynchronous functions end with the word Async. We tell the openAsync function that we want to open this file in read-only mode. After the first part starts execution, control immediately returns to the app. Later, the code inside the then function is called so that we can actually process the data stream read in from the file.
It might seem that a nesting pattern is the pattern to use:
//an async call
oneAsync(data).then(function (data2) {
//another async call
twoAsync(data2).then(function (data3) {
//another async call
threeAsync(data3).then(function (data4) {
//another async call
fourAsync(data4).done(function (finalData) {
//last call
finish(finalData);
});
})
})
});
However, a better approach is to chain the callbacks instead of nesting them:
//an async call
oneAsync(data)
.then(function (data2) {
//another async call
return twoAsync(data2);
})
.then(function (data3) {
//another async call
return threeAsync(data3);
})
.then(function (data4) {
//another async call
return fourAsync(data4);
})
.done(function (finalData) {
//last call
finish(finalData);
});
The difference between the two code fragments is subtle. For the chaining pattern to work, we must return the value in the completion handler. The then and done functions take three parameters. The first is the completion handler, the callback function when the function successfully completed. The second parameter is the error handler for when errors occur. The final parameter is the progress handler. Some functions can provide progress information, and we can create handlers to receive this information as the asynchronous function works toward completion.
The nesting approach creates a jagged Christmas tree pattern. The chaining approach is more readable. However, readability is not the primary reason for choosing the chaining pattern over the nesting pattern: The primary reason is error handling.
We don’t live in a perfect world, so errors happen and can be troublesome to debug while doing asynchronous programming. Fortunately, working with promises simplifies many complexities associated with handling asynchronous errors. To use error handling with promises, we need to have the last then or done function in the chain declare an error function.
The then function returns a promise that allows the chaining to occur. The done function does not return a promise. then returns a promise in the error state if an error occurs; it doesn’t throw an exception. done throws an exception if the error handler is not provided and an error occurs.
The correct error-handling pattern when chaining promises is to make sure that the last call in the chain is the done call and that the second parameter, the error handler, is set. Because each then function is chained together, the error is passed to the single error handler. Otherwise, if we nested our calls, we would need to have error handlers inside each nest. This arrangement would be hard to manage. An example of handling errors and the progress information follows:
//an async call
oneAsync(data)
.then(function (data2) {
//another async call
return twoAsync(data2);
})
.then(function (data3) {
//another async call
return threeAsync(data3);
})
.done(function (finalData) {
//last call
finish(finalData);
},
function (error) {
console.log("ERROR: " + error);
},
function (progress, resultSoFar) {
console.log("Data received: " + progress.dataReceived);
});
Working with HTML5 in Windows Store App Development
In HTML5, the Document Type Definition (DTD) can default to nothing. HTML5 is not XHTML. XHTML forces the markup to be a valid XML document. With HTML5, the parser does not require the document to be a valid XML document. We can still write code as valid XML, if we desire, but this isn’t required. In HTML 4, the doctype is specified like this:
<!DOCTYPE html
PUBLIC "-//W3C//DTD XHTML 1.0 Strict//EN"
"http://www.w3.org/TR/xhtml1/DTD/xhtml1-strict.dtd">
In HTML5, it is simply:
<!DOCTYPE html>
This is because, in HTML5, the correct DTD is assumed. It was rarely set correctly in many of the HTML 4 pages on the web, anyway. Either doctype is valid in HTML5. In fact, the first example is only 1 of 15 different valid doctypes that trigger “standards mode” in the browser.
The HTML tag is also much simpler, compared to its HTML 4 counterpart. In HTML 4, the html element typically was written as follows:
<html xmlns="http://www.w3.org/1999/xhtml"
lang="en"
xml:lang="en">
But in HTML5, it also became much simpler:
<html lang="en">
The default Windows Store app project templates don’t even include the lang attribute. Language is handled differently. This book contains too few pages to discuss localization and globalization for apps, but a great resource to get started is located at http://msdn.microsoft.com/en-us/library/windows/apps/hh465006.
Semantic Elements
Besides removing some attributes, HTML5 introduces new elements. The standards committee noticed that most web pages always used the div tag when breaking up their HTML content. The committee then added a class to div, to style it and also specify the type of content div was providing.
For example:
<div class="header"></div>
<div class="nav"></div>
<div class="article"></div>
<div class="footer"></div>
For HTML5, the standards committee decided to add semantic elements that behaves identical to the div tag but are explicit in the type of content. The same markup can be written in HTML5 as follows:
<header></header>
<nav></nav>
<article></article>
<footer></footer>
These elements, along with aside, figcaption, figure, hgroup, time, and mark, enable developers to explicitly state their intention with their markup. More information on semantic elements resides in a great free online resource, http://diveintohtml5.info/semantics.html.
New Elements
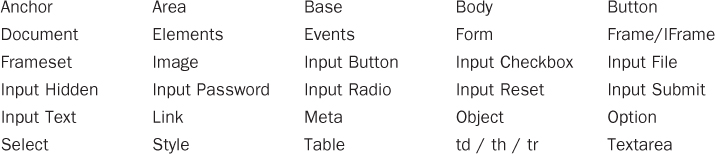
Besides adding the semantic elements, HTML5 introduces new elements that add functionality. One of these elements is the progress element, which, as the name suggests, provides a progress bar. It takes a maximum value and a current value:
<progress max="100" value="25"></progress>
With default styling with the light theme, the progress bar looks like Figure 1.1.
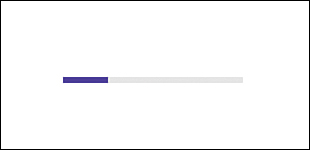
Figure 1.1. The progress bar rendered using ui-light.css.
Audio and Video
Arguably the two most talked-about additions are the audio and video tags. Both of those elements include a new source element. This source element can be repeated multiple times, with different encodings of the file. When each web browser finds the audio tag, it looks for the source of the audio. If it can play the audio, it does. Otherwise, it checks the next source element. It continues to do this until either it finds a source it can play or it runs out of sources to try. If the latter happens, web developers typically put some other failsafe code inside the audio tag and after the last source tag. This is either text stating that the audio couldn’t be played or a Flash or a Silverlight plug-in, or some other way to try to play the audio:
<audio controls="controls">
<source src="song.mp3" type="audio/mp3" />
</audio>
However, for Windows Store apps, we know what formats will work for the user and can make sure that the audio (or video) is encoded properly. The video tag works the exact same way.
The MSDN documentation from Microsoft contains a list of supported audio and video formats, at http://msdn.microsoft.com/en-us/library/windows/apps/hh986969.
Graphics
From a graphics perspective, two big hits are the addition of the canvas and svg elements. These elements are hardware accelerated, which means that the graphics processing unit (GPU) is used to display these graphical areas to the user. As the name implies, the GPU was built for this. GPUs have been in computers for about a decade and became a requirement in PCs when Windows Vista was released. Every new machine that runs Windows 8 has a built-in GPU. C++ and DirectX developers have become intimately familiar with the GPU. For our purposes, we do not need to do anything special to tell Windows to use the GPU; Windows handles that for us.
Drawing on the Canvas Element
We can think of the <canvas> tag as an <img> tag that we can write to. It is an area where we can draw individual pixels—but not modify them. We can overwrite the pixel, but we can’t actually undo the write. This isn’t a problem, but it is important to understand. The canvas can be modified only through JavaScript. No child elements make up the canvas. If we draw a rectangle on the canvas, it is simply pixels put on the screen. The rectangle does not actually exist in the DOM, so CSS can’t actually manipulate it. Instead, our JavaScript code determines how to redraw the canvas with any updated values for the rectangle. Canvas is rendered pixel by pixel. The canvas cares only about the state of the pixel, not about how the pixel came to hold that particular color value.
Creating a blank canvas is extremely easy to do:
<canvas id="surface" width="500" height="500"></canvas>
Then we need to use JavaScript to actually draw on the canvas. We can see the code for this in Listing 1.1.
Listing 1.1. Drawing on a canvas Element
function drawOnCanvas() {
var canvas = document.getElementById("surface");
var context = canvas.getContext("2d");
//clear canvas to all blue
context.fillStyle = "#0000FF";
context.fillRect(0, 0, 500, 500);
//offset and clear large section to red
context.fillStyle = "#FF0000";
context.fillRect(50, 50, 400, 400);
//offset some more and clear section to white
context.fillStyle = "#FFFFFF";
context.fillRect(100, 100, 300, 300);
//create a purple circle with a black outline
context.fillStyle = "purple";
context.strokeStyle = "black";
context.lineWidth = 2;
context.arc(250, 250, 100, 0, Math.PI * 2);
context.fill();
context.stroke();
//set line width to 15
context.lineWidth = 15;
//set stroke style (for our line) to yellow
context.strokeStyle = "yellow";
//begin path and move (without drawing) to 100,100
//then draw a line from 100,100 to 400,400
context.beginPath();
context.moveTo(100, 100);
context.lineTo(400, 400);
context.stroke();
//set stroke style to green
context.strokeStyle = "green";
//begin path and move (without drawing) to 400,100
//then draw a line from 400,100 to 100,400
context.beginPath();
context.moveTo(400, 100);
context.lineTo(100, 400);
context.stroke();
}
Figure 1.2 shows the result of Listing 1.1.

Figure 1.2. The canvas element enables us to write pixel data directly to its surface area.
The code in Listing 1.1 has some interesting bits. First, we don’t actually act on the canvas element itself; instead, we get the canvas context with the getContext function. The only valid parameter to pass to the function currently is 2d. When we have the context, we can set the fillStyle. Any drawing we do that does a fill command has this style applied to it. We immediately call the fillRect function, telling it to clear the entire contents of the canvas to blue.
To understand what the numbers mean when drawing to the canvas, it is important to understand screen coordinates. When dealing with 2D graphics, the x coordinate runs horizontally from left to right. The y coordinates run vertically from top to bottom, as in Figure 1.3.
Figure 1.3. The 2D coordinate system with the x-axis in red and y-axis in blue.
We can see that coordinate 0, 0 is the top left of the area (canvas, in this case). As we move horizontally to the right along the x-axis, the first number increases by one for each pixel until we reach the full width of the area (in this case, 499). As we move vertically to the bottom along the y-axis, the last number increases by one for each pixel until we reach the full height of the area (in this case, 499).
Armed with this information, we can then call the fillRect function, telling it to start at position 0, 0 and making the width 500 pixels and the height 500 pixels. This fills the entire area with blue, since we set the fillStyle property to #0000FF.
After filling the entire canvas area with blue, the next step in Listing 1.1 is to set fillStyle to red and then fill in another rectangle from points 50, 50 to 400, 400. This makes a smaller red-filled rectangle on top of the blue rectangle. We do it again by setting fillStyle to white and drawing another filled rectangle from points 100, 100 to 300, 300.
After drawing our three rectangles, we set fillStyle to the color purple, strokeStyle (or [out]line style) to black, and lineWidth to 2. Then we call the arc function, which takes in the x, y position of the center of the arc we want to draw. In this case, we want the circle to be right in the middle of our 500×500 canvas, so we picked 250, 250. The next two parameters of the arc function take the start angle and the end angle. We want full circle, so we use the start angle of 0 and then go a full 360 degrees by passing 2Pi to the end angle. When we have made the arc in memory, we can actually tell the context to fill that arc and then to draw the stroke of the arc.
When dealing with angles, we can measure them in degrees or radians. In radians, pi equals 180 degrees. 2*pi (2pi) is 360 degrees. An interesting read on measuring angles using radians or degrees can be found at www.kewlniss.com/post/2011/07/18/From-Radians-or-Degrees-to-Pi-or-Tau-to-a-Binary-Hand-Dance.aspx.
After drawing the circle, we set lineWidth to 15. This is just so the lines we are creating show up nice and big in Figure 1.2. The first line we set to yellow (at my oldest daughter’s request) by setting that color in the strokeStyle of the context of our canvas. We then began writing a path, but before we put the pen on the canvas, we had the position of the pen moveTo 100, 100. (This is the top left of the inner white rectangle.) Then we had it draw a lineTo 400, 400 (or to the bottom right of the inner white rectangle).
We drew the final line after setting the color to green in the same manner. We moved the pen without drawing to the top right of the inner rectangle, and then we drew a lineTo to the bottom left of the rectangle. This functionality was preceded by the beginPath call, which cleared any previous path information. We also needed to call stoke to actually have the line show up on the canvas.
All the code in this book appears on this book’s website. This example is under Hour01CanvasExample. (“GO TO →” Appendix This Book’s website)
Displaying Scalable Vector Graphics
Scalable Vector Graphics (SVG) is actually maintained in the DOM. JavaScript and CSS can manipulate it. The DOM treats the svg element much like a div element. Just as with any DOM element, each element can be manipulated by JavaScript. Elements can also be styled via CSS.
The svg element includes different shapes that are declared as children on the svg element, such as circle, ellipse, line, polygon, polyline, path, and text. For example, if we wanted to produce the same drawing we just created, but this time we wanted to create it in SVG, we would write the following markup:
<svg>
<rect x="0" y="0" width="500" height="500" style="fill: blue"></rect>
<rect x="50" y="50" width="400" height="400" style="fill: red"></rect>
<rect x="100" y="100" width="300" height="300" style="fill: white"></rect>
<circle cx="250" cy="250" r="100" stroke="black"
stroke-width="2" fill="purple" />
<line x1="100" y1="100" x2="400" y2="400"
style="stroke:yellow;stroke-width:15"></line>
<line x1="400" y1="100" x2="100" y2="400"
style="stroke:green;stroke-width:15"></line>
</svg>
The amount of markup is much less than what we were required to write in JavaScript to draw the same artwork on the canvas. We are using inline CSS for the rectangles, but we could have used the fill attribute, as we did on the circle. Typically, when using CSS, the styles should be put in an external file, but it was done inline here to show all the content in one code fragment. After drawing the circle, we draw the two lines, just like we did in the previous example.
As expected, the SVG markup produces the result shown in Figure 1.4, which is identical to what we saw in the canvas example.

Figure 1.4. Our SVG drawing is identical to our canvas drawing.
We can directly manipulate the individual elements through JavaScript or even CSS. We used CSS to style them to begin with. Absolutely no JavaScript was used to create this drawing when using SVG. Manipulating what we write to the canvas is not possible. Using SVG, we can add event listeners to each element in the drawing. Each one then would know when it was clicked or when the mouse hovered over it. This is very powerful; we don’t get that functionality with the canvas.
SVG is very powerful, but we focus on canvas in this book when it comes to graphics. However, do not let that deter you from learning SVG: Certain apps and games can really shine when using that technology. For example, when using SVG, you can zoom in on your graphics a great deal, with no loss of fidelity. Trying to do the same with a canvas causes pixilation.
When trying to determine whether to use canvas or SVG, think about performance. Canvas performs well on smaller areas or with lots of objects. SVG, on the other hand, performs well on large areas or with a few objects. If you have many objects (like a particle system), your only option is to use a canvas. Strengths and weaknesses surround both. To see more differences between canvas and SVG—and help make the decision on which to use—the following link may be of assistance: http://msdn.microsoft.com/en-us/library/windows/apps/gg193983.
This example appears under Hour01SvgExample. (“GO TO →” Appendix – This Book’s website)
Custom Data Attributes
Custom data attributes are an added attribute in HTML5. The attribute name can be applied to all elements because it is “in no namespace” (according to the HTML5 specification) and it starts with data-. It must have at least one character after the hyphen to be valid. The purpose of these attributes is to store custom data that the page or application can utilize when there are no other appropriate attributes or elements to use.
This seems a little odd at first, but it is extremely useful. When data needs to be stored with an element but there is no good place to store it, we can use a custom data attribute and then pull out data later. For example, if we wanted to store a user ID with every li we generated in markup that displayed their name, we could do the following:
<li data-userid="766">Chad</li>
<li data-userid="767">Chuck</li>
We discuss in detail how Microsoft utilizes these custom data attributes in Hour 3.
We have discussed a lot of changes for HTML5, but plenty more we have not discussed. For more information on HTML and DOM API changes, take a look at the list compiled by Microsoft, at http://msdn.microsoft.com/en-us/library/windows/apps/hh700404.
Using CSS3 in Windows Store App Development
Having markup in place and having the capability to manipulate the markup through JavaScript and the DOM API is nice, but without CSS, all of our hard work wouldn’t look very nice. In this section, we discuss how we can use CSS to select our HTML elements and style them.
Understanding Selectors
To style the content, we need to be able to let the system know which piece(s) of content we want to style. We do this with CSS selectors. Multiple types of selectors exist; these selectors enable us to easily select an element or group of elements so that we can apply CSS style rules to the elements.
Type Selectors
A type selector enables us to style a specific HTML element. For example, if we wanted all h2 elements to have a font size of extra-extra-large, we could create the following CSS rule:
h2 {
font-size:xx-large;
}
ID Selectors
HTML elements can be assigned an id. Using CSS, we style the element associated with the id. If we had the following HTML element:
<div id="myID">This is a div that has an id: myID.</div>
we could have CSS style that id by creating the following in the CSS file:
#myID {
color: red;
}
Class Selectors
Besides styling an id, we can also style classes. This is probably the most common way to style DOM elements. We associate a class to the element like this:
<div class="myClass">This div has the myClass class associated to it.</div>
We can style that element with a dot notation, like this:
.myClass {
color: blue;
}
Descendant Selectors
Sometimes we need to find a descendent of an element. We can do this by adding a space between the type/ID/class and the descendant we are looking for. For example, if we want to style all h3 tags that were descendants of any elements with the myClass class associated to it, we would write the following CSS rule:
.myClass h3 {
color: orange;
}
Child Selectors
Sometimes we want to style only an immediate child and not every descendant. In that case, we would add the following CSS rule:
.myClass > h3 {
text-decoration: underline;
}
Adjacent Selectors
We can also utilize adjacent selectors, which allow us to style an element that is an immediate sibling:
h3 + p {
color: green;
}
Pseudo-class Selectors
Pseudo-class selectors are interesting because they enable us to style elements differently, based on the state of the element. Common scenarios in which this is handy include dealing with links. Links have different states, such as hovered over, clicked, visited, and active. Pseudo-class selectors enable us to target each of these states and apply CSS rules to style these states. We do this by using a colon followed by the state we are styling:
a:visited {
color: orange;
}
a:hover {
border: 2px solid gray;
}
a:active {
background-color: yellow;
}
Other pseudo-class selectors include first-child, last-child, nth-child, and only-child.
First Child
The first child selector lets us style the first child in a collection. For example, if we wanted to style the first list item with the color red, we would add the following CSS rule:
li:first-child {
color: red;
}
Last Child
Similarly, if we wanted to style the last item to have very large text, we would write:
li:last-child {
font-size: xx-large;
}
Only Child
It is also possible to style the only child in a list. If we are also styling the first and last children, then the only child is also a first child and a last child, so it inherits those styles. The order of the selectors matters because the styles are applied in a cascading approach.
If we wanted the only child of an element to have a pink background color and reset the styles of the first and last child, we would write the following rule:
/* Notice, this comes after first and last and also
resets values they set (font-size and color) since
an only child is also a first and last child */
li:only-child {
color: black; /*reset first child color */
font-size:medium; /* reset last child size*/
/* make only child background pink */
background-color: pink;
/* don't have a bullet point */
list-style-type: none;
width: 200px; /* so the background stops */
}
nth Child
With the addition of the nth child selector, we can style the odd or even rows of a table much easier than we could before. In the past, we had to add an alternateRow class to every other record to style those records. Now we can use odd and even with this selector to get the same results, without having to change our markup.
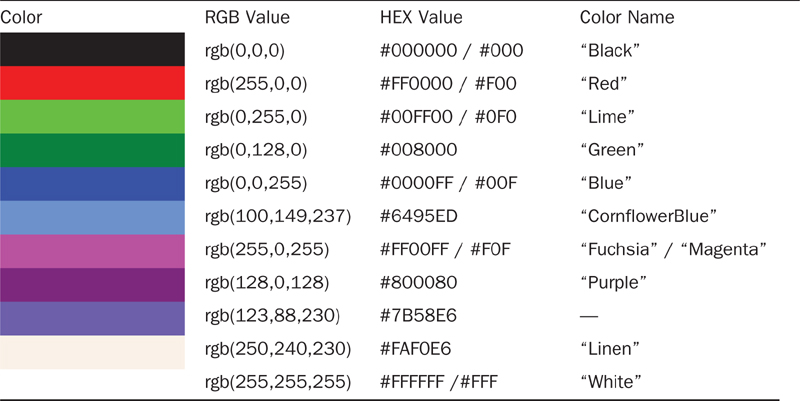
For example, if we wanted every odd row of our table to have the background color linen, we could write the following rule:
tr:nth-child(odd) td {
background-color: linen;
}
This makes all the td elements of every odd tr have the background color of linen.
Besides accepting the keywords, this selector enables us to use a formula. In fact, the odd keyword is really using the formula 2n+1. This means to start at row 1 (the + 1) and then style every second (nth) row with this rule. If we wanted to start at row 2 and then style every other row (the same as if we used the even keyword), we would use the formula 2n+2. 2n means every other row, and the +2 tells it to start on the second row. If we wanted to start on the second row but then skip two rows before styling the next row, we could use this CSS rule:
li:nth-child(3n+2) {
background-color: blue;
color: white;
width: 200px;
}
Using a formula with the nth child can be very powerful.
Listing 1.2 shows all the HTML markup and content we have styled with the CSS rules in this section.
<!DOCTYPE html>
<html>
<head>
<meta charset="utf-8" />
<title>CSSRulesExample</title>
<!-- WinJS references -->
<link href="//Microsoft.WinJS.1.0.RC/css/ui-light.css" rel="stylesheet" />
<script src="//Microsoft.WinJS.1.0.RC/js/base.js"></script>
<script src="//Microsoft.WinJS.1.0.RC/js/ui.js"></script>
<!-- CSSRulesExample references -->
<link href="/css/default.css" rel="stylesheet" />
<script src="/js/default.js"></script>
</head>
<body>
<header>
<h1>This is my header statement. Impressive, I know.</h1>
</header>
<h2>This is a header 2 element. It will be styled by a Type Selector:
h2 { }</h2>
<div id="myID">This is a div that has an id: myID. This will be styled by an
ID Selector #myID { }</div>
<h2>Another header 2 element shows that all will be styled by the
Type Selector.</h2>
<div class="myClass">This div has the myClass class associated to it. It will
be styled with the class selector .myClass { }</div>
<p class="myClass">This p element will also be styled by the same selector
that stlyed the above div: .myClass { }</p>
<div class="myClass">
<header><h3>This is a descendent h3 element of the div with the myClass
class. This will be styled with the Descendant selector
.myClass h3 { } </h3>
</header>
<h3>Another h3 tag that is a direct child of the div with the myClass
class. This will be styled with the Child selector
.myClass > h3 { }</h3>
<p>This is a paragraph element which is adjacent to the h3 tag that was
just styled. This will be styled with the Adjacent selector
h3+p { }</p>
</div>
<a href="#">This link will be styled differently based on the state it is in.
This is done by the pseudo-class selectors such as a:hover { }</a>
<table>
<tr><td>Key</td><td>Value</td></tr>
<tr><td>123</td><td>Roy</td></tr>
<tr><td>178</td><td>Roger</td></tr>
<tr><td>501</td><td>Tony</td></tr>
<tr><td>767</td><td>Chuck</td></tr>
<tr><td>900</td><td>Chad</td></tr>
</table>
<ul>
<li>Data 1</li>
<li>Data 2</li>
<li>Data 3</li>
<li>Data 4</li>
<li>Data 5</li>
</ul>
<ul>
<li>Nothing is available</li>
</ul>
</body>
</html>
Listing 1.3 shows all the CSS rules we have created to style the markup.
body {
margin-left: 20px;
}
h2 {
font-size:xx-large;
}
#myID {
color: red;
}
.myClass {
color: blue;
}
.myClass h3 {
color: orange;
}
.myClass > h3 {
text-decoration: underline;
}
h3 + p {
color: green;
}
a:visited {
color: orange;
}
a:hover {
border: 2px solid gray;
}
a:active {
background-color: yellow;
}
tr:first-child {
font-size: x-large;
}
tr:last-child {
font-size: x-small;
}
li:first-child {
color: red;
}
li:last-child {
font-size: xx-large;
}
/* Notice, this comes after first and last and also
resets values they set (font-size and color) since
an only child is also a first and last child */
li:only-child {
color: black; /*reset first child color */
font-size:medium; /* reset last child size*/
/* make only child background pink */
background-color: pink;
/* don't have a bullet point */
list-style-type: none;
width: 200px;
}
tr:nth-child(odd) td {
background-color: linen;
}
li:nth-child(3n+2) {
background-color: blue;
color: white;
width: 200px;
}
The HTML and CSS can be found in the example code located in the Hour01/CSSRulesExample folder.
Figure 1.5 shows the results of the markup styled with the CSS rules.
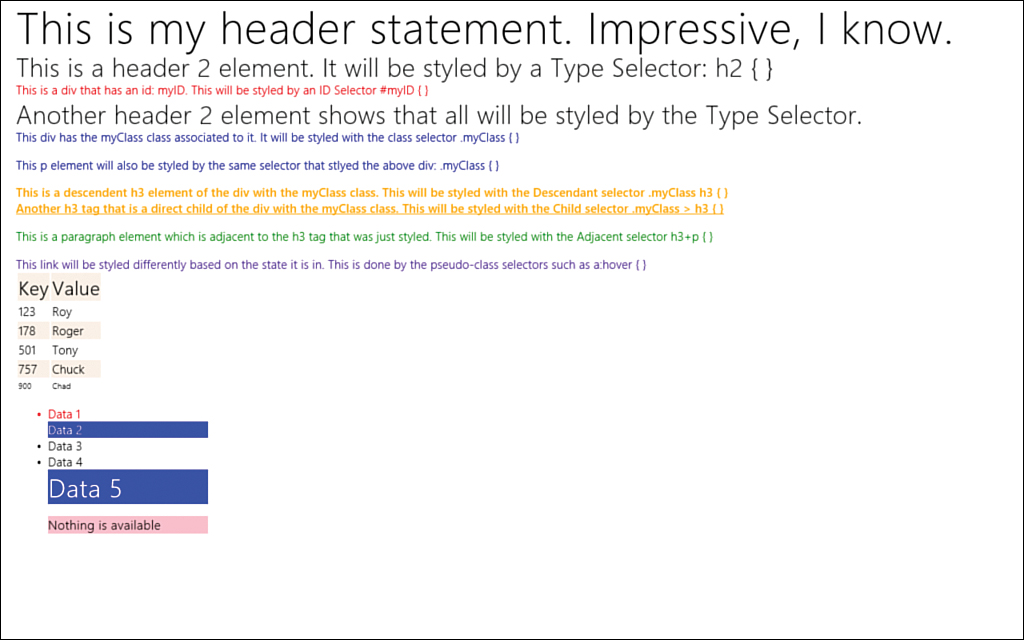
Figure 1.5. The results of the styles in Listing 1.3 that we applied to the markup in Listing 1.2.
Pseudo-element Selectors
Besides the pseudo-class selectors we just discussed are pseudo-element selectors, which use double colons instead of a single colon. Examples are first-letter, first-line, before, after, and selection.
As we dig into each of these selectors, assume that we are working with the following markup:
<h1>Header element</h1>
<article>
<header><h2>Exciting Article Title</h2></header>
<p>This is a paragraph element.</p>
<p>Another paragraph element.</p>
<p>We are rolling in paragraph elements today! I think that is a good
thing.</p>
<footer>Author</footer>
</article>
<article>
<header><h2>Another Great Article Title</h2></header>
<p>If there were no paragraphs, there wouldn't be anything to read.</p>
<p>It is a good thing we have paragraphs then!</p>
<footer>Author</footer>
</article>
This markup contains multiple articles. Each article has a header and footer element. The only other elements between the header and the footer are paragraph elements.
First Letter
The first-letter selector behaves as we expect: It enables us to style the first letter of an element. For example, if we wanted to combine some of our knowledge so far and create a CSS rule that would find all the articles in the document and find the first child of the article, and then make the first letter of that first child be very large and bold, we could write the following:
article:first-child ::first-letter {
font-size: xx-large;
font-weight: 400;
}
With our previous markup, this CSS rule would cause the first letter of the text inside the h2 tag inside the header element to be set to a bold extra-extra-large font.
If we wanted the first paragraph letter to be blue, we could write the following CSS rule:
p::first-letter {
color: blue;
}
If we wanted the very first paragraph under each article (immediately following the header) to have a large first letter, we could accomplish that by writing this:
article > header + p::first-letter {
font-size: x-large;
font-weight: 800;
}
First Line
If we wanted the first line of our paragraphs to have brown text, we could use the same selector but replace first-letter with first-line:
article > header + p::first-line {
color: brown;
}
Before
CSS3 actually enables us to inject content into the DOM. If we wanted to put a dash in front of the author’s name in the footer, we could do the following:
footer::before {
content: " -";
}
In another example, if we wanted the last article to have a “NEW!” label put in front of the article’s title, we could write the following CSS rule:
article:last-child h2::before {
content: "NEW! ";
background-color: yellow;
}
This finds the last article in the document and right before the h2 content (in the header), and it adds the content “NEW!” with a yellow background.
After
The after pseudo-element selector functions as we might expect. The following CSS rule adds the content “created this post” in a small font after the author’s name:
footer::after {
content: " created this post";
font-size: small;
}
Selection
We can even style the text that the user has highlighted (or selected). Microsoft uses this when a user selects a particular element in a grid. The following CSS rule shows how to set the selection’s background color:
::selection {
background-color: green;
}
Microsoft’s built-in style sheets disable text selection by default. This is important, to allow us to easily scroll with our touch screen. However, we can override that by setting the vendor prefix style -ms-user-select: text;.
The code for the pseudo-element selectors is found in Hour01CSSRulesExample2. Listing 1.4 shows the CSS in its entirety.
Listing 1.4. CSS to Demo Pseudo-element Selectors
body {
margin-left: 120px;
margin-top: 60px;
-ms-user-select: text;
}
article {
margin-top: 40px;
}
article:first-child ::first-letter {
font-size: xx-large;
font-weight: 400;
}
p::first-letter {
color: blue;
}
article > header + p::first-letter {
font-size: x-large;
font-weight: 800;
}
article > header + p::first-line {
color: brown;
}
article:last-child h2::before {
content: "NEW! ";
background-color: yellow;
}
footer::before {
content: " -";
}
footer::after {
content: " created this post";
font-size: small;
}
::selection {
background-color: green;
}
Figure 1.6 shows the result of the HTML, with no styling.
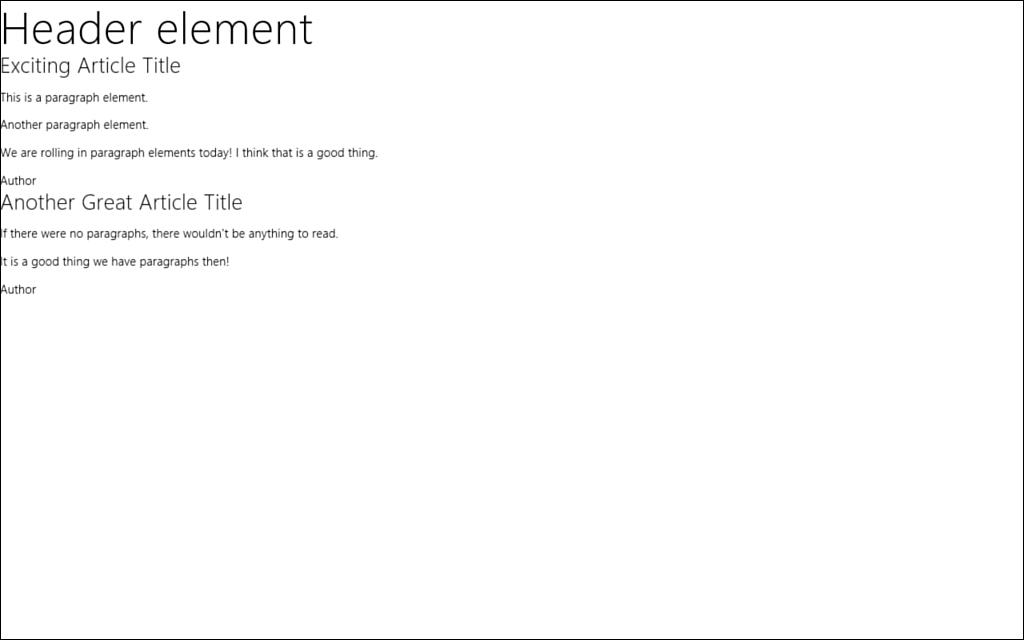
Figure 1.6. The HTML without any styling applied.
Figure 1.7 shows the result of styling the HTML with the CSS in Listing 1.4.
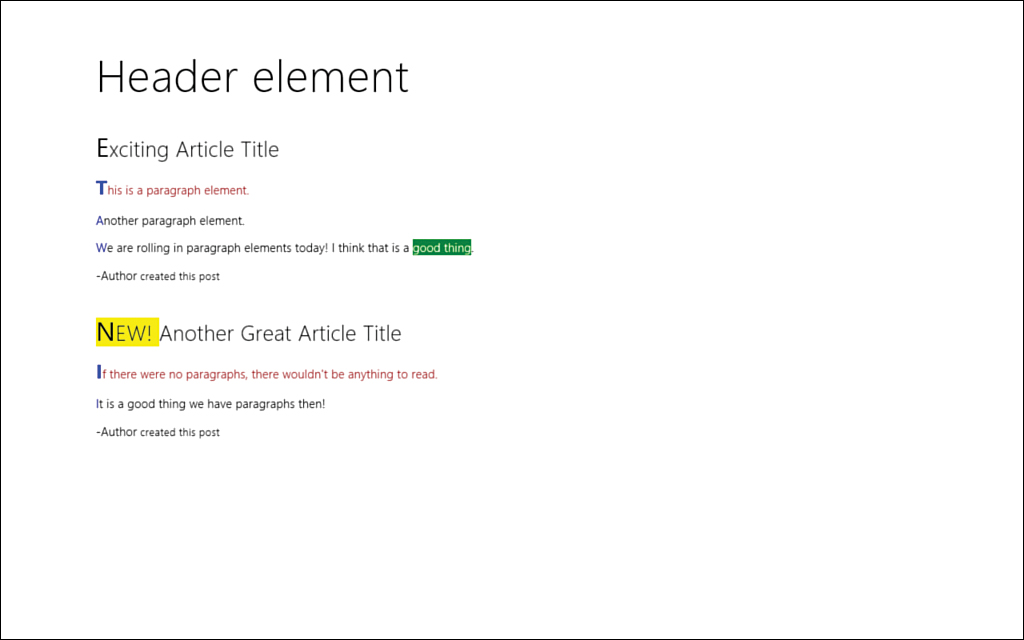
Figure 1.7. The HTML with the pseudo-element selectors styling applied.
Attribute Selectors
The last selector type we talk about is the attribute selector. This selector enables us to grab elements based on an attribute’s value in an element. This can be beneficial when we need to style different input controls based on their type. For example, assume that we had this input control in our HTML markup:
<input type="password" placeholder="enter password" />
We can create a rule that styles the password input type with a light green background:
input[type="password"] {
background-color: lightgreen;
}
Only input boxes with a type of password would have their background color set to light green. The code for the attribute selectors is found in Hour01CSSRulesExample3.
We can even use our custom data attributes as attribute selectors:
<input type="password" data-something="pwd" placeholder="enter password" />
input[data-something="pwd"] {
background-color: lightgreen;
}
Mentioning Media Queries
We discuss Media Queries in detail in Hour 13, “Working with Fullscreen, Filled, Snapped, and Portrait Views.” For now, it is important to know that we can style our content entirely differently, based on the layout of the device. For example, we can make sure our content looks great if the device is being held in portrait mode instead of landscape mode.
Further Exploration
We have talked about a lot of different technologies that make up HTML5. At the same time, we really just brushed over them. The rest of the book assumes that you are very familiar with JavaScript, HTML, and CSS. If any of this seems unfamiliar, take some time to look at these items again before continuing in the book.
Dive Into HTML5 is a great free online book that discusses HTML5; see http://diveintohtml5.info.
The W3Schools website (http://w3schools.com) has excellent tutorials on JavaScript, HTML, and CSS.
Summary
This hour, we covered a lot of information. It was important to include this refresher in the book, however, to make sure we understand these concepts before we tackle Windows Store app development. We get to utilize the web technologies we know and love to write Windows Store apps.
This hour served as a refresher on JavaScript, HTML, and CSS. We looked at each piece of the HTML5 puzzle and saw how everything works together to create the technology we call HTML5. We created self-executing anonymous functions in JavaScript to keep our code from polluting the global space. We talked about asynchronous programming in JavaScript and covered the promise pattern.
We looked at the newly created HTML5 semantic elements, such as header, footer, and article. We also looked at other new elements, such as audio, video, canvas, and svg. We were able to create the exact same drawing on a canvas and in SVG. Finally, we wrapped up the hour by talking about CSS3; we examined all the different type of selectors available for styling the HTML elements.
Q&A
Q. Is JavaScript with HTML the only way we can write Windows Store apps?
A. No. Besides JavaScript and HTML, we can use C#, Visual Basic, or C++ along with XAML. Another option, typically used for 3D games, is to use C++ with DirectX. This book discusses using only JavaScript and HTML.
Q. Will my JavaScript apps be fast enough? Should I use a language like C++ instead to make sure my app will run fast on the devices?
A. There’s no denying that properly written C++ code will outperform any other modern language. However, that does not mean we cannot write fast-executing apps using JavaScript. Microsoft continually states that it wants Windows 8 (and, therefore, all Windows Store apps) to be fast and fluid. For most tasks, the delay does not involve the actual code (C++, C#, VB, JavaScript) being executed. Instead, it involves grabbing resources from the web or the disk. With the asynchronous programming model in place in all languages, including JavaScript, we are able to write code that runs fast and does not block the main UI thread.
Q. I have a lot of C++ or C# experience but very little JavaScript experience. Why would I want to learn JavaScript? Isn’t it just a toy scripting language anyway?
A. JavaScript is much more than any toy language. Java developers originally wanted Java to be on every device, but that didn’t work out. However, it seems that almost every device has a browser of some sort and that every browser executes JavaScript code. As a result, JavaScript is on almost every device. So doesn’t it make sense to take a little time and learn a language that runs on almost every device out there? Beating JavaScript, HTML, and CSS is also hard when dealing with content that comes from the web. Trying to display web content in any other language is nowhere near as elegant.
Q. Can I use third-party JavaScript libraries in my Windows Store apps?
A. Yes! In this book, we strictly stick to Microsoft libraries. As an author, I do not want to make assumptions about what other libraries people are using. As a result, it seemed best to just not use them at all. Microsoft provides much more functionality out of the box than I can cover in this book. But if you enjoy using KnockoutJS for data binding or JQuery to manipulate the DOM or another third-party JavaScript library, you can definitely bring those into your projects and work with those libraries. The main point to keep in mind is that the libraries must be stored locally in your app; you can’t simply reference them from an online source. This is due to the security context that we will talk about during Hour 2.
Workshop
Quiz
1. Self-executing anonymous functions and self-executing object literals allow JavaScript developers to keep from polluting the global space. True or false?
2. For large particle systems, the canvas HTML element is be the better choice over SVG. True or false?
3. How would you find all the paragraph elements and make the first letter of each paragraph blue?
4. Microsoft created the JavaScript language. True or false?
Answers
1. True. Self-executing anonymous functions, along with self-executing object literals, enable us to keep some things private and make some things public while continually keeping the global space clean.
2. True. The canvas element is the correct choice if we needed to draw a large particle system.
3. To find every paragraph element and make the first letter blue. we would write the following CSS rule:
p::first-letter {
color: blue;
}
4. False. JavaScript was created by Netscape. The actual developer who created the language is Brendan Eich.
Activities
1. Write a JavaScript self-executing object literal that enables you to access some properties and functions while keeping other functions private.
2. Create an HTML document with an audio tag, and load in an MP3 or .wav file to play.
3. Create a simple drawing in an SVG element.
4. Create the same drawing on a canvas.