
Defeating the enemies is not enough. We need a solid goal to fight for. We will create this in the form of a base at the end of the road. The enemies will try to reach the base, decreasing its health with each enemy that enters it. The player must try to stop the enemies before they reach the base.
We will draw the base with some face-like features. Things that look human help the player to empathize more with them. The following are the steps to create a base:
- Create a new sprite by clicking on the paintbrush icon.
- Choose a dark gray color and draw a circle. To create a perfect circle, hold Shift while drawing.
- Fill the circle with a light gray color.
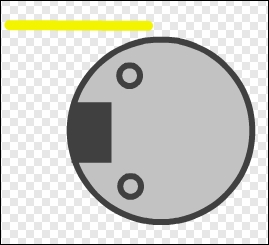
- Decorate the base with some circles and squares to resemble an open gate. See the following screenshot for an example.
- Like the enemies, this base will have a healthbar. Pick a bright yellow color and draw a line to the top-left of the base.
The base can be hit 20 times. So it will have 20 costumes, but don't copy them all at once. As the healthbar decreases, we will also draw some damage on the base as an extra visual indication to the player that all is not well and they should be trying harder. The following are the steps to do it:
- First make nine copies for a total of 10 costumes.
- Erase the healthbar to half in equal steps per costume.
- On the tenth costume, draw a few cracks on the base. Use the dark gray color you used for the outline. With the first half of the images done; for the costumes 11 to 15, we will add some more damage.
- Now copy this updated image five times.
- Decrease the healthbar to a quarter of its original length.
- Draw a few more cracks in the last image. The final quarter of costumes will show even more damage until the base is destroyed.
- Make five more copies of the last image.
- Decrease the healthbar to nothing.
- Draw even more cracks on the last two images.
- The last image is the dead/game-over state. To represent this visually, we will create a broken down base. Drawing the broken down base will take a bit more work than the previous steps, but it will look a lot better than just leaving the image as it is.
- Select only a few parts of the base and move them a bit away from the center.
- Select another part and move it in a different direction.
- Notice that you will move the lines but probably not the gray circle. That's because it's bigger than your selection, and that's okay.
- Click on the circle to select it and press Delete to get rid of it.
- Pick the same light gray color you drew the circle with.
- Click on the Pencil tool and increase the line thickness.
- Create some new irregular shapes on top of the repositioned cracks to represent broken shards of the base.
- Choose the Select tool and then click on one of the newly drawn shapes to select it.
- Click on the Back a layer button while holding Shift to send the shape all the way to the bottom. This will make sure the cracks appear on top of the base shards.
- Do this for all the shards that you've drawn. The following screenshots show the base in various stages of decay:

Go to the script tab to write the scripts that make the base move through all of its costumes and then break apart. You might think we will use a collision check like we did with the enemies, but this not the case. The enemies will keep moving some distance after they first hit the base, unlike the bullets, which are destroyed on contact. This continued contact would mean that the collision check is activated continuously, quickly going through all base costumes.
Instead of a collision check, we will use the broadcast method to make sure each hit is only counted once. In a later project, we will do more with broadcasts and explain how they work. The following are the steps to do it:
- Start a new script on the base with a when I receive … block.
- Create a new message and name it
reached base. - Attach a next costume block to step to the next costume when the message is received.
- Add an if … then ... block to check whether the base has reached its last costume.
- Grab a = operator and the costume# variable for the base.
- Put them together and write
20in the open slot. - Inside the if statement, place a stop <all> block to terminate all scripts, effectively ending the game.
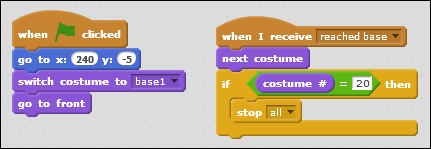
- We still have to put the base in the right position. So start a new script with a when <green flag> clicked block.
- Add a go to x: … y: … block.
- Fill in the numbers to place the base at the right end of the road. I used the values
240and-5for the x and y coordinates respectively. But your coordinates might be a bit different. - Use the Switch costume to <base1> block to make sure the game starts with the first (full health) image showing.
- Then add a go to front block to make sure the base is the topmost sprite. This way, enemies will disappear underneath the base making it look like they are entering. Have a look at the scripts for the base sprite shown as follows:
Almost done, but there is one more thing to do. The base is waiting for the message "reached base", but no one is sending it. Let's fix that by following the steps given:
- Click on the red enemy to see its script.
- At the end of the clone movement, after the last glide block, add broadcast <reached base>. Now the base will receive this message when an enemy has finished its move.
- Do the same for the blue and yellow enemies.