
We will start by adding a racetrack to the Stage backdrops. This way, we have some guidelines for the rest of our program. We know how the road is shaped and where the curves, corners, and walls are.
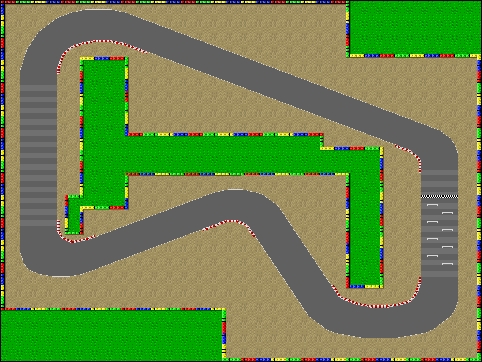
For the background, we will use an original Mario Kart map. You can find game images such as these all over the Internet. What's important to remember here is that the image you choose should fit your game screen. In this case, the game screen is 480 pixels wide and 360 pixels high, so a background image should be at least that size.
Another thing to note is that although these images may be freely available, it doesn't mean that they are completely free. The original artists put time and effort in creating them. Also the game studio and/or producer (Nintendo, in this case) invested money to promote and sell their game.
We will get a good-looking race map and place it as a background image in the Stage sprite:
- Find a Mario Kart map online or use the image file that comes with this project. Download the image to your computer if you're looking for an image on your own.
- Start a new Scratch project and remove the cat sprite.
- Click on the folder icon underneath the Stage thumbnail. This will open the file browser of your computer.
- Navigate to the folder where you saved your map image.
- Click on the image and select Open. This image will now be loaded as a backdrop.
The image will be shown in the Backdrops editor in its actual size or as big as possible if it's bigger than the stage area.
Your image might have different proportions than the stage area. In this case, you'll have to resize the image to fit the entire screen. To do this, follow these steps:
- Click on the Select tool, then on the image. You'll see the scaling widgets show up around the edges of the image.
- Pull the scaling widgets to fit the image to the screen. Take note that this will stretch the image, somewhat changing the shape of the track. But this shouldn't be too much of a problem.
- Perhaps you also need to clean the image, removing any unwanted details, such as coins and question blocks. You can do this in the Scratch editor, but this is where an external image editor might also be useful.
When we're done editing the image, we'll have a racetrack which fills the entire stage. The track contains a well-defined road, some sandy areas around it, and some colorful borders and grass that a kart won't be able to cross. These different elements will become important later in the project. That's why we're taking note of them.