The Game Manager sprite is the brain of the game. It manages game logic including scoring, level completion, winning, and losing.
When the user clicks on the green flag, Game Manager displays the start page with instructions and a start button. The game starts when the start button is clicked. After the game starts, Game Manager processes the broadcast messages sent from other sprites and decides on the following aspects:
- The time to move up a level
- When the game is won
- When the game is over
At the beginning of each new level, Game Manager engages the user as well as the other sprites in the game. To users, it displays the level-up screen that scrolls up, giving the users time to wiggle their fingers before the next game. To the other sprites, it notifies that this level is over and the sprites then wrap up the current level and prepare for the next one.
Instead of creating the Game Manager scripts from scratch, we will use the complete Game Manager sprite from the starter project and add two new levels to it.
Game Manager is the most complex sprite in this game. The Space Age message flow diagram below shows that Game Manager is at the center of the happenings. It determines and announces each stage of the game play: start, level-up, and termination. Moreover, Game Manager scripts also enables existing levels to be configured and new levels to be added.
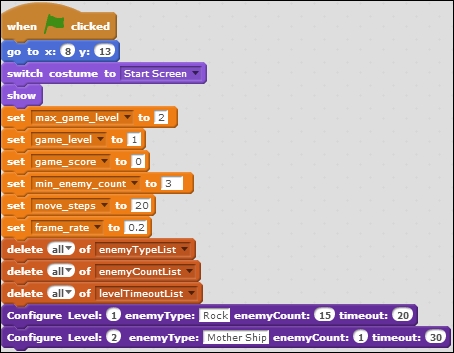
At system start (when <green flag> clicked), Game Manager displays the game rule to the user and prompts the user to play. It also initializes global variables and game levels. This initialization script is included in the starter project so that one can test the other sprites. Let's take a look at its when <green flag> clicked script:
- Display the start page by adding go to x: () y: () with the values
8and13, then switch costume to <Start Screen>, and show. - There are two game levels that we will add next. The first one is set <max_game_level> to () with the value
2. - We start with Level One by using set <game_level> to () with the value
1. - Reset the game score using set <game_score> to () with the value
0. - Now add set <min_enemy_count> to () with the value
3. If the enemy count goes below <min_enemy_count>, the player moves up a level. - Add set <move_steps> to () with the value
20. Add set <frame_rate> to () with the value0.2. - Let's move on to level configuration. First, clear all the entries from the level lists. Add delete <all> of <enemyTypeList>, delete <all> of <enemyCountList>, and delete <all> of <levelTimeoutList>.
- Use the Configure Level () block to configure each level.
- For Level One, use Configure Level: 1 enemyType: <Rock> enemyCount: () timeout: () with the values
15and20. The enemy type must be exactly the same as the enemy sprite name. Make sure that there is no extra space. - For Level One, use Configure Level: 2 enemyType: <Mother Ship> enemyCount: () timeout: () with the values
1and30.
The finished script looks like the following screenshot:
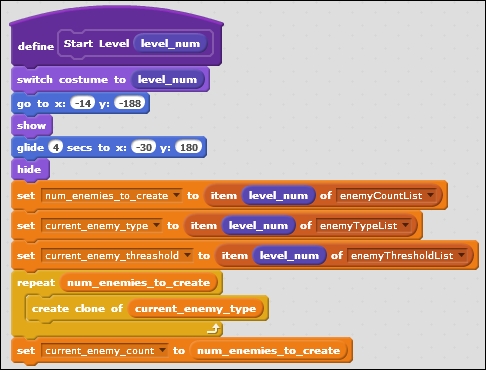
Game Manager also has a custom block to start a new level. It's called Start Level <level_num>. It's already included in the starter project so that one can test the other sprites. We do not need to make a change to the Game Manager scripts yet; let's take a look inside the Start Level () block:
- Add switch costume to <level_num>, which is the level banner.
- Create the scrolling effect using go to x: () y: () with the values
-14and-188, then show and glide 4 secs to x: () y () with values-30and180for x and y respectively. Then add hide. - Now, add set <current_enemy_type> to item <level_num> of <enemyTypeList>.
- Then, add set <current_enemies_to_create> to item <level_num> of <enemyCountList>.
- Next, add set <current_enemy_threshold> to item <level_num> of <enemyThresholdList>.
- Then come the repeat <current_enemies_to_create> and create clone of <current_enemy_type> blocks.
- Add set <current_enemy_count> to <num_enemies_to_create>.
- Lastly, add the broadcast <timer_start> block.
The finished script looks like the following screenshot:
To determine when to move the level up, an intuitive and simple way is to track how many enemies are left. If all the enemies have been shot down, then the level should go up, right? The answer is yes and no. Yes, if the game has very few enemy clones or if you do not use cloning at all. However, for a game such as Space Age, which uses many broadcast messages and clones, tracking the number of surviving enemies is not reliable. You can observe this for yourself by going to the Data tab and checking the current_enemy_count checkbox. Then, you can observe that the current enemy count does not always go down each time you shoot down an enemy, especially when the enemy clones are close to each other and you fire ammo rapidly.
To help with this problem, Game Manager uses current_enemy_threshold. If current_enemy_count becomes lower than current_enemy_threshold for that level, the game advances to another level.
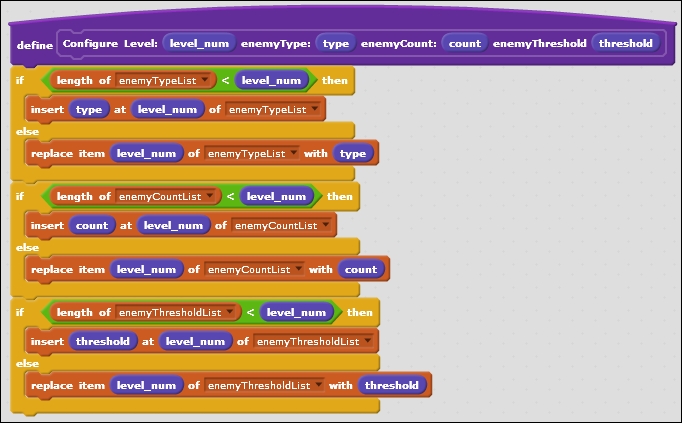
Game Manager has a Configure Level () block that allows the user to configure existing levels or add new levels. Game Manager stores the configuration of each level in three lists: enemyTypeList, enemyCountList, and enemyThresholdList. The enemyTypeList stores the enemy sprite types for all the levels; the enemyCountList stores the enemy counts (how many enemy clones to create); the levelTimeoutList stores the level timeout.
The Configure Level () block is already included in the starter project so that one can test the other sprites. Let's take a look inside the Configure Level () block:
- This block is called Configure Level: <level_num> enemyType: <type> enemyCount: <count> enemyThreshold: <threshold >. The <level_num> input variable is the next level number; the <count> variable shows how many enemy clones are to be created for the next level, and <type> shows the type of enemy sprite to be created; the <threshold> variable shows how low the enemy count has to go before moving up a level.
- Next, add <type> to <enemyTypeList>. If the entry is already there, use update instead of insert. Check condition if (length of enemyTypeList) is smaller than <level_num>. If yes, add insert <type> at <level_num> of enemyTypeList. Else, add replace item <level_num> of enemyTypeList with <type>.
- Next, add <count> to <enemyCountList>. If the entry is already there, use update instead of insert. Check condition if (length of enemyCountList) is smaller than <level_num>. If yes, add insert <count> at <level_num> of enemyCountList. Else, add replace item <level_num> of enemyCountList with <count>.
- Finally, add <threshold> to <enemyThresholdList>. If the entry is already there, use update instead of insert. Check condition if (length of enemyThresholdList) is smaller than <level_num>. If yes, add insert <threshold> at <level_num> of enemyThresholdList. Else, add replace item <level_num> of enemyThresholdList with <threshold>.
The following screenshot shows the final script: