
Now that we know the structure of our tiles, we can work on the specific designs. We will create a series of tiles with different pathway designs to use as building blocks for the level generator.
This step can be done with an external image editor, such as GIMP or Photoshop. The step-by-step explanation assumes you have such a tool available. GIMP is available for free.
If you don't want to bother with other tools besides Scratch, the Classified intel section of this task will explain how you could go about drawing the tiles in the Scratch image editor.
To start drawing the tiles, we first open the image editor of our choice. We will draw twelve different sprites to create a complete set of interesting tile options. Please create the images in the following order, because this will be important later on when we create the script for the tile generator:
- Create a new canvas 60 pixels wide and 60 pixels high.
- Then, make the grid visible and if necessary, set its spacing to 20 pixels. That easily divides our canvas into 20 x 20 pixels segments.
- We can first fill the entire canvas with a white background to create an open space. Since the Scratch stage is white too, this step is optional. A transparent space works just as well.
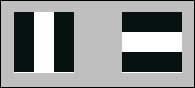
- Our first tile will be a straight vertical corridor.
- Use the box select tool to draw a selection rectangle around the left column.
- Then, we can click on the fill option to fill the selection with black.
- Repeat these steps for the right column and our first tile is done.
- Save the image with the name
tile1in an easy-to-find location. We will later import it into Scratch.
Our first image will look like the following screenshot:

We go on to creating the second tile. This will be a horizontal corridor. To create the tile, we perform the following steps:
- Erase the black fills we drew earlier.
- Then, select the top row and fill it with black color.
- Do the same for the bottom row.
- That's one more tile done. Save this image as
tile2.
Our horizontal and vertical corridors should look like the following screenshot:
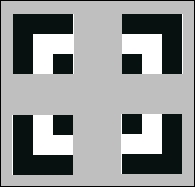
The third tile will be a corner and we create by performing the following steps:
- First click on the erase option to erase the image again.
- Then reselect the bottom row and click on the fill option to fill it with black color.
- Also, select the left column and and click on the fill option to fill that too.
- As a final step, select the upper-right segment and make that black too.
- This creates a corridor running from top to right (or vice versa).
- Save this image as
tile3.
To speed up the process, let's not redraw the entire image. As you might expect, there are three more corner tiles we can draw; but instead of drawing, we can just rotate the image as follows:
- Select the entire canvas and click on the rotate option to rotate it by 90 degrees.
- This will create a corner from right to bottom. Save this as
tile4. - Repeat the rotation for the next two tiles.
The following screenshot shows all four corner tiles:
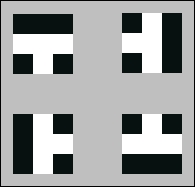
Now we have to think of another kind of corridor. How about a T-section? For this, perform the following steps:
- First click on the erase option to erase the image to have a blank canvas again.
- Select and click on fill to fill the left column with black color.
- Also, fill the upper-right segment and the lower-right segment. This creates our first T-section.
- Save this image. This would be named as
tile7. - This tile can also be rotated three more times as follows; so rotate the tile and save each image:
The last two images are unique. Perform the following steps:
- The eleventh image will be a regular crossroad.
- Start again with a blank canvas.
- Select and color each of the corner segments.
- Then, save the image.
- The last image will be an open square.
- Save the last image with the name
tile12.
The following screenshot shows the crossroads and the open square tiles:

The open square tile is the only image where we have to fill the tile with a white background. The reason for this is that if we leave the image blank, Scratch would treat it as a 0 x 0 size image. That would cause problems for the script we will create later.
That concludes our set of images. We drew twelve variant images that can fit seamlessly together when placed side by side. The images are simple yet effective for your game. There can be no mistake about which spaces are clear and which block movement.
If you want to create the tiles with the Scratch editor, this is how you could proceed. Please keep in mind that this approach will be less accurate and can leave gaps and overlaps between tiles. Perform the following steps to create the tiles:
- Click on the Paint new sprite icon to create an empty sprite.
- Look at the image editor and notice the checkered grid in the background. Each square is 4 x 4 pixels in size. This at least gives you a guide to work with for the size of your tile segments.
- Increase the magnification to 800% to get a better view and draw with more precision:

Note the cross hair at the center in the following screenshot. This should remain the center point for the tile, so always calculate distances from there outward:
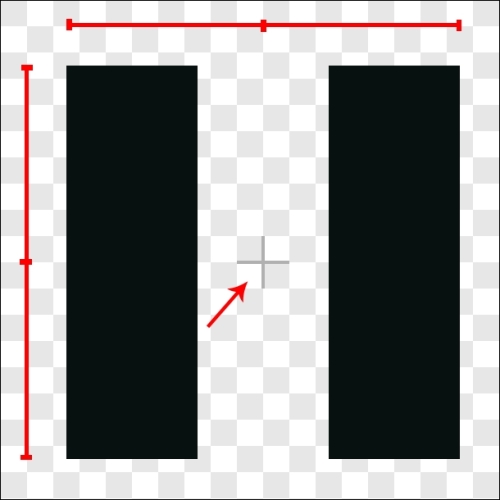
It's easiest to first create a bounding square centered on the cross hair by performing the following steps:
- Select the Rectangle draw tool.
- Select bright red for color.
- Make sure to have the border draw option selected.
- Then, count an eight-square distance diagonally from the cross hair to figure out where to start drawing.
- Drag a rectangle while holding the left mouse button and the Shift key to draw a square. Make sure to end the draw operation on the eighth square diagonally in the opposite direction.
- This bright red border will define the space to draw in.
- Click on Duplicate to duplicate the costume eleven times to have a basic setup to work with.
- Then, draw black-filled rectangles in each costume to define the walls.
- Here also, the last tile should be completely filled with white.
- To remove the red borders, select the transparent fill color. Then, use the Fill tool and click on the red borders. This will effectively remove the borders.