
17. Backing Up Your Work
If there is one rule of writing, it’s that as soon as you get lax about making backups, that’s when your computer dies, your file gets corrupted, or you accidentally overwrite 20 pages of the best prose you’ve ever written with 2 pages you intended to delete. If any or all of these sound like something that has or could happen to you, then you probably don’t need me to remind you to always make a backup!
In a perfect world, you make multiple backups, locally and offsite, to protect against the three major threats to your work:
• Project corruption: Back up frequently and automatically to a folder on your computer. Ideally, this folder automatically synchronizes with an Internet file storage service, such as Dropbox, which ensures you also have a copy offsite.
• Computer failure: Include your Scrivener project as part of your routine system backup to an external storage device using Time Machine or another backup utility.
• Theft or catastrophic event: Manually save a copy of your project onto a CD, DVD, or USB flash drive that you keep offsite in your car, home (if you work at an office), or office (vice versa), or with a trusted friend.
This chapter explores all of your backup options.
Setting Backup Preferences
Scrivener understands the importance of backups. Whenever you close your project, Scrivener automatically makes a backup to your hard drive. It compresses (into a Zip file) and stores the last five backups in your user folder.
This automatic, default backup is useful, but if your hard drive crashes or your computer gets lost or stolen, you’ve then lost both your saved project and all of the backups along with it. Fortunately, you can change the default to save to a folder that is automatically synchronized to a service on the Internet, such as Dropbox. Also, whereas Scrivener backs up when you close your project, you may want to create backups at other times, as well.
To customize the backup preferences, open the Preferences/Options window and select the Backup tab. In the Backup preferences, as shown in Figure 17.1, choose from the following options:

Figure 17.1 The Backup preferences/options configure Scrivener to automatically back up your projects to a local folder or external storage device.
• Turn on Automatic Backups: This option is selected by default. Automatic backups ensure that Scrivener is looking out for you even when you neglect to perform manual backups.
• Back Up on Project Open: This option saves a backup whenever you open the project. On the positive side, this ensures you start each session knowing you have a current backup before you modify the project. On the negative side, however, it takes longer to open your project as it performs the backup. This may take even longer if Scrivener is set to automatically open projects as all the projects are backed up. Also, unless you save a backup upon closing Scrivener, you risk losing any of the changes you made during a session if something happens to your computer between sessions.
• Back Up on Project Close: This default setting saves a backup whenever you close a project or when you quit Scrivener. The positive side is that you can walk away from a writing session secure in the knowledge that your new material is backed up. To ensure that this happens, however, you must be certain to close the project or quit Scrivener entirely at the end of each session. If you leave Scrivener running with your project open, it does not get backed up.
• Back Up with Each Manual Save: If you manually save (File, Save or Cmd-S on the Mac and Ctrl+S in Windows) your project at regular intervals, this option automatically creates a backup version at the same time. The best aspect of this option is that you can keep your project open over long periods of time without sacrificing the ability to automatically back up. On the other hand, it takes time to perform a backup, so this can slow you down as you work. This option also relies upon you to manually save your project on a regular basis. If you neglect to do so, your work may be at risk.
 Caution
When you first transition from a word processor to Scrivener, you may be in the habit of saving your project compulsively. I used to save after every paragraph when I worked in Word. While this is a great practice in a word processor, you may undermine your manual backup solution if you retain this habit in Scrivener. If you only keep the five most recent backups, all of those backups may only be a few minutes apart, which means that changes you made the day before or even earlier the same day can be lost forever. If you want to use manual backups, you may want to save an unlimited number of backups and manually cull through them on a regular basis.
• Compress Automatic Backups as Zip Files: Selected by default, this option compresses backups into .zip files. Zip files take up less hard disk space and are also less likely to become corrupted, particularly when transferring Scrivener projects over the Internet. It takes more time to save a backup, however, because Scrivener needs to back up the project and create the Zip file.
• Use Date in Backup File Names: This option adds a date and time stamp to the filename of the backup, making it easier to determine exactly when the backup file was created. This is helpful if you want to restore a backup from a particular day or writing session.
• Only Keep [Number] Most Recent Backups: Scrivener keeps five backups by default. If you back up frequently, you might want to retain more backups so you don’t inadvertently overwrite a backup from just a couple days prior. If storage space is a concern, you might want to keep fewer backups. Use the drop-down menu to choose 3, 5, 10, or 25 backups.
![]() Tip
Tip
To keep all backup files on the Mac, deselect the check box to the left of the Only Keep [Number] Most Recent Backups option. In Windows, you also have the option to Keep All Backup Files in the drop-down menu. If you choose this option, be sure to manually cull through the backup herd on a regular basis so you are not overrun with files. To do this, use Windows Explorer to navigate to your backup folder and delete backups you no longer need to preserve. You can also move them to a CD or DVD if you want them off your hard drive without losing access to them permanently.
• Backup Location: By default, Scrivener saves backups to ~/Library/Application Support/Scrivener/Backups on the Mac and C:UsersYourUsernameAppDataLocalScrivenerScrivenerBackups in Windows. If you’re using Windows XP, the path is C:Documents and SettingsYourUsernameLocal SettingsApplication DataScrivenerScrivenerBackups.
To change this location, click the Choose button and select a new folder. If you have an external hard drive or USB flash drive connected to your computer, you can select a location on that drive to store your backups. You can also change the backup location to your Dropbox folder to store backups if you use that service, as explained in the next section. You can only choose one location for automatic backups, so consider how each option fits into your overall system backup plan.
Caution
Scrivener displays a warning if it tries to back up to a location that becomes invalid, such as if you disconnect an external drive or if your online storage site becomes unavailable.
![]() Note
Note
If you downloaded Scrivener 2.4 or lower from the Mac App Store, backups are stored in ~/Library/Containers/com.literatureandlatte.Scrivener/Data/Library/Application Support/Scrivener/Backups, by default. If you downloaded Scrivener 2.4.1 or higher from the Mac App Store, you are prompted to choose a backup location the first time you launch Scrivener.
• Open Backup Folder: Click this button to open the backup folder in Finder or Windows Explorer.
![]() Tip
Tip
Although I provided the paths to the hidden directories for the default backup folders, the Open Backup Folder button is the easiest way to access this folder.
Caution
Scrivener tracks automatic backups by filename. If you have two projects with the same filename in two different locations, they are still saved to the same backup folder, where those filenames will become confused. Scrivener will only keep the specified number of backups of the two projects combined, and you will not be able to tell which backup pertains to which project without opening it. For this reason, it is always best to give each project a unique name, even if you save your projects in different folders.
Backing Up to Dropbox
Dropbox is a free service that syncs a folder and any subfolders from your hard drive with storage in the cloud. If you set your Dropbox folder as your backup location, you get the benefit of saving a backup on your computer in the local Dropbox folder and having an automatic copy on an external server.
![]() Note
Note
Go to www.dropbox.com for more information about this service. Dropbox offers a limited amount of storage for free, with options for increasing the limit by referring other customers or paying a monthly fee.
![]() Tip
Tip
These same steps apply to backing up to similar services, such as SkyDrive and Google Drive. If your cloud service does not require syncing only a specific folder, you can create a dedicated folder for Scrivener backups and then set it to sync via your cloud service.
To back up to your Dropbox folder:
1. Use the instructions on the Dropbox site to install Dropbox on your computer.
2. In Finder or Windows Explorer, create a new folder in your Dropbox folder for Scrivener Backups.
3. Choose Scrivener, Preferences (or Tools, Options in Windows) to open the Preferences/Options window.
4. Click the Backup tab.
5. In the Backup Location field, click the Choose button and navigate to the folder you created in your Dropbox folder.
![]() Tip
Tip
Also be sure to select the Compress Automatic Backups as Zip Files option to provide extra protection for the many files that comprise your project.
6. Click Open.
![]() Tip
Tip
You can also use Dropbox to store the project itself. For details on how to do that—and warnings on how to avoid corrupting your projects in the process—see Chapter 18, “Taking Scrivener Out and About.” If you plan to use Dropbox to store your active project, I suggest keeping your backups elsewhere, such as a different cloud service or on an external drive. If Dropbox is down or your account becomes compromised, you don’t want both the active project and all of its backups to be stored in one place.
Excluding a Project from Automatic Backups
If you have an exceptionally large project, the time it takes to automatically back up may exceed your patience. If you disable automatic backups, all your projects are affected, leaving even your smaller works at risk, so you need a different solution. You may also want to back up a particular project to a different location for security purposes. If you have created a dummy project for the purpose of designing a new project template, you might not want to back up the project at all.
For these or other reasons, you can exclude individual projects from the automatic backup settings. Take the following steps to do this:
1. Open the project you want to exclude.
2. Choose File, Back Up, Exclude from Automatic Backups from the menu. A check mark is added to the left of the menu item to indicate that it has been selected.
3. Repeat steps 1 and 2 for any other projects that you want to exclude.
Remember, if you are not automatically backing up a project, it remains at risk unless you perform a manual backup. If you change your mind, return to the File, Back Up, Exclude from Automatic Backups command to deselect it.
Performing Manual Backups
If you have excluded a project from automatic backups, you need to perform manual backups on a regular basis. If you want to save the backup to the same folder as the automatic backups for other projects, choose File, Back Up, Back Up Now from the menu.
To back up to a different folder or to a CD, DVD, or USB flash drive:
1. Open the project in Scrivener.
2. Choose File, Back Up, Back Up To from the menu.
3. In the Back Up To dialog box, shown in Figure 17.2, navigate to the location where you want to store the backup. In Windows, click the Browse button to choose a location.
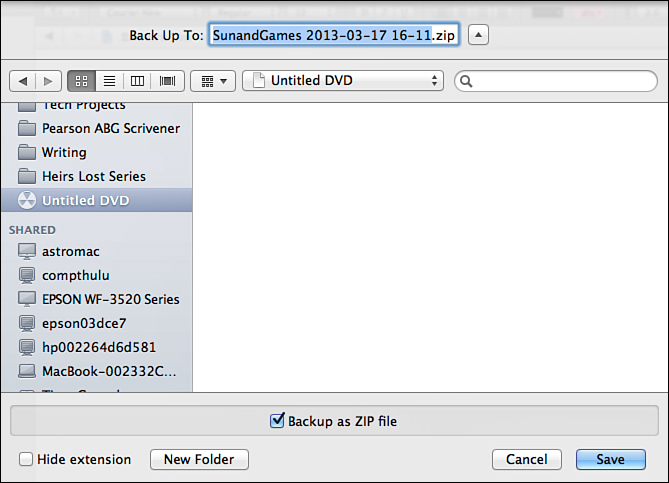
4. Scrivener provides a filename with a date and time stamp. If you want to change the filename, enter a new name.
5. Click the Backup as ZIP File option to save space and make the backup more secure.
6. Click Save on the Mac or OK in Windows.
CDs, DVDs, and even USB flash drives are becoming increasingly quaint as people rely more on streaming and cloud services to transfer files, but saving your files onto physical media still has its uses. If you do not have access to the Internet, a disk backup can be essential. Because disks and flash drives are not always connected to your computer and tend to fill up quickly, it is best to perform manual backups to this media rather than using the automatic backup settings for this purpose.
On the Mac, if you chose to save to a CD or DVD, open the disk in Finder or the desktop and choose Burn; then follow the prompts, as shown in Figure 17.3. In Windows, follow the prompts shown in Figure 17.4.
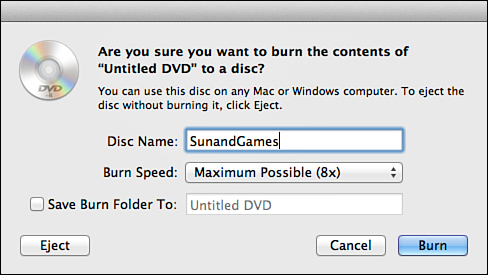
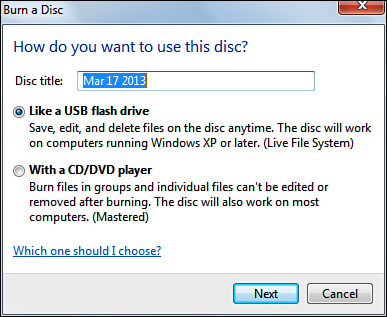
Figure 17.4 In Windows, you can choose to use your DVD as permanent storage or a more transient device.
![]() Note
Note
Even though I automatically back up to a Dropbox folder, I also perform a manual backup onto a USB flash drive at least once a week. If the Dropbox site were to go down or I had a major computer malfunction, this physical storage device provides reassurance that all is not lost.
Backing Up to Time Machine or Windows Backup
Mac OS X (Leopard and higher) provides an automatic system backup feature called Time Machine. Windows 7 includes a similar Windows Backup feature, while Windows 8 offers File History. These tools back up your entire system on a regular—often hourly—basis, including Scrivener. Be careful, however, if you need to restore a Scrivener project from a Time Machine or Windows backup. If you are working in Scrivener while the backup routine is running, it is quite possible that the copy it makes of your project is incomplete.
As an example, suppose you are working on your project at 3:00 when Time Machine runs its backup routine. You continue writing for another 45 minutes and then go to bed. If your computer crashes while you’re asleep and you need to restore from Time Machine, it only has the 3:00 files on it, so everything you added after that time is lost.
You can mitigate the potential damage by using a couple of techniques. First, you can manually run Time Machine or Windows Backup, so you might want to get into the habit of doing this when you are finished writing for the day, after you close Scrivener. In addition, Time Machine and Windows Backup are local backup systems, so if your equipment is stolen or damaged, the thief or catastrophe will likely take your external backup drive, as well. Therefore, a second technique is to always utilize another backup system for your Scrivener projects, as well, even if you use Time Machine or Windows Backup.
Restoring from a Backup
If the worst happens and you need to restore a project from a Scrivener-created backup, follow these steps:
1. In Scrivener, open the Preferences/Options dialog box and click on the Backup tab.
2. Click the Open Backup Folder button.
![]() Note
Note
If you had to reinstall Scrivener from scratch and the backup location is no longer set to your old folder, open Finder or Windows Explorer to navigate to your backup folder.
3. Locate the backup file you want to restore and copy it to another location. If the file is zipped, double-click to unzip the file. In Windows, right-click and select Extract All.