
16. Searching Your Project
Scrivener projects are like Chia pets. You start with a very nondescript foundation, plant the seeds of an idea, and they take off growing until they bear little resemblance to the original. Once your project has started sprouting with documents, research, template sheets, keywords and other meta-data, comments, annotations, and footnotes—along with its sheer number of words—it can be a challenge to find a single item within the whole.
Fortunately, Scrivener provides tools to search your project for every possible aspect of your content and its meta-data. There are four types of searches in Scrivener:
• Project Search: This search is used for finding items in the Binder that match the criteria you specify. Results are listed in a Search Results pane in the left sidebar.
• Document Search: This feature searches a selected document or Scrivenings. Scrivener steps through each of the results one at a time, in the same manner as a word processor.
• Format Search: This option searches for specific formatting or text that serves a particular function in a project, such as underlined or highlighted text, annotations, or links. Scrivener steps through the results one at a time within each item of the project.
• Synopsis Search (Mac Only): This feature opens the Synopsis Finder to examine synopses that match your search criteria.
Scrivener also allows you to create collections, groups of files that you manually group together or that are gathered as the result of a project search. This can save you considerable time if you tend to repeat the same searches over and over again.
If you need to find a needle in the haystack that is your project, this chapter explains how to do it.
Conducting Project Searches
The fastest and most direct way to search is with the Search tool on the Scrivener toolbar, shown in Figure 16.1. To use the Search tool:
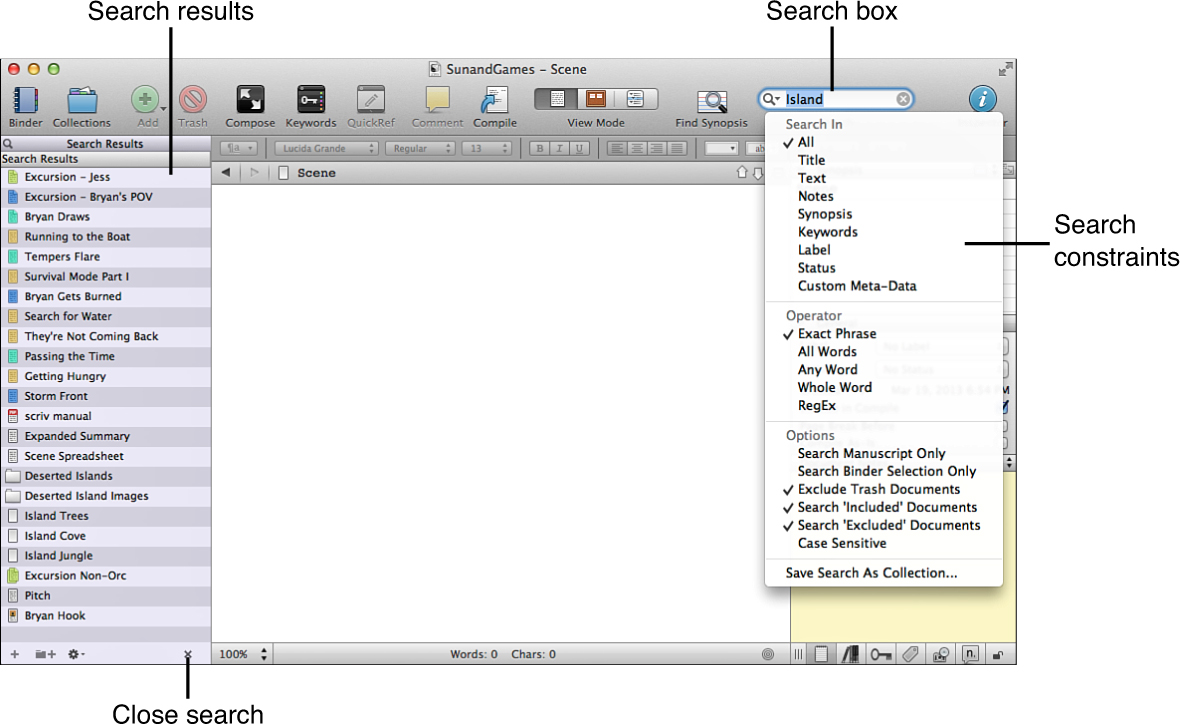
Figure 16.1 A project search lists all of the items that meet your search terms in the Search Results pane, subject to any constraints you put on the search.
1. Click inside the Search box in the toolbar. You can also press Control-Option-F on the Mac or Ctrl+G, Ctrl+S in Windows.
2. Type your search criteria.
3. Click the magnifying glass in the Search box to open the Project Search menu and select constraints for the search, if you want.
Scrivener begins listing items in the Search Results pane as you type your search criteria. To view an item in the Editor, select it in the Search Results pane. If the search criteria appear in the content of the document, every instance of the term or phrase is highlighted in the document. If the search criteria are found in the meta-data, of course you will not see any highlighted text in the document itself. To exit the Search Results pane and return to the Binder, click the Close (X) button at the bottom of the pane.
Narrowing Project Search Results by Element
Scrivener searches your entire project, including the Trash folder, to find an exact match for the word or phrase you enter. Scrivener searches meta-data as well as the content of your documents. If you have a large project, you may wind up with a considerable list of Search Results.
The magnifying glass in the Search box opens a drop-down menu of project search constraints, allowing you to hone in on exactly the type of result you seek. This menu is divided into three sections: Search In, Operator, and Options.
The Search In constraints limit the search to particular project elements, such as text, keywords, title, or other meta-data. In Windows, you can only use one Search In constraint at a time. On the Mac, select an option from the menu and then open the menu again and Option-click another option if you want to search within multiple project elements.
For example, if you want to find all the items using the Island keyword you created in the Project Keywords panel, type Island in the Search box and select Keywords from the Search In section of the Project Search menu. You can search by the following elements:
• All: Searches for all instances of the search term in every type of project element, including both document text and meta-data.
• Title: Searches for matches only within the titles of project items.
• Text: Searches only within the document text of each item.
• Notes: Searches the Document Notes throughout your project.
• Synopsis: Searches the synopsis of each document.
• Keywords: Searches for keywords assigned to each item.
• Label: Searches the Label field of each item. If you have renamed the Label field, this menu option reflects the current field name.
• Status: Searches the Status field. As with the Label option, the menu reflects the current field name for this option.
• Custom Meta-Data (Mac Only): Searches any custom meta-data fields for your search term.
![]() Tip
Tip
You can also search by keyword from the Project Keywords panel, as explained in Chapter 12, “Putting Keywords and Meta-Data to Work.”
Limiting Project Searches with Operators
The operators on the Project Search menu determine how Scrivener parses your search terms. The operators are as follows:
• Exact Phrase: When you enter multiple words as the search criteria, such as missing part, Scrivener searches for an exact match of that phrase, in the same word order and without any extra words or characters between words. If a document contains the words missing participle, it also appears in the search results because the word missing is just before the beginning of the word participle.
• All Words: Scrivener searches for documents that contain all the words in the search criteria. Unlike the Exact Phrase operator, however, the words can appear anywhere in the document, either together or apart. If the document only contains one of the words, however, it is excluded from the search results. Thus, if you search on missing part, documents with phrases such as missing an essential part or missing the party are included in the search results, but a document containing just missing is not included.
• Any Word: Scrivener searches for documents that contain any of the words in the search criteria. If you search on missing part, documents containing the words missing or part are included in the search results. Documents containing words such as party and particle are also included.
• Whole Word: This option is intended for single word searches when you want the exact word, not any other words of which that combination of letters may be a part. In Windows, this option is similar to an Any Word search, but only provides search results if the entire word matches rather than a part of a word.
• RegEx (Mac Only): This option allows you to enter Regular Expressions to narrow search results. Regular Expressions use a combination of special characters added to control the search criteria.
Narrowing Search Options
The Options portion of the Search menu provides additional means to narrow your search results. You rarely need to search your Trash, for example, so select Exclude Trash Documents to exclude the contents of the Trash folder from the search results. You can select multiple options, from among the following:
• Search Draft Only: Limits the search to the Draft folder. If you have renamed your Draft folder, this option is labeled with the name of the folder.
• Search Binder Selection Only (Mac Only): Limits the search to items you select in the Binder prior to performing the search.
• Exclude Trash Documents (Mac Only): Excludes the Trash folder from the search results.
• Search ‘Included’ Documents: Limits the search to items with the Include in Compile option selected in the Inspector.
• Search ‘Excluded’ Documents: Limits the search to only those items that are not included in the Compile settings.
• Case Sensitive: Limits the search to results that match the case setting of the search criteria. For example, Part is different than part.
The last option on the menu is Save Search as Collection (Save Search in Windows). Use this option to save your search options and criteria to reuse them. The search results become a new collection, as you discover later in this chapter.
Using Project Replace
Now that you’ve found all the items matching your search criteria, what do you do with them? The Search Results pane serves as a subgroup of the Binder, and can be helpful when you want to examine items with similar elements. You can select and edit items just as you would from the Binder. The Search Results pane is not, however, the best way to make global changes to your project. For that, you need to use Project Replace.
For example, if you decide your protagonist should own a bar named Styx rather than a coffee shop named Last Drop, if he swaggers instead of strides, if his name needs a sudden overhaul, it is faster to make these changes universally in your project than to manually wade through each reference. To do this:
![]() Tip
Tip
Although you can use Project Replace without first running a Project Search, you may want to use these tools together. Scanning through your Search Results following a Project Search with similar settings allows you to ascertain if you need to modify your search before you run Project Replace to make any changes, particularly because you cannot undo changes made with Project Replace. If you are a Mac user, you can also select documents from the Search Results pane and limit the Project Replace scope to only affect selected documents.
1. Choose Edit, Find, Project Replace from the menu.
2. In the Project Replace dialog box, shown in Figure 16.2, enter the word or phrase you want to replace in the Replace field.
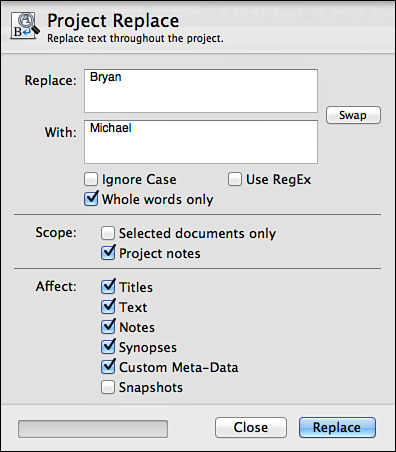
3. Enter the new word or phrase in the With field.
4. Limit the replacement operation with the following options:
• Ignore Case: When this option is selected, the name Pat is the same as the word pat.
• Whole Words Only: When this option is selected, the name Pat is different from Patrick.
• RegEx (Mac Only): When selected, this option allows you to add Regular Expressions to the Replace field.
5. Select the Scope options to further limit the replacement:
• Selected Documents Only (Mac Only): Only replaces the word or phrase if it appears in documents preselected in the Binder, Outliner, Corkboard, Search Results, or a collection
• Project Notes: If selected, replaces the search term in the Project Notes
6. Select from the Affect options to constrain the replacement to particular elements of a document.
![]() Note
Note
Project Replace cannot replace label and status values or keywords. To modify those elements, see Chapter 12.
7. Click Replace. The progress bar at the bottom of the dialog box on the Mac counts the number of changed documents.
8. Click Close to close the dialog box.
![]() Note
Note
In Scrivener for Windows, the Scope and Affect options are combined. You cannot limit the replacement to only selected documents. Windows also does not offer the ability to limit the scope of the replacement to Snapshots.
 Caution
You may want to create a backup before performing this operation because you cannot undo changes made with Project Replace. If you want to perform the replace in reverse, however, reopen the Project Replace dialog box and click the Swap button.
Using Document Find and Replace
Project Search and Project Replace are intended for large-scale interaction with your project. But what if your needs are more refined and require more oversight before making broad changes? Document Find and Replace work on a much more narrow scale, a single document or Scrivenings session within the Editor.
Performing a Document Find
Document Find and Document Replace are similar to the search tools found in a word processor. Instead of compiling a list of search results, these tools progress through your selected documents from result to result, allowing you to act on each one individually. To perform a Document Search:
1. Select the document or documents upon which you want to search.
2. Choose View, Scrivenings if you selected multiple documents and are not already in that view in the Editor.
3. If you want to search only a portion of a document or Scrivenings, select the text.
4. Choose Edit, Find, Find from the menu or press Cmd-F (Ctrl+F in Windows).
5. In the Find dialog box, shown in Figure 16.3, enter your search term(s) in the Find field.
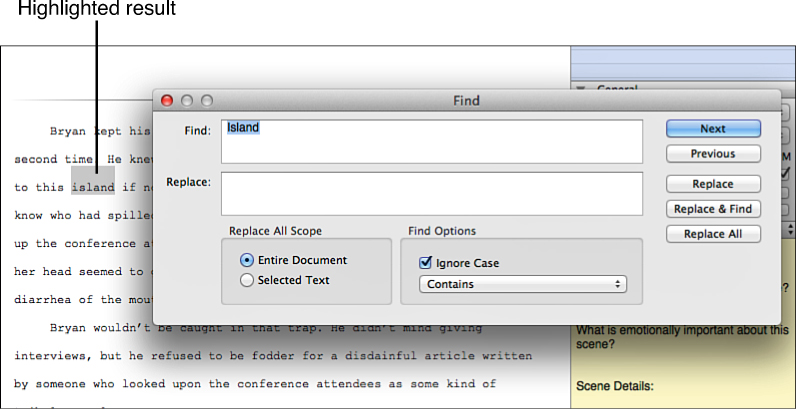
6. In the Find Options, deselect the Ignore Case check box if your search is case sensitive.
7. Click the drop-down menu below the Ignore Case option to choose from the following options:
• Contains: Finds any text containing the search term.
• Starts With: Finds text that starts with the search term. If you search for Pat, it highlights those letters in the words Pat, Patrick, and Patrice, for example.
• Whole Word: Highlights only words that completely match the search term. If you search for Pat, it only highlights Pat, not Patrick or Patrice.
• Ends With: Finds text that ends with the search term. If you search for pat, it highlights those letters in the word spat.
• Regular Expression (Mac Only): Allows you to use Regular Expression characters in the Find field.
8. Click Next. Scrivener begins to search the document(s) in the Editor and highlights the first match, as shown above in Figure 16.3.
9. Click Next to move to the next match. On the Mac, you can also press Return to close the Find dialog box and move to the next match. In Windows, press Enter to move to the next match, but this does not close the Find dialog box.
If you close the Find dialog box, you can continue to move from match to match through the document(s) with keyboard shortcuts. Press Cmd-G and Shift-Cmd-G to find the Next/Previous matches on the Mac or F3 and Shift+F3 in Windows.
![]() Tip
Tip
You can edit the document or Scrivenings while you search. Take advantage of this feature not only by changing the highlighted match, but also by editing content around the match. If you can’t recall the specific portion of the document you seek but know certain words appear in or around that text, search for what you know and then edit the content when you find the appropriate match.
Using Document Replace with Document Find
You can search a document or Scrivenings for a search term and replace it at the same time. Follow steps 1–7 in the “Performing a Document Find” section earlier in this chapter. Then follow these steps to add Replace criteria:
1. Enter the word or phrase you want to substitute in place of the search criteria.
2. In the Replace All Scope options, select if you want to replace the search criteria throughout the contents of the Editor or only a selection of text.
3. Click the Next button to find the first match.
4. Click one of the Replace buttons to replace the highlighted text, as follows:
• Replace: Replaces the highlighted text.
• Replace & Find: Replaces the highlighted text and finds the next match. If you want to skip a Replace but continue finding and replacing other matches, click the Next button.
• Replace All: Replaces all matches in the document, Scrivenings, or selection. If you want to use this option, skip step 3.
Using the Find Synopsis Tool (Mac Only)
If you make judicious use of synopses, you can use them as a search tool to locate key scenes or sections of your project. The Synopsis Finder, shown in Figure 16.4, allows you to search and view synopses and titles. When you find the scene you need, you can open the document itself in a QuickReference panel. To use the Find Synopsis tool:

1. Choose one of the following options to open the Synopsis Finder:
• Click the Find Synopsis icon in the toolbar.
• Choose Edit, Find, Find Synopsis from the menu.
• Press Control-Cmd-G.
2. At the top of the Synopsis Finder, enter a search term.
3. If you want to constrain your search with Regular Expressions, click the magnifying glass in the Search field and select Use Regular Expressions (RegEx) from the drop-down menu.
4. Select one of the results at the top of the Synopsis Finder to view the complete synopsis in the lower pane of the dialog box. You can also right-click on a result and choose to view either the synopsis text or image.
5. Adjust the size of the results list or synopsis by clicking the bar between the two panes.
6. Select a result and choose View, Reveal in Binder from the menu to highlight the document in the Binder.
7. Double-click on an item in the search results to open the document in a QuickReference panel.
If you find this search tool helpful, use your synopses wisely. If you are writing fiction, be sure the names of characters that appear in the scene are mentioned in the synopsis. If you are writing an academic paper, note the thesis statement or which point this section of the project supports. The more details you can briefly note in the synopsis, the more useful this tool becomes.
You can edit synopses directly within the Synopsis Finder. If you mention something in one scene that needs to appear again in a later scene, open the synopsis for the later scene in the Synopsis Finder and make a note of it. Then you can continue writing without having to navigate back to your original document.
![]() Tip
Tip
Because you can open documents from the Synopsis Finder in a QuickReference panel, it’s an ideal solution for locating a key scene or supporting topic for reference without losing your place in the current document in the Editor.
Searching by Format
Both the Project and Document Search tools focus on the text and meta-data of your document. You can also perform a Format Search to find items such as highlighted text, comments, footnotes, annotations, revision colors, links, and specific character formats. Searching by format allows you to find comments and revisions made by a co-worker or critique partner and double-check your footnotes and links before compiling an academic or nonfiction project.
![]() Note
Note
If you want to search within selected documents, open them in the Editor before proceeding.
To search by format:
1. Choose Edit, Find, Find by Formatting from the menu. You can also press Control-Option-Cmd-F on the Mac or Ctrl+F3 in Windows.
2. In the Formatting Finder, shown in Figure 16.5, click the Find drop-down menu and select a format. Each option provides additional format-specific selections in the lower portion of the dialog box. Choose from the following options:
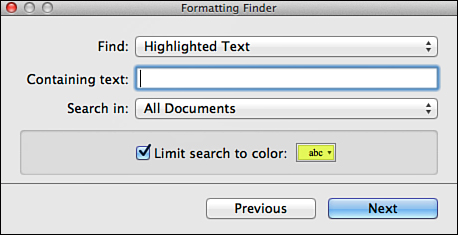
Figure 16.5 The Formatting Finder lets you search your project for formatted elements such as highlighted text.
![]() Note
Note
The Windows version lists these options in a different order, but with the exception of Revision Color and Text with Preserved Style, all options are available on both platforms. The Comments and Footnotes options are listed separately in the Find drop-down menu in Windows.
• Highlighted Text: Searches for highlighted text. If you select a specific highlight color, this option searches only for that color; otherwise, it searches for all highlighted text.
• Comments & Footnotes: When this option is selected, displays a Type drop-down menu to choose to search for All, Comments, or Footnotes.
• Inline Annotations: When this option is selected, click the drop-down menu at the bottom of the pane to select from Any Color to search for all inline annotations, Limit Search to Color to search for only annotations in a specified color, or Exclude Color from Search to search for all annotations except those in a particular color. To select a color to Limit to or Exclude, click the color swatch and choose a color from the Colors dialog box.
• Inline Footnotes: Searches for inline footnotes. There are no additional limits for this option.
• Revision Color (Mac Only): Searches for text marked as revised. You can specify a revision color from the drop-down menu.
![]() Note
Note
Learn more about annotations, comments, and revision marks in Chapter 10, “Editing Your Manuscript.” Learn about footnotes in Chapter 22, “Using Scrivener for Nonfiction Writing.”
• Colored Text: Searches for text that has been formatted with a specified color. If you deselect the Limit Search to Color option, Scrivener searches for all text that has been formatted with a color.
![]() Note
Note
There is a difference between text that has been specifically formatted with the black text color and text that does not have a color applied (even though it may appear black onscreen, depending on your preference settings).
• Links: Searches for links within the document text. You can search All, Web/File links to external sources, or Scrivener links to in-project sources.
![]() Note
Note
Links within the document text, known as Scrivener links, are not the same as reference links, which are added as meta-data. See Chapter 23, “Discovering New Uses for Scrivener,” to learn more about Scrivener links.
• Text with Preserved Style (Mac Only): Searches for text to which you have applied the Preserve Formatting command (Format, Formatting, Preserve Format). There are no additional settings for this option.
• Character Format: Searches by text format. Options include Bold, Italic, Underline, Strikethrough, and (on the Mac) Keep with Next.
3. Limit the search to specific text in the selected format by entering text in the Containing Text field. If this field is left blank, Scrivener identifies all instances of the selected formatting.
4. Click the Search In drop-down menu to choose from All Documents or Selected Documents.
5. Click Next. Scrivener highlights the first match.
6. Continue to click Next to browse through the matches. You can edit text in the Editor as you work.
Creating and Using Collections
A collection in Scrivener is a group of files that you pull together—either manually or through a project search—to view and arrange them outside the Binder hierarchy. Let’s say you have worked on scenes out of order and now want to focus on the scenes that still need content. You can collect all the items with a To Do status so they all appear in one group that can be easily updated as you pare down the list. You can also use a collection to try a different scene order without changing the Binder hierarchy.
![]() Tip
Tip
If you are using Windows, a collection is a good way to play with the order or grouping of scenes or similar items in lieu of the Freeform Corkboard, which is not available in Windows.
Collections can also be used to create a group of documents that you want to compile with different settings rather than the entire Draft folder, such as when printing the first three chapters and a synopsis for a manuscript submission. If you are a teacher or professor, you can create collections of materials you need for each day of a course.
You can also use collections to make portions of your project available through an external folder so non-Scrivener users can access and modify the documents. If you are on a Mac and also have an iPad, use collections to create a sync file to transfer items back and forth between Scrivener and the Index Card for iPad app using Dropbox as an intermediary.
There are two types of collections:
• Standard Collections: This type of collection allows you to manually add and remove items in a collection, giving you complete control over its contents. These are static collections, in that the only way to add or remove documents is for you to act to do so.
• Saved Search Collections: If you choose the Save Search as Collection option (Save Search in Windows) from the Project Search menu, your search results are saved as a dynamic collection that includes documents only as long as they continue to meet the criteria of the collection. The Search Results pane itself is a special collection, always containing the results of the most recent search.
Creating a Standard Collection
A standard collection is very flexible because you decide exactly which documents to include. To create a standard collection:
1. Open the Collections pane in the left sidebar by doing one of the following:
• Click the Collections icon in the toolbar.
• Choose View, Collections, Show Collections from the menu.
• In Windows, press Ctrl+Shift+9.
2. Choose one of the following methods for selecting files to include in the collection:
• Manually select files in the Binder.
• Run a Project Search to pare down the files, and then select the specific files you require from the Search Results.
3. Click the Add Collection (+) button in the header of the Collections pane, shown in Figure 16.6.
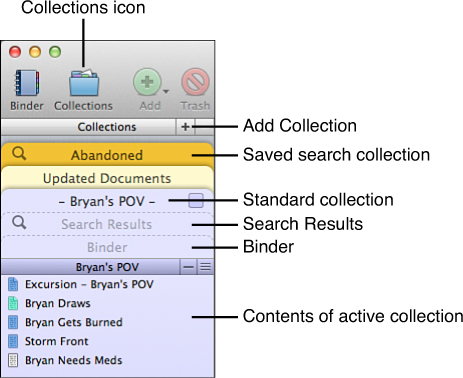
Figure 16.6 The Collections pane lists each collection along with the Search Results and Binder tabs.
4. Enter a name for the collection, then press Return (Enter).
As you can see in Figure 16.7, collections appear in the same sidebar as the Binder. If you have several collections, you may need to scroll to view them all. You can increase the number of visible tabs by clicking and dragging the Resize Collections Pane button on the Mac. In Windows, hover on the top edge of the Collections header bar to switch the cursor to a splitter that allows you to drag the pane up or down.
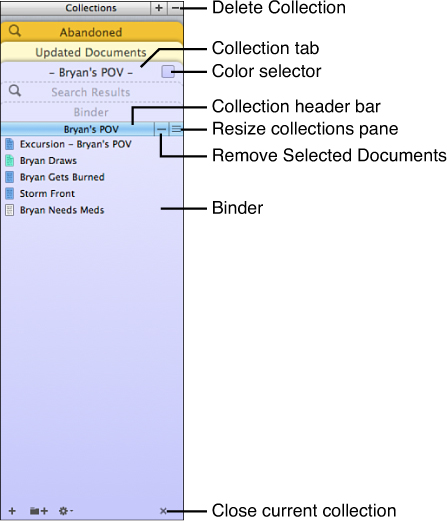
Figure 16.7 A closer look at the Collections pane shows the Color Selector and the contents of the collection.
Each collection is automatically assigned a color. If you want to change the color on a Mac, double-click on the Color Selector to the right of the collection name, and then select from the Colors dialog box. In Windows, double-click to open a list of options that include the More option, from which you can open the Select Color dialog box.
![]() Tip
Tip
When you are viewing collections, any tabs below the currently active collection appear in the same color as the active collection. Do not let that confuse you into thinking those tabs are part of the same collection. If you hover over the tabs, you see their true color and can select a different collection, the Search Results tab, or the Binder.
Once you have created a collection, it performs as a subset of the Binder. You can select documents to write or modify in the Editor or view the collection in the Corkboard or Outliner. On a Mac, to view an entire collection in the Corkboard, Outliner, or Scrivenings, click the header bar for the collection to select it, and then click one of the view buttons from the toolbar.
![]() Note
Note
The collection tab is used to select it from the collections pane and to change the collection color. The collection header bar controls the documents within the collection.
To close the collection, click the Close (X) button at the bottom of the pane. You can also simply click on another collection tab or the Binder tab.
Adding and Removing Files from Standard Collections
If you forget to include an item when creating a collection, you can add it afterward. You can also create new items directly within the collection (on a Mac) and remove items from a collection.
To add an item to a collection:
1. Select the item in the Binder.
2. Choose Documents, Add to Collection from the menu. You can also right-click the item to open the context menu and choose Add to Collection.
3. Select a collection from the submenu.
You can also drag and drop an item from the Binder tab onto a collection tab to add it to that collection. When you add a container to a collection, its subdocuments are not added unless you specifically select them. On the Mac, choose Edit, Select Subdocuments from the menu or hold the Option key while dragging a container to the collection tab to add the subdocuments of a selected container to the selection.
To remove an item from a collection, select the item within the collection and then click the Remove Item (−) button on the Mac or press Delete (in Windows, press Shift+Delete). When you remove an item from a collection, it remains in the Binder as part of the project.
If you create a new item when you are viewing a collection on a Mac, it is not associated with a particular folder in the Binder because collections stand apart from the Binder hierarchy. Thus, new documents are placed into new root folders in the Binder, with names that correspond to the collection name.
![]() Note
Note
You can move new files into the proper position when you return to the Binder or by using the Move To technique covered in the next section.
Moving Files in a Standard Collection
Changes in the order of files in the collection do not affect the Binder; thus you can rearrange the documents to play with a different order without locking it in. For example, when writing some of the chapters of this book, I wasn’t sure in which order I should present certain topics. By creating a standard collection containing all of the subheadings for a topic, I could rearrange the documents until I thought they flowed logically.
![]() Note
Note
Collections are flat lists, meaning you cannot change the hierarchy of files, only the order of them.
To rearrange files within the collection, simply drag and drop them into the desired location. You can also press Control-Cmd-arrow keys (Ctrl+arrow keys in Windows) to move documents up and down the list.
If you decide you want to retain the order of files you established in the collection, you can move items back into the Binder to preserve that order. To do this:
1. Select the files for which you want to preserve the order.
2. Choose one of the following options:
• Choose Documents, Move, To from the menu and then select a location from the submenu.
• On the Mac, drag the files to the Binder tab to open the Binder, and then drop the files into the desired folder.
• Right-click to open the context menu and then choose Move To and select a location from the submenu.
![]() Tip
Tip
This concept may seem confusing at first because of the terminology. Think of it as moving documents from wherever they originally appeared in the Binder into a new location in the Binder. The collection simply serves as the catalyst to bring the items together.
Caution
Remember that a collection is a subset of the project whole. If you move a file into a new location in the Binder based on how it flows within a collection, be sure you haven’t created a plot or content hole for yourself in another portion of the project.
Creating a Search Collection
Search collections are created by saving the results of a Project Search so you can repeat the search whenever necessary. These collections are dynamic because they automatically update the contents of the collection every time you open it. This ease of use in creating and updating a search collection comes with some compromises, however. You cannot manually adjust the items—no adding, removing, or reordering of files.
Search collections are good for grouping items that may change as you work on your project. If you use the Status field in the Inspector to note the progress of a document, for example, you can create a search collection for all documents with a status of First Draft so you know which items are waiting for you to revise. When you have revised the document, change its status to Second Draft in the Inspector, and that document no longer appears the next time you open the First Draft collection.
To create a search collection:
1. Perform a project search to create the search results you require.
2. Click the magnifying glass in the Search field of the toolbar and select Save Search as Collection (Save Search in Windows).
Caution
If you selected the Search Binder Selection Only option in the Project Search menu prior to conducting the search, the Save Search command is grayed out. This is because Binder selections are transient, so the dynamic collection would not be able to update properly.
If you conducted the project search on the Labels or Keywords, the search collection assumes the color associated with that label or keyword on the Mac, although you can change this color in the same manner as a standard collection.
You can distinguish standard collections and search collections in the Collections pane by looking for the magnifying glass that appears on the left side of a search collection tab. The contents of a search collection also appear on an alternating-color background on the Mac.
When you open a search collection in the Collections pane, the Search field in the toolbar reflects the criteria of the project search that created the collection. Click on the magnifying glass in the Search field to see which options and limitations were selected when performing the search. This acts as a reminder of the intent of the collection.
Converting a Search Collection to a Standard Collection
If you want to lock the results of a search collection so it no longer dynamically updates, convert it to a standard collection. To do this, click the tab of the collection you want to convert and choose View, Collections, Convert to Standard Collection from the menu.
Once you convert a search collection to a standard collection, this action cannot be undone. If you converted a collection in error, you need to create a new search collection.
Renaming Collections
Enter a name for a standard collection as part of the creation process, and the search collection assumes the name of the search by default. To rename either type of collection, double-click its name in the tab in the Collections pane; then type a new name and press Return (Enter).
You cannot rename the Search Results collection. This is a special type of collection that retains the results of the most recent project search.
Removing Collections
If a collection is of no further use to you, remove it from the Collections pane. Select the tab for the collection and click the Delete Collection (-) button in the Collections pane header. You cannot undo this action. In the case of search collections, you can re-create the project search and save the search to form a new collection. In the case of a standard collection, if you delete it in error, you must manually re-create it.
![]() Note
Note
There are two delete/remove buttons in the Collections pane, each with a specific purpose. The Delete Collection (−) button in the Collections pane header removes collections from the pane. The Remove Selected Documents (-) button in the header (on the Mac) within a standard collection removes documents from that collection.
Toggling the Collection View
If the multicolored spectacle of the Collections pane is distracting you while you work on a document, return to the Binder view. Click on the Binder tab and then select View, Collections, Hide Collections from the menu. Your collections still exist, but they remain out of sight until you choose to display them (View, Collections, Show Collections).
![]() Tip
Tip
If you hide collections while you are viewing a collection, the Binder only displays the contents of the collection. To return to the main binder, select View, Collections, Binder from the menu.
Setting Bookmarks (Mac Only)
When you read a physical book (yes, people still do that), you use bookmarks or dog-eared pages to note where you left off reading or a page to which you want to return at another time. Bookmarks in Scrivener are inline annotations formatted to do the same thing. Scrivener creates two types of bookmark annotations:
• Bookmark Annotations: Used to mark a location to which you want to return.
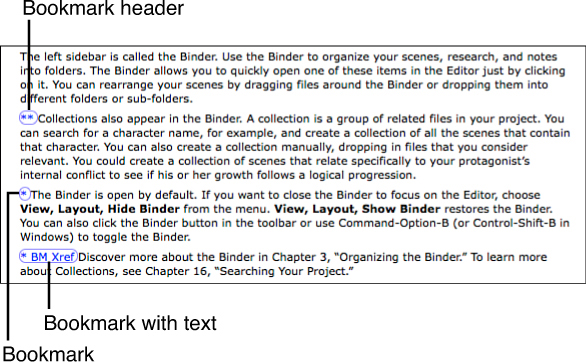
Figure 16.8 Bookmark annotations appear at the beginning of a paragraph. One asterisk indicates a bookmark, and two asterisks indicate a bookmark header.
• Bookmark Header Annotations: Creates a hierarchy of bookmarks in which a bookmark header is inserted into a document and the bookmark navigation menu, shown in Figure 16.8. Other bookmarks appear indented beneath it until the next bookmark header appears in the document. This is a way to keep bookmarks organized in a document that is rife with them.
Adding Bookmarks
To add a bookmark on the Mac, position the insertion point in the paragraph to which you want to attach the bookmark and choose Edit, Insert, Bookmark Annotation from the menu or press Shift-Cmd-B. The bookmark annotation is inserted at the beginning of the paragraph, as shown in Figure 16.8.
Using Bookmark Headers for Navigation
Once you have created bookmarks, you can view them in two locations, as follows:
• In the View, Text Bookmarks submenu
• In the Item Icon menu of the Editor header bar, as shown in Figure 16.9
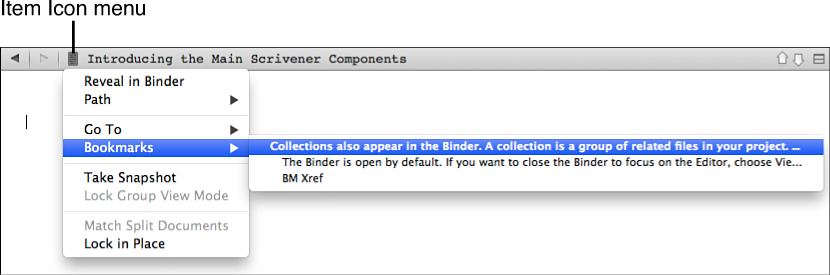
These menus only list bookmarks for documents currently loaded in the Editor. When you select a bookmark from one of these menus, you are taken to the location of the bookmark, and the paragraph to which it is linked is highlighted.
When navigating to a bookmark, Scrivener uses the first few words after the annotation to label the bookmark. You can override this feature by adding your own text to the annotation. Leave the asterisk(s) intact, but add your own label or words of text. As you can see in Figure 16.9, this text becomes the bookmark reference.
![]() Note
Note
When you are in Scrivenings mode, the bookmarks menu contains the bookmarks for all of the documents included in the Scrivenings.
Choosing Favorites (Mac Only)
As you work, you may find that you turn to certain documents repeatedly. On the Mac, you can set these documents as Favorites, which gives them priority seating on some of the navigation menus and their related entries on the context menus, such as the following:
• Edit, Append Selection to Document
• Edit, Scrivener Link
• View, Go To
• View, QuickReference
• Documents, Move, To
To add a Favorite to the menus, select the document in the Binder, right-click, and choose Add to Favorites from the context menu.
When I’m writing fiction, I add my character sketches to the Favorites menus. When I’m writing a tech book, such as the one you’re reading now, I add a document listing keyboard shortcuts to the Favorites. In other words, I use this feature for documents I like close at hand no matter what I’m doing.