
22. Using Scrivener for Nonfiction Writing
Scrivener has often been described as a fiction-writing tool, but to limit it to such a function is to underestimate its power. Scrivener is also well suited to academic and nonfiction writing. Whether you are writing a short essay, an entire thesis, or a complete nonfiction or technical book, Scrivener can help you organize your project and keep your research close at hand.
If you are looking for general tips to organize a nonfiction or academic project and you want to put the tools you’ve explored in the previous chapters to work, you’ve come to the right place. This chapter also explains how to add footnotes and a table of contents to your project and how to use Scrivener with a third-party citations manager.
Approaching a Nonfiction Project
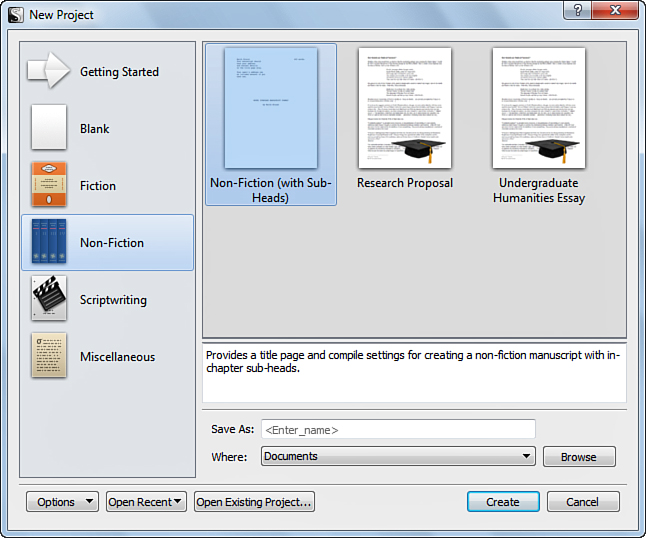
To begin a nonfiction or academic project, choose a project template from the Non-Fiction category of the Project Templates dialog box (New Project dialog box in Windows). The Mac platform, shown in Figure 22.1, has more preinstalled templates available than the Windows version, shown in Figure 22.2. You can find additional templates created by other Scrivener users on the Internet. Remember, however, that a project template is merely a starting point. You can even begin with a blank template and configure all the options you want to use yourself.
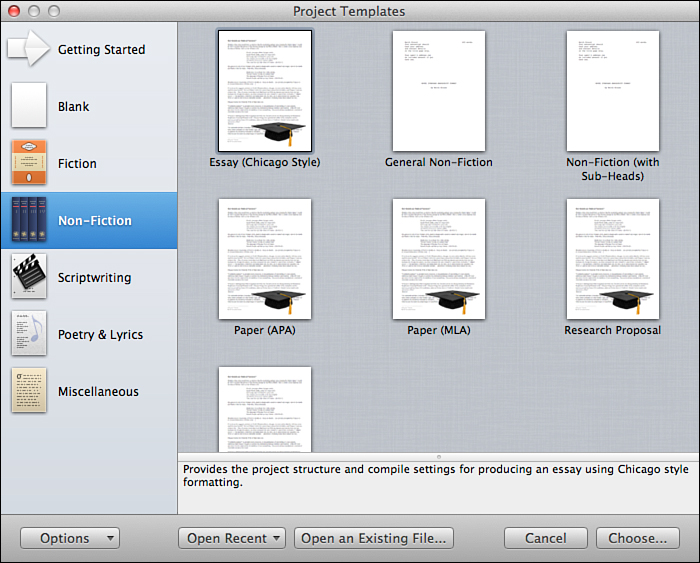
Figure 22.1 The Non-Fiction category of project templates on the Mac offers a general nonfiction project as well as several projects preformatted for specific academic styles.
When you write a novel, you can start with a blank screen and start typing. You don’t have to worry much about formatting because novels rarely contain more than chapter headings and scene breaks. Academic and nonfiction projects, by comparison, often have very specific formatting requirements. Theses, in particular, must be formatted exactly to your university’s guidelines.
When beginning a new nonfiction project, think about how you want to organize the Binder. Dividing your work into chapters and sections may not be enough. Think of the book you’re reading right now. The Scrivener Absolute Beginner’s Guide contains parts, chapters, section headings, and subsection headings. Breaking down the project to this level of detail in the Binder made it easy to rearrange subsections as I wrote. You could also, of course, choose to keep the Binder organized on a broader scale, adding subsections or even sections and subsections within a chapter or section document.
![]() Tip
Tip
If you opt to create separate items for sections and subsections, Scrivenings becomes invaluable for writing the transitions between sections so you can see how the chapter as a whole flows.
Creating Formatting Presets
Your nonfiction work may need to be converted to a Word template before submission. Word templates utilize styles, which are not available in Scrivener. To work around this limitation, you must import your project into Word and apply the template formatting. If you manually review your imported document, this process can take hours. You can take advantage of Scrivener’s formatting presets (on the Mac) and Compile settings, however, to make it easier.
![]() Note
Note
Chapter 4, “Writing in the Editor,” explained how to create formatting presets on the Mac. Chapter 19, “Compiling Your Completed Work,” covered how to format items at different levels of your Draft folder when you compile.
Make a list of the styles required by your Word template. You can format major heading styles in the Compile settings by dividing your Draft folder into items that reflect those headings. For example, if you divide your project into parts, chapters, sections, and subsections, you can use the Formatting tab in the Compile dialog box to format each of those headings differently.
Other styles require formatting within the Editor. For those elements, create formatting presets on the Mac or manually apply consistent formatting to those elements in Windows. In this book, for example, figure references require four different styles: a production directive to tell the production editor which art file to insert, the figure number reference, the caption, and the list of callouts. I created four formatting presets in Scrivener for the figure elements. Notes, cautions, and tips also each required a preset to correlate with a style in the Word template. When you are creating your formatting presets on the Mac or applying a series of formatting options in Windows, although you may want to make them completely match their Word counterparts, this is not always practical. If two styles use identical or even very similar formatting, conducting a find-and-replace action in Word becomes complicated and requires considerable manual intervention.
In those cases, you are better off creating a unique formatting preset that makes each element stand out in some way. You can use garish fonts, colors, and so on (see Figure 22.3), as that formatting is simply being used for search purposes. When you apply a style in Word after importing the compiled work, the formatting is replaced.
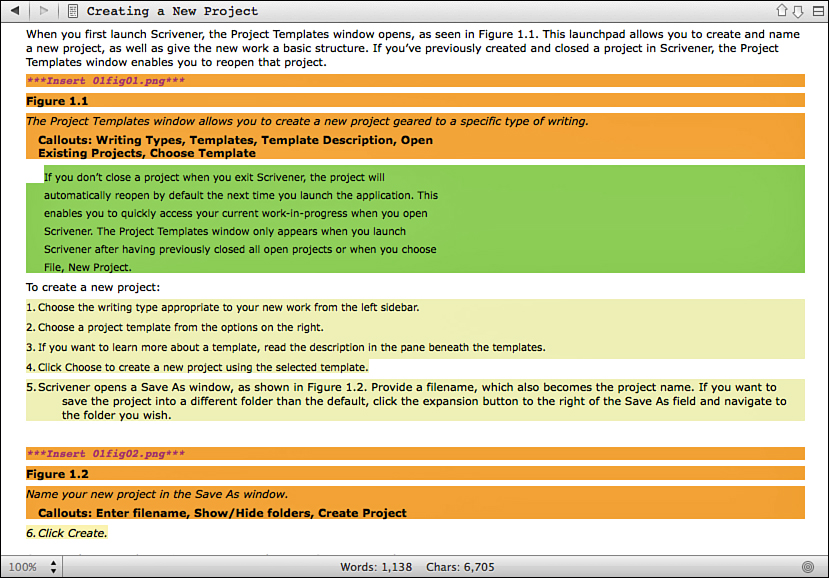
Figure 22.3 Projects requiring multiple styles when imported into Word may require colorful formatting presets in Scrivener to ease the find-and-replace process later.
When you need to import your project into Word, take the following steps to apply Word’s styles in place of the formatting presets you applied in Scrivener:
1. Compile your project using Rich Text Format (.rtf) for your output format.
2. Open the compiled file in Word.
3. Use the Advanced Find and Replace tools in Word to search for the formatting of each element. Do not search for specific words or phrases.
4. Replace the formatting with a style.
Repeat steps 3 and 4 for each style. When you have completed this process, skim over your document to ensure you didn’t miss any formatting.
Inserting Figure References
Nonfiction and academic projects often include figures. Some writers prefer to see images in position as they write. To do this, drag the image into the document from the Binder, desktop, Finder, or Windows Explorer, as you learned in Chapter 4. Other writers don’t want the distraction as they work, or the work contains so many figures that adding them to each document would slow down the project. In that case, if you’re on a Mac, you can use a placeholder tag to reference the image so it is added during the compile stage of your project.
To add an image tag:
1. In the Editor, position your cursor where you want to insert an image. This is usually a blank line in the document.
2. Type one of the following image placeholders:
• <$img:Image Title>: Use this format if the image has been imported into the project.
• <$img:Path/ImageFilename.extension>: Use this format if the image is on your computer but has not been imported into the project.
3. Apply paragraph formatting to the tag as you want the image itself to appear. For example, if you want the image to be centered, center the placeholder tag. If you want whitespace between the figure and the text above and below it, add the extra line spacing to the paragraph formatting.
You can opt to use the placeholder tag to set the size of the image. If you want the image to be 500 pixels wide by 300 pixels high, for example, enter the following: <$img:Image Title:w=500;h=300>.
Figures and tables usually require a reference number so you can refer to them within the text. If you enter these numbers manually, you must renumber the figures any time you add a figure in the middle of a document or change the order of your documents in the Binder. Placeholder tags automate this process, allowing you to add, remove, and rearrange figures without extra work. For example, you can use <$n> to automatically number figures or tables, or use <$hn> to number figures or tables according to the hierarchy of the document in which they’re contained (that is, Figure 1 versus Figure 22.1).
![]() Note
Note
You can find a complete list of placeholder tags for the Mac platform by choosing Help, Placeholder Tags List from the menu. In Windows, use your web browser to visit http://scrivener.tenderapp.com/help/kb/windows/placeholder-tags-list. Look for the Auto-Numbering tags.
If you are already using the <$n> tag to automatically number chapters in the Section Layout of your Compile settings, as you saw in Chapter 19, you cannot use the exact same tag to number your figures and tables. On the Mac, you can create unique streams for these items by adding a variable to the placeholder tag. Thus, you could use the tag <$n:chapter> for chapter numbers, and use <$n:figure> for figures. You can define multiple streams, so tables can use the tag <$n:table> in the same document.
 Caution
You can name your variables whatever you want, but you cannot use spaces in the variable name.
Finally, you can take this a step further and use keywords following the stream type to aid in cross-references to a figure or table within the text. For example, you can use the tag <$n:figure:ProjectTemplateDB> to number a figure. If you use the same tag, including the keyword, within the text of your document, the reference appears with the same number, as shown in Figure 22.4.
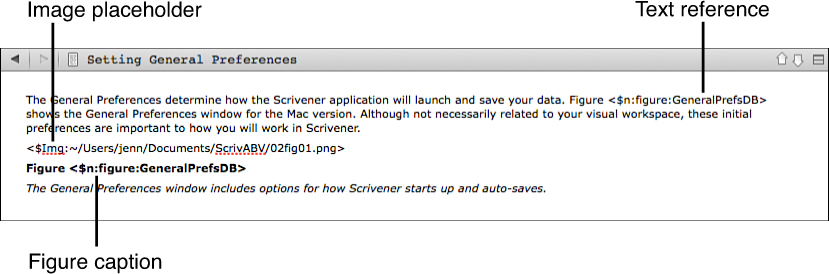
Figure 22.4 In this document, notice the figure reference in the caption as well as a reference to it in the text.
Caution
As with the stream variables, you cannot use spaces in the keyword. Also be sure to make each keyword unique so you don’t inadvertently refer to a prior figure when you intended to add a new reference.
Adding and Formatting Footnotes
In Chapter 10, “Editing Your Manuscript,” you learned how to add comments and annotations to your documents. The methods for adding footnotes to a project are similar, but the presentation of these notations is different. Comments and annotations are primarily intended for use by you and any collaborators as you work on a project. Footnotes, on the other hand, usually become part of the completed work and serve to add citations or explanations to information contained within the body of your work.
As with annotations, Scrivener offers two types of footnotes, as seen in Figure 22.5:
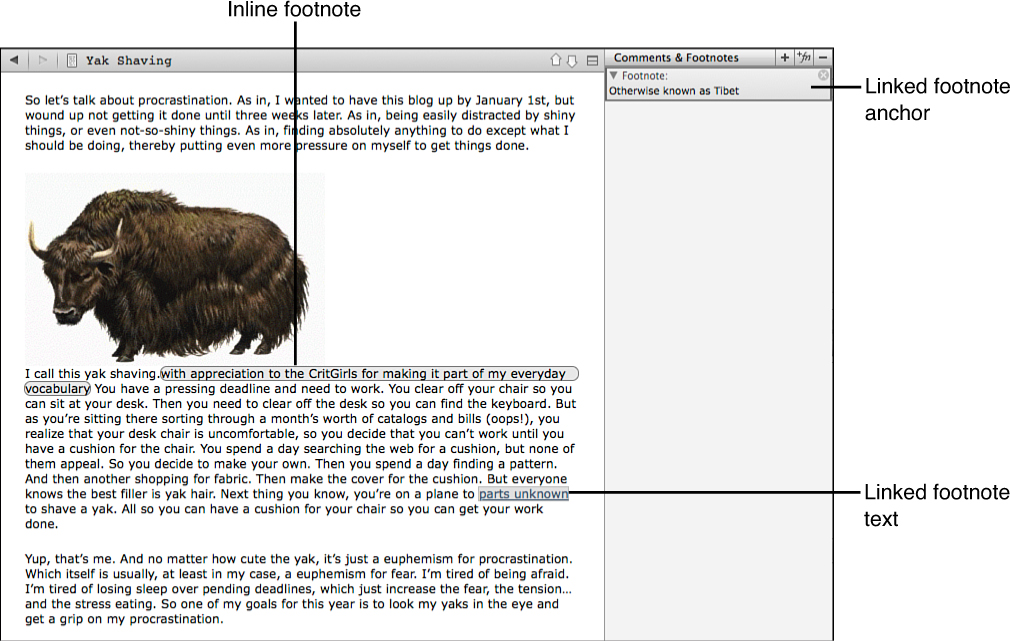
• Inline footnotes: These footnotes appear in a bubble within the text of your project. Although the footnote is contained in the document, it is not anchored to any specific text, so it can be cut and pasted like any other text. You can also edit the text around the footnote without altering the footnote.
• Linked footnotes: These footnotes appear in the Comments & Footnotes pane in the Inspector. They are linked to a location within your document. If you delete the text to which the note is linked, the footnote is removed.
Both types of footnotes can appear as footnotes at the bottom of the page or as endnotes at the end of the document when you compile your project, so the choice of which type of footnote to use is largely a matter of personal preference. If you’re on a Mac, you can even use both types of footnotes and assign one type as footnotes and the other as endnotes in your Compile settings if your output format supports both types of notes. This was covered in Chapter 19.
![]() Note
Note
Scrivener does not lay out footnotes until the compile process. At that time, if you export the project to Rich Text Format (.rtf) and open it in a word processor that recognizes the footnote formatting, the footnotes appear in position. While you are working on your project in Scrivener, however, you will not see footnote reference numbers or see how they flow on the page.
Adding Footnotes
To add an inline footnote to your document:
1. Position the insertion point where you want the footnote to appear.
2. Choose Format, Inline Footnote from the menu. You can also press Shift-Cmd-F on the Mac or Ctrl+Shift+F in Windows.
3. Type the text of your footnote. It appears in a gray bubble by default.
You can also select text in your document and convert it to an inline footnote by following step 2.
Caution
Do not add whitespace in the document text to set it apart from the footnote because the extra space appears in the compiled document. Instead, add whitespace at the beginning and end of the footnote itself. These extra spaces are stripped from the footnote when you compile.
![]() Tip
Tip
If you want to change the color of the footnotes’ background in Windows, open the Appearance tab in the Options dialog box and choose Editor, Footnote Background from the Colors options. On the Mac, inline footnotes always appear with a gray background.
To add a linked footnote:
1. Select a word or phrase in your document that you want to serve as the anchor for the footnote.
2. Choose Format, Footnote from the menu. You can also press Control-Cmd-8 on the Mac or Shift+F5 in Windows. If the Comments & Footnotes pane of the Inspector is already open, you can also press the Add Footnote (+fn) button at the top of the pane, as shown in Figure 22.6.
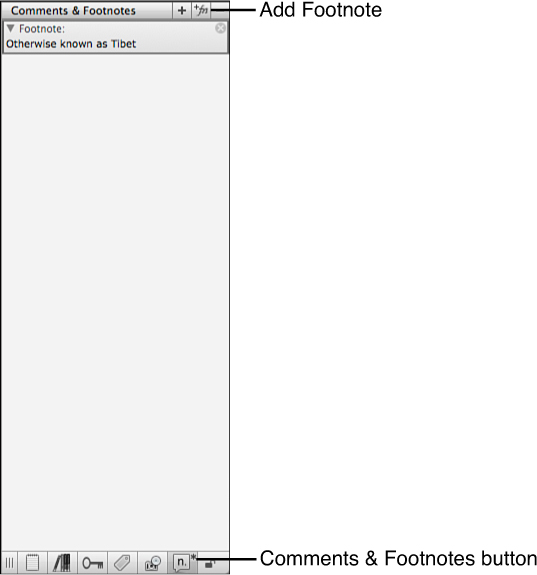
Figure 22.6 The Comments & Footnotes pane of the Inspector lists linked footnotes (as well as linked comments).
3. Type the text of the footnote in the Footnote box in the Comments & Footnotes pane.
4. Press Esc or click in the Editor to return to your document from the Comments & Footnotes pane.
The footnote anchor appears as a box around the selected word or phrase, which also serves as a hyperlink to the corresponding footnote in the Comments & Footnotes pane of the Inspector. When you compile the document, this text remains part of the document, followed by the footnote number. If you do not select a word or phrase in step 1, the word or punctuation just prior to the insertion point becomes the anchor for the footnote. If your work requires footnote numbers to appear before punctuation in the text, select the Terminate Footnotes and Comments Before Punctuation option in the Formatting tab of the Preferences window (the General tab of the Options window in Windows).
Using Referenced Inline Footnotes (Mac Only)
On the Mac, if you want the simplicity of containing all of your footnotes within your document text without the visual distraction of the notes appearing within the flow of the text itself, use referenced footnotes. A referenced inline footnote places a small note reference within your text, but allows you to add the content of the footnote elsewhere in the document or even in a different document in your Draft folder. When you compile the project, the note reference is replaced with the footnote number, and the content is positioned at the bottom of the page or in the endnotes, as you specify in the Compile settings.
To add a referenced footnote:
1. Place the insertion point in the document where you want the footnote to be anchored.
2. Choose Format, Inline Footnote from the menu. You can also press Shift-Cmd-F.
3. Enter an anchor word surrounded by square brackets, such as [Otherwise]. Each referenced inline footnote must have a unique anchor word.
4. Position the insertion point where you want to place the footnote text. You can insert the footnote text within any document that will be included in the compile group.
5. Choose Format, Inline Footnote (or Shift-Cmd-F).
6. Enter the anchor word surrounded by square brackets, followed by the text of the footnote.
7. Click outside the inline footnote.
When you compile your project, the footnote references are replaced with footnote numbers in the order in which they appear in the compilation.
Customizing Linked Footnote Markers (Mac Only)
If you add a significant number of linked footnotes to your documents, all the linked text can become distracting. If you prefer, you can use a footnote marker on the Mac to note the location of each footnote rather than selecting words from your text. To do this:
1. Choose Project, Text Preferences from the menu.
2. In the Project Formatting Preferences dialog box, shown in Figure 22.7, select the Use Footnote Marker check box.
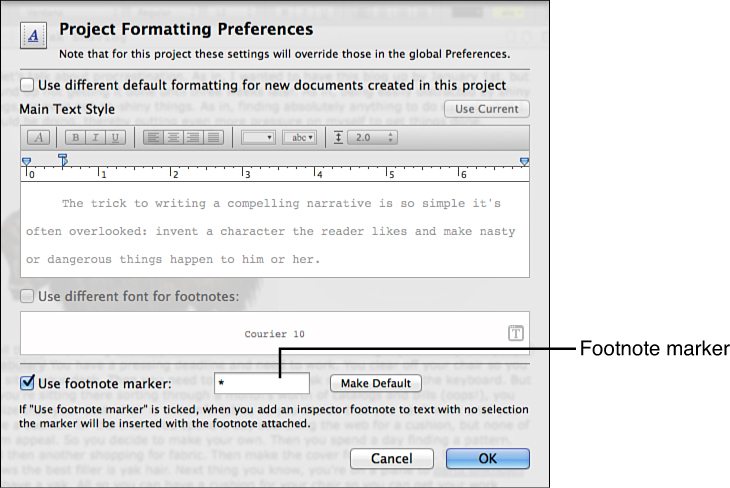
3. Enter a character to use as a marker for linked footnotes. The default is an asterisk (*).
4. Click the Make Default button if you want to use this setting on future new projects.
5. Click OK to close the Project Formatting Preferences dialog box.
6. In the Editor, position the insertion point where you want to anchor your footnote.
7. Choose Format, Footnote from the menu. You can also press Control-Cmd-8, or press the Add Footnote (+fn) button at the top of the pane.
8. Type the footnote text in the Footnote box in the Comments & Footnotes pane of the Inspector.
9. Press Esc or click in the Editor.
Whenever you need to create an additional footnote, follow steps 6–9. The character you selected as a marker in step 3 appears in the text as an anchor to the footnote. When you compile, the marker is replaced with the footnote reference number. Footnotes are numbered in the order in which they appear in the compilation.
Caution
Do not switch marker characters in the middle of a project or turn this option on and then later disable it. If you do so, the marker remains within the document text when you compile.
Creating a Table of Contents (Mac Only)
In Chapter 20, “Creating E-Books,” you learned how to generate a table of contents when compiling an e-book. Although Scrivener does not have any other method for generating a dynamic table of contents, you can create a static table of contents that becomes cross-referenced to page numbers when you compile the project to output in Print, Portable Document Format (PDF), or Rich Text Format (.rtf) formats.
![]() Tip
Tip
After you create the table of contents in Scrivener, you cannot update it. If you make further changes to the project, you will need to delete the table of contents and create a new one. Because of this, you should wait until just before you’re ready to compile the project to perform this task.
To create a table of contents:
1. Add a new document to your Front Matter folder for the table of contents. Alternatively, add the document to your Draft folder.
2. Select the Draft folder in the Binder and choose View, Outline, Expand All from the menu to expand all of the containers in the Draft folder. You can also press Cmd-9.
3. Select all of the items you want to include in the table of contents from the Binder. Selecting a folder or file group does not include its subdocuments, so be sure to select each file you want to include as well as its parent container. If you want to exclude a level of subdocuments from the table of contents, do not select those items.
![]() Tip
Tip
You can also select the Draft folder and then choose Edit, Select With Subdocuments from the menu or press Option-Cmd-A. If you want to exclude certain levels, open the Draft folder in the Outliner and then press Cmd-0 to collapse all of the subfolders. Then repeatedly press Cmd-A and press the right arrow key to expand the selection level by level to the desired depth.
4. Choose Edit, Copy Special, Copy Documents as TOC from the menu.
5. Open the document you added for the table of contents in the Editor.
6. Position the insertion point where you want the table of contents to appear, and then choose Edit, Paste from the menu or press Cmd-V.
The table of contents appears in the document as a list of Scrivener links and placeholder tags, as shown in Figure 22.8. You can change the formatting in the table of contents document just like any other text. For example, you might need to adjust tab stops to line up the page numbers properly or want to change the font. Select the Compile As-Is option in the Inspector to prevent the table of contents from being reformatted when you compile. Click a link to open the linked document.

Figure 22.8 A static table of contents appears as a series of Scrivener links and placeholder tags for page numbers.
![]() Note
Note
Scrivener links are covered in Chapter 23, “Discovering New Uses for Scrivener.” Linked documents open either in the current editor, the other editor (if you’re in Split Screen mode), or a QuickReference panel depending on your settings in the Navigation tab of the preferences dialog box.
Creating a Bibliography
If your work requires a bibliography or list of citations in a specific format, your best solution is a third-party citation manager. The most popular cross-platform citation manager is EndNote, which is often available for free through your university or costs $250 for an individual license. Zotero is a popular open source cross-platform application. If you are on a Mac, you might also consider Bookends or Sente.
To use one of these citation managers with Scrivener, open the General tab in the Preferences dialog box (Options dialog box in Windows). In the Bibliography Manager section, click the Choose button to select your citation app.
To insert a citation in Scrivener from EndNote:
1. Choose Format, Bibliography/Citations from the menu or press Cmd-Y (Ctrl+G, O in Windows) to launch EndNote.
2. Right-click on the citation you want to insert and select Copy from the context menu.
3. In Scrivener, choose Edit, Paste or press Cmd-V (Ctrl+V in Windows) to paste the citation.
A citation placeholder appears as something similar to (Doe, 2010 #125), where the first listed author and the publication year are included along with the citation number from EndNote. When you have completed work on the project, compile it into Rich Text Format (.rtf) and open the compilation in Word or another word processor that can interact with your citation manager. In EndNote, open the Cite While You Write tab and select Update Citations and Bibliography.