In This Chapter
Connecting the SharePoint site calendar to the Calendar module in Outlook 2007
Maintaining your SharePoint contacts list in Outlook
Reviewing the Outlook e-mail activities log for SharePoint contacts
Accessing the documents in a SharePoint document library in Outlook
One of the great things about SharePoint 2007 is how tightly integrated it is with the applications in Microsoft Office 2007, especially Outlook. This chapter looks at some of the more important ways that you and your team members can access and update SharePoint site information right from the comfort of Outlook folders.
If you're like many knowledge workers, Outlook is the one program you always have open on your computer and the one in which you often spend a good part of your workday. For you, being able to access and work with information from different parts of the SharePoint site from within Outlook can't help but enhance your ability to communicate and collaborate with other members of the team.
Outlook's Calendar module provides a convenient graphical view of your upcoming appointments, usually on a daily, weekly, or monthly basis. If you're part of a SharePoint team, you can keep track of team-related events and deadlines by connecting the team's SharePoint calendar to your Outlook Calendar module so that they stay synchronized.
To connect the SharePoint calendar to Outlook, follow these steps:
Open the team's calendar page in SharePoint.
If your SharePoint site uses only the one default calendar, you can do this step by clicking the Calendar link in the Lists area of the home page's Quick Launch.
Choose Connect to Outlook from the Actions drop-down menu.
SharePoint displays an Internet Explorer alert dialog box asking you to allow the browser to open Outlook on your computer.
Click the Allow button.
Outlook displays a Connect alert dialog box asking you to confirm the connection to its Calendar.
Click the Yes button in the alert dialog box.
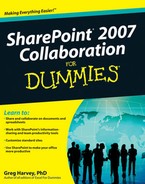
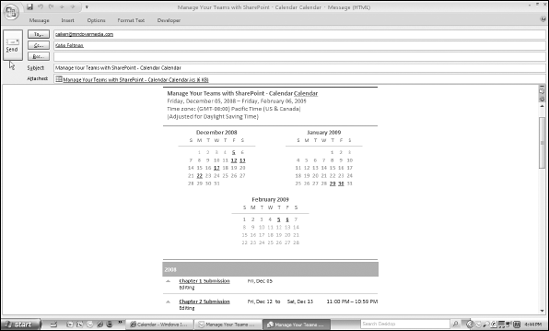
Outlook downloads the SharePoint calendar, which it displays alongside the Outlook calendar that's currently open in the program (see Figure 11-1). In addition, Outlook adds your SharePoint calendar to the list of calendars displayed in the Other Calendars section of the Navigation pane.
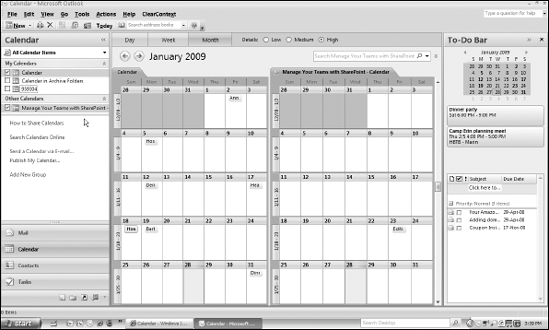
Figure 11.1. My Calendar module in Outlook 2007 after connecting the default Calendar on the SharePoint calendar to it.
After you connect your SharePoint calendar to your copy of Outlook and it's displayed in the Calendar module along with the Outlook calendars you have open, you can display it alone in the Calendar module: Simply deselect the check box or boxes for the calendar or calendars that are currently selected in the My Calendars section of the Navigation pane.
When your SharePoint calendar is the only one displayed in Outlook, you can then switch the view from the default monthly calendar view to the more in-depth weekly or daily view by clicking the Week button or Day button, respectively, at the top of the calendar. After clicking the Week button, you can switch between displaying the full calendar week (Sunday through Saturday) and displaying the normal workweek (Monday through Friday) by selecting the Show Work Week radio button that then appears to the immediate right of the Month button.
Note
When you want to once again view your Outlook calendar, select its check box in the My Calendars section of the Outlook Navigation pane and then select the check box in front of your SharePoint calendar in the Other Calendars section to deselect it. Remember that there must always be at least one calendar displayed in the Outlook Calendar module, so you must always display your Outlook calendar with the SharePoint calendar before you can hide the SharePoint calendar (and vice versa).
After you've connected your SharePoint calendar to Outlook, you can then add events to the SharePoint calendar in Outlook without having to log on to the SharePoint site in your Web browser. All you have to do is follow these easy steps in Outlook:
Display the SharePoint calendar in the Outlook Calendar module, as spelled out in the previous sections.
Right-click the date on the calendar where you want to add the event and then choose New Appointment from the shortcut menu that appears.
Outlook opens a new, Untitled – Appointment dialog box similar to the one shown in Figure 11-2. Here, you specify the subject, the location, and the event's starting time and ending time, along with a description of the event.
Note: If the event is something along the lines of a seminar or conference that takes all day or spans more than one day, choose New All Day Event from the shortcut menu to call up an Untitled – Event dialog box.
Enter the subject of the meeting in the Subject line of the Untitled – Appointment dialog box and then press Tab.
Outlook advances the cursor to the Location line of the Appointment or Event dialog box.
Enter the location of the meeting (Conference Room, online, telephone, and so forth).
Next, you need to specify the starting and ending times of the event. In the Appointment dialog box, the All Day Event check box is not selected as it is in the Event dialog box.
If necessary, modify the starting and ending times of the event using the Start Time and End Time date and/or time drop-down buttons. If the event is an all-day or many-day affair, be sure the All Day Event check box is selected.
Click the text area immediately below the Start Time and End Time options and type a detailed description of the appointment or event.
The Appointment or Event dialog box also contains a Contacts field at the bottom, where you can add links to the contact information for particular team members who are involved in some way with the upcoming event on the SharePoint calendar.
(Optional) To add a link to a contact in your Outlook Contact folder, click the Contacts button and then select the person or people in the Select Contacts dialog box before you click OK.
Now you're ready to save the appointment or event on your SharePoint calendar.
Click the Save and Close button at the beginning of the Appointment or Event tab on the Ribbon.
Outlook closes the Appointment or Event dialog box and returns you to its display of your SharePoint calendar. The appointment or event you just created appears on the appropriate day (or days) on the calendar.
After adding items to your SharePoint calendar in Outlook 2007, their events automatically appear on the copy of the calendar in SharePoint the next time you open the calendar's page.
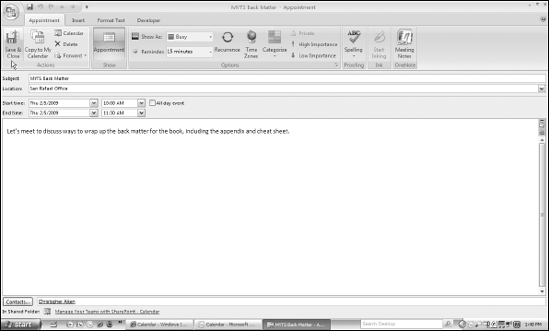
To view the details of the appointment in the SharePoint site, simply click the item on the calendar in SharePoint (just as you would a calendar item in Outlook). The program then opens a page for the calendar item, similar to the one shown in Figure 11-3.
This page contains the standard appointment fields as well as a Workspace field that shows the location of any meeting workspace you may decide to set up for the event. (See Chapter 6 for more on meeting workspaces.)
If you need to edit the calendar item, you then click the Edit Item button at the top of the form on this page and make whatever changes are needed or desired in the appropriate fields. When you finish editing the event, simply click the OK button to close the page and return to the calendar.
After you've connected your SharePoint calendar to Outlook, you can easily copy items from the local calendar or even an Internet calendar (such as a Google Calendar) to your SharePoint calendar. All you have to do is follow these few general steps:
Open both the local Outlook calendar or Internet calendar that contains the items you want to copy and the SharePoint calendar to which you want to copy them.
Remember that you display multiple calendars in the Outlook Calendar module by selecting their check boxes in the appropriate sections (My Calendars and Other Calendars) of the Navigation pane.
Drag the calendar items you want to copy from the Outlook or Internet calendar and drop them on the appropriate day in the SharePoint calendar.
Outlook displays an alert dialog box telling you that any incompatible content in the items you're copying will be removed when the items are synchronized. (This applies only if your Outlook calendar contains special fields that aren't supported by the SharePoint calendar feature.)
Click the Yes button in the Outlook alert dialog box.
Outlook completes the copies, and the calendar items you dragged to the SharePoint calendar in Outlook now appear on the appropriate date on the calendar.
Note
Keep in mind that you may have to refresh the calendar page displayed in your SharePoint site before the items that you've copied in Outlook appear in the online copy as well. If you're using Internet Explorer, you can do this by clicking the Refresh button, pressing F5, or pressing Alt and then selecting View
If you're the type of Outlook user who mostly works in the Mail module and doesn't visit the Calendar very often, you can help remind yourself of upcoming team-related events that have been placed on your SharePoint calendar by adding them to the Outlook 2007 To-Do Bar. That way, the calendar event appears on-screen in Outlook no matter which module you have open.
To copy an event from your SharePoint calendar in Outlook 2007 to the Task List section of the Outlook To-Do Bar, do the following:
In Outlook, click the text in the Task List area of the To-Do Bar that says "Click here to add a new task."
Outlook removes the "Click here to add a new task" text from the text box and replaces it with the cursor.
Display the portion of the SharePoint calendar that contains the item or items you want to add to the Outlook To-Do Bar and then drag the item from the calendar and drop it into the empty text box in the To-Do Bar that used to contain the "Click here to add a new task" text.
Outlook copies the title of the event into the empty text box.
Press the Enter key.
SharePoint adds the event as a task to the Tasks List section at the bottom of Outlook's To-Do Bar.
Because calendar events usually have start and stop times associated with them but don't have any due date, they are, at best, an imperfect fit in the Task List section of the To-Do Bar. Because they're bona fide appointments, they really should be added to the Appointments section of the To-Do Bar that appears immediately above the Task List section.
Unfortunately, Outlook 2007 only displays appointments placed on your local Outlook calendar in the To-Do Bar, so you have to add your SharePoint calendar items to its Tasks List.
Tip
If you do add SharePoint calendar items to the Tasks List part of your Outlook To-Do Bar, you might want to edit these calendar items (by double-clicking them in the To-Do Bar) and add a Reminder to their task items. That way, Outlook will remind you before the date and time of the event like it does with appointments, and you don't have to keep the SharePoint calendar open either in Outlook or in your Web browser in order to remember to attend an important team meeting or event.
Outlook 2007 also makes it easy to share your SharePoint calendars with other team members. In Outlook, you can either e-mail the calendar (or a part of it) to other team members or send them an e-mail that invites them to visit the copy of the calendar on the SharePoint site.
To e-mail a copy of the calendar, right-click the SharePoint calendar's listing in the Other Calendars section of the Navigation pane and then choose Send via E-Mail from the shortcut menu that appears.
Outlook then displays a Send a Calendar via E-Mail dialog box, where you use both the Data Range drop-down list to select which part of the calendar to send and the Detail drop-down list to select the number of details to include. (In the Detail drop-down list, choose Full Details to include availability status plus all the information on each item, choose Availability Only to include availability status only, or choose Limited Details to include availability status plus the subjects of your calendar items.) If you want to include any files that are attached to particular calendar items, you need to click the Show button to the immediate right of the Advanced heading and then select the Include Attachments within Calendar Items check box.
When you click the OK button, Outlook inserts the entire calendar (or just the part you selected) into the body of a new e-mail message, as shown in Figure 11-4. You can then personalize the body of the message introducing the SharePoint calendar information and select the message's recipients by inserting their e-mail addresses from your Contacts address book into the To, Cc, and Bcc fields, as appropriate. When you're ready, click the Send button to send the e-mail with your SharePoint calendar info.
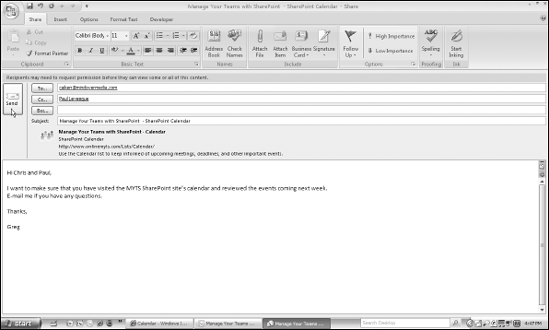
To invite other team members to view a SharePoint calendar on the SharePoint site — provided they are authenticated users of the SharePoint site — right-click the SharePoint calendar's listing in the Other Calendars section of the Navigation pane and then choose the Share option followed by the name of the SharePoint calendar that appears on the calendar's shortcut menu.
Outlook then opens a Share window similar to the one shown in Figure 11-5. This window contains a new e-mail message with a link to the SharePoint site's calendar page. The team members who are the recipients of this e-mail can then follow this link to review the calendar online (assuming, of course, that they're authenticated users of the SharePoint site and are equipped with user IDs and passwords, for gaining access to the site, and permissions, for reviewing the calendar information).
In Chapter 4, I show you how to create a Team Contacts list for keeping track of your team's essential contact information as part of my discussion on maintaining SharePoint lists. If you use Outlook 2007, you can maintain this list right from within Outlook. All you have to do is connect the Team Contacts list in SharePoint to Outlook (by choosing Connect to Outlook from the list's Actions drop-down menu).
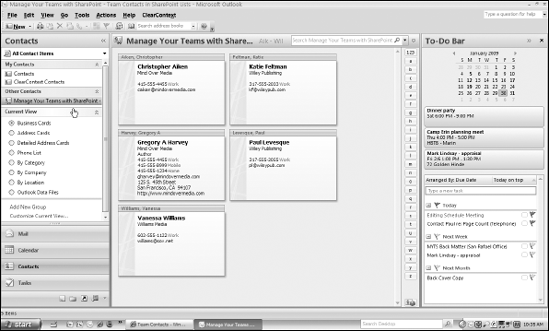
After you establish this connection, Outlook adds a Contacts list associated with your SharePoint site under the Other Contacts heading in the Outlook 2007 Contacts module. Selecting the list displays the contact information you've entered for your team members using the Contacts module's default Business Card view, as shown in Figure 11-6.
Note
Remember that you can change the way that Outlook displays the records in your SharePoint contacts list by choosing View
When you have the SharePoint contacts in Outlook, any updates you make to the information in their contact records in Outlook are automatically reflected in their records in the copy of the contacts list that resides on your SharePoint site.
To add a new record for a team member, click the New button when the SharePoint contacts list is open in Outlook or press Ctrl+N. Then fill in the contact information you have for that team member in the appropriate fields in the Untitled Contact window and click the Save & Close button.
Tip
If you have a record for a team member in your regular Outlook Contacts folder that you need to add to Outlook's copy of your SharePoint contacts list, you can add it by opening the Outlook Contacts folder and then simply dragging the contact icon and dropping it onto the SharePoint Contacts folder that appears in the Other Contacts area of Outlook's Navigation pane.
In addition to being able to update your SharePoint contact records and add to them in Outlook, you can do any of the following things with them:
Assign the contact to a color category: Outlook 2007 enables you to assign any of its items to particular color-coded categories. To assign the contact for a SharePoint team member to one of these categories, right-click the contact and then choose Categorize from the shortcut menu that appears, followed by the name and color of the category on the shortcut's continuation menu.
Flag the contact with a reminder: To flag a SharePoint team member with a reminder that you should contact him in a particular manner at a particular date and time, right-click his contact record and then choose Follow Up from the shortcut menu that appears, followed by Add Reminder from the submenu. Outlook then opens a Custom dialog box where you specify what type of contact to make in the Flag To combo box (Follow Up, Call, Arrange Meeting, Send E-Mail, or Send Letter) as well as the date and time when Outlook is to display a reminder to you to initiate this contact.
Create a message, meeting request, or task for the contact: To send an e-mail to a SharePoint team member, request his presence at an upcoming team meeting, or assign him a task to complete, right-click his record and then choose Create from the shortcut menu that appears, followed by New Message to Contact, New Meeting Request to Contact, or New Task for Contact from the submenu.
Outlook 2007 has the ability to search for and display all the e-mail activities involving a particular SharePoint team member in your contacts list (including sent and received messages that refer to him). Before you can review the e-mail activities of particular members in the SharePoint contacts list, though, you first need to define Outlook folders that will be searched and designate a folder in which to store the list of items. To do this, follow these steps:
Open the contacts list associated with your SharePoint site in Outlook and then right-click its folder in the Navigation pane and choose Properties from the shortcut menu that appears.
The contacts list for your site should be located under the Other Contacts heading in the Navigation pane.
Outlook opens a dialog box for the SharePoint list's Outlook folder.
Click the Activities tab in the Outlook folder dialog box and then click the New button.
Outlook opens the View Title and Folders dialog box where you designate the name of the new folder to contain the list of e-mail activities as well as designate the Outlook folders that are to be included in the search.
(Optional) In the Name text box, replace the generic New Folder Group name suggested by Outlook with a more descriptive name such as SharePoint Contact Activities.
Next, you need to designate the Outlook folders to be included in the activities search.
Select the check box in front of Personal Folders in the View Title and Folders list box and then click OK.
Outlook returns you to the SharePoint Contacts List dialog box where the names and groups of folders you specified appear in the Folder Groups list box.
Click the OK button.
Outlook closes the SharePoint list's dialog box and returns you to that list in Outlook.
After defining the Outlook folder to record the items and the Outlook mail folders to search, you can view all the e-mail activities involving a particular SharePoint team member by following these steps:
Double-click the team member's contact record in Outlook.
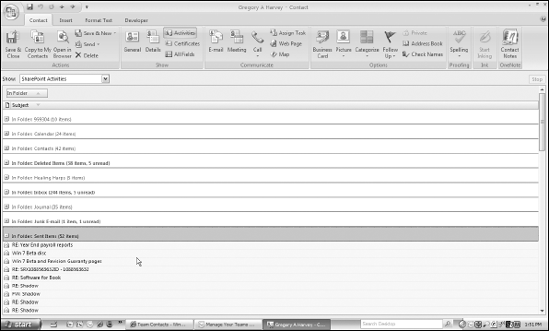
Outlook opens the member's record in its own window, similar to the one shown in Figure 11-7.
Click the Activities button in the Show area of the Contact tab on the Ribbon.
Outlook then displays a list of all the e-mail activities (including sent and received messages that refer in some way to the team member) in the Contact window.
Tip
You can make this list of Outlook items much more manageable by grouping them by their Outlook folders (as I've done in Figure 11-7). To do this, right-click the top row of the list with the column headings and then choose Group By Box from the shortcut menu that appears. Outlook then displays the message "Drag a Column Header Here to Group by That Column" in the Group By box that now appears at the top of the list. You then drag the In Folder column header and drop it somewhere in the area of this box. Outlook then groups the items by Outlook folder, and each folder has its own set of Expand buttons when its section of the list is collapsed; when its section is expanded, the folder has Collapse buttons.
Note
Don't forget that you can redisplay the normal fields in the Contact window by clicking the General button in the Show area of the Contact tab on the Ribbon after you finish reviewing the contact's list of e-mail activities.
If you and your team members use Outlook 2007 for sending and receiving e-mail and keeping track of your schedule, you can easily access the files that you've uploaded to a SharePoint document library by connecting the SharePoint site (and consequently the selected document library) to your Outlook program. Then, all you have to do to work with the files is to open them in their client applications directly from the document library's Outlook folder on your computer. (That's assuming that the necessary client applications are installed on your computer.)
Tip
Connecting a SharePoint document library to Outlook gives you the added benefit of being able to work with the files in that library even when you can't be connected to the Internet and need to work offline. This is especially useful when you're accessing the SharePoint site on the go on a laptop computer and encounter times when you don't have Internet access but still need to access and work with site information stored in one of its document libraries.
To see how you can put this feature to work on your SharePoint site, follow along with the steps for connecting the default Shared Documents library to Outlook 2007 on my laptop computer and then using the Outlook folder that points to the SharePoint library to open one of the library's files saved in Microsoft Word:
Open the Shared Documents library in the SharePoint site and then choose Connect to Outlook from the Actions drop-down menu.
Internet Explorer displays an alert dialog box asking you to allow the SharePoint Web site to open a program on your computer. Note that the Connect to Outlook option won't appear on the Actions menu if you don't have Outlook 2003 (or later) installed on the computer you're using to access the SharePoint site.
Click the Allow button in the Internet Explorer alert dialog box.
Windows launches Outlook, if it's not already running on your computer, and Outlook displays an alert dialog box asking you to confirm the connection of your SharePoint document library to Outlook.
Click the Yes button in the Outlook alert dialog box.
If you connect to SharePoint Services on an external server hosted by a third party, a Connect dialog box may appear prompting you for your username and password. After supplying your password in this dialog box, click OK.
Outlook creates a folder for the newly connected document library with the name of your SharePoint site. This Outlook folder appears in the SharePoint Lists section of the Mail Folders area in the Outlook Navigation pane. Immediately beneath this library Outlook folder, the program creates a subfolder for any subfolders in the connected SharePoint document library. Beneath these subfolders, you find two Outlook Search folders: Offline Documents and SharePoint Drafts.
When you select a file in the Messages pane (to the immediate right of the Navigation pane), Outlook attempts to display a preview of the selected document in its Reading pane (to the immediate right of the Messages pane). If no preview is available for the file you select, Outlook informs you of this situation in the Reading pane.
To open the document file you've selected in the Messages pane, double-click it or right-click it and then choose Open from its shortcut menu (as shown in Figure 11-8 ).
Windows displays an Opening File dialog box that reminds you that you should only open files that come from a reliable source.
Click the Open button in the Opening File dialog box.
Windows launches the program that created the document file (assuming that this application is installed on your computer), while at the same time opening the selected document.
Note
When you open files in standard Office applications such as Word and Excel, a message bar similar to the one shown in Figure 11-9 appears at the top of the document. If you want to edit the document (as opposed to simply printing it), you need to click the Edit Offline button in this message pane. The program then displays an Edit Offline dialog box (sometimes preceded by an alert dialog box and a Connect To dialog box) that tells you that the changes you make to the document will be saved to a copy stored in the SharePoint Drafts folder in the My Documents folder on your computer's hard drive.
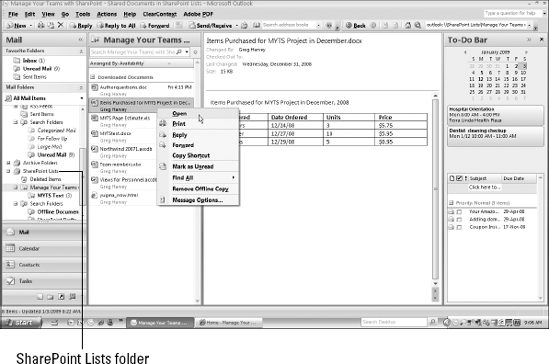
Figure 11.8. Outlook 2007 as it appears immediately after you connect the Shared Documents library to it.
After you click OK in the Edit Offline dialog box, you can make all your editing changes. After you save your changes and close the document, another Edit Offline dialog box appears, reminding you that you're currently offline and asking whether you want to update the document library on the SharePoint server with a copy of your revised document. Click the Update button in this dialog box to have the updated document saved in your SharePoint document library.
