In This Chapter
Understanding the vital role that lists play in SharePoint 2007
Reviewing the major types of lists you can have in SharePoint sites
Adding lists to your SharePoint site
Adding and importing data into the lists you use
Customizing your SharePoint lists to suit your site's data needs
Lists form the very core of a SharePoint 2007 site. Almost all the information that you share with your fellow team members is in the form of some sort of SharePoint list. Even SharePoint libraries (the subject of the next chapter), although routinely considered a separate SharePoint component, are in fact SharePoint lists that give you information and links to various documents and graphics files you share with your team members.
This chapter gives you an overview of SharePoint lists by introducing you to their general types and functions. The chapter also gives you a rundown on the basic care and handling of SharePoint lists. This coverage includes how to create new lists, edit existing ones, customize their layout, and do fundamental sorting and filtering of their contents. You can then use this information to create custom lists for your teams and present them with all the information they need to work with.
Lists are everywhere in SharePoint. For example, in the main part of the home page of a new SharePoint site, you find three different empty lists — Announcements, Calendar, and Links — that you can immediately start adding data to. And in the left pane of the home page, all the links (including every single one in the Quick Launch) take you to pages that contain their own lists. In fact, clicking the first link in the left pane, View All Site Content, takes you to the All Site Content page, which contains the granddaddy of all SharePoint lists: a list of all the lists that exist in the top-level SharePoint site!
The first thing to know about SharePoint lists is that, rather than being simple laundry lists that catalog a bunch of items, they're more often than not bona fide data lists whose individual items are made up of several different types of data that the lists track.
For example, in the case of the Calendar list on the SharePoint home page, its items consist of the upcoming events that you want to publicize to your team members. And the standard types of data recorded for each of these items include such pieces of information as the event's title, location, starting and ending times, and general description.
The standard types of data that a data list catalogs are known as its fields (title, location, starting time, and so on in the Calendar list), and the individual items made up from the actual data entered into these fields are known as its records (the individual events that the Calendar list chronicles).
As with other applications that work primarily with data (such as Microsoft Excel and Access), the information in data lists is routinely presented in a table layout. In the table, each column contains a different field from the data list, and the individual rows of the table make up its records.
Note
It's important, however, to remember that tabular presentation of a data list is only that. The data in the fields that make up the list's items are stored independently of the table itself. And it's this independence that makes it easy to customize the table by changing the order in which the fields appear within it as well as the number and type of fields that the table displays. In addition, this independence makes it easy to sort the items in the table by various fields of the data list as well as to apply criteria to certain fields that filter the data list so that only the records you want to see remain displayed.
Tip
In a typical SharePoint site, you make great use of this ability to quickly set up custom views of data in particular lists so that only the fields and records currently of interest to the team are displayed on a particular Web page.
Normally, the procedure for adding a new list to your SharePoint site is twofold. First, you create a new list for the top-level site or a particular subsite. Then, you add the data you want to the new list you've created.
Note
Keep in mind that this twofold process collapses down to a single step when you create a new list directly from a spreadsheet table of data stored in the worksheet of an Excel 2003 or 2007 workbook file. In that case, when you create a new list in SharePoint, the program creates two things:
A Web page for the list where you can begin adding data.
A Web Part specifically for the list you create that you can use to place the same list on another page of the SharePoint site. Note that this list shows up in the Lists and Libraries section of the Add Web Parts dialog box. (See Chapter 2 for details on using Web Parts.)
Tip
Not only can you reuse this new Web Part on a different page within the same subsite, but you can also modify its appearance (officially known as a view) without changing how the information is displayed in the original list. For example, you can use the Web Part created for a particular team contacts list to add a view of the list to the Right Web Part zone of the home page of your SharePoint site. There, you can modify the appearance of the Web Part so that only the columns with the team member names and e-mail addresses are displayed. That way, you still have all the contact information on the Web page created for the original list while the Right Web Part zone of the home page just contains e-mail links that make it easy for you and other team members to send each other messages.
SharePoint offers a whole array of different list templates that you can use for your new lists. SharePoint organizes its standard list templates into the following three groups:
Communication: This group contains SharePoint's standard tools for keeping your team members informed and in contact with each other. It includes Announcements, Contacts, and Discussion Board.
Tracking: This group makes it easy to track people, places, and things of interest to you and your team members. It includes Links, Calendar, Tasks, Project Tasks, Issue Tracking, and Survey.
Custom Lists: This group enables you to create made-to-order lists that don't fit any of the other patterns and that contain only the fields (columns) you want and need. It includes Custom List, Custom List in Datasheet View, and Import Spreadsheet.
The following bullet list examines each of the individual templates a bit more closely. Just keep in mind that, when you add a list to a SharePoint site, you can make use of the following templates:
Announcements: Provides a place to publish brief messages, updating team members on some upcoming aspect of the project and/or its current status.
Contacts: Provides a place to publish contact information of all different types (team, vendor, client, you name it) that your team members need during the project.
Discussion Board: Provides a place to get feedback from your team members on some aspect of the project using the familiar threaded discussion format.
Links: Provides a place to share links to other Web sites that contain information of general or specific interest to the team.
Calendar: Provides a place to publicize upcoming events (meetings, project milestones, deadlines, and so forth) that are either of general interest or directly involve members of the team. The calendar list presents this information in the very familiar and graphical layout of a paper version of a daily, weekly, or monthly day planner.
Tasks: Provides a place to publicize a listing of all the tasks that you and your fellow team members need to complete as part of the project.
Project Tasks: Provides a place to publicize the tasks that you and your teams need to complete as part of a Gantt chart — a type of bar chart that illustrates the start and finish dates of the specific components of a project. Note that you can open and edit a Project Tasks list in Microsoft Office Project 2007 (if you use that application in your work) as well as in the Web browser you use to browse the SharePoint site.
Issue Tracking: Provides a place to track issues or problems that need to be resolved in the course of the project. You can use this type of list to prioritize issues, assign their resolution to particular team members, and track their settlement.
Survey: Provides a way to poll individual team members on some aspect of the project and then publicize the group results in the SharePoint site.
Custom List: Provides a way to create a completely customized list that contains only the fields (columns) you need to use.
Custom List in Datasheet View: Provides a way to create a customized list whose data is entered in the familiar datasheet format (very similar to entering data in an Excel worksheet with its column and row format). The great thing about entering data for a list in Datasheet view is that it enables you to quickly make mass edits for the list.
Import Spreadsheet: Provides a way to create a custom list directly from a table of data stored in an Excel 2003 or 2007 worksheet. When SharePoint creates the list from a range of cells in a spreadsheet table, it uses the table's column headings to create the fields.
The procedure for creating a new list for a SharePoint site is very straightforward, although it does differ slightly depending upon the template you select for the list you're creating:
Select the site where you want the list to be.
If you want to add the list to a top-level SharePoint site, select the home page by clicking the name of the site in the Content Navigation Breadcrumb above the name of the current page. If you want to add a list to a particular subsite, select the main page of that subsite by clicking its tab on the Top Link bar below the name of the current page.
Click the Lists link in the Quick Launch of the site you've selected.
SharePoint opens the All Site Content page for the selected site, showing all the lists currently added to the site.
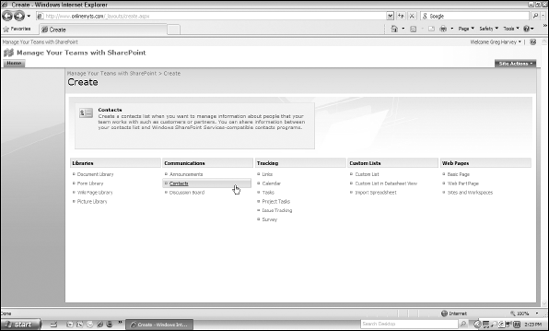
Click the Create button at the top of the listing of all the lists on the All Site Content page.
SharePoint opens a Create page similar to the one shown in Figure 4-1. This page contains links to the many different types of lists you can create. (See the section "The different types of standard lists" immediately preceding this one for details.)
Click the link attached to the type of list you want to create in the Communications, Tracking, or Custom Lists columns of the Create page.
SharePoint opens a New page corresponding to the type of list you've chosen. (You'll use this page to enter a name for the list as well as a description of its function.)
Enter a name for the new list in the Name text box and then press Tab and enter a description of the list in the Description text box. If you're creating a list from a spreadsheet, you also need to specify the workbook file that contains the table in the File Location text box and then specify the range of cells to use in the Import to Windows SharePoint Services dialog box.
For all lists (except those created by importing a spreadsheet), SharePoint automatically displays a link to the page with the new list on the site's Quick Launch. If you don't want the new list to show up on the site's Quick Launch, click the No radio button in the Navigation area of the New page.
Several types of lists (Tasks, Project Tasks, and Issue Tracking) have an option that you can select for automatically sending e-mail notification when ownership of the list is assigned.
When creating a survey, the New page contains Survey Options that you can change when you don't want usernames to appear in the survey results and/or don't want to allow users to answer the survey more than once.
(Optional) Make any desired changes to the default settings of the other options that the particular type of list you're creating offers.
Now you're ready to create the new list.
Click the Create button (or the Import button, in the case of a list created using the Import Spreadsheet link).
SharePoint creates the new list and displays its page so that you can begin customizing its columns or entering its data.
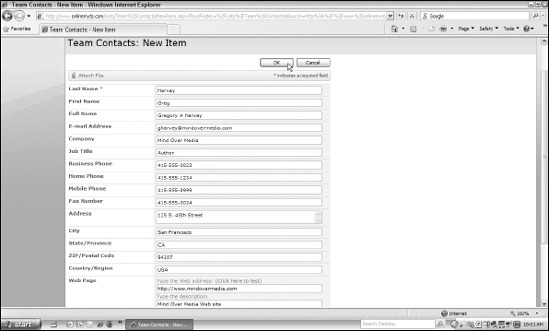
After creating a list using one of the standard list templates, you can begin adding data to it. To manually enter data for a new record, choose New Item from the New drop-down menu. SharePoint then opens a New Item page containing the series of fields (as either single-line text boxes or multi-line list boxes) for the type of list you created.
For example, Figure 4-2 shows the top part of a New Item page for a new Team Contacts list created from the Contacts list template. This New Item page contains a whole series of fields, starting with Last Name and extending all the way down to Notes (not visible in the figure).
Note, however, that for a Contacts list, the Last Name field at the very top is the only mandatory field (indicated by the red asterisk immediately following this field name at the top of the form). This means that all the other fields in this form are optional and don't have to be filled in if you either don't have data for the fields or don't need to track the information in the particular list you're building.
Also note that the data entry for this type of list contains an Attach File link at the top that you can use to upload particular files and attach them to the record you're creating. So, for example, in the case of the Team Contacts list, I can use this link to mark both a team member's resume (saved as a Word document) and his publicity photo (saved as JPEG graphics file) as a part of his contact record in this list.
Tip
When entering information into the fields of a list's data form, keep in mind that a SharePoint data form supports the standard editing keystrokes that you use in Word to move the insertion point/cursor and to edit text. In addition, you can press the Tab key to advance from one field to the next down the data form and press Shift+Tab to move back up to a previous field.
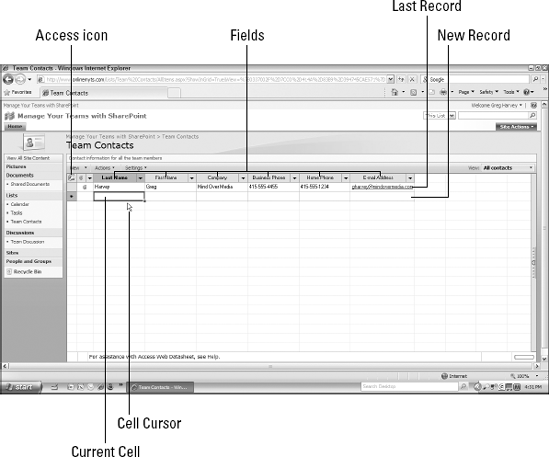
When you finish entering all your information into the various fields of the list's data form, you then click OK to save the record. SharePoint automatically returns you to the list page where entries for the fields in the default view — the All Contacts view, in the example of the Team Contacts list shown in Figure 4-3 — appear at the top, immediately beneath the column (field) names.
Note
Remember that a list typically contains many more fields than are displayed in the columns of the list's default view. For example, in the case of the Team Contacts list, each record may contain up to a total of 18 fields of information (when you include the Attachments field by adding supporting files to any of its records). Contrast this to the mere six fields of information (seven if you count the paperclip icon for the Attachment field) that appear in the columns of the list's default All Contacts view on the Teams Contacts Web page (see Figure 4-3).
If you have the Microsoft Office 2003 or 2007 Professional version installed on your computer and use a Web browser such as Internet Explorer 7 or 8 with Active X controls installed, SharePoint 2007 supports a Datasheet view for most of the lists that you create from standard templates (Calendar, Survey, and Discussion Board being the big exceptions).
Datasheet view enables you to add and edit the contents of your list in a familiar spreadsheet-like environment of columns and rows, which facilitates editing the contents of more than one list item at a time. This Datasheet view also enables you to quickly sort and filter the contents of your list on different columns as well as modify the layout of its current list view.
To turn on Datasheet view (for a type of list that supports it), open the Web page containing the list and then choose Edit in Datasheet from the Actions drop-down menu. (Note that if the Edit in Datasheet option doesn't appear on your Actions menu, this is a clear sign that your computer/browser isn't currently set up to support the Access Web Datasheet view.)
The moment you choose Edit in Datasheet, SharePoint redisplays the contents of the list in a row-and-column grid that sets the list in a table of cells very similar to that used by an Excel worksheet. In addition to the row-and-column grid, Datasheet view adds drop-down buttons to the right of the field names in the top row of the list, and you can use those drop-down buttons to sort and filter the list. This view also adds an Access icon in the upper-left corner of the list, which you can use to select the entire list. The view also adds a row of blank cells beneath that last record of the list into which you can add the entries for the next record. (See Figure 4-4, which shows you the new Team Contacts list with a single record after turning on Datasheet view.)
To add data to a list in Datasheet view, follow these steps:
Use the arrow keys to move the cell cursor to the cell in the first column of the list's final blank row that needs data — or simply click that cell with the white-cross mouse pointer.
SharePoint shows that the cell is selected by outlining the cell's borders with a heavy, dark blue line.
Enter data for the first field of the new record and then press Tab or the → key.
SharePoint advances the cell cursor to the cell in the column to the immediate right and adds a new blank row to the bottom of the list's datasheet.
Enter the data for this field in the current cell and then press Tab or → again to advance to the next field to the right.
Continue entering data for the new record in this manner by repeating Step 3 until you've entered data in the cell located in the final column of that row.
Press the Tab or → key.
SharePoint enters the data you've typed into the last cell of the current row and then automatically moves the cell cursor to the first column in the blank row below, setting you up for adding a new record in that row.
If, when making a cell entry in a new row, you type the same initial letters as a previous data entry made in rows above in that column, SharePoint displays a pop-up menu containing the entry or entries that share the same beginning letters. You can then make a duplicate entry in the new cell (assuming that duplicates are appropriate, as in the case of a field such as the Department, Company, City, State, or Country) simply by clicking that entry in the pop-up menu.
When you finish adding all the records to the list in this manner, you can then take the list out of Datasheet view by performing the next step.
Click the Show in Standard View option on the Actions button's drop-down menu.
SharePoint takes the list out of Datasheet view and back into its Standard view.
Tip
Note that you don't have to enter the data for a new record across successive columns of the final blank row of its datasheet (as outlined in the previous procedure). If you prefer, you can enter the data down the rows of each successive column in the list instead. All you have to do is remember to press the Enter key after you finish each cell entry. When you finish entering the last entry for the first field, simply press the Enter key without making any entry in the final blank row and SharePoint will then advance the cell cursor to the top of the very next column. You can then press the ↓ key to move the cell cursor down to the first blank cell in that new column, where you can begin making the entries for that field.
Note
Remember that when you enter data into a list using its Datasheet view, you are entering data only in those fields whose columns are displayed in the current list view. To enter data for fields in the list whose columns aren't displayed, you either have to add their columns to the list view (see "Modifying the columns in a list in Datasheet View," later in this chapter) or you have to enter that data for those fields in the item's data form (which you can easily open from the datasheet by clicking the item's link in the first column of its record).
In Datasheet view, you can use a number of keystrokes to make selections and perform commands in the datasheet. (See Table 4-1 for details.) For example, to select a range of cells in the list for editing, hold down the Shift key as you press the appropriate arrow keys.
Note
As long as you hold down the Shift key as you press an arrow key, SharePoint increases the cell selection to include all the cells that the cursor moves through (indicated by light blue highlighting of the individual cells and the heavy dark blue line of the cell cursor outlining the borders of the entire selection). Keep in mind, however, that if you forget to hold down Shift as you press an arrow key, SharePoint merely moves the cell cursor to the next cell without extending the size of the cell selection.
Table 4.1. Keystroke Shortcuts for Editing a SharePoint List in Datasheet View
Press This. . . | ...To Do This |
|---|---|
Arrow key | Advance the cell cursor to the next cell in the direction of the arrow (if there is no cell in the direction of the arrow, pressing the key does nothing). |
Tab | Advance the cell cursor to the next cell to the right in the current row. |
Shift+Tab | Advance the cell cursor to the previous cell to the left in the current row. |
Enter | Advance the cell cursor to the next cell down in the current column. (If the cursor is in the last blank cell of a column, it then advances to the top of the next column.) |
Home | Advance the cell cursor to the first cell in the current row of the datasheet. |
End | Advance the cell cursor to the last cell in the current row of the datasheet. |
Ctrl+Home | Advance the cell cursor to the first cell of the datasheet. |
Ctrl+End | Advance the cell cursor to the last cell of the datasheet. |
Page Down | Scroll to the next list page. |
Page Up | Scroll to the previous list page. |
Shift+arrow key | Extend the cell selection in the direction of the arrow. |
Shift+spacebar | Select all the cells in the current row of the datasheet. |
Ctrl+spacebar | Select all the cells in the current column of the datasheet. |
Ctrl+A | Select all the cells in the datasheet. |
Ctrl+Shift+Home | Extend the cell selection from the current cell to the first cell of the datasheet. |
Ctrl+Shift+End | Extend the cell selection from the current cell to the last cell of the datasheet. |
Esc | Restore the previous entry to the current cell before the current cell edit has been completed (by pressing Enter or a navigation key). |
F1 | Open a browser window with Help on using the Access Web Datasheet. |
F2 | Put the current cell into Edit mode by displaying the insertion point cursor in that cell at the end of the cell's current entry. |
Delete | Delete the contents of the current cell selection. |
F8 | Display the Datasheet task pane with buttons for performing common editing tasks and links for using the list with Microsoft Access and Excel. (See the section "Using the task pane in Datasheet view" immediately following for details.) |
Shift+F8 | Hide the Datasheet task pane. |
Ctrl+C | Copy the contents of the current cell selection to the Windows Clipboard. |
Ctrl+V | Paste the contents of the Windows Clipboard into the datasheet. |
Ctrl+X | Cut the contents of the current cell selection to the Windows Clipboard. |
Ctrl+Z | Undo the last edit in the datasheet. |
Shift+F10 | Open the context menu with common editing commands for the current cell selection in the datasheet. |
Note
Keep in mind that you can make some cell selections in a datasheet with the mouse. To select the entire column containing the cell cursor, position the mouse pointer somewhere in the cell with the field name at the top of the column and then click when the mouse pointer changes to a black arrow pointing down. To select the entire row with the cell cursor, position the mouse pointer in the shaded cell at the very beginning of the datasheet row and then click when the mouse pointer changes to a black arrow pointing to the right. To select all the cells in the entire datasheet, position the mouse pointer in the cell with the Access icon in the very upper-left corner of the table and then click when the mouse pointer changes to a black arrow pointing diagonally downward and to the right.
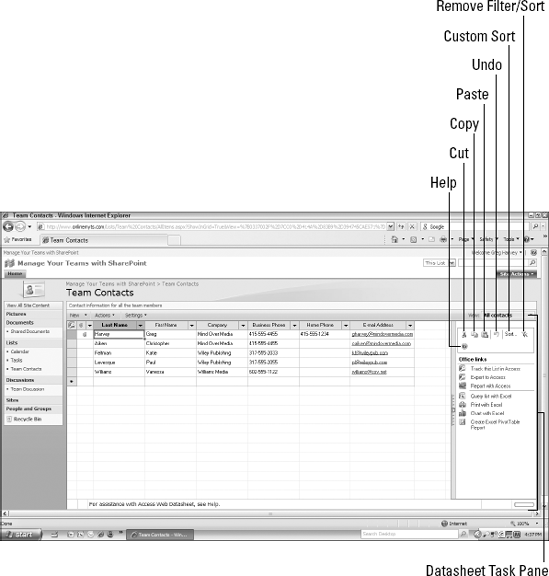
Datasheet view sports a task pane that you can easily display or hide as you enter and edit data in a new list. To open the task pane in Datasheet view, you can either choose Task Pane from the Actions drop-down menu or press F8. To close the task pane, you then either choose Task Pane from the Actions drop-down menu again or press Shift+F8.
Figure 4-5 shows this task pane open in the sample Team Contacts list in Datasheet view. As you can see, the top row of this task pane contains a bunch of buttons that are very useful when you're editing data in the cells of the datasheet.
Immediately below this row of buttons, you find a bunch of links that you can use to work with this list either in Microsoft Access or Excel. (See Chapter 12 for more on using SharePoint data in Office applications such as Access and Excel.)
One of the great features of editing a list in Datasheet view is that this view makes it really easy to modify its columns. All you have to do is select the column by right-clicking its heading and then select one of the following options on its drop-down menu:
Add Column: Select this option to add a new field to the list and display its column immediately after the column currently selected in the current list view. See the section "Adding a new column to the list," later in this chapter for details.
Edit/Delete Column: Select this option to change some settings for the field (including its field type) in the selected column or to permanently remove it from both the current list view and the list's data form.
Column Width: Select this option to widen or narrow the width of the currently selected column. If you select this option, a Column Width dialog box appears, and in it is a dialog box of the same name where you can replace the current column width with a new value. Note that if you narrow a column and then make a data entry in the column that is longer than its new width can display, SharePoint automatically wraps the leftover text to a new line in the row (provided that you haven't selected the Turn Wrap Text Off option on the column's context menu).
Hide: Select this option to temporarily remove the display of the selected column from the list. You can then redisplay all hidden columns by selecting the entire list (by pressing Ctrl+A or clicking the first cell with the Access key icon), right-clicking, and then selecting Unhide from the context menu that appears.
Note
You can also open this context menu and access these options for a particular column in the list by clicking to select the column and then pressing Shift+F10.
When you select the Add Column option on a column's context menu, SharePoint opens a Create Column page for the list, similar to the top part of the page shown in Figure 4-6.
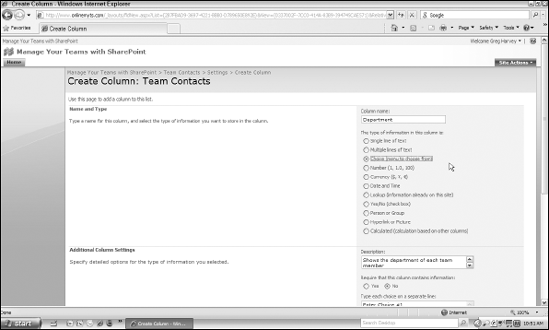
Figure 4.6. I used the options on the Create Column page to add a new Department column to the Team Contacts list.
When adding a new column using the options on the Create Column page, you always specify the following settings:
Column Name: Enter the name of the field in the Column Name text box.
Type of Information in This Column: SharePoint automatically makes all new columns you create a Text field with a single line of text. The program, however, offers a wide variety of different field types from which to choose. To change the field type, click the radio button for that type under this heading. Afterward, select the appropriate options specific to the type of field you choose that then appear in the Additional Column Settings section of the Create Column page.
Description: Enter a description of the new column in the Description text box, indicating the type of information this field is to contain.
Require That This Column Contains Information: SharePoint automatically makes data entry in the new column you're creating optional. If you want to make data entry mandatory, click the Yes radio button under this heading.
Add to Default View: SharePoint automatically adds the new column you're creating to the list when it's displayed in that list's default view. If you'd rather that the new column appear only in a custom list view you create later (as described in "Modifying or creating a new view for a standard list,", later in this chapter), deselect the Add to Default View check box.
Different options appear in the Additional Column Settings section near the bottom of the Create Column page, depending upon the type of field you select under the Type of Information in This Column heading. For example, if you leave the default Single Line of Text radio button selected, the page contains a Maximum Number of Characters text box option (with a default value of 255 characters), a Default Value radio button (with the Text button selected), and an empty text box option (where you can enter the most likely data entry for that field).
However, when you select another type of field besides text with single or multiple lines, the column options in this section of the page will be much different. For example, Figure 4-7 shows you the types of options that appear in this section of the Create Column page when you select the Choice (Menu to Choose From) radio button in the Name and Type section shown earlier in Figure 4-6. However, even here in Figure 4-7, I deleted the original three generic choices (Enter Choice #1, Enter Choice #2, and Enter Choice #3) in the list box entitled Type Each Choice on a Separate Line, and I replaced them with my own particular departmental choices (Editorial, Marketing, Sales, and Accounting).
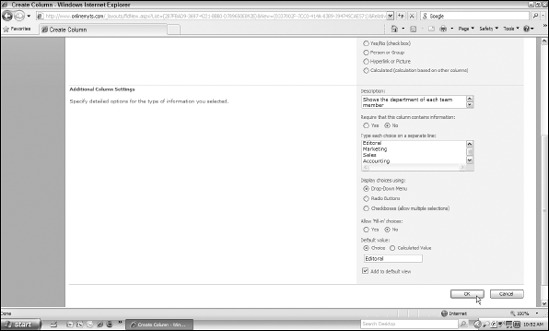
Figure 4.7. Specifying the additional column settings for the new Department column after designating it a Choice field.
Note that these Choice type-specific options not only enable you to specify the user's choices but also let you determine whether these choices appear on a drop-down menu or as radio buttons or check boxes. And when the default Drop-Down Menu option is selected, you can specify whether the user can type his own entry that's not on the drop-down menu and which one of the choices is to appear in the field by default.
SharePoint gives you a wide choice of field types for the new columns you add to a list. Use the following descriptions to help you decide which field type works best for the column you're adding:
Single Line of Text: Use this default field type when the new column requires only a short text entry that normally fits on a single line.
Multiple Lines of Text: Use this field type when the new column requires more text than normally fits on a single line, as would be the case for a field soliciting comments from team members.
Choice (Menu to Choose From): Use this field type when the entry for the new column is to be selected from a predetermined number of choices as might be the case for a custom Vendor field that gives the user a choice of vendors on a short, preapproved list.
Number (1, 1.0, 100): Use this field type when the new column requires a numeric entry, such as a custom Units Ordered field that asks the user to enter the number of items he or she has ordered. When creating a Number field, as well as the default value, you can specify the range of numbers allowed, the number of decimal places to display, and whether or not to display numbers as a percentage.
Currency ($, ¥, €): Use this field type when the new column requires a financial entry, such as a custom Travel Expense field that asks the user to enter travel expenses associated with completing the project. When creating a Currency field, as well as the default value, you can specify the range of values allowed, the number of decimal places to display, and what country's currency format to use in displaying the value.
Date and Time: Use this field type when the new column requires a date or time entry, such as a custom Start Date field that asks the user to specify the date he started work on a particular project or task. When creating a Date and Time field, you can specify whether to include Date Only or Date and Time as well as whether the default date is based on the current date or is calculated.
Lookup (Information Already on This Site): Use this field type when the entry returned to the new column depends upon data looked up in another existing list, as in a custom SSN field that returns a particular team member's Social Security number from an SSN field in another custom list on the SharePoint site called Personnel.
Yes/No (Check Box): Use this logical field type when the new column requires only that a true or false answer be recorded, as in the case of a custom Active Status field that records whether a particular task or issue you're tracking in the list is still active.
Person or Group: Use this field type when the new column requires the entry of an authenticated user on the SharePoint site. When creating a Person or Group field, you can specify whether multiple people or group selections are allowed, whether people only or people and their groups can be selected, whether people can be selected from all authenticated users on the site or only from particular SharePoint groups, and what personal information is displayed in the field when you select the column in the list with the Presence icon (the circle that changes color to reflect a user's current online status).
Hyperlink or Picture: Use this field type when the new column requires a URL link to another Web address or an address containing a graphic file that you want displayed in that field when the list is displayed in Standard view. (Only the URLs and not the pictures themselves show up in this field in a list when the list is in Datasheet view.)
Calculated (Calculation Based on Other Columns): Use this field type when the new column's entry needs to be returned as the result of a formula calculation between values entered into other fields in the same list, as in the case of a custom Extended Price field that multiplies the quantities entered into a Numeric Units field by the value entered in a Currency Price field in the same record. When creating a Calculated field, you specify the formula that determines what operation (addition, subtraction, multiplication, division, or concatenation [for joining text]) is performed between which columns in the list as well as the type of data that the formula returns (text, number, currency, date and time, or logical, Yes or No).
When creating the formula, start by typing an = (equal) sign and then select the first column by clicking it in the Insert Column list box, click the Add to Formula link, and then type the operator (+ for addition, − for subtraction, * for multiplication, / for division, and & for concatenation). Finally, select the second field to use in the calculation from the Insert Column list box. (For details on how to build formulas using simple operators, see my book Excel 2007 For Dummies, from Wiley Publishing).
The records for a new list are automatically sorted in ascending order (A to Z for text fields and lowest-to-highest value for numeric fields) by the primary required field for its type of list (which just happens to be the column displayed in the first column in the list's default view). Datasheet view makes it easy for you to change this default sort order to any order that better represents your data. You simply click the drop-down button to the right of the field name at the top of the column by which you want the list sorted and then click either the Sort Ascending or Sort Descending option at the top of the drop-down menu.
To sort your list based on more than one field, display the Datasheet task pane to the immediate right of the datasheet view of the list (by choosing Task Pane from the Actions drop-down menu). Then, click its Custom Sort button (called Sort) on this task pane to open the Custom Sort dialog box (shown in Figure 4-8). Here, you select the fields from the drop-down menu to sort the list by more than one column in the order from the most general to specific, each time indicating whether to sort the items in each column using the (default) ascending sort order or descending order. After you've selected the fields to sort the list on, click OK to perform the sort.
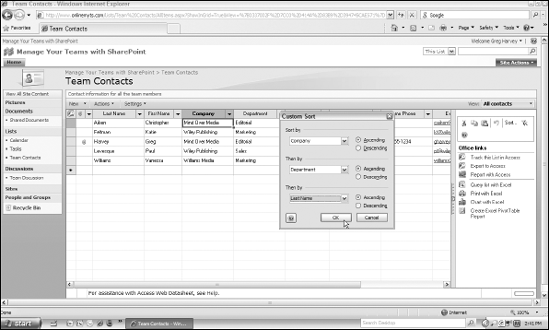
Figure 4.8. I've sorted the Team Contacts list by Company, Department, and Last Name in ascending order.
Tip
To restore a list to its original sort order, simply click the Remove Filter/Sort button (the one with the funnel icon with a red x on it) that appears in the top row of the Datasheet task pane. To remove the Datasheet task pane from the list, choose the Task Pane option from the Actions drop-down menu.
Filtering refers to the process of selecting a particular entry in one or more columns of a list to determine what records are then temporarily displayed in the list. Filtering provides an excellent way to quickly display only those records that you need to work with at a particular time.
To filter a list, open a column's drop-down menu and then click the field entry in the list that you then want to use as the criterion for any filtering. For example, to filter the sample Team Contacts list so that only records for folks who work at Wiley Publishing are currently displayed, click the Company column's drop-down button and then choose Wiley Publishing from the menu. SharePoint then hides all the records where the entry in the Company field is any business other than Wiley Publishing.
As with sorting, when filtering a list you can filter the records using more than one column. For example, perhaps you want to further filter the Team Contacts so that only records for team members who work in the Editorial department at Wiley Publishing are displayed. In that case, click the Department column's drop-down button and then click Editorial. SharePoint then hides all the records for the team members working at Wiley Publishing except for those working in the Editorial department.
SharePoint provides a Custom Filter feature that enables you to filter the list on more than a particular entry in the field. This feature enables you to filter the list on a range of values, the exclusion of values, or text that entries begin with. To open the Custom Filter dialog box for a column, choose the Custom Filter option from the column's drop-down menu.
SharePoint then opens the Custom Filter dialog box, similar to the one shown in Figure 4-9. This dialog box contains a series of three drop-down list boxes in the left column, enabling you to select the conditional operators for filtering, and a series of three combo boxes (where you can enter a value or select one from the drop-down list) directly opposite in the right column, enabling you to specify the values or text entries that the conditions use. In between the three rows of drop-down list box/combo box combinations, you find a pair of And and Or radio buttons. You can use these buttons to make the conditions you set up additive (meaning that all the conditions in the series must be met in order for the filtering to take place) or selective (meaning that the filtering takes place when any of the series of conditions are met).
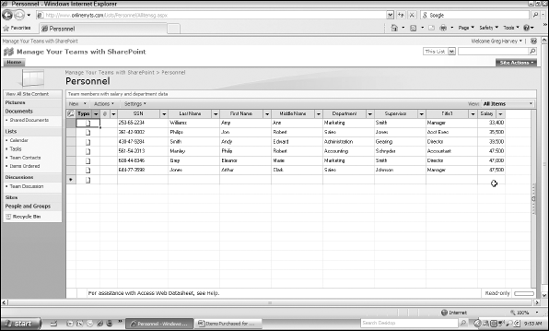
Figure 4-9 illustrates how you can use the Custom Filter dialog box to set a range of values on which a list is filtered. In this case, you're dealing with a Personnel list that contains a Salary field that you want use in the filtering. To filter the list so that only the records for employees who make between $33,000 and $47,500 a year will display, first select the Is Greater Than or Equal To operator from the first drop-down list and then type 33000 in the corresponding text box. Then select the Is Less Than or Equal To operator in the drop-down list in the second row of the Custom Filter dialog box and type 47500 in its corresponding text box, without changing the default selection of the And radio button between the two rows.
Figure 4-10 shows you the filtered list after you click OK in the Custom Filter dialog box. As you can see, now only records where the annual salary is between $33,000 and $47,500 are displayed in the Personnel list.
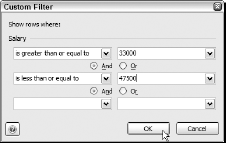
Figure 4.9. I've created a custom filter to display records in a Personnel list for a range of salaries.
Tip
To remove the filters from a list so that all of its records are once more displayed, choose Show All from the filtered column's drop-down menu. If you've filtered the list based on entries in several columns, you can remove all the filters at one time by clicking the Remove Filter/Sort button in the top row of the Datasheet task pane. Also, be aware that SharePoint automatically removes any filtering on a list the moment you switch it out of Datasheet view and back into Standard view.
Windows SharePoint Services 3.0 no longer supports a command for importing data directly from another file into a list's datasheet on your SharePoint site. However, you can still do it by using the good old copy-and-paste-through-the-Clipboard trick to get data stored in a compatible format into the list's Datasheet view.
The key to copying and pasting data is that the layout of the data in the source document must be identical to that of the SharePoint list you're importing it into. This means not only that the fields must contain the same type of data (text for a text field and numbers for a numeric field), but that the fields must be arranged in the same order in the source document as they are in the SharePoint list.
In other words, if you've created a table in Word or Excel with four fields in the column order of Item Name, Date Ordered, Units, and Price, your SharePoint list must have these same four fields in the same column order. Furthermore, the initial Item Name column must be a text field (usually with a Single Line of Text), the Date Ordered field must be a Date and Time field, and the Units and Price columns must be numeric. (Units can be a Number field, and Price can be a Currency field.)
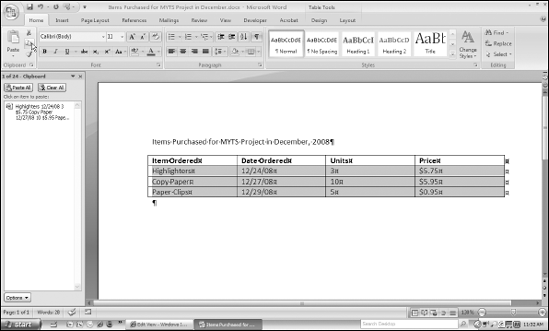
Figures 4-11 and 4-12 illustrate how easy it is to copy and paste information in this manner. Figure 4-11 shows a simple table kept in a Word 2007 document whose data you want to copy to the custom SharePoint list shown in Figure 4-12. To make this kind of copy, all you do is open the Word document with the source data table in a program window and then open the page with the destination SharePoint list (in Datasheet view) in a browser window. Then follow these simple steps:
Switch to the Word 2007 window and then select the cells of the table in the Word document that you want copied to the SharePoint list.
When selecting the cells, you don't need to select the column headings in the Word table, as these already exist in the custom SharePoint list. You do, however, need to select entire rows (records) of the Word table because you want all the data copied to their corresponding fields in the SharePoint list.
Copy the selected data to the Windows Clipboard by clicking the Copy button on the Ribbon (or by pressing Ctrl+C).
Word copies the selected table data to the Clipboard.
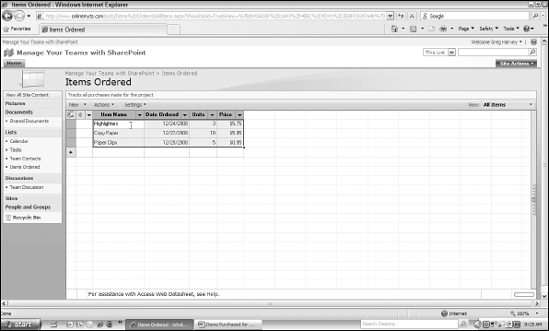
Switch to the browser window displaying the SharePoint list and then locate the first blank cell in the first row of the list.
In the example of the Items Ordered list, the first blank cell in the datasheet is the one directly beneath the one with the Item Name column heading.
Paste the table data copied to the Clipboard into the SharePoint list by right-clicking the first blank cell you located in Step 3 and then choosing Paste from the drop-down menu (or by just pressing Ctrl+V).
SharePoint copies all of the table data that was copied to the Clipboard into the SharePoint list, creating new rows as needed, as shown in Figure 4-12.
Tip
If you use Outlook 2007, you can easily copy records into a SharePoint list created from the Contacts list template by connecting the list to Outlook. (If you're not up to speed on connecting lists, don't worry; Chapter 11 has all the details you'll need for connecting SharePoint lists with Outlook and doing this sort of neat stuff.) You can then drag the contacts stored in your Contacts folder (or some other subfolder in the Contacts module) into the Outlook folder created for your SharePoint Contacts list either by dragging and dropping or copying and pasting. When you then open the list in the SharePoint site (or refresh the page containing the list), voila! The contact records you copied locally in Outlook are now displayed in the list on the SharePoint site.
Whenever you create a new SharePoint list using the Custom List or Custom List in Datasheet View template, the program gives you a list with only two columns:
In almost all cases, you'll want to add to (or at the very least customize) the default Title field a bit. To add other fields to the custom list and/or edit the Title field that SharePoint automatically adds to it, click the Settings button at the top of the list and then choose one of the following options from its drop-down menu:
Create Column: Choose this option to add a new field to the default Title field in the list. SharePoint opens the Create Column page where you specify the column name, type, description, and other settings. (See the section "Adding a new column to the list" earlier in this chapter for details.)
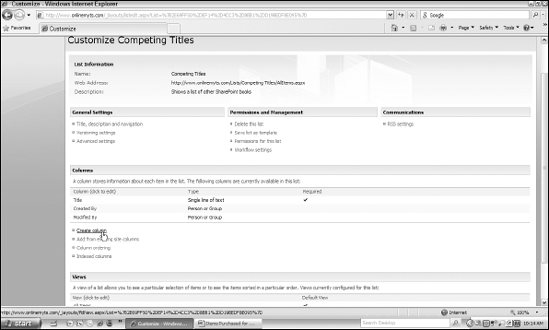
List Settings: Choose this option if you want to edit the Title field, add additional fields to the list, or modify other list settings. SharePoint opens a Customize page, similar to the one shown in Figure 4-13. To edit the default Title field, click the Title link to open a Change Column page where you make your modifications. To define a new field, click the Create Column link to open the Create Column page. (See the section "Adding a new column to the list" earlier in this chapter for details.) To add a field to the list from the many predefined fields available to you, click the Add from Existing Site Columns link to open the Add Columns from Site Columns page. Use that page to add columns to the list by clicking their names in the Available Site Columns list box on the left and then clicking the Add button to copy them to the Columns to Add list box on the right.
After adding fields to the list, you can click the Column Ordering link on the list's Customize page to modify the order in which the fields appear in the data form your team members use to add items to the list. Simply indicate its new field position from the top of the data form by selecting its number with the drop-down list boxes attached to each Field Name on the Change Field Order page that appears.
Note
Keep in mind, however, that changing the column ordering in the data form in this manner has no effect whatsoever on the order in which the columns appear in the list's default view. To change this ordering, you must modify the default view or create a new view that uses a different column ordering.
Regardless of what type of list you create in SharePoint, the program creates a default view for the list. This default view determines what information is displayed in the list as well as how it's displayed.
If the default view doesn't include all the information (fields) that you want your team members to see or includes information that your team doesn't use, you can modify its settings. Better yet, you can create additional views for the same list customized to include just the information your teams need. You can then select any of these new views to display the data in the original SharePoint list on its Web page or in the custom Web Parts list that you subsequently add to other pages in the same site.
To modify the settings for the existing list view, follow these steps:
Open the Web page for the list whose view you want to modify.
If the list is displayed in the site's Quick Launch, you do this by clicking its link in the Lists category. If the list isn't displayed there, first click the Lists link in the Quick Launch to open the All Site Content page and then click the list's link in the List section.
If the view you want to modify isn't already displayed on the list's Web page (indicated by the view name displayed in the View button), choose the name of the list view you want to change from the View drop-down menu.
If you haven't yet created any additional views for the list (see the "Creating a list view" section that follows), the name of the sole default list appears in the View drop-down menu. (Most often, this view is called All Something or Other as in All Contacts or All Items.) There won't be any others you can choose from the drop-down menu.
Choose Modify This View from the View drop-down menu.
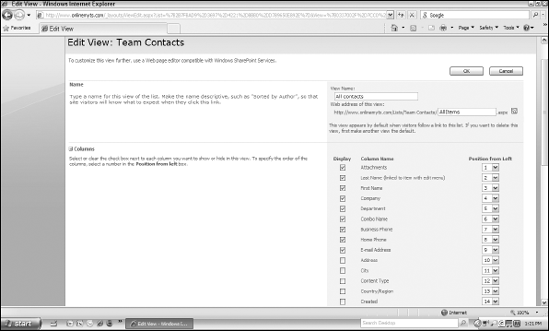
SharePoint opens the Edit View page for the selected view (similar to the top of the page shown in Figure 4-14).
Make all necessary changes to the settings in the various categories on the Edit View page and then click OK.
SharePoint then saves your updates as part of the selected list view and returns you to the list's Web page, where the list now reflects the modifications you made to the view.
A list's Edit View page contains a fair number of settings, arranged in the following categories:
Name: The Name settings enable you to rename the list and/or change the address of the Web page that contains the list.
Columns: The Columns settings enable you to determine which columns are displayed in the view you're modifying and the order in which they appear in the list (from left to right). You add columns to the list by selecting their check boxes, and you remove them by deselecting their check boxes. Use the Position from Left drop-down list boxes to fix their sequential numbering that then determines the order in which they appear in the list.
Sort: The Sort settings determine which field or fields are automatically used to sort the list items in that view. To change a view's default sort order, select new columns in the First Sort by Column and/or the Then Sort By Column drop-down list boxes. To have SharePoint use descending order when sorting on a particular column, you then select its Show Items in Descending Order radio button as well.
Filter: The Filter settings determine whether all the items added to a list are automatically displayed in that view. To modify the view so that SharePoint automatically filters the list, select the Show Items Only When the Following Is True radio button and then use the drop-down list box and text box settings to set up the condition for a column or columns. The condition determines which rows of the list are displayed.
Group By: The Group By settings determine whether SharePoint arranges the items in a list in groups and subgroups complete with Expand/Collapse buttons that your users can then click to show and hide the groups' items. Here's what you can do with the Group By settings:
To modify the view so that SharePoint automatically groups the list items (and then sorts them within each group and subgroup in either ascending or descending order), click the column to be used first in grouping in the First Group By the Column drop-down list box. If you then want SharePoint to further arrange the items in the list by a subgroup found within the first group (such as Teams within Departments), select its column in the Then Group By the Column drop-down list.
To have SharePoint use the descending sort order for either or both columns used to create the main group and subgroup, click the appropriate Show Groups in Descending Order radio button.
To have these groupings expanded in the list view, click the Expanded radio button.
To change the maximum 100 groups displayed on each page, enter the new higher or lower value in the Number of Groups Per Page text box.
Totals: The Total settings determine which field or fields in the list are used in creating arithmetic calculations — usually totals in the case of numeric fields and counts in the case of text fields. To have SharePoint perform a calculation on the entries in a particular field, select the type of calculation to perform on that field from the Total drop-down list. In the case of text fields, you're limited to the Count function. However, in the case of Date and Time fields, you can also choose between Average, Maximum, and Minimum functions. And in the case of Number and Currency fields, you can also choose between the Sum, Std Deviation, and Variance functions.
Style: The Style settings determine what basic layout the view uses. To select a new style for the view, click its name in the View Style list box.
Folders: The Folders settings determine whether a list that uses folders shows the items inside their folders in the view or creates what SharePoint calls a flat view of the items, that is a straight listing of the items without the normal folder hierarchy you see in a folder list.
Item Limit: The Item Limit settings determine how many list items are displayed on each Web page. To change the maximum number of items displayed on each Web page, enter a new higher or lower value in the Number of Items to Display text box. To make the new value you enter into this text box the maximum number of items the list returns (rather than simply the maximum number of items displayed per page), click the Limit the Total Number of Items Returned to the Specific Amount radio button. Keep in mind that limiting the number of items returned in your view can really make the pages load faster, especially when you're dealing with a list with lots and lots of data.
Mobile: The Mobile settings determine whether the list view is available on a mobile device, such as a cell phone that has Internet access and that uses a SharePoint-compatible Web browser. To make the view you're modifying available on such a mobile device, select the Make This a Mobile View check box. To further make the view the default view for the list on the mobile device, also select the Make This the Default Mobile View check box as well.
Note that both these Mobile view settings apply only to views that were created as Public views rather than Personal views, meaning that they can be used by any team member who has access to the SharePoint site (rather than just by the user who created the view). Note also that all default views that SharePoint creates for the new list are automatically Public views. The only way to designate a view as a Personal view is to do so when you first create a new view. (See the "Creating a list view" section that follows for details.)
Creating a new view for a list is a two-step procedure: First, you select a View format to use as a general guide for the view, and then you specify the view's settings (using many of the same options as when editing a view).
To start this process, you display the Web page with the list for which you want to create a new view (either by clicking the list's name in the Quick Launch or by clicking the Lists link in the Quick Launch followed by clicking the list's name in the Lists section of the All Site Content page). Then, choose Create View from the View drop-down list.
SharePoint then opens a Create View page for the list, showing the various formats you can use as a guide in creating the new view (similar to the page shown in Figure 4-15). The View formats that you can select from the Create View page include:
Standard view: This format displays the items in the list on a Web page in some sort of tabular layout.
Datasheet view: This format displays the items in the list in a datasheet similar to an Excel worksheet, with columns and rows that you can quickly edit.
Calendar view: This format displays the items in a list visually as a daily, weekly, or monthly calendar like you see in a standard paper day planner (and used by the default Calendar list that SharePoint automatically adds to the top-level site).
Gantt view: This format displays the items in a list visually using a Gantt bar chart that tracks the progress of certain items over time. Reserve this format for lists that track tasks that you or your teams must accomplish and that have fields that record important milestones and deadlines.
Note
Note that if your computer has Microsoft Access 2007 installed on it, the Choose a View Format section of your Create View page also contains an Access View link that you can click to launch Microsoft Access 2007 and then use this database application to create an Access form from the list's data. You can use this Access form to edit the list's data or to create a report within Access. (See Chapter 12 for more on using SharePoint with Access 2007.)
Tip
The Create View page also displays a Start from an Existing View section that contains a list of all the existing views for the selected list. If you know that the new view you're creating for a list is very similar to one that already exists, you can save time by basing the new view on an existing one. Simply click the name of the existing view in this section and then edit and modify its original settings as needed for the new view.
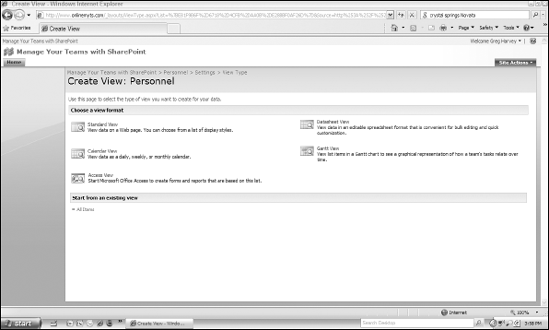
Figure 4.15. Select a View format for a new view being created for the Personnel list on a SharePoint site.
After you select the View format to use for a new view, SharePoint opens a Create View page for the list, using the default settings for the particular format you select. You can then modify these settings as needed (see the section "Modifying a list view" earlier in this chapter for details) before you click OK to have SharePoint create the new view and apply it to the list for which you created it.
After creating multiple views for a particular list, you can then apply any one of them to the list when the list is displayed in the SharePoint site.
Simply click the View button that appears on the right side of the command bar at the top of the page and then choose the name of the view you want to apply to the list from the View button's drop-down menu. SharePoint then immediately redisplays the items in the list using whatever settings you've defined for that view.
Whenever you create a new list for your SharePoint site, the program automatically creates a Web Part for that list. You can then use this new Web Part to display the list on any page of the same SharePoint subsite that requires the list information. Not only that, but you can then apply one of the custom views that you've created to the list data displayed in the Web Part without affecting the view used to display the original list on its Web page.
You can put this technique to good use whenever you find the need to create a condensed version of a much larger, original list. This condensed version then presents the full list's information in some way that's much easier for your team members to digest and use. You can sometimes do this by reducing the number fields used in the custom view. Other times, you can accomplish this with a custom view that filters the full list so that only records vital to a specific task or activity are displayed. You can even sometimes make this happen by selecting a more graphic format for the custom view (such as the Calendar view or Gantt view) that presents the list's full information in a more visual way.
To visualize how this technique might work for you, follow along with the steps for creating a condensed version of the Team Contacts list on the SharePoint site home page that team members can use to send e-mail messages to one another without having to access the complete Team Contacts list on its own Web page.
To create this "condensed" Team Contacts list for the home page, start out with the Web Part that SharePoint automatically generates when the original Team Contacts list is created. Then customize the Web Part with the help of a custom E-Mail view fashioned for the list that displays only 3 of its 18 possible fields: Last Name, First Name, and E-Mail Address (because this is all the information needed for one team member to e-mail another). And it just so happens that when the Team Contacts list is displayed using only the three fields in the E-Mail list view, the list fits perfectly in the width of the Right Web Part zone on the home page.
To add this handy form of the Contacts List to the Right Web Part zone of the SharePoint home page, follow these steps:
Click the Home tab on the Top Link bar.
SharePoint displays the home page of the SharePoint site.
Choose Edit Page from the Site Actions drop-down menu.
SharePoint puts the home page into Edit mode, which shows the location of the Left and Right Web Part zones.
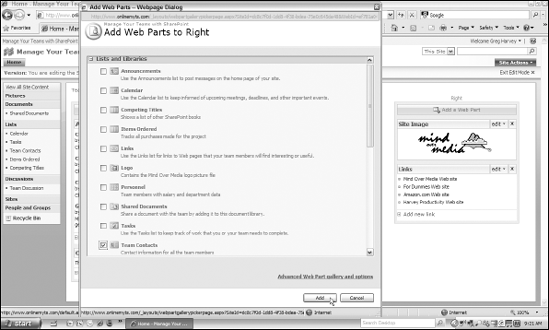
Click the Add a Web Part button at the top of the Right zone.
SharePoint opens the Add Web Parts to Right dialog box shown in Figure 4-16.
Select the Team Contacts check box in the Lists and Libraries section and then click the Add button.
SharePoint closes the dialog box and redraws the screen, displaying a copy of the Team Contacts list at the top of the Right Web Part zone.
Click the Edit button on the Team Contacts Web Part's title bar and then choose Modify Shared Web Part from its drop-down menu.
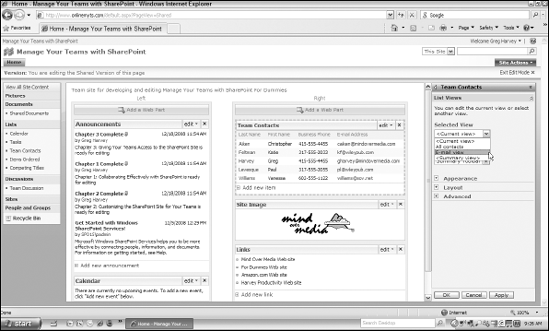
SharePoint opens the Team Contacts task pane with the List Views section displayed at the top, as shown in Figure 4-17.
Choose E-mail View from the Selected View drop-down menu.
SharePoint displays an alert dialog box warning that switching views removes changes made to the view and can disable Web Part connections.
Click OK in the alert dialog box and then click OK in the Team Contacts task pane.
SharePoint closes the task pane and redisplays the Team Contacts list using E-mail view.
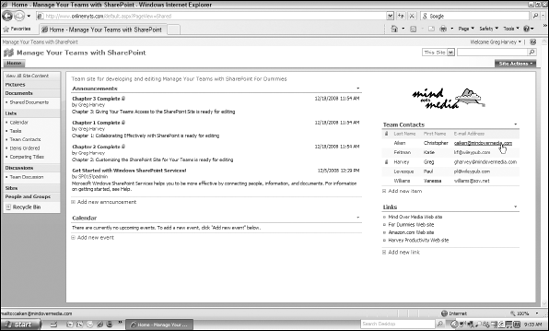
Drag the Team Contacts list down in the Right Web Part zone and drop it so that the list is repositioned immediately below the Site Image Web Part with the company logo and then click the Exit Edit Mode button.
SharePoint takes the home page out of Edit mode and redraws the page with the condensed form of the Team Contacts list displayed immediately below the company logo, as shown in Figure 4-18.
Now, team members can e-mail one another simply by clicking the e-mail address link next to the names in the copy of the list on the home page. And should they need more information on a team member, such as their business telephone number or department, they can still look that information up in the original form of the Team Contacts list accessed by clicking the Team Contacts link in the Quick Launch.