In This Chapter
Editing an Office document saved in a SharePoint document workspace
Saving Word documents directly to your SharePoint document libraries
Exporting Excel worksheet data into custom SharePoint lists
Importing Excel worksheet data into custom SharePoint lists
From the perspective of the typical SharePoint user, one of the most satisfying things about using SharePoint 2007 is how well integrated it is with the later versions of Office applications (2003 and later), especially the core programs such as Microsoft Word, Excel, and PowerPoint.
A big part of this integration is provided by the Document Management pane (called Shared Workspace in Office 2003) in these core Office programs. You can use these panes to create and maintain SharePoint document workspaces (see Chapter 9) as well as to collaboratively edit their documents. Using the controls provided by the Document Management (Shared Workspace) panes, your team members can make their edits on the document saved in the workspace on the SharePoint site, and you, as the team leader, can determine which edits to save in case of conflicting changes.
When it comes to using Word 2007 with your SharePoint site, you can not only save and upload your documents to your SharePoint document libraries (see Chapter 5 for details on creating SharePoint document libraries) but also create and post your SharePoint blog entries (see Chapter 8 for details).
When it comes to Excel and your SharePoint site, you can import Excel worksheets to create new custom lists (see Chapter 4) as well as publish Excel worksheet tables directly to a new custom SharePoint list. This makes it extremely easy to share the latest worksheet data with the members of your team who rely on the data in order to make intelligent and timely decisions.
Note
If your SharePoint site happens to use MOSS 2007 technologies, you may be able to make use of its Excel Services, which greatly enhance SharePoint integration with Microsoft Excel. This is because Excel Services enable SharePoint to maintain dynamic connections between the data in Excel worksheets and the SharePoint lists that use these data. Excel Services also includes a special Excel Web Access Web Part that enables you to display parts of Excel worksheets in various Web Part zones on your SharePoint site's Web Part pages.
Many of today's knowledge workers are very comfortable using the core Office programs Word, Excel, and PowerPoint to communicate their ideas and share vital information. If you had the opportunity to peruse Chapter 9, you know that SharePoint enables collaborative editing of the document files created with these applications in a special location referred to as a document workspace.
The great thing about SharePoint document workspaces is that not only do they enable you (as an administrator) to set up and maintain the document workspace from within the Office document (see Chapter 9 for details), but they also enable you and your team members to access these shared documents saved on the SharePoint server right within the comfort of the Office applications on their local computers.
Moreover, when the documents you place in these document workspaces are edited at the same time by different team members (all of whom must have at least Contribute-level site permissions — see Chapter 3) and this simultaneous editing results in conflicting changes, you, as team leader, can easily resolve these conflicts on the SharePoint site right within the native Office applications used to create the documents.
Figure 12-1 shows an Excel 2007 Employee Data List worksheet containing a table of personnel information. I created a SharePoint document workspace from this Excel workbook file by clicking the Office button and choosing Publish
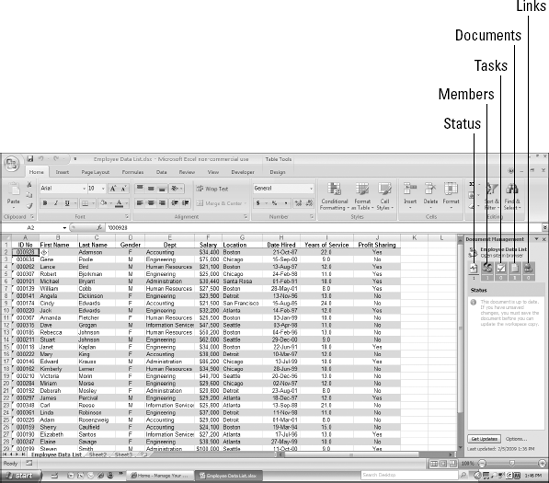
Figure 12.1. Using the Document Management pane in Excel 2007 to administer the SharePoint document workspace created from this worksheet.
Note
If you're using Excel 2003, this pane is referred to as Shared Workspace. You open the Shared Workspace pane in an Office 2003 program by choosing View
Note
Don't forget that document workspaces that you create from within Office applications such as Excel do not automatically show up on the SharePoint site's Quick Launch. If you don't manually add their links to the Quick Launch (see Chapter 9 for details on this procedure), you must open the workspace from the Sites section of the SharePoint site's All Site Content page.
After creating the document workspace, you can use buttons and links that appear in the Document Management (or Shared Workspace) pane to administer the workspace. The first thing you probably want to do with a new document workspace is to give the other team members who will be reviewing and potentially editing the document access to it.
To add team members to a document workspace in Excel 2007, for example, follow these steps:
Click the Members button at the top of the Document Management pane.
Excel displays your name as the sole member of the document workspace in the Document Management pane.
Click the Add New Members link near the bottom of the Document Management pane.
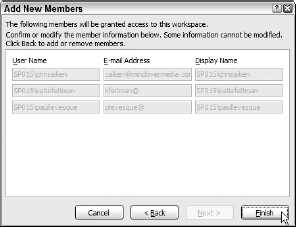
Excel displays an Add New Members dialog box similar to the one shown in Figure 12-2. Here, you specify the e-mail addresses of the team members you want to add as members (all of whom must already be authenticated users of the SharePoint site — see Chapter 3) and select their permission level.
Type the e-mail addresses or usernames of all the team members who need access to this document workspace. Separate each e-mail address or username entry with a semicolon (;).
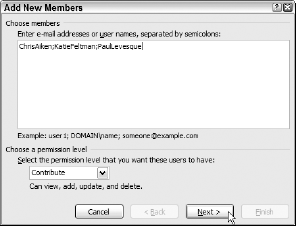
Figure 12.2. Adding authenticated users to the document workspace in the Add New Members dialog box.
If any of your team members have more than one e-mail address, be sure to enter the e-mail address that is associated with their username on the SharePoint site in this list box.
(Optional) Select a permission level (other than Design) for the team members you're adding to the document workspace by clicking Full Control, Contribute, or Read on the Choose a Permission Level drop-down menu.
The default Design permission lets team members approve and customize the document workspace as well as view, add, and update the contents of its document(s). Select Contribute only if you want them to be able to view and edit their document(s) in the workspace or Read if you want to restrict them to reviewing. Only select Full Control when you're granting access to other site administrators to whom you want to give the ability to delete, customize, or edit the workspace and its documents.
Click the Next button.
Excel displays a second Add New Members dialog box similar to the one shown in Figure 12-3. This dialog box displays the username, e-mail address, and display name for each of the team members you just added.
Verify that the list of team members displayed in the second Add New Members dialog box is complete and then click the Finish button.
Excel displays an Add New Members alert dialog box that indicates that all your team members were successfully added to the document workspace and asks you to confirm by sending an e-mail invitation to each of them.
Click the OK button in the Add New Members alert dialog box.
Excel opens a new e-mail message in Outlook 2007 similar to the one shown in Figure 12-4. This message lets each team member know that he's been granted access to your document workspace. It also gives each member a live link to the document workspace and lets him know the permission level he has. You can then customize this e-mail message with your own comments and directives, if you wish, before you send it.
(Optional) Customize the message with any of your own comments or instructions that you want your team members to have as part of the initial message inviting them to visit the document workspace.
Click the Send button.
Outlook sends the e-mail message to each team member. Windows then closes Outlook and returns to Excel, where the Document Management pane now displays the names of all the team members you just added.
Note
The Document Management pane divides the team members added to the document workspace into two camps: Online and Not Online. Further, should any of the currently not-online team members suddenly go online with Windows Instant Messenger or Office Communicator, this change in status is indicated in the list of display names in the Document Management pane: A color is added to the otherwise transparent ball (called the Presence icon) that appears in front of the person's name. You can chat with that team member directly by using Instant Messenger.

Many times, after adding your team members to a new document workspace, you want to assign them specific tasks with appropriate milestones and deadlines. You can do this in the Office application that you use to create a new document workspace and to edit the documents you place there. Simply follow these steps:
Open the document in its native Office application and then click the Tasks button in the Document Management pane.
To ensure that the Document Management pane automatically opens each time you open a document in its native Office program, click the Options link in the pane. Next select the check box called The Document Is Part of a Workspace or SharePoint Site that appears at the top of the Service Options dialog box under the Show the Document Management Pane at Startup When heading. Click OK.
When you click the Tasks button in the Document Management pane, the Office program displays all the tasks currently assigned. This pane also contains links to add a new task, set up e-mail alerts, and review workflow tasks (see Chapter 10) associated with the document workspace.
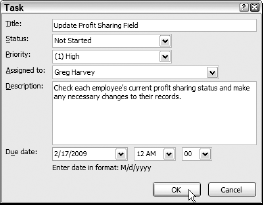
Click the Add New Task link in the Document Management pane.
The Office program opens the Task dialog box similar to the one shown in Figure 12-5. Here, you specify a title for the task, its status, its priority, the team member to whom the task is to be assigned, a description, and a due date.
In the Task dialog box, enter a title for the task, select the team member to whom the task is assigned, enter a description of the task, and select its due date and time in the appropriate fields.
By default, the status of a new task is Not Started and its priority is Normal. You can modify either or both of these settings if the task is already underway and needs a higher priority level.
(Optional) To elevate the status or priority of a new task, select the appropriate option in the Status or Priority drop-down list box.
Click the OK button.
The Office 2007 application program adds the new task to its Document Management pane. To send out an alert to yourself as well as to the person to whom you've assigned the task, click the Alert Me About Tasks link in the Document Management pane and then select the appropriate settings in the New Alert page that appears on the SharePoint site before you click OK.
The beauty of using a SharePoint document workspace to edit an Office document is that different team members can all be working on local copies of the document saved to the hard disks on their own computers at the same time. However, if a team member attempts to save his changes to the workspace copy and these changes conflict with changes that some other team member has made to that copy, he then needs to resolve the conflicts by deciding which version of the document to save on the document workspace.
Note that when a team member opens the Office document from the SharePoint document workspace and then saves the document locally on the hard disk of his computer, the Office application displays an alert dialog box asking him if he wants to be able to update the workspace copy of the document with the changes he makes on his local copy.
After the team member clicks the Yes button in this alert dialog box, if there are conflicts between the version of the document on his computer and the copy on the document workspace, the Status in the Document Management pane contains a message telling him that his changes conflict with those made to the workspace copy. When the user clicks the Document Updates link that appears beneath this message in the Document Management pane, the Office application opens a Document Updates pane to its immediate right (see Figure 12-6).
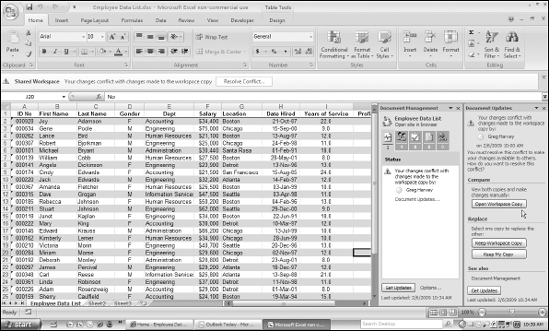
The team member can then click the Open Workspace Copy button in the Document Updates pane to open the copy of the document in the workspace on the SharePoint site so that he can directly compare the edits made in this version on the server to those that he's made to the document on his local computer.
When he has determined which copy of the document needs to be saved (both on the workspace and on his computer), he clicks either the Keep Workspace Copy button to abandon his changes in favor of those on the workspace, or the Keep My Copy button to overwrite the server copy with his local changes. The Office application then displays an alert dialog box that reiterates which copy of the document is going to replace the other. He must click the Yes button to have the changes saved and the server and local copies synchronized.
After the Office application saves the selected version and synchronizes the server and local copies, the Document Updates pane contains only a View Previous Copy button that you can click to open the earlier version that didn't get synchronized. In addition, the Status information displayed in the application's Document Management pane now indicates that the document is up-to-date.
If you're anything like me, you do almost all your writing and a good deal of the composing of your lists in Microsoft Word documents. If your office uses Word 2007, you'll find it a snap to publish these Word documents to your SharePoint site (without having to do anything with your Web browser).
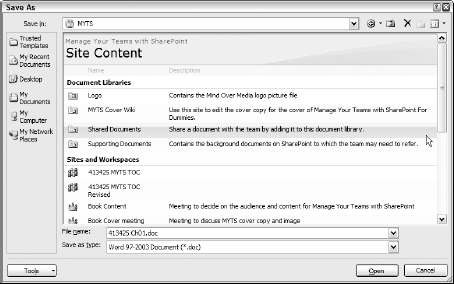
To save a copy of the document you're editing in Word 2007 directly on the SharePoint site, simply use the program's Save As command (click the Office button and then select the Save As option or press F12). Word then opens the Save As dialog box, where you replace the suggested filename in its File Name text box with the URL address of your SharePoint site before you click the Save button.
Word then connects to your SharePoint site (on some systems, after prompting you for your User Name and Password if the site is hosted) and displays its Site Content page showing all its document libraries, sites, and workspaces in the Save As dialog box (as shown in Figure 12-7). You then select the SharePoint document library, site, or workspace in which to save the Word document by double-clicking its icon, or by clicking the item and then clicking the Open button. When you click the Save button after selecting the document library, site, or workspace, Word saves a copy of the document directly on the SharePoint server.
Note
Remember that you can use this very same Save As method in other Office applications such as Excel and PowerPoint to save their native documents directly to your SharePoint site.
Just as Word gives you mastery over the written word, Excel gives you mastery over all kinds of numerical data (especially financial and statistical data). For this reason, many SharePoint users need to be able to supply their sites with data entered into particular Excel spreadsheets (technically known as worksheets).
Excel 2007 provides two methods for bringing its spreadsheet data to your SharePoint site:
Export the data from an Excel worksheet by creating a new custom SharePoint list.
Import the data from an Excel worksheet into a new custom list that you create in SharePoint.
Note
Keep in mind that importing and exporting Excel worksheet data to a SharePoint site list does not create any kind of dynamic link between the original worksheet and the new list. These kinds of imports and exports are much more like making a static copy of the data. Therefore, when you update the data in the worksheet, you must remember to also manually update the custom list by repeating the import or export. Also, remember that you must manually add links to the custom lists created from exporting or importing Excel worksheet data to the SharePoint site's Quick Launch.
To export a table of worksheet data into a SharePoint list, follow these steps:
Open the worksheet in Excel 2007 and then select the first cell in the table of worksheet data that you want to export (this should be the cell that contains the first column heading).
Next, you need to convert the cell range containing the data (including the row of column headings at the top) into a bona fide worksheet table.
Click the Format as Table button in the Styles group of the Home tab on the Ribbon.
Excel selects all the cells that it thinks constitutes the worksheet table, while at the same time displaying the Format As Table dialog box that shows the range's address in its text box.
If necessary, adjust the cell selection to include all the cells you want to export by clicking and dragging through them in the worksheet itself, and then click OK.
Excel applies one of its table style formats to the cell selection. Drop-down buttons appear on the right side of the cells in the top row with the table's column headings.
Click the Export button in the External Table Data group and then click the Export Table to SharePoint List option on its drop-down menu.
The Export Table to SharePoint List – Step 1 of 2 dialog box (similar to the one shown in Figure 12-8) appears.
Enter the URL address of your SharePoint site in the Address text box and then press Tab twice.
The first time you press Tab, Excel advances the cursor to the Create a Read-Only Connection to the New SharePoint List check box. The second time you press Tab, Excel advances the cursor to the Name text box.
Type a name for the new SharePoint list in the Name text box and then press Tab.
Excel advances the cursor to the Description text box.
Type a description of the new list and then click the Next button.
Excel displays the Export Table to SharePoint List – Step 2 of 2 dialog box (similar to the one shown in Figure 12-9), displaying the data type (Text, Number, and so on) that new SharePoint list will have for each column in the table of worksheet data.
Check that the data types are correct for each column of the worksheet table and then click Finish.
Note that if a column doesn't have the correct data type associated with it, you need to click the Cancel button in the dialog box and then apply a Number or text format to the range of cells in that column of the table that tells Excel what type of data it contains. Select the range again, click the Export button, and click the Export Table to SharePoint List option. Then repeat the steps from Step 5 on.
After you click Finish, Excel displays a Windows SharePoint Services alert dialog box that indicates that the table was successfully exported and that it contains a direct link to the new list on the SharePoint site.
Click the link to the new SharePoint list to visit the site and review it, or click the OK button to complete the export.
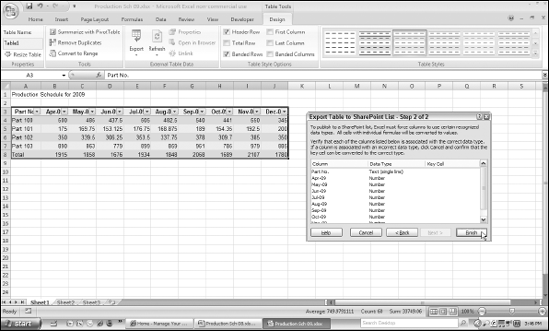
Figure 12.9. Verifying the data type of each column in the new SharePoint list before exporting the data.
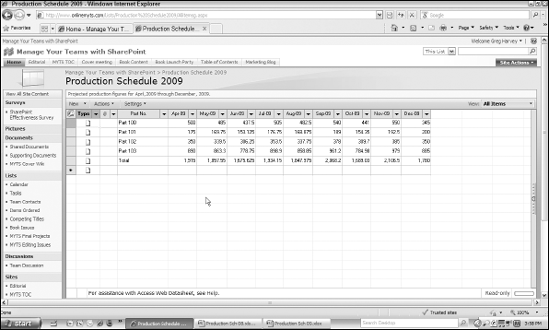
If you click the link to the list, the page with the custom list appears in the Datasheet view (see Figure 12-10). If you click the OK button, Excel closes the dialog box and you can then later open the new list by selecting its link in the List section of the SharePoint site's All Site Content page.

The other method for getting Excel worksheet data into a new custom list is by importing the cell range or table into SharePoint. To do this, follow these steps:
Open the subsite in SharePoint where you want to add the new list and then click the View All Site Content link in its Quick Launch.
SharePoint opens the All Site Content page.
Click the Create button at the top of the All Site Content page.
SharePoint opens the Create page.
Click the Import Spreadsheet link at the bottom of the Custom Lists column.
SharePoint opens a New page containing a Name and Description and an Import from Spreadsheet section.
Type a name for the new list in the Name text box and then press Tab.
SharePoint moves the cursor to the Description text box.
Type a description for the new list and then press Tab.
SharePoint moves the cursor to the File Location text box.
Click the Browse button, select the Excel workbook file that contains the data you want to import in the Choose File to Upload dialog box, and then click the Open button.
SharePoint closes the Choose File to Upload dialog box and inserts the path to the Excel workbook file into the File Location text box.
Click the Import button.
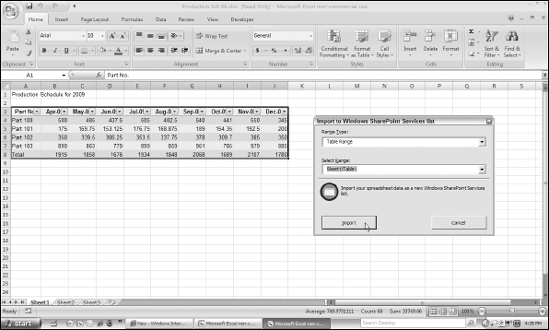
SharePoint opens the workbook file in Excel 2007, displaying the data in its first worksheet along with the Import to Windows SharePoint Services List dialog box (see Figure 12-11). This dialog box contains two drop-down list boxes: Range Type (where you choose between the default Table Range option and the Range of Cells and Named Range options) and Select Range (where you actually indicate the cells whose data are to be imported).
Select the appropriate option: Range of Cells (if the range hasn't been formatted as a worksheet table) or Named Range (if you've given the range a formal name in Excel).
If you selected Table Range or Named Range as the table type, select the name of the table or range using the drop-down button attached to the Select Range drop-down list box. If the range type is Range of Cells, click the Select Range drop-down list box and then drag through the cells in the worksheet to have the range address appear in this box.
As soon as you select the range of the worksheet data to import, the Import button becomes active and available.
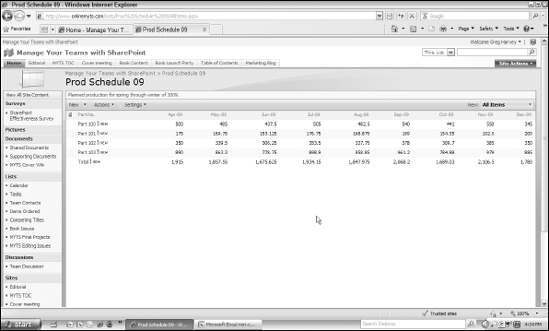
Click the Import button.
SharePoint creates a new custom list and then imports this data into a new list (similar to the one shown in Figure 12-12). Note that data in this list appears in the Standard view (as opposed to the Datasheet view used when you export worksheet data to a SharePoint list as shown earlier in Figure 12-10).