
Chapter 25
Permission Levels
One of the most important areas you will manage as a SharePoint site administrator is that of permissions. In many companies and businesses the use of file shares usually means that permissions to data and information are controlled centrally by the IT team. With SharePoint this central control is delegated to site collection administrators and site owners. Site collection administrators manage the security for the site collection as a whole, while site owners usually manage security for a team site or collection of subsites.
As you saw in Lesson 24, SharePoint security is built around security groups, both SharePoint and Active Directory groups. When you use a security group you assign a permission level to that group, such as contributor or owner. The group can then interact with SharePoint according to the permission level assigned to the group and the rights available within that level.
However, SharePoint is also flexible enough to enable you to edit the permission levels and in fact create your own. (Remember that permissions can be given only as part of a level; individual permissions contained within a permission level cannot be assigned individually to one user.) This ability to create your own permission levels and associated rights can be useful when you find certain permissions do not meet your requirements. The core permission levels provided out of the box for a team site include the following:
- Full Control: All available rights are granted to this level.
- Design: All permissions on lists and restricted rights on the site itself. This permission is usually restricted to design rights, for example the ability to change themes and styles.
- Contribute: Standard permission containing rights given to the majority of site users.
- Read: Read-only rights to the site and its content.
- Limited Access: Permission to access certain lists and libraries within the site structure.
- View Only: Rights to view list and library content.
Additional permission levels can be available depending on the features that your sites may have, for example with a publishing site additional levels related to publishing will be available.
Permission level defaults are usually broken down into three categories, each covering a particular area of SharePoint object management. Each category contains a specific set of rights that are made available to users via their permission levels.
- List Permissions: Permissions relating to SharePoint lists and libraries, such as permission to add, edit, view and delete list items.
- Site Permissions: Permissions relating to the site itself, for example the ability to create subsites or change a site's theme or style.
- Personal Permissions: Permissions that enable users you to personalize areas of SharePoint, for example by creating personal views of lists and working with personal Web Parts.
Figure 25.1 shows the list management permissions available for the full control permission level within a team site collection.

It is also possible to create your own permission levels as required: for example, you may want a user to have a limited subset of permissions rather than all permissions for a particular level. On one large SharePoint site, I manage a specific group of high-level users who need very specific permissions. None of the built-in permission levels contained what was needed, so I created a specific level just for this group. This new custom level granted a subset of the permissions for an existing level.
Permissions and permission levels can also be managed at the web application level. For example, if there is a specific permission level right that you do not want users to have, you can remove it at the web application level as opposed to manually within each site collection. However, remember that your changes will apply to all site collections created for that web application.
New permission levels can be based on existing categories or created from scratch. You should never change the out-of-the-box levels. Doing so can cause problems: if you do change a default permission level, every group using that level will find its permissions changed. It can also make your site difficult to manage, especially for others, who will expect the default permission levels to remain unchanged. When creating permission levels, either copy an existing permission that gets you up and running or create a completely new level yourself. Once you have created a new custom level it will be available within your site and can be used to give permissions to groups and users.
Adding Rights Levels to a Permission Level
When a permission level is created it is assigned rights to carry out actions on SharePoint objects. If you choose to copy a permission level it will contain the existing permission rights for that level and you can then add or remove rights as required.
You will also find that certain rights can be dependent: that is, when you assign one right to a level, other rights are enabled as a consequence. For example, if you assign the right to add list items, the right to view list items will also be enabled. If you enable the right to approve content, the view and edit item rights will also be enabled. Always be careful because dependency does not work in reverse: removing the approve right will not automatically remove the view and edit items right. Double-check all permission rights before saving, to ensure that you are giving only those you wish to give.
Best Practice
There are some things you can do to make working with custom permission levels easier for yourself as a site administrator, including:
- Do not customize existing permission levels. Create new levels either by copying an existing permission level or by creating your own.
- Always double-check before saving the level to make sure that the rights you are assigning are correct.
- Don't get carried away and create multiple custom levels. This only makes security harder to manage and (of course) to document.
- Document all changes to permission levels and custom levels.
- Create permission levels infrequently. Out-of-the-box permissions should meet most of your requirements.
- Always test a new level by logging in as a user with that level, to ensure that it behaves as expected.
In this exercise you are going to create a new SharePoint permission level that will allow users to edit list content. You will then save the new permission level and assign it to a SharePoint user group called Lesson 25 Users.
You will then copy an existing permission level, add the right to create subsites, and make the new custom level available for use within your site collection.
Requirements
- SharePoint site collection administrator permissions.
- A site group named Lesson 25 Users, or an equivalent group.
Step-by-Step
You are going to create a new permission level to allow users to view and edit lists. As this is a site collection configuration, to begin the process you must be on the home page of your site collection. The permission levels of a subsite that inherits permissions from its parent are managed at the site collection level. If you are using a subsite with its own unique permissions, the process is just the same as in the following steps, but you can work from within the subsite itself.
1. Click Site Actions.
2. Click Site Settings.
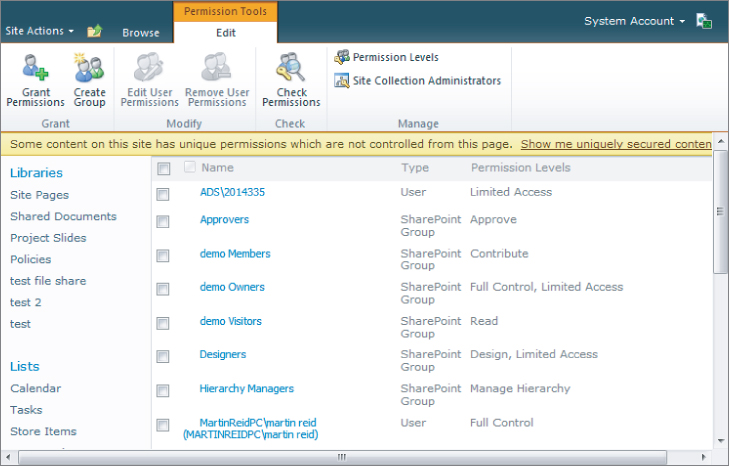
3. In the Users and Permissions category, click Site Permissions.
Figure 25.2 shows the Site Permissions screen and the Permissions ribbon. Note that the default groups and users with permission to the site are displayed.
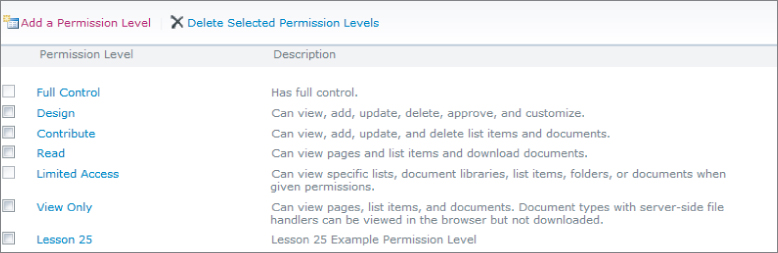
4. Click the Permission Levels icon on the ribbon to open the Permission Levels screen, where you can add, edit, and delete existing permission levels.
5. Click the Add a Permission Level hyperlink to open the Add Permission Level screen.
6. Enter a name for your permission level, in this case enter Lesson 25.
7. Check the box entitled Edit Items — Edit Items in Lists, Edit Documents in Document Libraries, and Customize Web Part Pages in Document Libraries. Checking this option will also enable the view right, and if you scroll down through the form you'll see that the view pages and open rights are also checked.
8. Leave all the other options blank and click Create to save the new permission level.
Figure 25.3 shows the newly created permission level in the Permission Level screen.
Now that the permission is available, you can assign it to a user group or to individual users. To grant a group permissions to your site collection and use the new Lesson 25 permission level from the home page of the site collection, do the following:
1. Click Site Actions.
2. Click Site Permissions.
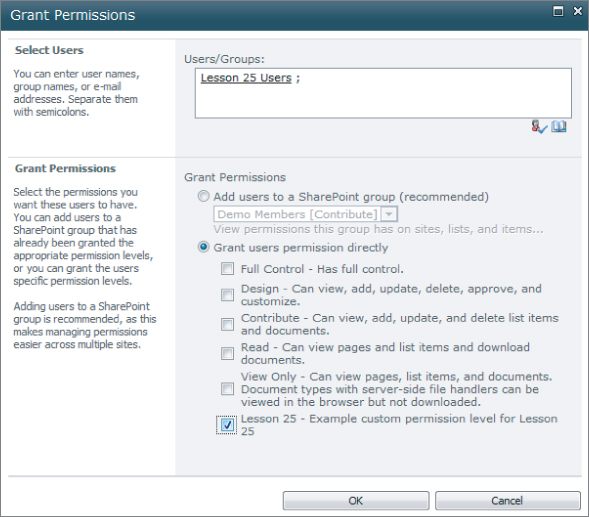
3. Click the Grant Permissions icon on the ribbon.
4. Enter the user group name Lesson 25 Users into the Users/Groups text box.
5. Click the Check Names icon (which looks like a disembodied head) to confirm that the group is valid.
6. In the Grant Permissions settings, click the Grant User Permissions Directly radio button.
7. Check the Lesson 25 permission level, which should now appear in the list of available permissions. Figure 25.4 shows the screen at this point.
8. Click OK to save the changes.
Your new permission level has been created and you have assigned it to a group within SharePoint. You can try out the effect of the permission level by logging in as a member of the group to see how it works.
The process for copying and customizing a permission level is very similar. The main difference on this occasion is that you will be working with the full set of rights already available and copied into the new level for your use. For example, to copy and change the contributor permission level and add the right to create subsites, do the following:
1. Click Site Settings.
2. Click Site Permissions.
3. Click Permission Levels.
4. Click the Contribute permission level to open the Edit Permission screen. This screen shows all the rights associated with the selected permissions.
5. Scroll to the bottom of the screen and click the Copy Permission button shown in Figure 25.5. This will copy all the current rights associated with the permission into your new custom level.
6. Enter a name for the permission level. In this case use the name Lesson 25 Contributor — Add Sites.
7. Enter a description, in this case Customized contribute permission level with add subsite rights.
8. Scroll to the Site Permissions section and check the Create Subsites permission level.
9. Scroll to the bottom of the screen and click Create to copy and create your custom permission level.
Your new custom permission level will now be available for use within the site collection. You can use the new level as you did in the previous example, by assigning it to groups or individual users.
Please select Lesson 25 on the DVD or visit www.wrox.com/go/sp2010-24 to view the video that accompanies this lesson.