
Chapter 31
Using Metadata
In Lesson 30 you learned how to create a Metadata Service. In this lesson we will examine the various places in SharePoint where metadata is useful and how it is used in SharePoint.
- Metadata in Lists: To use metadata and enable tagging of content in a SharePoint list or library, you can create a Metadata field type as a list column. This is a new column type in SharePoint 2010. You can assign this column type directly to a list or library or to a content type that is used in the list or library. Figure 31.1 shows an edit screen for a list that contains a metadata column.

- Metadata in Search: When you use SharePoint search or FAST search (an upgraded version of search) in 2010, you will be presented with a series of refiners that can be based on metadata fields. In other words, you can limit the results you want to see from the search to only those items tagged with a metadata value that you select from the list of metadata values presented. FAST search gives you more advanced refiner functionality than the SharePoint Enterprise Search product that is part of a Standard or Enterprise License. Refiners are not included in SharePoint Foundation search. Figure 31.2 shows a list of results from a search query on an announcement list. On the left-hand side you can see the refiners, which you can use to limit the results of the search. By selecting one of the refiners, you will further limit the set of search results to only those items whose properties contain the selected refiner.

- Metadata in Navigation: When looking at a list or a view of a list (or library), you can use metadata values in order to drill down into lists based on the values of metadata columns. Figure 31.3 shows the navigation options available to a list using values from a metadata field.

In this lesson, you will create a new list, and add a metadata column to the list. In addition, you will see how to use the column to tag a document with keywords. This lesson does not cover the administrative task of setting up a Metadata Service, which is a prerequisite step discussed in Chapter 30.
Lesson Requirements
To complete this Try It exercise, you need the following:
- A SharePoint site with SharePoint Server.
Hints
This Try It assumes the Metadata Service application has already been created and some term sets created, as covered in Lesson 30. It also assumes you can perform some minor tasks such as creating lists and libraries.
Step-by-Step
1. Create a list on a SharePoint site. It can be any type of list. For this example we will use an announcements list.
2. In the List Settings for the list, add a column of type Managed Metadata. If you do not see this type listed, make sure you have started the service and activated the features as demonstrated in Lesson 30. Once you have selected this column, you will see some options specific to this field type.
3. In the Display Format section (see Figure 31.4) you can choose to display the tag alone in the column or the entire hierarchy and path from the top-level term down to the term you have selected.

4. In the Term Set Settings section (see Figure 31.5) you can select one term set that will be the basis for the values you can use in this column. The search box allows you to easily find the terms you need if you are dealing with a large term store with many term sets.
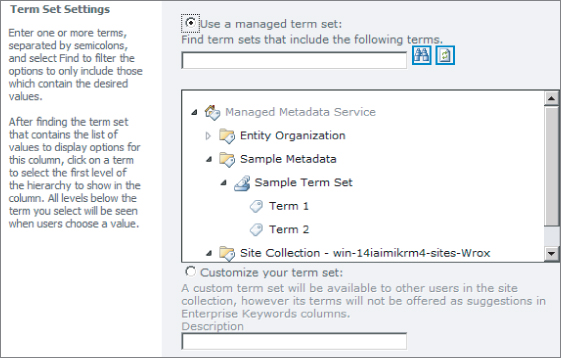
5. You can also customize your term set. This allows you to make a term set on the fly that will be useable only within the current site collection. Such a term set will not offer suggestions in other columns based on typing, as term sets with managed keywords do.
6. Optionally, opt to allow additions to the term set to be made by letting users add their own terms if they cannot find the one they need in the list.
Allowing users to add their own terms is useful if you want to be able to capture the terms people actually use in their day-to-day work, which can differ from the official terms set by some faraway IT committee. On the downside, it may lead to more inconsistent tagging of information, which can frustrate attempts to create easier navigation and search strategies. Note that according to the options you chose when creating the term set in the Metadata Service, this option may not be available for users.
7. Finally, choose a default tag value for the column. Click OK when finished.
8. Back at the List Items View page, you can edit an item and add terms to the column you just created. Notice how it will give you type-ahead suggestions. You can hit the Tab key at any time, click the suggestions with your mouse, or continue typing to place a value in the field.
9. In the list settings you can opt to add an enterprise keyword column to the list. The two options, as shown in Figure 31.6, enable you to add a field to a list or library to tag content with keywords, and to report on the use of and display the tags onto a user's individual MySite if they are activated.

After selecting this option, edit one of the list items and you will see the keyword field has been added. The options for this field derive from the Enterprise keyword list that you set up as part of the Managed Metadata Service. (Refer to lesson 30 for more details on this feature.)
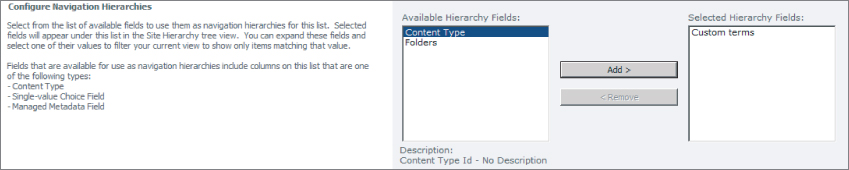
10. Optionally, you can select the Metadata Navigation Settings link, shown in Figure 31.7, to set up the options for this navigation. The list settings page enables you to set up a special navigation option for your list or library that enables you to filter your view of the list based on a variety of items such as metadata fields, content types, and choice columns.
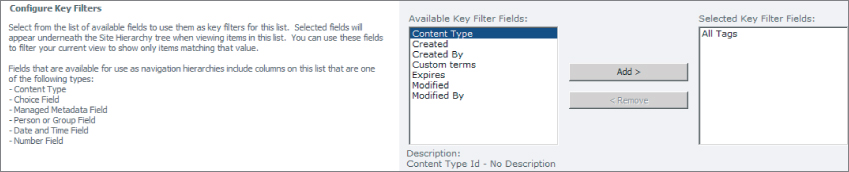
On this same page you can also use manually typed filter values based on selected columns, as shown in Figure 31.8. The navigation options at the beginning of this lesson (refer to Figure 31.3) result from the selections you make here on the List Settings page.
Please select Lesson 31 on the DVD or visit www.wrox.com/go/sp2010-24 to view the video that accompanies this lesson.