
Chapter 35
Creating an External List
In Lesson 34 we looked at creating an external content type that connected to an SQL Server customer table and returned a small set of data. In this lesson we are going to expose that data within SharePoint as a list and have a look at creating a custom Web Part page, again exposing the data to users. Creating the external list is perhaps one of the easier exercises you will do in this book.
This ability to allow users access to external content within SharePoint cannot be underestimated, as among other advantages it gives you a way to expose data held outside the main SharePoint system. In this way some of the pressure is removed from IT staff to provide information from central systems. Many users welcome such access and with this release of SharePoint and SharePoint Designer 2010 it is now possible for such access to be given in a secure controlled way.
There are currently a couple of limitations when using External Lists in SharePoint including:
1. Workflows cannot be associated with the External List.
2. No versioning or version history exists for list items.
3. Users cannot export list data to client programs, including Excel.
4. Unable to add attachments to list items.
5. Dataview features are not available.
This appearance of external data as a standard Sharepoint list can be confusing to users who expect the full range of list functionality to be available. Perhaps the best way to view the External List is as a version one technology whose use and integration with SharePoint will improve over time.
In this exercise you are going to do the following:
- Create an external list.
- Configure the list to use external data.
- View the list in the browser.
- Modify the list data.
Lesson Requirements
To complete this Try It exercise, you need the following:
- An external content type called Customers, as was created in Lesson 34.
Step-by-Step
To create an external list and configure it to expose SQL Server data, do the following from within a SharePoint team site:
1. Click Site Actions.
2. Click More Options.
3. Click the Data category.
4. Click External List.
5. Click Create.
6. Enter Customer External Data as the name.
7. In the Description field enter Data from external SQL Server.
8. Accept the default navigation, Display This List on the Quick Launch? (This option is set to Yes.)
9. In the Data Source Configuration section click the second data source icon, which is highlighted in Figure 35.1.
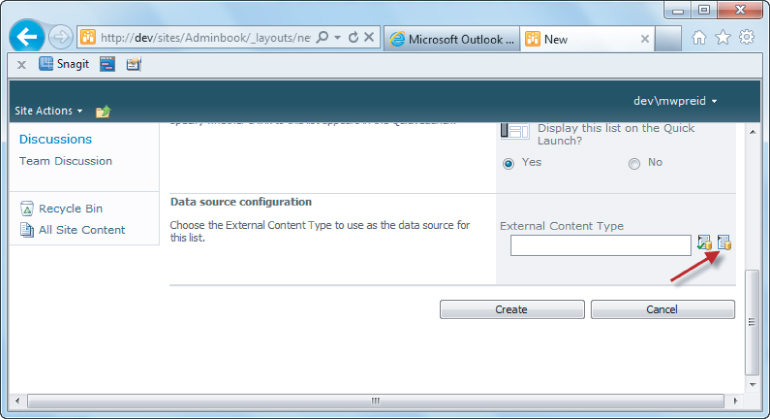
10. The External Data Type Picker will open, enabling you to search for or select external content types. Select the content type created in Lesson 34 and click OK.
11. Click Create to save the configuration and create the external list. The list will open within SharePoint, as shown in Figure 35.2.
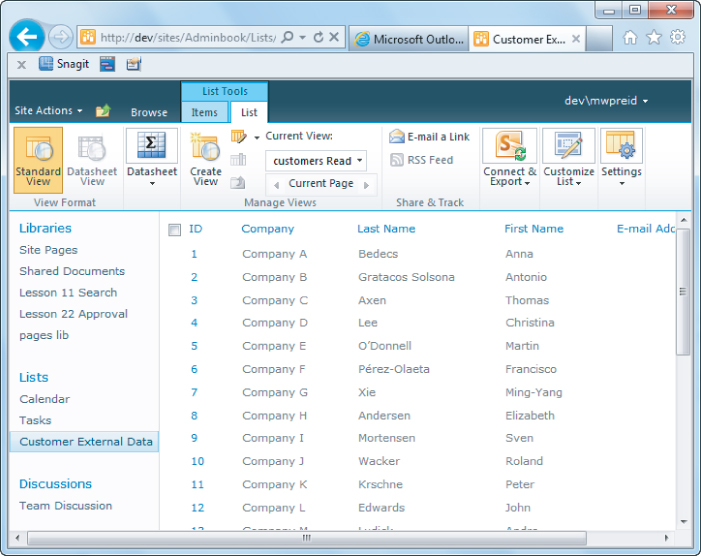
As you can see, from the site perspective the list simply looks like any other SharePoint list. For most situations you can treat it as such. Operations available of the list and its data such as editing items will depend on the operations configured when the external content type was created in SharePoint Designer 2010.
Working directly with the data in the external list is just like working with a standard list. For example, to edit a list item do the following:
1. Select the first record in the external list.
2. Select the record by checking the Selector checkbox.
3. Click Edit Item on the ribbon. The standard SharePoint Edit Item form will open.
4. Make a change to the item and click the Save button.
You have just edited a database record and saved it back to the database via the external content type and list. Depending on the permissions you have you should be able to carry out any of the standard functions on the external list and write those changes back to the database system.
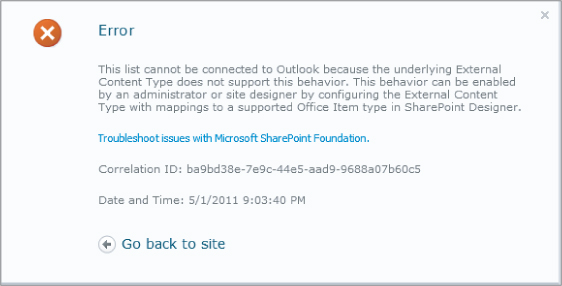
Recall that in Lesson 34 you disabled the ability to connect this data to offline clients such as Outlook, by setting the external content type to be a generic list. Figure 35.3 shows the error that appears when you try to connect the list to Outlook using the SharePoint ribbon. You would get a similar message if you attempted to connect to the list using SharePoint Workspace 2010.
External content types can also be used within the BDC Web Parts available in your site. To see how this works you must first create a new Web Part page. To continue:
1. Click Site Actions.
2. Click More Options.
3. Click the Page link.
4. Click the Web Part Page icon in the page types.
5. Click Create.
6. Enter ECT as the page name.
7. Select the default layout template for the page: a header, a footer, and three columns.
8. Accept the default save location, the Site Assets library.
9. Click Create. You will be returned to the Web Part page in edit mode.
10. Click the Add a Web Part link in the middle column.
11. Click Business Data in the Web Part Category section.
12. Click the Business Data list in the list of available of Web Parts in this category.
13. Click the Add button to add the selected Web Part to the page.
14. Click the Open the Tool Pane link in the Web Part. This will open the tools used to configure this Web Part. Figure 35.4 shows the screen at this point.

15. Click the Select External Content Type icon in the Tool pane, next to the Type text box.
16. In the External Type Picker select the External Content Type created in Lesson 34.
17. Click OK.
18. At the bottom of the Tool pane click OK to save the changes and view the data within the Web Part.
This simple process gives you a quick convenient way to display corporate data using either a standard SharePoint list or Web Parts. If you are using multiple external content types with associations between them, Web Parts are the way to go.
Please select Lesson 35 on the DVD or visit www.wrox.com/go/sp2010-24 to view the video that accompanies this lesson.