
Chapter 5
Managing Reporting Services
On the Site Settings page of a SharePoint site is a heading called Reporting Services. SharePoint site administrators can use these settings to schedule and display reports created from a tool called Reporting Services. Typically the reports created from this tool pull data from an external data source or a SharePoint list, and present a view of that data on the report.
This lesson shows you how to use Reporting Services to schedule the report and display it in a document library. By scheduling the report, we mean periodically refreshing the information from the report's data source. This lesson assumes someone else has already configured the Reporting Services tool and created the report. What follows is a brief description of the Reporting Services tool, whose use is beyond the scope of this lesson.
Reporting Services is a feature of SQL Server that can be integrated with SharePoint. It enables a SharePoint site owner to make schedules for creating reports and for viewing reports via SharePoint that were created in Reporting Services. The initial setup and configuration of Reporting Services is quite complex: a SQL server database administrator and a SharePoint administrator must work together to enable SharePoint Server to act as a reporting portal.
After Reporting Services is configured, reports can be created in SQL Server and published to a location on a SharePoint Server site. Alternatively, they can be uploaded to a document library and placed on a schedule to run automatically. This lesson deals only with how to set a report schedule and enable some Reporting Services settings. It is beyond the scope of this lesson to discuss the setup and configuration of Reporting Services or to delve into the details of how the reports are created. The goal of this lesson is to show you the final product of the Reporting Services application and to walk through the configuration options open to SharePoint site administrators.
The Shared Schedule page is used to create a schedule on which to run reports that are on the SharePoint site. After the schedule is created and named, it can be assigned to any given report. For example, a manager may wish to see an updated copy of a status report weekly. In SharePoint the report can be published to a document library, and items created in the library can use the schedule to automatically update according to the schedule assigned to it. Schedules are created under the Manage Shared Schedule link in the Reporting Services section on the Site Settings page. Reports used in this fashion are created using a program called Report Builder that is part of the SQL Server 2008 R2 Reporting Services toolkit. A completed report can be uploaded into a SharePoint library and assigned to a schedule. Incidentally, you can download Report Builder 3.0 for free from http://www.microsoft.com.
Reporting Services Site Settings
On the Site Settings Page page is a heading titled Reporting Services. Clicking on the Reporting Services Site Settings link under this heading reveals a small menu consisting of three checkboxes.
Enable RSClientPrint ActiveX Control Download
Check the Enable RSClientPrint Active X Control Download checkbox if you want to allow users to download an ActiveX control that can give them printing functionality for reports from their browsers. (An ActiveX control is a sort of mini-program that is downloaded to the browser and provides extra features.) A user must also take action to ensure the ActiveX control is downloaded and installed. If you do not check the Enable RSClientPrint Active X Control Download checkbox users will not have the option to download the additional control and take advantage of the print options.
Enable Local Mode Error Messages
In order to display information in reports on the browser, SharePoint uses a control behind the scenes called the Report Viewer. In previous versions of SQL Server before 2008 R2, your SharePoint farm had to be integrated with your Reporting Services server that processes the reports in order to view them in a SharePoint document library. New to SQL Server 2008 R2 is a method for rendering reports from Reporting Services without integrating the SharePoint farm with a Reporting Services server. Using the Report Viewer control to view reports from a Reporting Services server not integrated with SharePoint is referred to as being in local mode. If you wish to view detailed error messages from reports while using this disconnected mode, select the Enable Local Error Messages checkbox. Local mode can be useful for troubleshooting, but it is generally considered poor form for production applications to display detailed error messages, and in some cases it is a security risk. Reports using local mode are more likely to produce errors because of the additional configuration and security concerns. The purpose of this checkbox is to make this troubleshooting easier. It should be unchecked once the reports are working properly.
For additional information on local mode, refer to the following Microsoft documentation: http://msdn.microsoft.com/en-us/library/ff487969(v=SQL.105).aspx.
Enable Accessibility Metadata for Reports
Checking the Enable Accessibility Metadata for Reports checkbox will enable the report to output metadata that defines accessibility options for people with disabilities. For example, the report may be able to note the availability of Braille formats, audio descriptions, and other such features.
In this exercise, you will create a shared schedule and see how you can use it to set a schedule for a report to be run in a SharePoint farm that is using Reporting Services.
Lesson Requirements
To perform this lesson, you will need the following:
- Access to a SharePoint site.
- Administrator rights to the site.
- SharePoint Reporting Services set up in SharePoint integrated or local mode on SQL Server. This setup work is beyond the scope of this book. This lesson assumes that a SharePoint farm administrator or SQL database administrator has set up the prerequisite elements for making Reporting Services available on a SharePoint site.
Hints
The document library in this example has been configured to allow content types. There is a specific content type for these type of reports called “Report Builder Report” that should be added to the document library as an available content type.
Step-by-Step
Follow these steps to complete the lesson:
1. On the Site Settings page for your site, browse to the section titled Reporting Services (see Figure 5.1). If you do not see this section, you should verify that you have a Reporting Services service running in integrated mode on your SharePoint farm. Click the Manage Shared Schedules link.

2. Click Add Schedule in the command bar (see Figure 5.2).

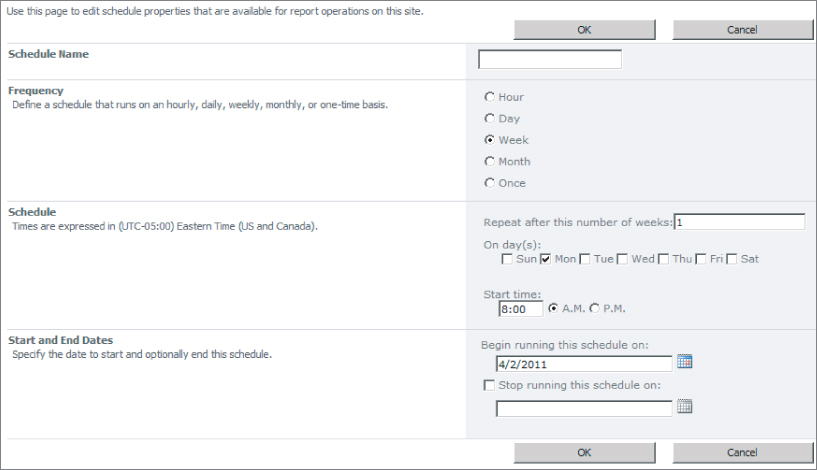
3. Set the options (see Figure 5.3) for how often you would like the report to be processed. Click OK.
4. Browse to a document library in which you have Reporting Services reports. It is possible to define the output to a SharePoint library automatically in Reporting Services. For the purposes of this walkthrough, the report has been manually uploaded to the document library, as opposed to the output of the report automatically appearing in the library after it runs. In addition, we have added the Report Builder Report content type to the library, which will enable scheduling and other options for our report document.
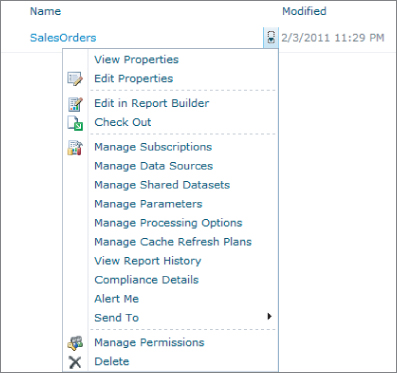
5. This example uses an uploaded .rdl file (a Reporting Services report) to our document library and assigned it the content type of Report Builder Report. In Figure 5.4 you can see the options available in the drop-down menu.
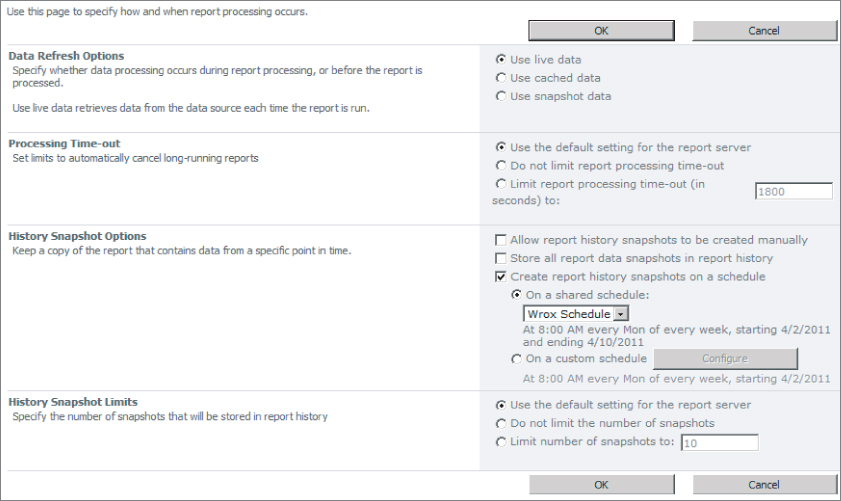
6. Select the option Manage Processing Options. Notice that under the History Snapshot Options (Figure 5.5) there is a checkbox titled Create Report History Snapshots on a Schedule. The schedule can be customized for this report or you can use the shared schedule that you just created in Step 3.
Please select Lesson 5 on the DVD or visit www.wrox.com/go/sp2010-24 to view the video that accompanies this lesson.