
Chapter 26
Configuring Access Services
Microsoft Access is without rival when it comes to working with desktop databases and is a favorite development tool for millions of database developers the world over. But one feature has long been missing from this popular solution: the ability to manage an Access database from a web browser. Many attempts have been made to do this over the years, and Microsoft Access 2010 with SharePoint is perhaps the best solution for many of the less complex Access databases in use today.
SharePoint contains a service application to manage the process of converting and running your Access database in browser. Access Services is created and maintained at the SharePoint server level. However, as a site collection administrator, you will also be involved in working with Access on the Web or, in the world of SharePoint and Access, with Access web databases. Figure 26.1 shows an Access web database.

The combination of SharePoint and Access is one of the nicest new features available, and it can all be set up with a couple of mouse clicks. Access Services still has some limitations, but if you are careful when creating web databases you won't go wrong. Databases can be created whether templates are available in SharePoint or offline in the Access client. You can also create web databases yourself using the Access client and move existing databases to SharePoint. However, not all databases are suitable to move to the Web; databases that use a lot of Visual Basic code or are complex in structure will not convert to the web format without a lot of rewriting.
Sometimes when running Access Services, the reports don't work in your web database. This is because Access Services relies on SQL Server Reporting tools, which must be installed and configured for reporting to work with Access. You will also need to speak to your server administrator to ensure that session state is configured and available. You can download the Reporting Services add-in for SharePoint from http://www.microsoft.com/ and install it on your server.
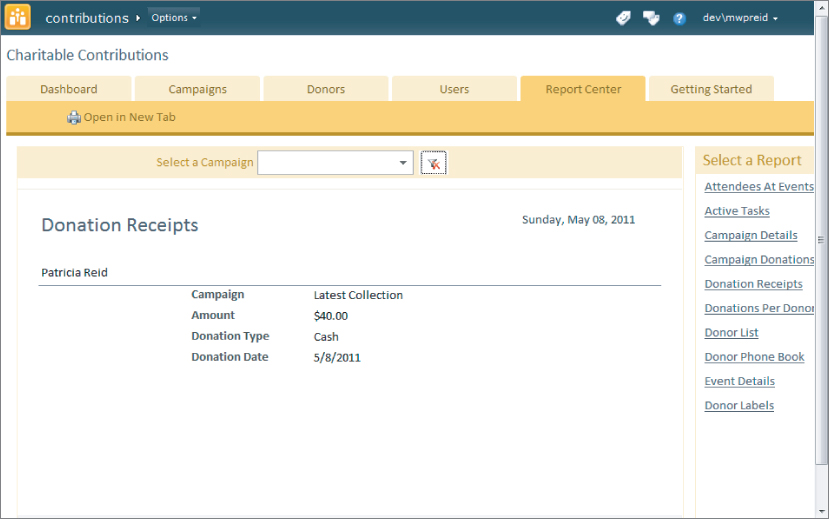
Figure 26.2 shows the reporting screen on SharePoint for the Charitable Contributions web database.
Once you create web database sites you will lose all the familiar SharePoint site management tools; in fact, the Site Actions and Site Settings menus will totally disappear, to be replaced with screens that enable you to manage the Access web database lists. Permissions to the web database site itself are the only remaining management tool that is directly related to SharePoint. But once you access the permissions screen, you will find links back to all the familiar SharePoint site settings, proving that this is actually a SharePoint site hosting an Access web database.
In addition to creating web databases from within the Access 2010 client, you can create them using the site templates available within SharePoint. The following web database site templates are available:
- Assets Web Database: For managing company assets.
- Charitable Contributions: For managing financial contributions received.
- Contacts Web Database: For managing company contacts.
- Issues Web Database: For tracking issues (problems) and tasks.
- Projects Web Database: For managing company projects.
Using a template within SharePoint does not create the client application in Access 2010. You need to do that yourself using the Options menu for the Web Database once it has opened. This menu offers you the following choices:
- Open in Access: Opens the current web database in the client program.
- Manage Site Permissions: Opens the standard SharePoint site permissions form. Also gives you access to the standard SharePoint site settings menus.
- Settings: Gives you access to all the database objects in the web database: tables, queries, forms, reports, and macros. Selecting an object will open a new Access client database containing all objects with the selected object open for editing.
You need to be careful with databases: for example, your users could execute queries that return large numbers of records, and this in turn can affect your servers' performance. For this reason, several options can be set at the Access Services level related to the performance of your web database, including:
- Maximum Columns Per Query: The maximum number of columns one can reference in a database query. The value can range from 1 to 255. The default value on my install was 40, while the published default is 32.
- Maximum Rows Per Query: The number of rows a list based on a query can have. The value can range from 1 to 200000. The default on my install was 25000. The published default is 5000.
- Maximum Sources Per Query: The maximum number of lists a query can reference. The value can range from 1 to 20. The default on my install was 12. The published default is 8.
- Templates: The maximum size of database templates in megabytes. The value can range from -1 to any positive integer. The default is 30.
There are a number of other configuration settings which will be discussed in this lesson's video.
When you are creating a web database there are a number of things you can do to assist Access and SharePoint to make the process of moving to the browser that much easier. Some of the things you need to do include:
- Use Access Data Macros when possible to automatic processes instead of Visual Basic code to provide logic in your Access forms.
- Create table relationships using Lookups columns.
- Use single field primary keys for your tables adding an Autonumber Primary to each table.
- Save Access files using the ACCDB database format.
In this exercise, you will create a new Access Service, configure the Access Services options, and create an Access Services-based site.
Lesson Requirements
- To complete this Try It exercise, you need the following: Access to SharePoint 2010 Central Administration and permissions to create the Access Service.
- Site collection permissions.
- A Microsoft Access 2010 client to create the web database.
- A managed account to run the Access Services.
Step-by-Step
The first part of the process of getting your Access 2010 databases to the Web is creating and configuring the Access Services. In Central Administration, follow these steps:
1. Click Manage Service Applications in the Application Management category.
2. On the ribbon, click New.
3. Click Access Services.
4. Enter Lesson26 as the service name.
5. Click the Create New Application Pool radio button and enter Less26AppPool as the new application pool name.
6. Select the managed account to use for the service. In this case, it is Lesson26AccessAcc.
7. Accept the Add to Default Proxy List setting to make the service available to all web applications. You can also configure the service to be associated with individual web applications if you like.
8. Click OK to save the initial configuration.
9. Click the Access Services name Lesson26 to review the options available. In this case, accept the defaults, as they meet the requirements for this exercise. The options are discussed earlier in the lesson and are also further examined in the Lesson 26 video.
It is worthwhile reviewing any existing Access applications you may be considering moving to Access Services to ensure that the settings will enable the most efficient use of the database.
At this point, you have configured the Access Services and accepted the default configurations. The next step in the process is to create a web database using the Access 2010 client. Follow these steps:
1. Open the client and click File.
2. Select New.
3. Click Sample Templates.
4. Click the Projects Web Database to select it.
5. Leave the default name and click Create.
At this point you may be informed that there are no users in the database. If that is the case, do the following:
1. Click New User in the Users dialog.
2. Enter a user's full name. In this case I entered Martin Reid.
3. Enter an e-mail address for the user.
4. Enter a domain account. In this case I entered my own account, devmwpreid.
5. Click Save & Close to continue.
6. Select a user and click Login.
7. Click the Enable Content button on the ribbon if required (you may also be required to log in again)
Now that the database is created, you can publish it to Access Services. Follow these steps:
1. Click File.
2. Click Publish to Access Services.
Figure 26.3 shows the Publish screen.

At this point, you can also check the database for compatibility with Access Services. This is a good idea if you are not using a template and want to ensure your database will publish with no problems. In the Publish to Access Services section, follow these steps:
1. Enter the URL of your SharePoint site.
2. Accept the default site name of Projects.
3. Click the Publish to Access Services button.
A synchronization dialog opens and keeps you informed of the process. Figure 26.4 shows the confirmation screen that opens when the move is complete.
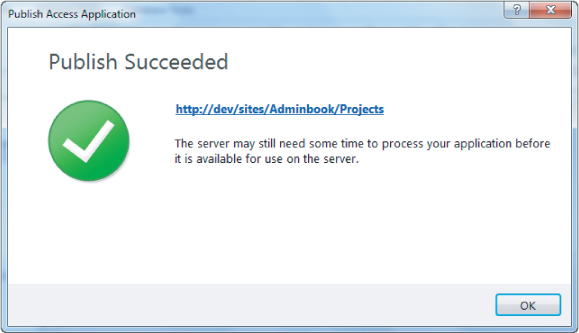
6. Click OK to finish the process.
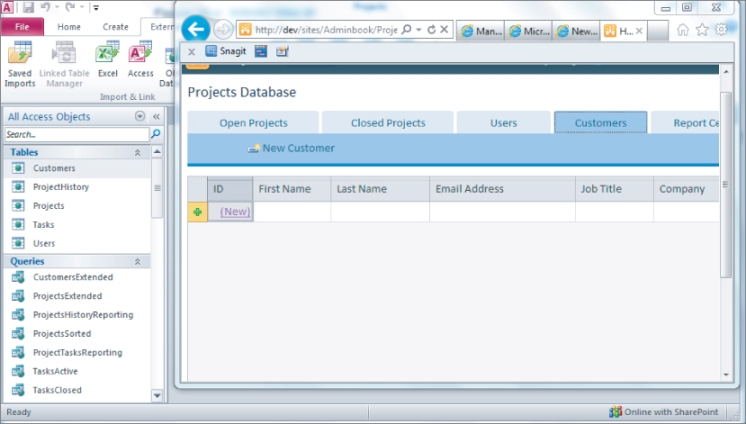
In this case, the database tables will be moved to a new SharePoint site called Projects as SharePoint lists, and a link will be created back to the Access client database, which remains open on screen. Figure 26.5 shows the Access backend application and the SharePoint web database open in the browser. It is important to remember that the data will not be held in Access but inside SharePoint as list data.
Please select Lesson 26 on the DVD or visit www.wrox.com/go/sp2010-24 to view the video that accompanies this lesson.