
Having a single collection inside the cluster is nice, but there are multiple use cases when we want to have more than a single collection running on the same cluster. For example, we might want users and books in different collections or logs from each day to be only stored inside a single collection. This recipe will show you how to create multiple collections on the same cluster.
Before reading further, I advise you to read the Creating a new SolrCloud cluster recipe of this chapter. This recipe will show you how to create a new SolrCloud cluster. We also assume that ZooKeeper is running on 192.168.1.10 and is listening on port 2181 and that we already have four SolrCloud nodes running as a cluster.
As we already have all the prerequisites, such as ZooKeeper and Solr up and running, we need to upload our configuration files to ZooKeeper to be able to create collections:
- Assuming that we have our configurations in
/home/conf/firstcollection/confand/home/conf/secondcollection/conf, we will run the following commands from thehomedirectory of the first run Solr server to upload the configuration to ZooKeeper (thezkcli.shscript can be found in the Solr deployment example in thescripts/cloud-scriptsdirectory):./zkcli.sh -cmd upconfig -zkhost localhost:2181 -confdir /home/conf/firstcollection/conf/ -confname firstcollection ./zkcli.sh -cmd upconfig -zkhost localhost:2181 -confdir /home/conf/secondcollection/conf/ -confname secondcollection
- We have pushed our configurations into Zookeeper, so now we can create the collections we want. In order to do this, we use the following commands:
curl 'localhost:8983/solr/admin/collections?action=CREATE&name=firstCollection&numShards=2&replicationFactor=2&collection.configName=firstcollection'
curl 'localhost:8983/solr/admin/collections?action=CREATE&name=secondcollection&numShards=4&replicationFactor=1&collection.configName=secondcollection'
- Now, just to test whether everything went well, we will go to
http://localhost:8983/solr/#/~cloud. As the result, we will see the following cluster topology: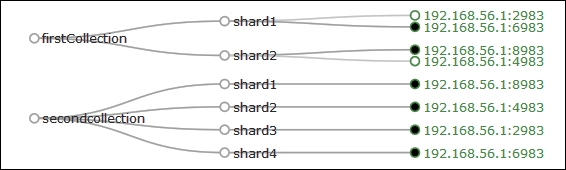
As we can see, both the collections were created the way we wanted. Now let's see how that happened.
We assume that we already have ZooKeeper installed—it is empty and doesn't have information about any collections, because we didn't create them. We also assumed that we have our SolrCloud cluster configured and started.
To create collections, we start by uploading the configuration to ZooKeeper. This is what we already discussed in the Creating a new SolrCloud cluster recipe of this chapter. We start by uploading two configurations to ZooKeeper, one called firstcollection and the other called secondcollection. After that, we are ready to create our collections.
We start by creating the collection named firstCollection that is built of two primary shards and one replica. The second collection, called secondcollection, is built of four primary shards and it doesn't have any replicas. We can see that easily in the cloud view of the deployment. The firstCollection collection has two shards—shard1 and shard2. Each of the shards has two physical copies—one green (which means active) and one with a black dot, which is the primary shard. The secondcollection collection is built of four physical shards—each shard has a black dot near its name, which means that they are primary shards.