
In This Chapter
Case management is the collaborative process of assessing a problem, planning its solution, and ultimately providing a favorable outcome. In this chapter, I show you how to use Sugar's Cases module to identify and fix the problems that are bothering your customers before they snowball into major headaches. And, after you solve the problem and/or resolve the issues, you can document your findings in the company Knowledge Base.
Fortunately, some of you may never have to use Sugar's Cases module. Maybe you sell a product that never breaks — or one that you don't have to worry about fixing. Perhaps the services that you offer are so stellar that you never receive a complaint. Lucky you! If that's the case, feel free to skip this chapter.
For the rest of the crowd, the Sugar Cases module will seem heaven-sent. Many other CRM products require you to purchase expensive add-on software if you need to manage a help desk or incident tracking. By having one integrated product, however, your support personnel can attach the issues to existing records without having to retype address and other contact details in the database.
With Sugar, you can use the Cases module to deal with a variety of complaints and questions that all too often land on your desk. Maybe you sell products or equipment that can break from time to time. Maybe you run a call center that fields questions about various products. Or maybe your company has a customer service department that needs a place to log the complaints they have to deal with. Whatever the situation, Sugar is there to handle all the negative aspects with a sweet smile.
Generally, the bigger the company the greater the possibility that things will go wrong. The Cases module is fairly generic, so you can use it company-wide to help resolve the issues facing various departments. This is very important in a small or medium-sized company where typically a single solution is used for multiple purposes:
Customer service department: A customer service department can use Sugar to keep track of all the issues and problems your customers report about your product or services. Issues no longer slip through the cracks. Sugar tracks the life of support issues from the day they're reported to the day they're resolved so that you keep your customers happy — and don't lose them to your competition!
Sales department: Because the entire database is integrated with the customer support issues, your sales folks can see how your customers are being taken care of and what issues they face.
Marketing department: Marketing can refer to the Cases module to analyze the nature of the problems your customers are reporting and use the insight to improve your product or services.
Internal IT department: Your overworked and underpaid IT folks can use Sugar to keep track of internal, employee-related tasks so they can prioritize their time.
Warning
Although the Cases module is fairly basic at first glance, a trip to Chapter 15 shows you how to customize and make Cases as robust as you need.
Creating Cases records and resolving them with Sugar is a very easy process. In essence, the customer notifies the help desk or customer service department of his issue and the support personnel assigns a ticket that details the problem. If the first person is able to solve the issue, he closes the case. However, if he is unable to resolve the problem he can assign a follow-up to someone else in the company who might have better luck in helping Mr. Customer — and ultimately closing the case. Anyone in the company can view the details of the case from the Cases subpanel of the associated Accounts record.
Creating a Cases record is much easier than waiting for a small problem to develop into a mountain of trouble:
Choose Create Case from the Shortcuts menu.
The Cases page opens. Check out Figure 10-1 to see what it looks like.
Enter information into the fields on the Cases page.
Number (required): You may wonder how exactly you fill in information for this required field. Gotcha! You don't; Sugar automatically assigns the next sequential number to a new case.
Priority: Specify the urgency of the problem (High, Medium, or Low) from the drop-down list.
Assigned To: Specify the lucky person who is in charge of the Cases record.
If the administrator has enabled e-mail notification, then the case owner will receive an e-mail whenever a Cases record is assigned to her. Chapter 16 shows you this and a few more tricks available to the database administrator.
Status: Specify the status of the problem from the drop-down list; typical choices include items like New, Closed, and I'm really stumped.
Account Name (required): You must associate a Cases record with an existing Accounts record. You can type in the first few letters of the account name and Sugar will magically suggest possible matches, or you can click the Select button to manually search for an Accounts record.
Type: The type of case you're creating. The choices are Product, User and Administration.
Subject (required): Enter a brief summary of the Cases record to help identify it among the rest of the Cases records.
Description: For some record types, a description offers little or no value. However, in the case of case management this is where you'll want to write a litany that clearly describes the problem.
Resolution: Enter the results of the investigation into the problem.
Click Save to save the Cases record.
The Cases Detail view displays, as shown in Figure 10-2.


Some cases have easy resolutions and you're able to open and close the case at the same time. However, many cases are more complex and involve a bit more intervention before they can be closed.
Here's how you can monitor a Cases record from start to finish:
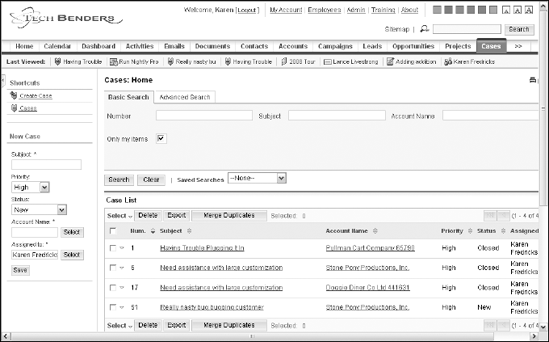
Click the Cases module tab from the Sugar Home page.
You can access your entire case load by clicking the Cases module tab from your Home page. The Cases Home page allows you to search for Cases by Number, Subject, or Account Name. In addition, Figure 10-3 shows how you can opt to view only those Cases records assigned to you.
By now, you're pretty much a Sugar List expert. You can sort, delete, export to Excel, or merge Cases records using exactly the same method you use for any other List in Sugar.
Click the case record's name to view the details of a Cases record.
Clicking the name of a Cases record from the Case List opens the Case page. This page is extremely important in the life cycle of a Cases record.
Click Edit to change the case record's details and then click Save to record your changes.
Because Cases records are fairly volatile, you need to edit them frequently. In particular, you'll want to change the Status field — especially when you close the Cases record.
(Optional) Click the View Change Log button to view any recent changes to the Cases record.
Scroll to the Contacts subpanel and click Select to associate additional Contacts records with the Cases record.
You can associate as many Contacts records as you like to a Cases record. By associating the Cases record to various Contacts records, you give the rest of your organization a bit of a heads-up that there's a problem before they step into a possible minefield.
Figure 10-4 shows you the various Case page subpanels.
Scroll to the Activities subpanel.
You can perform a variety of case-related tricks from the Activities subpanel.
Task: Here's where you can hand the next step of the case to one of your unsuspecting colleagues.
Meeting: If the case requires some major fine-tuning on the part of the customer, you might want to schedule a face-to-face meeting with him to discuss it.
Call: Schedule a follow-up phone call for either yourself or one of your co-workers.
E-mail: This really sweet option automatically opens an e-mail prefilled with the case record's number and subject in the subject line so that you can keep Ms. Customer informed via e-mail.
Scroll to the History subpanel.
Need to fill in a few more tidbits of info? Here's the place!
Scroll to the Bugs subpanel.
Chapter 11 tells you about the crawly critters and insects that infect software; here's where you can associate a bug with your Cases record.

You have a couple of nice ways to really stay on top of your case load. My favorite is to make sure you include the My Open Cases dashlet on your Home page — and place it in a prominent position so that you see it each time you fire up Sugar. Chapter 9 walks you through that task.
Another way to keep track of your cases is by using a report to view your cases. SugarCRM Professional Edition comes with both a price tag and a bunch of case reports.
You can access the Case Reports by clicking the Cases module tab on the Sugar Home page and then choosing Case Reports from the Shortcut menu. As you see in Figure 10-5, the four "out of the box" reports are
Open Cases By User By Status
Open Cases By Month By User
Open Cases By Priority By User
New Cases By Month
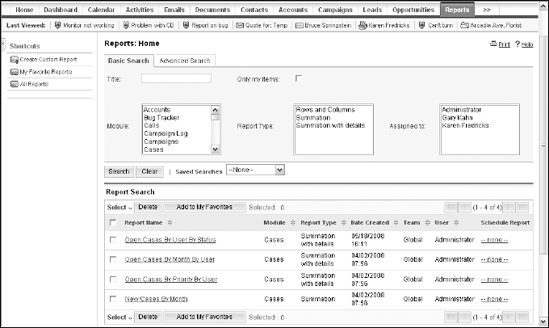
The default reports all display in graphical format. Once displayed, you can change the filters or opt to have a report display as text rather than as a graphic; Chapter 14 explains how to change the report options. You can also drill down on any portion of the report to see more detail. Figure 10-6 shows you a sample of the Open Cases By Priority By User report.

The beginning of this chapter deals with the issues that your customers face — and the process you go through to provide a solution. You might think that after the customer goes away — hopefully with a smile on his face — your problems are over. However, chances are pretty good that other customers will come to you with the very same issues somewhere down the line. You might start the process all over again — or you might try to learn from your experiences.
SugarCRM Professional Edition includes a Knowledge Base module. A knowledge base is a collection of articles that pertains to a specific topic. Generally, knowledge base or KB articles include a problem and its solution. Typically, a knowledge base includes the ability to search the articles to find the answers to your specific questions.
Using the Knowledge Base module, you can create articles on any subject to develop your own searchable library of answers to common questions as well as create FAQs (Frequently Asked Questions). You can attach a file to the article, create an article from an existing case, and even e-mail the article directly to one of your customers.
The steps for creating a new Knowledge Base article are easy. Here's all you have to do:
Open a new Knowledge Base article.
You can create a Knowledge Base article using any one of the following three methods:
From scratch: Click Knowledge Base on the Module Tab bar from the Home page and then choose Create Article from the Shortcuts menu.
From an existing Cases record: If you have an existing case — preferably one you've already resolved — open the case and then click Create Article on the Cases record's Detail view. This method saves you from having to enter a Title, Subject, Description, or Resolution because that information automatically fills in from the corresponding fields in the Cases record.
From an existing e-mail message: Hard as it may be to believe, a problem might stump the stars of your company only to be solved by the customer himself. In cases like these, the customer e-mails you with a solution, which you can use to generate a new article without having to start from scratch.
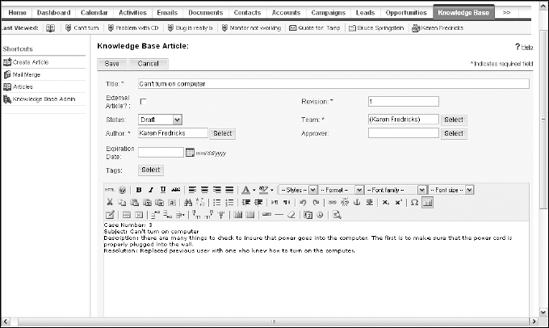
Whatever method you use, the Knowledge Base article page opens, as shown in Figure 10-7.
Enter information into the Knowledge Base Article fields.
Although not all the fields are required, they're all important so take the time to fill them all in.
Title (required): This is the main way you identify an article so give it a good title.
External Article: Select this check box to make the article available to both your internal Sugar users and your external SugarPortal users.
Revision (required): Enter the article's revision number. Typically, the revision number of a new article is 1, followed by 2, 3, 4, and so on.
Status: Choose the status of the article from the drop-down list to indicate whether it's ready for prime time viewing.
Warning
To make the article available for viewing, the status must be set to Published.
Team (required): Enter the name of the team that's allowed to access the article. If an article is an external one, Team will default to Global so that everyone can access it.
Author (required): By default, the article creator is the assigned author. However, you can click Select and choose a different user.
Warning
Make sure that the author is a member of the assigned team so that she will be able to access — and subsequently edit — the article.
Approver: Click Select to select the name of the lucky user who's responsible for the final rendition of the article.
Expiration Date: Old news is, well, old news, so you might want to include an expiration date to ensure that your article will not display when it is no longer relevant.
Warning
When an article reaches its expiration date, it no longer appears in any internal search results or in the SugarPortal.
Click the Tags Select button to link the article with a new or existing tag.
The next section, "Playing tag with your KB articles" talks about tags, which is the method Sugar uses to organize your articles.
Enter the text of the article in the Body field.
This is the main purpose — and most important part — of the article. The body includes a nice HTML editor so you can format your text using familiar tools, such as bold, italics, underline, colors, and font size. You'll even find buttons that allow you to create a hyperlink within the article and preview the final product.
Typically, KB articles include a description of the problem and its resolution.
(Optional) Click Browse to navigate to the location of a file and select it to attach the file to the article.
For example, if you are a software company, you might have created a hot fix to fix a problem and want to attach it to the article.
(Optional) Click Browse to navigate to the location of a graphic and select it to embed an image into the article.
A picture is worth a thousand words so you might want to include one in the body of your document to illustrate your point.
Click Save to save the article.
The article's Detail view displays.
Tags are similar to folders. They allow you to group articles so that it's easy to find the ones you want. When you tag an article, the system creates a link between the tag and the article.
Sugar comes with two tags: FAQs and Untagged Articles. You also have the capability to create custom tags. If you're a software company, for example, you might create additional tags such as Hardware Errors, Software Errors, and Nut Behind the Keyboard Errors. An article can be linked to more than one tag, and a tag can be linked with multiple articles.
As your Knowledge Base grows, you can organize your tags into root tags and subtags. Root tags are the main categories, and subtags are the subcategories.
When you create an article, you can create a new tag for it or select an existing one. It's probably a bit easier to create tags prior to creating the articles so that you give some thought to the organization you want the Knowledge Base to follow.
Here's how to start creating tags:
Click Knowledge Base on the Module Tab bar on the Sugar Home page and then choose Knowledge Base Admin from the Shortcuts menu.
The Knowledge Base Admin page opens. A list of existing root tags displays under the Tags heading.
Choose an action from the admin options drop down list and then click the folder to which you'd like to create a new tag.
Don't be fooled by the check boxes — you need to click the actual filename here. Click the Tags folder if you'd like to create a root tag; click one of existing root tags if you'd like to create a subtag.
Fill in the name of the new folder and then click Save.
Figure 10-8 gives you an idea of what adding a new tag looks like.

After your Knowledge Base grows, you'll probably need to reorganize it a bit by renaming or deleting tags, or maybe changing which articles correspond to a given tag. The Knowledge Base Admin page is just the place to make these changes.
Notice in Figure 10-8 that you can select both Tags and the corresponding articles associated with a tag. By selecting Tags and/or articles and making use of the admin options drop-down list, you have a whole bunch of editing options available to you:
Delete Tag: Choose Delete Tag from the admin options drop-down list, select a tag, and then click the Delete Tag button.
Warning
Only administrators can delete tags because they can view all the articles associated with a tag, whereas some of your users might not have the necessary permission to view all articles.
Tip
Only empty tags can be deleted.
Rename Tag: Choose Rename Tag from the admin options drop-down list, click a Tag name, and type in the new tag name.
Move article(s): Choose Move Selected Articles from the admin options drop-down list, select the article(s), click the Select Tag button, and then click the name of the desired tag.
Apply new tags to an article: Choose Apply Tags to Articles from the admin options drop-down list, select the article(s), click the Select Tag button, and then click the name of the tag you want to associate with the article.
Ah. The hard work is over. You've solved the problem, saved the world — and created a Knowledge Base article so that everyone else can benefit from your brilliance. But, like most of life, there's a slight catch — how are people going to find your article?
If your Knowledge Base contains only a handful of articles, it's easy to browse for the article in question. However, as your Knowledge Base grows, you'll want to search for articles.
Browsing the base
It's very easy — albeit a bit time-consuming — to browse for an article. Here's how you do it:
Click Knowledge Base on the Module Tab bar on the Sugar Home page and then choose Articles from the Shortcuts menu.
The Browse tab of the Knowledge Base Home page appears in all its glory, as shown in Figure 10-9, and displays a list of existing tags.
Click a tag name to view its contents.
All the articles within a selected tag display in the right panel.
(Optional) Click the plus (+) sign to view the sub tags and the articles contained within.
Click an article name to view the contents of that article.
From here, it's a question of clicking a tag to reveal the articles it contains. You even have an Untagged Articles tag that you can use to search for any articles that might not have been tagged.

Warning
All tags are visible to all users. However, you can see only those articles you have permission to see.
Quickly querying the Knowledge Base
Browsing works well for tiny knowledge bases — or if you have lots of time on your hands. However, as your Knowledge Base grows, you'll want to search for articles by keywords, tags, and/or titles to find the articles that you want.
The Knowledge Base Home page has three tabs: Search, Browse, and Advanced. Your first trip to the Knowledge Base lands you in the Browse tab, which I discussed in the previous section. In this section, I discuss the two other tabs, which you use to find just the article you're looking for.
Simply searching for an article
Click Knowledge Base on the Module Tab bar on the Sugar Home page and then choose Articles from the Shortcuts menu.
The Knowledge Base Home page opens.
The Knowledge Base Search tab opens, as shown in Figure 10-10.
Enter one or more words in the search field to find related articles.
You can search by supplying a part of a title or the information found within the article.
(Optional) To restrict the search, choose a criterion from the Search Within drop-down list.
The Search Within list allows you to restrict your search a bit more by allowing you to choose such options as Pending Approval or Added Last 30 Days.
Click the Search button.
Any articles that match your request will appear in a list at the bottom of the search page.

Performing an Advanced search
As your Knowledge Base grows, so too will your need to perform bigger, more powerful searches. And, like the reliable software program that it is, Sugar is ready to grow with you.
The Advanced tab of the Knowledge Base allows you to plug in lots of additional criteria to your search. And, although it's advanced and powerful, the Advanced search is every bit as easy to perform as the basic search.
Click Knowledge Base on the Module Tab bar on the Sugar Home page and then choose Articles from the Shortcuts menu.
The Knowledge Base Home page opens.
Click the Advanced tab and then click the More Options link.
By clicking the More Options link, you can view all the fields shown in Figure 10-11 that are available to you.
Specify any of the search criteria.
You can make your searches as simple — or as complex — as you like.
Containing These Words: Type the words or phrases you're looking for.
Search Within: Choose additional criterion from the drop-down list, such as a time period or a tag.
Excluding These Words: Enter a word or phrase to exclude from the search.
Using This Tag: Select a tag from the list of existing tags.
Title: Enter the name of the article you're looking for.
Viewing Frequency: Choose the most popular (Top 10) or least popular (Bottom 10) from the drop-down list.
Status: Choose the article's status, such as Draft or Published, from the drop-down list
Team: Click Select to choose the team assigned to the article you're looking for.
Approved By: Click Select to choose a user from the Users list to search for articles assigned to a specific approver.
Author: Click Select to choose the name of the person who wrote the article.
Published: Click the calendar icon to select a specific date for the article.
Expires After: Click the calendar icon to search for articles that expire after a specific date.
Attachments: You can search for all articles with attachments, or specify the name of the specific attachment you're looking for.
External Article: Here's where you can look for only those articles that are accessible by people outside your circle of Sugar users.
Save This Search As: If you'd like to use this search again, enter a name for the search and then click Save.
Previous Saved Searches: Choose the name of the saved search from the drop-down list to reuse a search.
Click Search to start the search.
A list of articles that match your criteria will appear.
