
In This Chapter
Customizing the Home page
Dashing through the dashboards
Quick searching
Performing and saving queries
Creating and saving customized views
Printing
After you enter information into Sugar, you need a way to find it again. Sometimes, you'll want a 360-degree view of all your information. You can accomplish this easily by making use of the Home page and dashboards. Other times, you'll want to hone in on a single record. Or, you might want immediate access to a group of records based on very specific criteria. Knowing how to search in Sugar will provide you with the power you need to find the information you need. And, once you find the data, you might even want to print it for posterity.
The Home module is the first thing you see when you log in to Sugar. The Home page consists of dashlets — individual components that summarize your various activities. A dashlet displays a list of item records that is similar to the List view displayed on a module's Home page. You can remove the dashlets that you don't use and add other dashlets that are better suited to your needs.
By default, the Home page displays the following dashlets:
My Calls: Lists all the phone calls you're scheduled to make, regardless of time period.
My Meetings: Lists all your meetings.
My Leads: Shows your recently added Leads records.
My Top Open Opportunities: Lists your top open Opportunities records.
My Accounts: Displays the Accounts records that are assigned to you.
My Open Cases: Here's where you can view a list of customer issues that you — or some other nice person — has assigned to you to resolve.
Jot Pad: This is your virtual sticky note; feel free to jot down anything you need to.
My Pipeline: Displays a chart of your sales opportunities based on their current sales stage.
Figure 9-1 shows a sample of the My Top Open Opportunities dashlet.

After you decide on the dashlets you want to display on your Home page, the real fun begins. All dashlets have several common elements:
To rearrange your dashlets, place your mouse on the dashlet title and then drag-and-drop it to a new position.
To remove a dashlet, click the Delete (X) icon.
To refresh a dashlet, click the Refresh (double-arrow) icon. By refreshing the dashlet, you're able to see any changes that have been made in Sugar.
To zoom in for more information, click the record name or subject.
To sort your information, click a column header.
You'll probably find the Home page to be one of your best resources because it allows you to see the various aspects of your business on one page. However, you might not be satisfied with the information displayed on a dashlet. For example, the My Top Open Opportunities dashlet only displays your top five opportunities; with a little tweaking you can make it display ten — or as many as you want.
You can configure each dashlet to display various rows and columns. Additionally, you can change the filters to display the exact information you need. Best of all, it's really easy to tweak the dashlets if you follow these steps:
Click the Edit (pencil) icon of the dashlet you'd like to modify.
The Options dialog box displays in a separate window similar to the one shown in Figure 9-2.
Change the dashlet title.
For example, you might rename the My Top Open Opportunities dashlet to simply My Top 10 Ops.
Select the columns to display by selecting a column title from the Hide Columns area and then clicking the left-pointing arrow.
Your column choices are dependent on the type of dashlet that you're editing. You can also remove columns from the Display Columns area. And, feel free to use the up and down arrows to rearrange things a bit.
Change the Filters.
You can opt to show only your items or to filter items according to date range or some other criteria.
Click Save when you finish editing the dashlet.
You might want to take a moment to appreciate your artistry. Or, if you're not satisfied with your changes, you can always try, try again!

You can add and remove dashlets as needed. Simply click the Add Dashlets button at the top-right side of the Home page and the dialog window shown in Figure 9-3 opens.
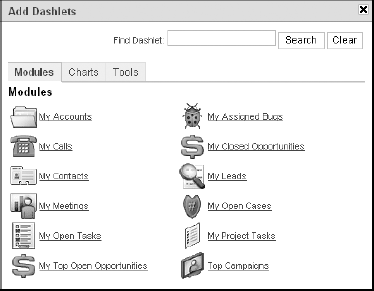
Notice that many of the dashlets already appear on your Home page. However, you might want to add multiple dashlets of the same kind and give them different names and filters. For example, you might add a dashlet for your top five opportunities, and another similar dashlet with the top ten opportunities company-wide. After you added a dashlet, you can move it using the technique described in the previous section.
Warning
By default, you can only add ten dashlets to your Home page. However, if you feel an overwhelming desire to increase that number, consider wandering over to the administrator with a subtle bribe because she can change this setting. And, if you find you can't modify the Home page at all, you might consider finding an even larger bribe because the administrator has control of that setting as well.
Tip
Got the "I've done a bit too much Home page customization" blues? There's a sure-fire cure. Click My Account from the Home page and then click the Homepage button in the Reset to Default area at the top of the Users page. Voilà! — you're back to the original Home page layout.
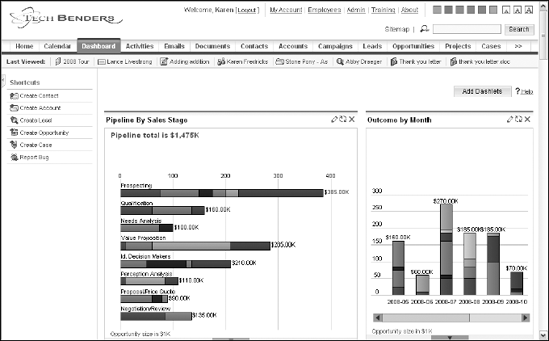
The Dashboard is quite similar to the Home page. However, most of the Home page dashlets are in list format whereas the Dashboard dashlets take the form of neat graphical charts and graphs like the ones shown in Figure 9-4.
You access the dashboards by clicking Dashboard on the Module Tab bar. If you've mastered the dashlets on the Home page, then you've mastered the Dashboard dashlets because you add, remove, edit, and move the dashlets in both modules exactly the same way.
The Dashboard module contains six dashlets, all of which focus on information it gathers from the Opportunities module:
All Opportunities by Lead Source by Outcome: A bar chart displaying opportunities segmented by each lead source.
All Opportunities by Lead Source: A pie chart that shows the proportion of total opportunities for each lead source.
Campaign ROI: If you're using the Campaign module (see Chapter 14), this displays a campaign's return on investment.
My Pipeline by Sales Stage: This one is a funnel chart that shows the total dollar amount for your opportunities grouped by sales stage.
Outcome by Month: A bar chart displaying the total sales pipeline for each month.
Pipeline by Sales Stage: A funnel chart that displays the total dollar amounts for all your opportunities grouped by sales stage.
Click the Add Dashlets button to add an additional dashlet to the Dashboard page. Remember, you can add the same dashlet multiple times and then edit it to change the names and filtering criteria.
SugarCRM Professional Edition comes complete with mag wheels and enhanced dashboard functionality. It also comes with two additional dashlets:
My Closed Opportunities: Shows a gauge chart of your opportunities that you've closed.
My Forecasting: Compares your sales quota against the actual amount of your opportunities. You read about the Forecasting module in Chapter 16.
You can also perform an additional party trick using SugarCRM Professional: the ability to group your dashlets into pages.
If you look closely at Figure 9-5, you'll notice two tiny — albeit important — differences from what you see in Figure 9-4:
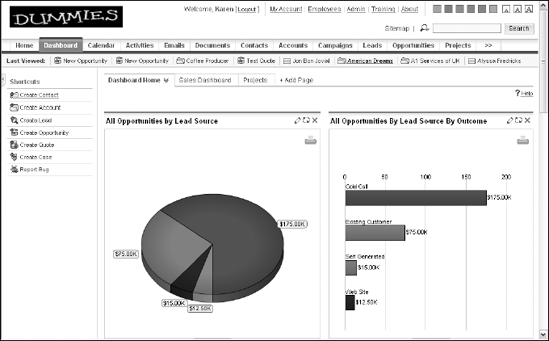
The Add Dashlets button disappeared.
The Dashboard features additional page tabs.
In Professional Edition, you modify the Dashboard by clicking on a page of your dashboard and then clicking the double down arrows. This opens the dialog window shown in Figure 9-6.
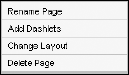
From here you can
Rename: Rename the dashboard page by replacing the existing page name with a new one.
Add Dashlets: Add additional dashlets to the page using the same technique as you do for Community Edition dashboards. In addition to the dashlets mentioned above, you can also add any customized charts that you've created.
Tip
If you're not sure how to add your customized charts, you might want to take a gander at Chapter 16.
Change Layout: Change the dashboard layout to have a one, two, or three column layout.
Delete Page: Delete a dashboard page. However, you can't delete the Dashboard's Home page.
If all roads lead to Rome, surely all processes in SugarCRM lead to the Search window. A search is a way of looking at only a portion of the records in your database, depending on your specifications. A good practice in Sugar is to perform a search and then perform an action. For example, you might perform a search and then follow up on your key opportunities. Or, you might do a search and then perform a mail merge.
The theory behind the search is that you don't always need to work with all your contacts at one time. Not only is working with only a portion of your database easier, at times, doing so is absolutely necessary. If you're changing your mailing address, you probably want to send a notification to everyone in your database. Comparatively, if you're running a special sales promotion, you probably notify only your leads and accounts. And if you're sending overpriced holiday gift baskets, you probably want the names of only your very best customers.
In Sugar, you can search for information across several modules or restrict your search to one specific module. You can also perform a quick search based on a single field.
The three types of Sugar searches are
Global Search
Basic Search
Advanced Search
A Global Search can be an extremely useful way to find data about your records no matter where that information might be lurking. In fact, you might nickname this search the "Super" search. As your database increases, you might want to see all the records that revolve around a single Contacts or Accounts record. Sugar's Global Search enables you to dig for that information in the Accounts, Bug Tracker, Cases, Contacts, Leads, Opportunities, Projects, and Quotes modules of Sugar.
For example, suppose that you're looking for all the information about a key Accounts record. You perform a Global Search by filling in your search criteria in the search box located at the top-right corner of any Sugar screen and then clicking the Search button.
Tip
The percent sign (%) is the universal wildcard in a MySQL database. Sugar automatically adds the % wildcard to the end of a search. For example, searching for "The Big%" matches such records as The Big Kahuna or The Big Bopper. Searching for "%Big" returns Mr. Big.
Note
Depending on the type of database you're using, a Global Search may or may not be case-sensitive. Sugar databases that use the MySQL database are not case-sensitive whereas those using Oracle are case-sensitive.
A Gobal Search searches throughout your database — checking all records — and returns all records relating to your criteria in a page that looks similar to Figure 9-7.
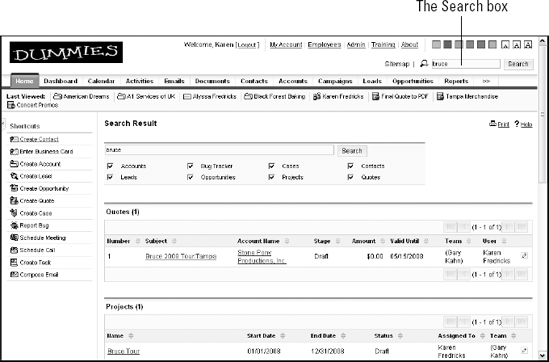
The modules with the most records display at the top of the Search Result page. When the search has completed, you can further refine your search by selecting only the modules you wish to query and then clicking the Search button.
You can perform a Basic Search from the Search subpanel, which is conveniently located at the top of most module Home pages. The Basic Search limits your search options to a few crucial fields.
Performing a Basic Search is easy if you follow these steps:
Select the tab of the module that you'd like to search.
Unlike a Global Search, the Basic Search is limited to a single module.
Fill in the criteria on which you'd like to search.
For example, Figure 9-8 shows you the Basic Search tab of the Contacts Home page, which includes the First Name, Last Name, and Account Name fields. You can search by any — or all — of the fields.
The search fields are context-sensitive; when you type a character in a field, the system performs a search and presents a list of values starting with that character.
(Optional) Select the Only My Items check box to find only those records that are related to your tasks and activities.
Click the Search button.
Quick as a wink, your List view modifies to show only those records that match your search criteria. If you enter information into more than one field, then a record must match all those fields to be included.
At this point, you can continue on your merry way. Feel free to perform a mass update, delete the selected records, and perform any function that you can normally perform in the List view.
Click the Clear button when you finish working with the selected records.
You might feel a momentary feeling of panic right after performing a search, wondering what happened to the rest of your records. Sugar believes in the "Mother May I" school of computing. After you perform a search, those records — and only those records — will display in the List view even if you log out of Sugar and log back in again. Make sure you hit the Clear button to bring the rest of the records out of hiding.

After you use your database for a while and it slowly but surely fills up with more and more records, you might feel the need to add a little more power to your searches. You also might find yourself constantly creating the same search and wishing you could save that search. In fact, you might even start using the term query, which is computer-speak for search.
If you need to base your search on multiple criterions, you can perform a query to create the search. In Sugar, a query searches all the records in your database based on the criteria that you specify and then creates a list of the records that match that criteria. Additionally, you can rearrange the list to show the fields you deem to be most important.
Many of you might associate advanced with difficult, but that's certainly not the case here. In Sugar, the Advanced Search is powerful, but not difficult, if you follow these steps:
Click the Advanced Search tab of the module's Home page.
As you probably know by now, most every module includes the Search subpanel on its Home page. The Advanced Search page displays various fields depending on the selected module. The fields are blank; your mission — should you choose to accept it — is to specify the fields and values that define the query.
Fill in any criteria on which you want to search.
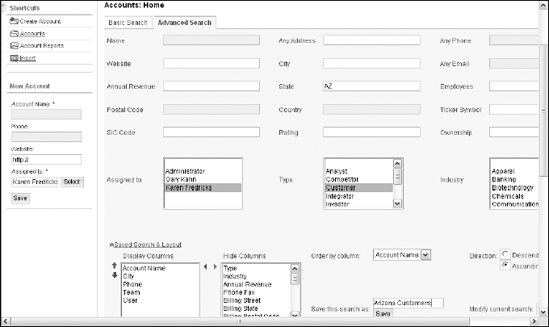
The Advanced Search allows you to create an exact profile for the contacts you're hoping to find. For example, you might want to have a look at all of your Accounts records from the state of Arizona who are manufacturers.
Fill in as much criteria as you need. The whole purpose of doing an Advanced Search is to look for records that fit more than one criterion. If you're looking for all customers who are located in Arizona, select Customer from the Type list and type AZ in the State field, as I do in Figure 9-9.
Click the Search button.
Sugar happily displays a list of all the Contacts records that match your search criteria in the List view.
Click the double down arrows next to Saved Search & Layout.
The Saved Search & Layout subpanel expands. The Saved Search & Layout option lets you save the search criteria as well as how you want that information to display.
Select a field from the Hide Columns list and click the left arrow to add a column to the List view.
The object of the game is to decide which fields you want to display — and the order in which they'll be displayed.
To change the order of the displayed fields, select a field from the Display Columns list and then use the up or down arrow to move it. To remove a column from the List view, select it from the Display Columns list and use the right arrow to move it to the Hide Columns list.
Choose the column you wish to sort by from the Order By Column drop-down list.
Only those fields you select in the Display Columns list will show in the Order By Column drop-down list.
Select the appropriate Direction radio button.
Most folks like to see things in Ascending or A-Z, low-to-high order. However, you might choose descending order if you're searching for opportunities and want to see the big-ticket items first.
Enter a name for the search results in the Save This Search As field and then click Save.
Creating an Advanced Search is only half the fun; the other half comes from being able to use it again — and again and again!
Choose None from the Saved Searches drop-down list to clear the current search, and then select your saved search from the Saved Searches list to view the saved search.
(Optional) Make any necessary changes to the search criteria and/or the layout and then click Update.
Mistakes happen. The world evolves. And you may need to tweak your saved search. Feel free to do so.
(Optional) Click Delete to delete the saved search.
Over time, your list of saved searches might get very l-o-n-g; you'll want to prune it a bit.
Warning
Saved searches can be a bit confusing. You might find yourself using a saved search, changing the filters and actually creating a new search — even though the Saved Searches drop-down displays the original search name. It's a good practice to choose None from the drop-down and then click Clear to rid yourself of any evidence of the prior search.