
In This Chapter
Using the wizard to create a campaign
Keeping your eye on the target
Creating a Leads form
Creating templates and newsletters
Diagnosing campaign issues
On the simplest level, you can use SugarCRM as a glorified Rolodex and be quite happy with a place to find basic contact information. However, if you're at all interested in growing — or maintaining — the size of your business, you'll want to make use of the Campaigns module. You start by creating a Target List of the folks who will be the recipients of the campaign. Next, you decide exactly the type of collateral you'll be sending them. You test the campaign process — and figure out ways to measure the ROI (return on investment). Finally, should you find that your campaign stalls at the time of blast-off, you need a way to figure out exactly what's wrong.
Quite simply, a campaign is an activity — or series of activities — designed to accomplish a purpose. Just as a candidate campaigns to get elected, a sales manager campaigns to get products purchased. You measure the success of a political campaign by whether the candidate is elected; you measure the success of an advertising campaign by whether you see an increase in sales. And, to continue the analogy, should your campaign not attain the desired outcome, there's nothing to prevent you from trying again!
Typically, a mass marketing campaign targets a specific group of individuals or businesses. Therefore, the campaign process begins with identifying targets and grouping them into a Target List. In addition, you can associate Contacts, Leads, and Opportunities records with an existing campaign to get a better understanding of your campaign's results. For example, you might want to know which specific Opportunities records were a direct result of a campaign.
Sugar gives you two options for creating a Campaigns record. You can find both options in the Shortcuts menu of the Campaigns module Home page:
Campaign Wizard: This option steps you through the process of creating a campaign as well as all campaign-related tasks. Because so many steps are involved in creating a marketing campaign, it's probably best to complete the wizard as thoroughly as possible and then go back to add more information later.
Create Campaign (Classic): This option creates a basic Campaigns record; however, you're responsible for completing the various other campaign-related tasks, such as specifying the e-mail settings all by your lonesome.
The Campaigns module is ideally suited for a variety of marketing efforts. Sugar excels with e-mail and e-newsletter campaigns; Sugar helps you by using merged documents, transmitting them to a Target List, and tracking their results. Sugar can also help automate snail-mail campaigns by merging a template with your Target List and creating labels. When you create other types of campaigns, such as radio, print ads, or telemarketing, you can't execute the campaign directly from Sugar; however, you can create a Campaigns record to help you manually track the results.
Warning
If you plan to create Campaigns records using snail mail, you need to purchase a license for the Sugar plug-in for Microsoft Word so that you can create personalized templates in Word and then merge them with your Sugar contact data. Chapter 8 shows you how to create mail merge templates.
Warning
The plug-in comes free with the Professional and Enterprise editions.
Whew! You might be thinking such a powerful feature must be confusing and complicated. Fortunately, the handy dandy Campaign Wizard guides you through the process.
Follow these steps to create a new Campaigns record using the Campaign Wizard:
Click the Campaigns module tab from any Sugar window.
The Campaigns Home page opens.
Choose Campaign Wizard from the Shortcuts menu.
The Campaign Wizard displays. You'll probably find it easiest to use the wizard every time you create a new campaign, and then edit the various stages manually. And, as Figure 13-1 shows, creating a campaign involves a lot of stages.
Select the type of campaign you want to create and then click Start.
The next screen of the Wizard opens; Figure 13-2 shows an example of a Newsletter campaign.
If you haven't done so already, Sugar will prompt you to set up an e-mail account to handle any potential bounced e-mails. This isn't a hard thing to do but must be performed by the database administrator; just make sure he knows the e-mail address you'll be using.
Enter the basic campaign information and then click Next.
You'll want to record a few minor pieces of housekeeping information:
Name: Give the campaign a name.
Status: Choose a status from the drop-down list to let others know how far along you are in the campaign process.
Assigned To: Supply the name of the person who is in charge.
Frequency: If you're creating a newsletter, you need to indicate how often you'l be sending it.
Start Date: Click the calendar icon to select the campaign's start date.
End Date: Click the calendar icon to select the campaign's end date.
Description: Give a description of the campaign if you think it needs one.
(Optional) Enter the campaign budget information and then click Next.
This information is purely optional. However, if you'd like to calculate your ROI (return on investment), then you'll want to figure out your budget and how much money you hope to make from your marketing endeavor. Later, you might want to edit this information to include the actual cost of the campaign.
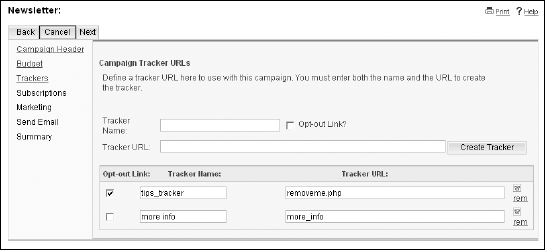
Enter the tracker URL information and then click Create Tracker.
A campaign e-mail can include text, images, and links directing your targets to other URLs. In case you wonder whether people are actually clicking the links in your e-blasts, you can set up a tracker URL to track the response to your campaign. The tracker URL keeps track of such information as the date, the time, and what domain the user was logged on to when she clicked the links.
Sugar can create trackers for you — as well as a specific opt-out tracker that supplies a link for anyone who wishes to opt out of your newsletter. If you choose to create an opt-out link, Sugar automatically selects the Email Opt Out option on the target's Detail view.
As you see in Figure 13-3, you just need to supply a name for the tracker and decide whether you want to have an opt-out link; Sugar does the rest of the work for you.
If you want to create additional tracker URLs, click Create Tracker again and enter the new tracker information. Click Next when you finish adding URL trackers.
Complete the Subscription Information page for your campaign.
The Subscription Information page of the Campaign Wizard opens. A Sugar campaign requires three lists of people, or targets:
Subscription List Name: These are the folks who you are either targeting for a marketing campaign or to whom you're sending a newsletter.
Unsubscription List Name: These are the people who no longer want to buy what you're selling — or at any rate, don't want to be bothered by future e-mails.
Test List Name: This list comprises all of your e-mail guinea pigs. Over the years, you've probably been the recipient of a mailing in which the sender hits the Send button a tad too early. Hopefully, by sending to a test list, you can circumvent problems now instead of later.
Select your Target Lists and then click Save and Continue.
Click Allow Select and then click the Select button to use an existing Target List, or click Auto-Create to create a new Target List. If you choose the Auto-Create option, Sugar will suggest a snappy name for the list; you can add more names to that list later. Figure 13-4 gives you an idea of what the finished product looks like.
Tip
You just gotta love software that unobtrusively makes life easier for you. When you choose to select an existing target list, Sugar displays just the right types. For example, if you want to select a test list, Sugar only shows you existing test target lists.
Fill in the information on the Marketing Email page.
The Marketing Email page you see in Figure 13-5 lets you specify how and when your newsletter or campaign is distributed. You want to indicate the From Name, From Address, when you want your campaign to be sent, and the name of the template you're using.
Warning
Not sure how to create an e-mail template? A quick look at Chapter 12 will show you how.
The Email Marketing record that you create is a mandatory part of an e-mail campaign. If necessary, you can create multiple Email Marketing records. For example, if you're sending a monthly newsletter, you'll want to create an Email Marketing record for each issue.
Click Next to continue.
This is the moment you've been waiting for: the final page of the wizard! Whew! You made it. At this juncture, you can send a test e-mail or schedule the e-mail for a later transmission, as shown in Figure 13-6.
Click Finish to close the wizard.
Personally, I'd click Finish and go for a quick jog around the block, knowing that most of my work is complete and that I can tweak my campaign when I get back.


If you surf the Internet, you've probably run across Web-to-lead forms. In general, a company's Web-to-lead form prompts you for your contact information in exchange for something you want. For example, you might have to fill out a Web-to-lead form to enter an online contest or to receive additional information about a product.
In essence, a Web-to-lead form is an easy way to harvest contact information. Typically, you place a link to a Web-to-lead form on your Web site. However, you can also place a link to a Web-to-Lead form in your campaign template. When the targets in your campaign click the link, they're prompted to fill in the form. Sugar will take that information and update the Lead record in your Sugar database or add a new lead in case the template finds its way to a new, unsuspecting target. You can then use this information in future campaigns.
Tip
Although this chapter focuses on using a Web-to-lead form as a part of your campaign, you can also create a link on your Web site to a Web-to-lead form. Hopefully, visitors to your site will click the link — and submit their contact information.
Here's how you easily create a Web-to-Lead form:
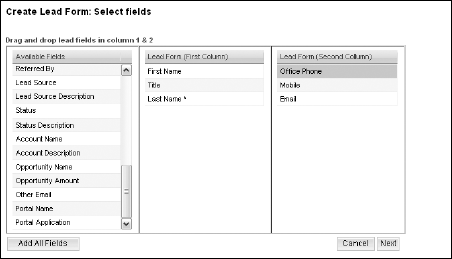
Click the Campaign module tab from any Sugar window and then choose Create Lead Form from the Shortcuts menu.
The Create Lead Form page displays, as shown in Figure 13-7.
Click and drag the desired fields from the Available Fields panel to either the First Column or the Second Column panels.
All the available Leads record fields appear in the Available Fields panel. If you would like to capture additional information, the administrator needs to go to Chapter 15 and read how to use the Sugar Studio to create new fields in the Leads module.
Click Next to continue.
Enter the form information.
This is probably one of the easiest forms you ever have to contend with because most of the information is already filled in for you.
Form Header: Sugar automatically supplies a name; feel free to edit it.
Form Description: Again, Sugar fills this in, but you're free to change it at will.
Submit Button Label: This is the button that recipients click to transmit the Web-to-lead form. You can change the wording to Click Me, Sign Up Here, or any other cute phrase that crosses your mind.
Post URL: This is the location where the lead information is stored. If you want to change the URL, click Edit and change away.
Redirect URL: This is where the recipient lands after he submits the form; you might choose your Web site or some other landing page.
Related Campaign: Select the campaign that this form is linked to; this field is required.
Tip
Not sure what to choose if the Web-to-lead form is placed on your Web site? Consider creating an ongoing campaign called something along the lines of "Web site Leads."
Assigned To: By default, this is you, but you can click the Select button to select the name of another user if you prefer.
Form Footer: Add a footer to the Web-to-lead form if you feel like there's something you want to say on the form.
Click Generate Form.
After a momentary pause, the form opens in the editor, as shown in Figure 13-8. You can beautify the form by changing its color, or by adding additional information and/or hyperlinks. Required lead fields automatically appear with an asterisk. Notice that the header of the form corresponds to the header you assigned in the previous step.
Click the Save Web To Lead Form button to save the form.
You receive a prompt to download your Web-to-lead form followed by a hyperlink to your form. Copy the hyperlink and paste it into a template or onto a part of your Web site.

Your campaign is fairly complete: You've associated an e-mail account with the campaign, you've determined the template to use with your campaign, and you've scheduled a start date and time for the campaign. But wait — you've overlooked one key element of the campaign. A campaign is only as good as the list of people to whom you're sending the campaign.
If you start your campaign by using the Campaign Wizard, you have the opportunity to create three different types of Target Lists: campaign recipients, opt-outs, and test recipients. Once created, you can edit those Target Lists to provide a few more details than what is available to you with the wizard. If you chose to create your campaign using the Create Campaign (Classic) method, you have to create the Target List from scratch.
Follow these steps to create a Target List.
Click the Campaigns module tab from any Sugar screen and then choose Create Target List from the Shortcuts menu.
The Target Lists page opens.
Enter the following information on the Target Lists page:
Name: Give the Target List a name.
Type: Specify the Target List type from the drop-down list. I mentioned three Target List types: default, which consists of the people receiving the campaign; suppression list, which are the opt-outs; and test, which is the sample group you send to prior to sending the campaign. However, you can also designate a Target List as a seed list — usually, this is the head honchos who need to see and review the Target List before it's sent.
Assigned To: Add the name of the person in charge of the list; by default, that person is you.
Description: Optionally, enter a brief description of the Target List.
Click Save to save the target list.
In the previous section, you create a Target List, which is the list of recipients you want to reach with your campaign. Now you need to fill that list with contacts. A Target List can consist of four records:
Targets: This is the low man on the totem pole. A target is a really cold prospect or lead. Targets are generally considered unqualified because you just don't have much information on them yet. You can convert a Targets record to a Leads record.
Leads: Leads are the next step up from targets. You might have qualified a lead and have one or more opportunities associated with the lead. You can convert Leads records into Contacts, Opportunities, and/or Accounts records.
Contacts: These are the folks that you've, well, made contact with — and have probably sold some of your wares to.
Users: You might want to add database users to a test Target List so you can double-check the mechanics of your campaign before you set it loose on thousands of unsuspecting individuals.
Tip
Notice that an Accounts record can't be in a Target List. That's because you send marketing collateral or newsletters to specific people.
Follow these steps to add new targets to your Target List:
Click the Campaigns module tab from any Sugar view and then click Create Target from the Shortcuts menu.
The Targets page opens.
Tip
Unlike Contacts, Leads, and Users records, you can only access Targets directly from the Campaign module. Additionally, Targets are stand-alone records that can't be associated with other types of records. If you plan to send your campaign to only existing Contacts, Leads, and/or Users records, skip to Step 4.
Enter any information that you have for the target.
Tip
If you have a text file containing a list of brand-new targets, you can import that list. Click the Import link on the Shortcuts menu and navigate to the saved file.
By nature, you might not have much information about a target other than his name and e-mail address. You can add as many e-mail addresses as you want by clicking the Add Address link, filling in an address, and specifying whether the address is primary, opt-out, or invalid.
Click Save to create the target.
When you save the target, the target's Detail view displays. You're now ready to add those targets — along with your existing Contacts, Leads, and Users records — to the campaign's Target Lists.
Click Target Lists from the Shortcut menu and then click the name of the Target List you want to populate.
The Target List Details view opens.
Warning
Make sure you select the correct Target List. Adding contacts to the wrong Target List can result in disastrous results. If you followed the wizard, you might see three lists for each campaign, as shown in Figure 13-9. The main recipient Target List displays Default in the Type column; test lists display Test as the type, and Suppression lists display Suppression List.
Scroll to the appropriate subpanel and click the Select button.
For example, if you want to add existing contacts to the Target List, scroll to the Contacts subpanel. In any event, the Search window will open.
Fill in your search parameters and click Search.
Alternatively, you can scroll through the contacts and place a check mark next to any contacts that you want to include. Figure 13-10 shows a search of all existing customers who are assigned to Karen Fredricks.
Select the check box to the left of the Name column to select all the contacts and then click Select.
The contacts are now included in your Target List.


By now, you might have a mental picture of yourself at the starting line. You've gone through the on your mark and get set stages of the race, er, campaign. But hold on there — you need to attend to a few more housekeeping chores before hitting Go!
Before you launch your e-mail or newsletter campaign, it's important that you test it to make sure the thing is going to work. Consider the following important points:
Test your e-mail preferences. You should test your e-mail preferences before sending your message to thousands of people. If you don't, you might find yourself with a thousand e-mails in your Outbox that can't be sent. Make sure your test Target List includes contacts from both inside and outside of your office.
Test your e-mail template. Again, testing your message before sending it across the universe is always a good idea. Having correct spelling and punctuation isn't a bad idea, either. Make sure the graphics can be viewed correctly through a variety of different e-mail clients.
You might discover that although your templates look picture perfect when you first create them in Word, they look a bit spacey when you attempt to use them as e-mail templates. You might find that your message now appears to be double-spaced. Basically, something was lost in the translation from Word to HTML. You can correct this quite simply by returning to the scene of the crime — or in this case, the original template — and holding down Shift each time that you press Enter to create a new line.
Check with your ISP. Many ISPs have implemented safeguards against spam. Before you send an e-mail to all the contacts in your database, call your ISP to find out how many e-mails you can send at a time. If your ISP limits the number of e-mails you can send at one time, you need to send your mailings in smaller groups or purchase an add-on product that sends your e-mail in batches. You discover more about these products in Chapter 18.
Read up on the Can Spam laws. Laws are in place that require your e-mail to contain various elements, including your correct contact information and a way for recipients to opt out should they not want to hear from you.
Here's all you need to do to test your campaign:
Click the Campaigns module tab from any Sugar view, click Campaigns from the Shortcuts menu, and then click your campaign.
The Campaign Detail view opens. You might want to take this opportunity to scroll down the page and make sure that a test Target List appears in the Target List subpanel, and that you have at least one record in the Email Marketing subpanel.
Click the Send Test button.
The Send Test page opens. As shown in Figure 13-11, the test message will automatically send to your test list.
Select the name of the campaign message you want to test.
When you're in the test mode, Sugar very cleverly disables your Suppression lists and then checks for duplicates. Therefore, you can send the test message multiple times until you get it right.
Click Send.
This is a case of no news being good news. If all systems are go, you'll return to the Campaign Detail view. If there's a problem, Sugar rewards you with an error message. And, if you included yourself as one of the recipients in the test Target List, you can race over to your Inbox and take a look at the message.

Running a campaign can seem a bit overwhelming. You have a template to produce. You have Target Lists to fill. You have tracker URLs to insert. You have Email Marketing records to create. You have a test to send. Holy guacamole — that's a lot of details to take care of! In the previous section, you create a test message that confirms whether you dotted all your Is and crossed all your Ts.
After all that effort, it would be fairly mind-blowing to have a technical glitch prevent the campaign from staying on schedule. Unfortunately, although a regular user can perform all the campaign tasks mentioned above, only an administrator can set up the actual e-mail handling portion of the campaign. Fortunately, Sugar comes with a neat Campaign Diagnostics tool that will put your mind at rest by confirming that the administrator has done her job — and you won't be left in a finger-pointing match should the campaign go off schedule.
Follow these steps to run the Campaign Diagnostics tool:
Click the Campaigns module tab from any Sugar view and then choose Diagnostics from the Shortcuts menu.
The Campaign Diagnostics page displays on the screen.
Warning messages like the one you see in Figure 13-12 appear if the administrator has not configured the e-mail settings and bounce-handling options correctly.
(Optional) Contact your administrator to complete the necessary e-mail tasks.
You might alternate between using threats and bribes, depending on which method works best with your administrator. Printing the Campaign Diagnostics screen and posting it throughout the office often works well, too.
Follow Step 1 above to return to the Campaign Diagnostics screen and then click the Re-Check button.
At this point, all systems should be good to go.

I mentioned earlier that there are basically two types of campaigns — those that use e-mail and those that don't. If you are using a non-e-mail campaign, such as a Telemarketing or a Mail campaign, you will need to make changes manually to the campaign to keep others updated on the status and success of the campaign.
Follow these steps to view the campaign's details so that you can make changes:
Click the Campaigns module tab from any Sugar view, choose Campaigns from the Shortcuts menu, and then click the name of the campaign you wish to edit.
Seems like a whole lot of steps, but by now you should feel pretty comfortable with navigating to a Detail view.
Click Edit to add additional campaign details and then click Save to save your changes.
In particular, you might need to adjust these fields to help calculate your ROI:
Impressions: This is the number of calls made, or items sent.
Actual Cost: This is the amount that the campaign cost you.
Sugar uses this information to automatically calculate a Cost Per Impression figure.
(Optional) Click Mail Merge to perform a mail merge.
You're now able to select the template you want to merge to your Target List.
Warning
This option works only if you have the Sugar Mail Merge add-in for Microsoft Word.
Mark as Sent after you launch the campaign.
You need to mark a non-e-mail campaign as sent to let other users know when the campaign has been launched. When you do this, the Campaigns subpanel on a target's Detail view will show the status as Active.
As you can see, creating a campaign requires a lot of planning and work. As the saying goes: no pain, no gain. However, all your work won't go unnoticed by the Sugar system — and hopefully not by your boss! After you launch a campaign, you can head to the pool, grab a drink, and float into the sunset with visions of dollar signs dancing in your head. Alternatively, you might want to check on the outcome of the campaign.
The campaign's Detail view allows you not only to view the current campaign status but the results as well. This information can help you plan future campaigns. For example, you might want to view the leads that came in as a result of the campaign and add them to a Target List for a future campaign, or add the opt-out records to a master unsubscribe Target List. You can even see the exact return on investment (ROI) of the campaign.
Because the campaign's Detail view supplies you with so much information about the results of your campaign, you'll want to head back there at least one more time:
Click the Campaigns module tab from any Sugar view, choose Campaigns from the Shortcuts menu, and then click the name of the campaign you wish to analyze.
By now, you can probably open the campaign's Detail view in your sleep, but it's always nice to have instructions just in case!
The ROI chart displays. Figure 13-13 shows you a sample of the data you'll find for your campaigns. The ROI chart shows the actual revenue versus the expected revenue generated from the campaign, and the actual and budgeted cost of the campaign. In case you're wondering, the revenue figure is a compilation of all new opportunities that users have attributed to the campaign; hopefully, that number will continue to increase every time you check the campaign's ROI.
If you've created an e-mail campaign, you're treated to a wide array of information. You'll see a tracking chart of responses from campaign targets. This includes seeing how many people viewed the message, how many opened any links that were included in the campaign e-mail, and how many people chose to opt out of the campaign. You'll even see the number of leads that were created as a result of your campaign. Talk about heavy-duty analysis!
If that's not enough, if you scroll to the bottom of the page, you'll find subpanels listing the people who are graphically represented in the chart. For example, you'll find lists of the people with bounced or invalid e-mail addresses as well as those who clicked through the various links in your campaign e-mail message. Most importantly, you'll see a list of the opportunities that were created as a result of your campaign.
