
In This Chapter
Wandering into the Sugar Studio
Adding and editing custom form fields
Editing field values
Changing layouts
Modifying drop-down lists
Using Sugar's Module Builder
Changing module tabs
In this chapter, I show you (that is, all of you who have Administrator rights to your databases) not only how to add new fields to a SugarCRM database, but also how to set the various field parameters to help users use the database more effectively and efficiently. After you add a field, you want to put it somewhere so that it's visible to all of your users. I show you how to maintain consistency in your database by using drop-down lists. Finally, if you have a specific need that isn't addressed by the existing Sugar modules, I show you how to add one.
For many of you, the modules and their fields that come with Sugar are more than enough to run your business. If that's the case, feel free to skip this chapter. However, many of you like to do things in your own unique fashion. Fortunately for you, Sugar includes the ability to make changes to modules, fields, drop-down lists, and even layouts directly from within the Sugar program. And, by doing so, you can create a customized solution for your business that would probably cost you tens of thousands of dollars if you were to hire an outside programmer to create the whole thing "from scratch."
Warning
To make structural changes, you must be a database administrator; the makers of Sugar made this a requirement so that you understand the importance of this responsibility. So, unless you have those rights to the database, you don't even have to read this chapter! I suppose you still could just for curiosity's sake, but it isn't necessary.
Note
Sugar is Open Source software, which means that you have access to the entire source code. Therefore, if you have a good, working knowledge of PHP, you can change any aspects of Sugar. This chapter focuses on the areas you can change by using the Developer Tools you find in Sugar; however, feel free to explore other changes that are beyond the scope of this book.
I am a firm believer that a little knowledge is a dangerous thing. Although making structural changes to your Sugar database isn't hard, it is something that should be well thought out and planned. This is particularly true if you plan to share your database with other users. Planning is important because you usually have a goal in mind for your database. For example, if your goal is to create a report with three columns — contact name, birthday, and Social Security number — you need to make sure all those fields exist in your database. Planning also prevents you from adding thousands of contacts to your database, only to find that you have to modify each record to include information that was omitted the first time around!
Okay, I admit it — I'm a former secondary school teacher, and I guess that background just naturally spills over into my Sugar consulting. Well, class, pretend you're back in school because you're going to be assigned some homework. I consider it important homework that you must complete prior to jumping in and making major changes to the structure of your database, so your assignment is as follows:
Jot down all the fields that you want to add to your database.
Most of the fields you want to see, such as company, name, phone number, and address, are already included in Sugar. What you need to decide here is what fields, if any, are specific to your business.
Dust off your thinking cap while you create your list. Sometimes one field will do the job, and other times you might need multiple fields. For example, suppose you sell widgets that are red, white, or blue. In one scenario, a customer needs to buy only one widget; in this case, you create a product field with three choices in the drop-down list — red, white, or blue. Or, perhaps you manufacture a different kind of widget; in this case, a customer would hopefully buy one of each color. This time, your purposes would be better served by creating three fields — one for each type of widget.
Scurry around the office and collect any documents that you want Sugar to create for you. This includes both forms and form letters.
You have to get a little high-tech here, but I think you can handle it. Get out your trusty highlighter and highlight any of the information in each document that is contact specific. For example, each contact has its own unique address. Maybe you're thanking particular contacts for purchasing widgets (as opposed to gadgets, which you also sell). This means that you need a Product field.
Think how to populate the fields with drop-down lists. Then, on the list that you start in Step 1, jot them down to the side of each of the fields.
For example, if you run a modeling agency, you might need a field for hair color. The drop-down choices could contain red, blonde, black, and punk pink.
Visualize where you'd like your new fields to appear.
Adding a field is half the fun. The other half comes from deciding where you want that new field to appear.
Sketch out any reports that you want to create from Sugar and add the column headings to the now rather long list that you created in Step 1.
The idea here is to get your thoughts down on paper so that you can visualize how you want your reports to look. If you already have a sample of your report in Excel, you can use that. If not, get out your trusty pencil and outline on a piece of paper what you want your report to actually look like.
We're not talking about a stubbed toe here. Rather, think about areas of your business that Sugar could help you manage. Maybe you're a travel agent and would love to add a module that lists itineraries. Or, perhaps you're selling yachts and need a place to track the specs on each vessel. Put Sugar to use to help manage any or all data.
Jot down even your smallest wish.
You may as well take advantage of Sugar's customization capabilities. For example, you might deal only with hospitals and would like to rename the Accounts module the Hospital module.
Get out a red pen. At the top of your paper, write 100%, Well Done, and then draw a smiley face. Hang your list on your refrigerator.
Okay, that last step isn't really necessary, but now you're well on your way to having the database of your dreams!
After you've done your homework, you're probably chomping at the bit to jump in and start creating. Although I admire your enthusiasm this might be a great time to take a quick peek at the design tools that you'll be using.
The tools are easy to access — just click the Admin link on the Home page and scroll to the Developer Tools subpanel. Figure 15-1 shows you what you're getting in to.

Although the elements are logical, it doesn't hurt to take a fast tour:
Studio: You might think of the Studio as a playground for nerdy grownups; this is where you can add fields, change a label, rearrange your layouts, and edit a subpanel on your existing modules.
Module Builder: Like a fancy set of building blocks, here's where you can build new modules to customize Sugar exactly to your liking.
Configure Tabs: If you're overwhelmed by the number of tabs that display across the top of Sugar, here's the place to remove the ones you aren't using.
Configure Group Tabs: You might want to swap the module format for a menu-based system grouping.
Portal: Select this option to add tabs to other Web sites.
Module Loader: Use this option to load Sugar modules, themes, and language packs that you've purchased or downloaded.
Dropdown Editor: Click this option to add and edit the contents of your drop-down lists.
Rename Tabs: Select this option to rename a module tab.
You might think of the Studio as the heart and soul of your design efforts. This is where you change the data that is displayed — and determine how that data can be viewed — for the basic Sugar modules as well as any modules that you might have created. Figure 15-2 shows the Sugar Studio Home page.
Tip
Need a little more room to spread out? Click a double left arrow to close a section that you're not using, such as the Help or Shortcuts menu section. Want to get them back? Click the double right arrows.

The Studio Home page lists all the existing modules in the left panel. The middle panel displays the exact same information in the form of icons. If you like working from a list, click the plus sign (+) to expand the module to show the Labels, Fields, Layouts, and Subpanels associated with the module. If you prefer icons, clicking them will reveal the view you see in Figure 15-3.

You'll also notice that the right panel offers you helpful hints; these hints will change to reflect the area of the Studio you're in. And, should you get lost wandering around the Studio, the buttons that run along the bottom of the page will get you back on track.
Before getting started, I want to outline briefly the three steps involved with adding fields to a database:
Understand why you want to add fields and what purpose these fields will serve. And, if you did your homework earlier in this chapter, you're already done!
Determine what fields you're going to add and what type of data will be stored in them (dates, numbers, drop-down items, and so on). If you're creating a drop-down list, decide on the drop-down items.
Add the fields to your layouts and subpanels.
For most of you, adding a field to your database will be easy. After all, you're good at following directions. However, for some of you, knowing why to enter a field can prove to be more challenging.
To explore the question of why, I first want to reiterate the basic concept of fields. What the heck is a field? A field is a single piece of information. In general, a field contains just one piece of information. For example, you have only one business zip code; therefore, you have one business Zip Code field. Alternatively, you probably have several phone numbers: home, business, toll-free, cellular, fax, beeper ... and the list goes on. Each of these phone numbers requires a separate field.
A good field holds one fairly specific piece of information. A bad field contains too much information. For example, having a separate field for your street address, city, state, and zip code is a good thing. These separate fields allow you to perform a lookup based on any of the criteria: You could find clients by zip code, city, or state. An example of creating a bad field is lumping all the address information into a single field; in this example, you'd then lose your ability to search by zip code, city, or state. (Need a refresher on searching? Head to Chapter 9.)
You can add custom fields to any module in Sugar. The actual addition of fields is relatively easy; just follow these steps:
Click Admin on the Sugar Home page and then click Studio in the Developer Tools subpanel.
The Sugar Studio opens.
Expand the module that you want to edit from the Modules panel and then click Fields.
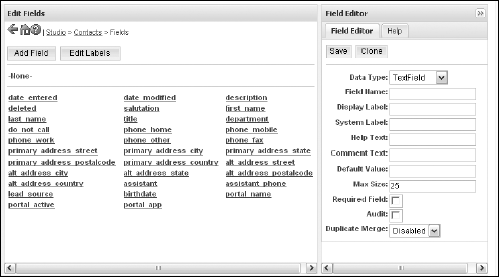
The Edit Fields panel opens, as shown in Figure 15-4.
Click the Add Field button.
The Field Editor panel (shown in Figure 15-5) opens on the right side of the screen, replacing the Help panel. If you still need a bit of help, click the Help tab.
Choose one of the data types from the drop-down list.
Text Field: This is probably the most common of the field type choices; a character field can contain both numbers and characters
Address: Talk about a timesaver! When you designate a field as an address field, Sugar automatically creates five fields: street address, city, state, zip code, and country.
Currency: This field comes equipped with a dollar sign, appropriate commas, optional decimal places, and a sunroof (optional).
Date: When the time comes for you to enter information into a Date field, you see a tiny little calendar that enables you to select a date. The calendar supplies a useful purpose. If you create a field for a birthday and make it a character field, the other local yokels using the database might get creative and input anything from Jan 1 and January 1st to 01/01 and 1/1. Finding all birth dates in the month of January would become an exercise in futility.
Dropdown: When you choose this data type, you pick an existing drop-down list to associate with the field or create a new one. I cover creating drop-down lists in the upcoming "Creating a drop-down list" section
Decimal: This field accepts only numbers, a decimal point, and more numbers
Integer: This will create a field specifying positive or negative numbers. You can specify a range with the Min and Max value fields. This option enables you to enter only numbers into a field. Say you want to find all your customers that have more than 30 employees. You can easily search for a number greater than 30, whereas you can't possibly search for a number greater than thirty.
MultiSelect: This is a special type of drop-down list field that allows you to select multiple items from the drop-down list.
Flex Relate: This is kind of a wild card field; with a Flex Relate field, you can choose a record type from a drop-down list, select a record, and then link that record to the current record.
Warning
You can add only one Flex Relate field to a module.
Phone: If you designate a field to be a Phone field, you automatically get a year's supply of dashes
Radio: Creates a radio button, which will allow you to pick only one of the drop-down list options
Relate: Creates a field to associate a record with another record. You can add multiple Relate fields to a module
TextArea: Where you can store a large amount of information you don't want to bury among your other notes. For example, you might want to include your driving directions in this area
Link: Use this field type if you need to associate another Web address with your record.
Specify a Field Name. Enter a name for the field.
The field name can't include any spaces so use a name like FieldName or Field_Name rather than Field Name.
Add the remaining field properties.
The remainder of these fields is optional but it's always nice to know what they mean just in case you decide to use them:
Display Label: The label you will see to help you identify the field
System Label: This is the official "system" name for the field label
Help Text: Like a little set of training wheels, this information will appear when a user places their cursor over a field
Default Value: Add a default value for the field. For example, if you sell most of your products in the state of confusion, add confusion as the default value for the state field
Max Size: Enter the maximum number of characters that the field can have
Required Field: Select this check box to ensure that the users will enter information into this field
Audit: Select this check box if you want changes to this field to appear in the Audit Log for a record
Duplicate Merge: Select an option from the drop-down list to indicate whether you want to use the field as a way of finding duplicate records.
(Optional) Fill in any remaining field values.
Some fields appear depending on the value you use in the Data Type field. For example, a Decimal field will ask for a Precision (number of decimal places) and an Integer field will ask for a minimum and maximum value.
Click Save to create the field.
The new fields are listed above the core fields in the Edit Fields panel. Notice that a tiny "c" was added to the end of each one indicating that it is a custom field.

Deleting a field
Warning
If you delete a field from a database, all data in that field is deleted. Forever. Permanently. Delete a field only if you're sure that you no longer need that data.
The core fields that come with Sugar are so important that Sugar won't allow you to delete them. As an alternative, you can delete those fields from your layout so that they can't be accessed.
Ironically, the monumental task of deleting a field is ridiculously easy to fulfill. To do so, just follow these steps:
Click Admin on the Sugar Home page and then click Studio from the Developer Tools subpanel.
The Sugar Studio opens.
Expand the module that contains the field you want to delete, and then click Fields.
Select the field you want to delete.
I don't think I need to mention how important it is that you click the field you want to delete and not one you mean to keep.
Click the Delete button in the Properties panel to delete the field.
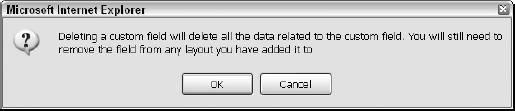
Click OK to confirm the deletion, as shown in Figure 15-6.
Click OK to the warning prompt.
That's all, folks. If you're waiting for a second reminder to ask whether you're really, positively, 100 percent sure that you want to delete the field, you'll be waiting for a very long time because it's not going to happen. Any information associated with the field will be gone permanently.
Editing fields
After you create a field, you might find that you need to tweak it later on down the road. Unlike many programs that are very difficult — if not impossible — to edit, you can edit your newly created, customized fields to your heart's content. However, the only part of a core field that you can edit is the label.
To edit a field:
Warning
The only portion of a core field that you can change is its label.
Arranging fields the way you want them might sound like a no-brainer, but many SugarCRM users never realize the importance of changing the field locations in the various Sugar views. For example, after you add more fields you might end up with the main business phone number on the top portion of your layout, the toll-free number somewhere in the middle, and the direct-line phone number in a third location. If you're constantly scrolling through your layout to find phone numbers, you'll want to move them together into one strategic place on your layout. This organization might not make your layout look better, but you'll certainly work better! The point is to design your layout in such a way that data input becomes easy.
You can edit where a field appears — or doesn't appear. In addition, you can change the order in which the fields appear. You can make those changes to a number of locations throughout Sugar:
Layouts: You can edit the Edit, Detail, and List views of any record type. In addition, you can edit the QuickCreate menus.
Search pages: You can change the search fields in both the Basic Search and Advanced Search windows.
Subpanels: You can add your new fields to a subpanel. For example, if you add an Account Number field to the Accounts module, you might want to see it on the Accounts subpanel for all the associated Contacts records.
The good news here is that it's very easy to add and remove fields from any page. The bad news is because there are so many places to customize, it's easy to add a field and then forget to make it visible throughout the various areas of Sugar.
As an example, say you add a toll-free phone number to the Contacts module. At the very least, you'll need to add that field to the Edit view (so you can add the number) and to the Detail view (so that you can see it). You might even decide to include it in the QuickCreate menu and on the Advanced Search window if you might want to find a contact by his phone number. As if that weren't enough choices, you might include the number on the Contacts subpanel of the Accounts and Leads module. Whew! You have your work cut out for you.
Changing the List view is a drag
The technique for adding fields and editing their position differs slightly between the various views. Here's how you can edit the various list-type views including the List view, Basic and Advanced Search pages, and the subpanels.
Click Admin on the Sugar Home page and then click Studio in the Developer Tools subpanel.
The Sugar Studio opens.
Expand the module for which you want to change the view, expand the Layouts section, and then click the List view you want to edit.
If you've been following along at home, the Edit Layout page opens. Figure 15-7 shows you an example of the page you see when editing the ListView.
Warning
You might want to close the Help panel on the right side of the screen to free up a bit more space to see the Studio fields.
The Edit Layout panel consists of three columns if you're editing the ListView:
Default: Contains the fields that are displayed in a List view by default
Available: Contains fields that the users can choose to create a custom List view
Hidden: Contains fields that the users won't be able to see until the administrator makes them available.
If you're editing Search windows or subpanels, you only see the Default and Hidden columns.
Make your changes by dragging fields to the desired location.
You can move fields around to get just the look you're looking for. For example, you might want to add a new field to the QuickCreate menu and remove an existing one.
To add a field: Select and drag the field from the Available or Hidden column and drop it into the Default column.
To remove a field: Select and drag the field from the Default column to the Available column.
To hide a field from users: Select and drag the field from the Default or Available column to the Hidden column.
Click the Save & Deploy button to save your changes.

When you modify the Edit view or Detail view, things look a bit different. Studio shows the separate sections of the layout and the fields they contain. You can edit, create, rename, and/or move the sections. Talk about having things just the way you like them!
Click Admin on the Sugar Home page and then click Studio in the Developer Tools subpanel.
The Sugar Studio opens.
Expand the module for which you want to change the view, expand the Layouts section, and then click the DetailView or ListView.
The Edit Layout page opens, as shown in Figure 15-8. Notice that it comes equipped with a Toolbox.
Make your editing changes.
Tip
Notice the pencil icon in the top-right corner of each field; to drag a field, you need to place your mouse pointer directly on that icon.
Remove an existing field: Select the field and drag it to the Recycle bin. The field will appear in the list of fields under the Recycle bin where you can retrieve it at any time.
Replace a field: Select the field from the list of available fields under the Recycle bin, drag it to the new location, and drop it on the field that you want to replace.
To add a field: Drag the New Row icon from under the Recycle bin and drop it on the layout where you want it to appear. The field will display (filler). You can then replace the filler field with an available field.
To move a field: Drag the field to the desired location on the layout.
To expand the width of a field: Drag the field next to it to the Recycle bin.
To decrease the width of an expanded field: Click the minus sign on the left corner of an expanded field; the field will contract and a filler field will be left in the open space.
(Optional) Click a field's pencil icon and then replace the existing field name with a new field name in the dialog box that opens.
In most cases, the field name and the field label are exactly the same. Having a field label differ too radically from the name of the actual field proves to be quite confusing when you wander into the area of template and report creation. However, sometimes you might want to tweak the field label so that it fits your layout better. For example, a field named Cellular Telephone Number might be shortened to a more readable Cell.
(Optional) Drag the New Panel icon to the layout to create a new panel.
You can then create a label for the panel by clicking its pencil icon and giving it a name. Once created, you can start adding fields to it.
(Optional) Drag a panel to a new location on the layout to move it.
You can drag a panel — and all the fields it contains — to a new location on your layout.
Select a save option when you're finished editing the layout.
Save: Allows you to save your changes without making them visible to your users
Save & Deploy: Displays the updated view to the Sugar users.

The sure-fire way to destroy a database is by adding information in an inconsistent manner. Drop-down lists help ensure that users input data in a uniform way. As an added bonus, drop-down lists also save you time: When you type the first several letters of an item in your drop-down list, Sugar responds by completing the word for you.
As the administrator, you can create and edit values in all of the existing drop-down fields. Better yet, you can create new drop-down lists for Dropdown and MultiSelect field types.
Creating a drop-down list requires two steps:
Building a drop-down list.
Specifying that the field is to contain a drop-down list.
Although you can start by creating a field first, it's probably better to start by creating the drop-down list. It will save you from having to edit a new field to associate it with a drop-down list.
Click Admin on the Sugar Home page and then click Dropdown Editor in the Developer Tools subpanel.
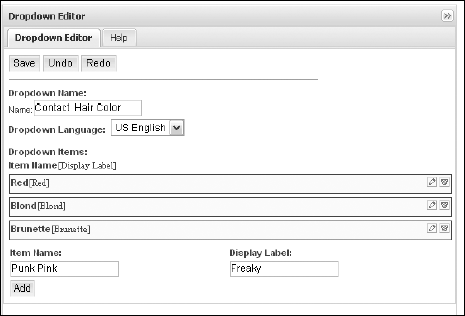
The Dropdown Editor panel opens, as shown in Figure 15-9.
Click the name of the drop-down list you want to edit or click the Add Dropdown button.
Because the names of the drop-down lists are a bit confusing, selecting an existing drop-down list can be a bit tricky and may take you a few tries before you select the correct one. In any event, the panel shown in Figure 15-10 opens.
Give the drop-down list a name in the Name field.
To make life easier for you, provide a name that coincides with the field that is going to use the drop-down list.
Add the first drop-down item in the Item Name field and add its label to the Display Label field.
Generally, the Item Name and the Display Label are the same.
Click the Add button.
Your new drop-down value appears at the bottom of the Dropdown Editor.
Continue adding new drop-down values by repeating Steps 4 and 5.
Click Save to save the drop-down list.
The new drop-down list displays under the module name in the center panel.

This might seem like a case of "Which came first, the chicken or the egg?" In the preceding section, I tell you how to create a drop-down list. Typically, your next step is to create a field and associate the drop-down list with it. In other cases, you might create a field, create the drop-down list, and then edit the field to associate the drop-down list with the field.
Here's what you need to do to edit an existing field and associate it with a drop-down list:
Click Admin on the Sugar Home page and then click Studio in the Developer Tools subpanel.
The Sugar Studio opens.
Expand the module that contains the field you want to add the drop-down list to and then click the name of the field.
Warning
You can only add drop-down lists to Dropdown and MultiSelect field types.
Choose the name of the drop-down list from the Dropdown List drop down menu.
Whew! You might want to reread that sentence a few times. Basically, Sugar provides you with a list containing all your drop-downs. And, if the name of the drop-down list matches the name of your field, Sugar cleverly makes the association for you automatically.
Click Save to save the changes to the field.
Just as you can add fields to your database, you can also add modules. Using modules is a great way to organize the information in your database. Once created, a module can appear as a subpanel on other records.
There are a number of great scenarios for creating a custom module. For example, you might create a Products module that lists the various products you're tracking that includes the serial number and a link to the Accounts or Contacts record(s) that purchased that specific product. Or, if most of your business comes from specific individuals, you might create a Referrals module and then link the referral source to each Accounts record that they send you.
Tip
Before you begin to reinvent the wheel, you might want to check out SugarForge (www.sugarforge.org) and SugarExchange (www.sugarexchange.com) where you can either download lots of modules for a slight fee or free.
The first step to creating a new module is to create a package. In Sugar, a package holds your custom module(s). Although a package can contain modules that are unrelated to each other, generally you create a package for a project you're working on.
After you create a package, you can begin creating modules for it, or you can return to the Module Builder later to finish the project.
The process of creating a Package is a very easy one:
Click Admin on the Sugar Home page and then click Module Builder in the Developer Tools subpanel.
Module Builder opens. If this is your first foray into the Module Builder, there won't be much to see except a rather large icon that reads New Package.
Module Builder's Package panel changes to allow you to enter information about the new module.
Enter the basic module information.
As you can see in Figure 15-11, there's not much information that you need to enter:
Package Name: Give the package a name.
Author: You may as well get credit for your work.
Key: Enter an alphanumeric key to help Sugar with its housekeeping, as Sugar will append this key to various directories and tables. In general, it's a good idea to keep the key name as short as possible — but long enough so that you can still identify it.
Description: Enter a description of the package.
Readme: If there's something else about the module that you want other users to know, feel free to give them some reading material.
Click Save to create the module package.
The Package page refreshes and displays a couple of new options. You're now free to roam around the cabin — or start to build your module.
After you create a package, you're ready to fill it with a module — or two or three. And of course, you'll want to edit the module — which you already know how to do if you read the section, "Stepping into the Studio," earlier in this chapter.
Click Admin on the Sugar Home page and then click Module Builder in the Developer Tools subpanel.
Alternatively, if you just finished creating a package, you can start by clicking the New Module icon that appears when you save a package.
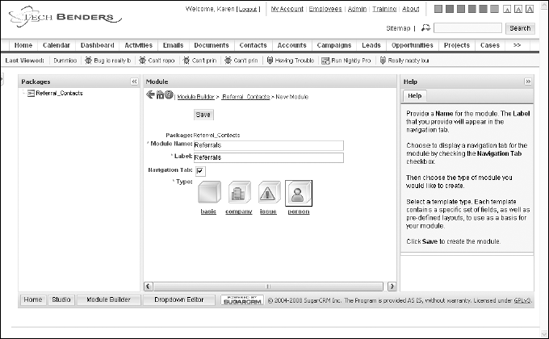
Click the name of your package and then click the New Module icon.
The Module page opens, as shown in Figure 15-12.
Fill in the basic module information:
Select the type of module you want to create by selecting its icon.
Each module template contains a set of fields; picking the right module type now will save you from having to add a bunch of fields later.
Basic: Creates the basic fields used in most modules, such as Name, Assigned to, Team, Date Created, and Description.
Company: Provides such fields as Company Name, Industry, and Billing Address. Think of this as the Accounts module clone.
Issue: This Cases and Bug Tracker clone includes such fields as Number, Status, Priority, and Description.
Person: Gives you basic contact fields, such as Name, Title, Address, and Phone Number.
Warning
Choosing a module type is just a starting point. After you create a module, you can edit any of the field labels or create new custom fields.
Click Save to save the module.
The Packages page refreshes and shows you a hierarchy in the Packages panel on the left side of the page. This hierarchy should give you a feeling of déjà vu because it's the same type of hierarchy that appears in the Studio.
Expand the name of your project from the Packages panel and then expand the name of your module.
Click an element to start editing the module.
You'll probably want to start by looking at the fields that Sugar created for you and tweaking them. You can then move on to your layouts and customize the ListView, EditView, DetailView, and Search fields if needed.

Warning
You can't delete any of the default fields that come with a module but you can hide them from within the Layouts pages.
Like a family tree, a Sugar module can have multiple relationships with other modules. For example, the Accounts module is related to the Contacts, Leads, and Opportunities modules. After you establish a relationship between modules, the related modules will appear as subpanels in a record's Detail view. In the example of the Accounts module, the Contacts, Leads, and Opportunities subpanels are in an Accounts record's Detail view because they are related to the Accounts module.
When you create a module, you need to specify its relationship to other modules. A Sugar module can have multiple relationships with other Sugar modules. You can also specify the modules in which you want to display the custom module as a subpanel.
Click Admin on the Sugar Home page and then click Module Builder in the Developer Tools subpanel.
Click the name of the package and then click the name of the module that you want to relate to another module.
The Module's page opens.
Click the View Relationships button.
Any existing relationships display on the page.
Click Add Relationship to create a relationship.
The relationship fields display in the Properties tab in the right panel. You might take a look at Figure 15-13 just to make sure you're on the right track.
Add the following information about the relationship:
Relate To: Choose the module that you want to associate with your new module from the drop-down list.
Label: Enter a name for the relationship.
Subpanel: Choose Default from the drop-down list if you want to display the associated module as a subpanel on the Detail view of the custom module.
Record Subpanel: Choose Default from the second drop-down list if you want to display the custom module as a subpanel on the Detail view of the related module.
Click Save to create the relationship.
The new relationship displays under the Add Relationship button in the middle panel.

Neither Rome — nor a Sugar module — is built in a day. Now, maybe you see why it's so important to plan your Sugar implementation before you dive off the customization deep-end.
Knowing that it can often take several days — or even a month — to create a new module from start to finish, Sugar offers you a "create now, use later" scenario. Here's how you can get that module to your users:
Click Admin on the Sugar Home page and then click Module Builder in the Developer Tools subpanel.
Alternatively, if you just finished creating a package, you can start by clicking the New Module icon that appears when you save a package.
Click the name of your package and then click the name of your module.
Sugar offers you three options for getting your newly created module into the hands of your end-user:
Publish: Use this option when you only want to give the module to specific users. Sugar creates a zip file, and then the users upload it by using the Module Loader. Further customization can be done by using the Studio.
Deploy: This option makes the module available to all the users in your organization. Further customization can be done by using the Studio.
Export: This option is used to share the module with other developers. Sugar creates a zip file that a developer can save and install with the Module Loader. Further customization can be done by using the Module Builder.
For now, concentrate on deploying your new module to all your users.
Click Deploy.
Sugar begins loading the module into your Sugar instance and indicates that something wonderful is happening. Any smoke that emanates from your computer is temporary.
When Sugar finishes deploying your module, the Package page will refresh. If you want to make further changes to the module, you can do so from the Sugar Studio where the new module appears along with all the existing ones. Your users can access the module by clicking the corresponding tab on the Module Tab bar.
By default, all the module tabs are displayed when a user logs in to Sugar. However, if you're the administrator you can decide which module tabs to display — and which ones to hide. You can even choose the order in which these tabs are arranged.
When you decide which tabs you want your users to access, the users can go into the My Account page and make further modification (see Chapter 9). However, users can't add module tabs that the administrator removed. And, if the administrator has an ax to grind with the users — or is afraid that they might wreak a bit of havoc — the administrator can prevent the users from making any changes to the module tabs.
Tip
Although it's been said that you can't go home again, this adage doesn't hold true in Sugar. Nobody — not even Mr. Administrator — can hide the Home tab.
You can rename the module tabs that display in Sugar:
Click Admin on the Sugar Home page and then click Rename Tabs in the Developer Tools subpanel.
The Administration: Rename Tabs page opens. As shown in Figure 15-14, it's a simple page consisting of the name of the official tab name (Database Value) and its label (Display Value).
Click the label that you want to edit and replace it with the new value.
You can't change the name of the Database Value; it remains constant just in case you want to return to the original tab name.
Click Save to save your changes.
The new tab name appears in the module tab menu.

By now you're acquainted with the basic modules and are probably in awe of their functionality. However, sometimes less is more — particularly when you are dealing with computer-challenged database users. For example, you might not use the Quoting module that you'll find in the Professional and Enterprise versions, or you might use Outlook for your activities and not want to confuse your users with the Activities module. Or perhaps you just want to start out slowly and introduce new modules as your users become more proficient Sugar users.
Sugar makes it easy to hide a module tab. The operative word here is hide; it's an easy matter to unhide a module should you decide you'd like to use the module.
Follow these steps to hide a module tab — or to bring it back to life if you've already hidden it:
Click Admin on the Sugar Home page and then click Configure Tabs in the Developer Tools subpanel.
The Configure Tabs page shown in Figure 15-15 opens. Like the Rename Tabs page, this is a simple page consisting of two columns: Display Tabs and Hide Tabs.
Drag any tabs you don't want the users to have access to from the Display Tabs column to the Hide Tabs column.
(Optional) Remove the check mark in the Allow Users to Configure Tabs check box if you don't want the users to make changes to the tabs that they're allowed to access.
Click Save to save your changes.
