
In This Chapter
Changing global settings
Working with the Scheduler
Updating your version of Sugar
Changing the locale settings
Adding users to the database
Creating user roles
If you're the Master Chef...er, I mean database administrator, you need to make sure that your soufflés don't flop — and that your database purrs along. As the administrator, you have the sole access to the Administration module where you perform great feats of daring, including updating Sugar and setting system settings. You also set up users — and decide which areas of Sugar they can access.
If you're the database administrator, becoming familiar with the system configuration is good practice. If you're the sole user of the database, these settings will likely save your sanity. If you share the database with other users, these settings can probably save you all a lot of head scratching.
You can access Sugar's System Settings by clicking the Admin link on your Home page and then scrolling to the System subpanel of the Administration Home page. The System subpanel (shown in Figure 16-1) is divided into nine areas; although I only cover the most basic ones, feel free to flip through the other settings.

Clicking the System Settings link on the System subpanel opens the System Settings page shown in Figure 16-2. Here's where you can configure various default settings that will apply to all your users.
You have a number of options to change including:
User Interface: This subpanel configures how users will view Sugar. You can set the number of records they'll see in a List view or the number of subpanels they'll see in a record's Detail view.
Tip
Worried that your users won't like your choices? Don't be — users can specify different settings for many of the options in their My Accounts page. Worried that they will change so many things that they'll get confused? You can opt to keep them from customizing their Home page and subpanel layouts by checking those options.
Logos: Here's where you can upload your logo to give Sugar a piece of your corporate identity.
LDAP Authentication Support: If your organization is using LDAP or authentication, you can also enable LDAP authentication in Sugar.
Proxy Settings: If you're using a proxy server to connect to the Internet, you'll need to enter the settings.
Customer Self-Service Portal: This option enables your customers to access their Bugs, Notes, and Cases information.
SkypeOut: Allows your users to make calls through Skype.
Mail Merge: Click this if you have the Sugar plug-in for Microsoft Word.
Export: By default, both users and administrators can export files from Sugar. However, here's where you can prevent users from exporting data.
Click the Save button after you select your System Settings options to make sure they're saved.

You might nickname Sugar's Scheduler "Set it and Forget it" because that's exactly what it does. You can schedule a variety of jobs that will automatically run based on your pre-determined time schedule. The benefit is the peace of mind you have in knowing that various scheduled maintenance tasks will run without any further intervention. It's a wonderful thing — set up a task and have Scheduler complete the job for you.
The Scheduler allows you to automate several key jobs. The small amount of time you need to set up a job in the Scheduler will save you plenty of time — and possible heartache — in the future.
Click Admin on the Home page and then click Scheduler in the System subpanel.
The Schedulers Home page opens. As shown in Figure 16-3, the Scheduler comes equipped with several pre-programmed jobs. Feel free to edit them to make them behave the way you want, or continue to create your own unique task:
Process Workflow Tasks: Chapter 14 talks about Sugar's Workflow feature that triggers an activity based on an event. This process runs those triggers.
Run Report Generation Scheduled Tasks: Runs reports and e-mails them to a specific user.
Check Inbound Mail Accounts: Checks for activity in your Inbox.
Run Nightly Process Bounced Campaign E-mails: Checks your mass e-mail campaigns to look for any bounced e-mails.
Run Nightly Mass E-mail Campaigns: Sends the outbound e-mail for your mass e-mail campaigns.
Prune Database on 1st of Month: Similar to the Windows Defragmenter, this permanently deletes any records that your users have deleted to improve performance.
Click Create Scheduler in the Shortcuts menu of the Scheduler Home page.
The new Schedulers form opens, as shown in Figure 16-4.
Fill in the Scheduler information:
Job Name: Give the job a name.
Status: Select Active when you're ready to go live with the job.
Job: Select a job type from the drop-down list. The job names correspond with the pre-programmed jobs listed above.
Interval: Specify the time intervals to check for new scheduled jobs.
Execute If Missed: If for some reason the job didn't run, select this check box to run it manually — just give yourself a minute or two because it might take a while to run the job.
Date & Time Start: Give a date for the job to start running.
Date & Time End: Specify a date to stop running the job.
4. Click Save to create the job.


Nobody's perfect. Although it might seem that Sugar comes pretty darned close, from time to time, a few of those dreaded bugs slip by the programmers and annoy the heck out of you. Or, you run out to purchase the latest and greatest version of Microsoft Office only to find that it won't work with your existing version of Sugar. Enter the update.
Sugar's Upgrade Wizard provides a quick way to upload and install Sugar upgrades. During the upgrade process, Sugar automatically converts all customizations implemented through the Sugar Studio. And, although the database administrator is the only one who can update Sugar, she can do it from the luxury of her desktop rather than needing direct access to the server.
As you can see in Figure 16-5, Sugar makes it abundantly clear when a new update arrives on the scene by placing a notification at the top of just about any window you wander to.

Here's what you need to do to make sure you have the latest and greatest Sugar version:
Download the appropriate Sugar Upgrade zip file from the Sugar Web site.
For your convenience,
www.sugarcrm.comhas a download link that takes you to the Download Wizard that walks you through the process of finding the correct upgrade file.Click Admin on the Sugar Home page.
Click Upgrade Wizard in the System subpanel of the Administration Home page.
The Upgrade Wizard displays, as shown in Figure 16-6. The wizard will hold your hand while you continue to upgrade your Sugar installation.
Click Next to continue.
A progress window appears while Sugar checks your system to make sure you're good to go. When it finishes, the System Checks page appears.
Click Next.
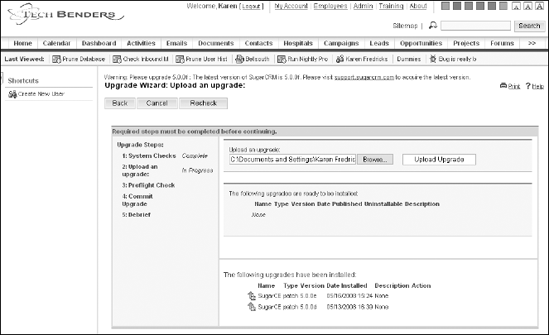
The Upload an Upgrade page appears.
Click the Browse button, navigate to the location where you saved the Upgrade zip file, and then select the file.
The path and filename conveniently appear in the Upload an Upgrade box.
Click the Upload Upgrade button to upload the package to your installation of Sugar.
An indicator window appears while Sugar uploads the package and displays it on the page. Feeling lost? Take a look at Figure 16-7 which should help clear things up.
Click Next to continue.
Again, you have to wait a minute as Sugar performs a preflight check. At this time, you just might feel like you're in a spaceship hurtling towards Mars. At any rate, the Commit Upgrade window appears.
Click Next to continue.
Like most wizards, the Upgrade Wizard contains many Next buttons. However, this is the final one because if all systems are go, you'll see the Debrief window.
Click Done.

Aren't you glad I didn't tell you to click Next? At any rate, you're treated to a page verifying that yes, indeedy, you have officially upgraded to the latest Sugar version.
Clicking the Locale Settings link on the System subpanel opens the System Locale Settings page you see in Figure 16-8. Here's where you can configure various default settings that apply to all your users. Use this page to specify the default system-wide locale settings, such as the language, date and time format, and even the type of currency that your company uses. Changing these settings ensures consistency for users when they access Sugar; these settings appear throughout Sugar in various documents including Quotes and Contracts.

A user is a special contact in your database who logs in to your database. If several people enter data into your Sugar database, I highly recommend setting up each person as a separate user. If you and Jane are both set up as users of the database, make sure that you log in as you and Jane logs in as herself. Sugar automatically enters several key pieces of information based on how you log in to the database. For example, you're recognized as the record creator of each new Contacts record that you add to the database. Your name is automatically associated with any meetings, calls, or other activities that you schedule. Having unique, identifiable users in a database allows you to view your activities on a calendar. Otherwise, you might find yourself driving to Podunk to visit Jane's mom on her birthday!
After you assign the players to the teams, get ready to rumble! The purpose of the game is to decide exactly what each user can do within Sugar. You can do this on a user-by-user basis. This works out well if you assign access rights to each new contact when you create it. Or, as the administrator, you can assign users a role. Roles determine which modules a user has access to — and the type of activities he can perform within that module.
Although creating new users is an easy process, take your time and fill in as much pertinent information as possible. In addition to simply creating users, the administrator can — and should — include contact information about the users.
Click Admin on the Home page.
It's only logical that because only an administrator can create new users, you start the process on the Administration Home page.
Choose Create New User from the Shortcuts menu.
The Users page shown in Figure 16-9 opens.
Add the user's first and last name, their login name and password, and the user status in the top subpanel.
The user name is the name the user will use to log in to the database. Although it's not case sensitive, make sure you remember what name you decide on. If you set up multiple users for the same database, consider sticking to a set naming convention: Gary Kahn or gkahn are good choices; you might want to avoid Gary B. Kahn or Gary Kahn, Esq.
Tip
You can't delete users but you can stop someone from accessing the database by changing their status to inactive. This is done so that you can still see what records have been assigned to them, or what fields they've changed.
Select the appropriate options in the User Settings subpanel.
You can specify whether you want the new user to have Mail Merge privileges (if the user has access to the Sugar plug-in for Microsoft Word), and how you want his name to appear at the top of the various Sugar views. You can enable e-mail notifications to the user when a record is assigned to him.
Most importantly, you can specify the type of user you wish to create. In Sugar, there are three different kinds of users in addition to the basic end-user. By default, Sugar assumes you're creating an end-user unless you specify otherwise.
Administrator: Finding the job of database administrator to be overwhelming? You can assign another user to be your partner in crime.
Warning
Assigning two users as the database administrator is always a good idea. Not only do those two people feel extra special, but it can also save your little rear end. As hard as it might be to believe, the administrator might leave the company suddenly and without warning — taking the keys for the restroom and the password for the database with him. This means you might not be able to access the database, add users, or make field changes. You might also find yourself looking for a new job. Remember: No password, no entry!
Group user: A group user can't log in to the database. The function of a group user is to receive general inbound e-mails that might pertain to a department as a whole instead of a specific individual. For example, you might create a group user named Complaints to handle customer service issues. You can then assign them to the appropriate users from the group Inbox.
Portal-only user: A portal user can log in to portals created in Sugar but can't log in to the Sugar database. For example, you might create a user record for one of your top customers so that he can access general portal information, such as FAQ's and the Knowledge Base.
Set the values in the Locale Settings subpanel.
Although you can set default locale settings (see the earlier "Getting Locale with the locals" section), you can change these values for individual users if necessary. For example, your company may be headquartered in New York, thus you've set default locale values to EST and US Dollar. However, you may have a user located in California who works on PST, or maybe a user in London who works in a different time zone and uses a different currency.
Specify the information in the User Information subpanel.
Here's where you can supply work-related details including the user's title, department, phone numbers, who he reports to, and any other pertinent info. You can even add a comment in the Notes field if necessary.
Supply the user's home address in the Address Information subpanel.
(Optional) Enter a Publish Key in the Calendar Options subpanel to prevent others from publishing the user's calendar.
Change the modules that the user can see in the Layout Options subpanel.
By default, a new user has access to all the Sugar modules. As the administrator, you decide which of those modules the user can access.
As shown in Figure 16-10, the Layout Options subpanel contains three lists:
Display Tabs: Lists the tabs that the user can see.
Hide Tabs: Shows the tabs that the user can't see.
Admin Remove Tabs: Lists the tabs that none of the users can see.
You can move a tab from one list to another by selecting it and then clicking the appropriate right or left arrow. To change the order of the modules, select the module and then click the up or down arrow.
Warning
Chapter 3 shows the end-user how to configure the tabs that she sees. Chapter 15, on the other hand, shows you how the administrator can prevent the end-user from doing exactly that.
Add the user's e-mail address in the Email options subpanel.
You can set up an e-mail address — or two or three — for each user.
Click Save to create the user.
You land with a plop on the Users Home page where the new user is listed right along with all the other Sugar users. They also appear on the Employees List, which you can access by clicking the Employees link from any of the Sugar views.


After you create your users, you assign them roles depending on the tasks they perform within your organization. By default, users have access to all Sugar modules. Roles enable the administrator to limit access to specific modules. Additionally, roles allow the administrator to decide the functionality the users have within a module.
For example, you may decide that your customer service folks don't need to access the Opportunities module; you can create a role that restricts their access to this module and assign that role to everyone in the customer service department. Or, you may want to allow your sales staff the ability to view and edit Accounts, Contacts, and Leads records but not the ability to delete or export records.
Users who aren't assigned a role can, by default, access and take any action in any module they want. The only way you can change that access is by assigning them a role that limits access to a module. The same role can be assigned to multiple users, and a user can be assigned multiple roles.
Tip
An administrator, by default, has permission to access all modules and records. And, the only way you can deny him those permissions is to edit his user record so that he is no longer an administrator.
Creating a starring role
Follow these steps to create a role:
Click Admin on the Home page.
Click Role Management in the Users subpanel.
The Roles Home page opens.
Choose Create Role from the Shortcuts menu.
The Roles page opens.
Supply a name for the role, give it an optional description, and then click Save.
All the Sugar modules — along with the basic functions — are listed in table format. You use this table to grant permission to access modules or perform specific actions.
As shown in Figure 16-11, the edit view appears a bit intimidating at first.
You might think of this as a giant Bingo board. The column on the left lists all the Sugar modules. The top row shows you the various functions:
Access: Determines whether the users assigned that role can access a module.
Tip
If you deny users access to a module, you automatically deny the users all the functionality listed in the rest of the columns in that row.
Delete: Authorizes the user to delete records (Contacts, Accounts, Leads, Opportunities, and so on). By default, the administrator already has permission to delete at will.
Edit: Lets users edit records in the module through the Edit page, List view, or the Mass Update panel in the List view.
Export: Permits the user to export any List view information to a file.
Import: Users can import record data in the module.
List: Users can view lists of records in the module or in a subpanel but can't edit them unless they have editing permissions.
View: Users can see the Details view of module records.
Double-click a cell to change its value.
Here's where the Bingo board concept comes into play. If you want to disable a module, double-click the cell in which the Access column and the module row intersect. Depending on the cell you're modifying, you have a number of options available:
All: All users who are assigned to the role can perform the action.
Owner: Only the user who either created or is assigned to the record can perform the action.
None: None of the users assigned to the role get to play — or perform the action.
Enabled: Allows the user to view the module.
Disabled: Hides the module from the users' view.
Not Set: This leaves the setting unchanged. This can be because you haven't gotten to the setting yet or you left the function unset knowing that another role covers that particular function.
Tip
If you assign more than one role to a user, the most restrictive setting prevails. For example, if a user is assigned to two roles — one allowing him to access a module and one disabling the module — he won't be able to access the module.
Click Save when you finish defining the role.

Rolling out roles to the users
By now, if you're following along at home, you've added a couple of new users to your database. You've also created a role that will both let the users carry out their day-to-day business and leave you with the security of knowing they can't abscond with the entirety of your database should they decide to seek employment elsewhere. Your next step is to tie the two together. Fortunately for you, the hard work is over; assigning a role to a user is very easy.
Click Admin on the Home page.
Click Role Management in the Users subpanel.
The Roles Home page opens. The role you created is listed there.
Click the name of the role to which you want to assign a few users.
The Roles page opens.
Scroll to the Users subpanel (see Figure 16-12).
Click the Select button.
The Select Users window opens, revealing a list of all your database users.
Select the corresponding check box for all the users you want to assign to the role and then click Select.
The user(s) that you assign to the role appear in the Users subpanel.
(Optional) Click the Rem icon corresponding to a username to remove a user if you no longer want him to abide by the role.

Viewing roles for a user
Because so many options are available to you when creating a role, it's only natural that you might get lost along the way, particularly if you assign several roles to a user. Fear not, dear reader. Sugar again has your back, allowing you to view the finished work — or in this case the final role settings — on a user-by-user basis.
Follow these steps to view the permissions you set for each user:
Click Admin on the Home page.
Click Role Management in the Users subpanel.
Choose List Roles by User in the Shortcuts menu.
The Roles page opens, looking slightly different than you've seen it before.
Choose the user in question from the drop-down list.
Sugar responds by displaying a table detailing the user's permissions for each module. The bad news is that you can't change any of the permissions for the user. The good news is that you can click the List Roles shortcut and edit the role if you need to.