
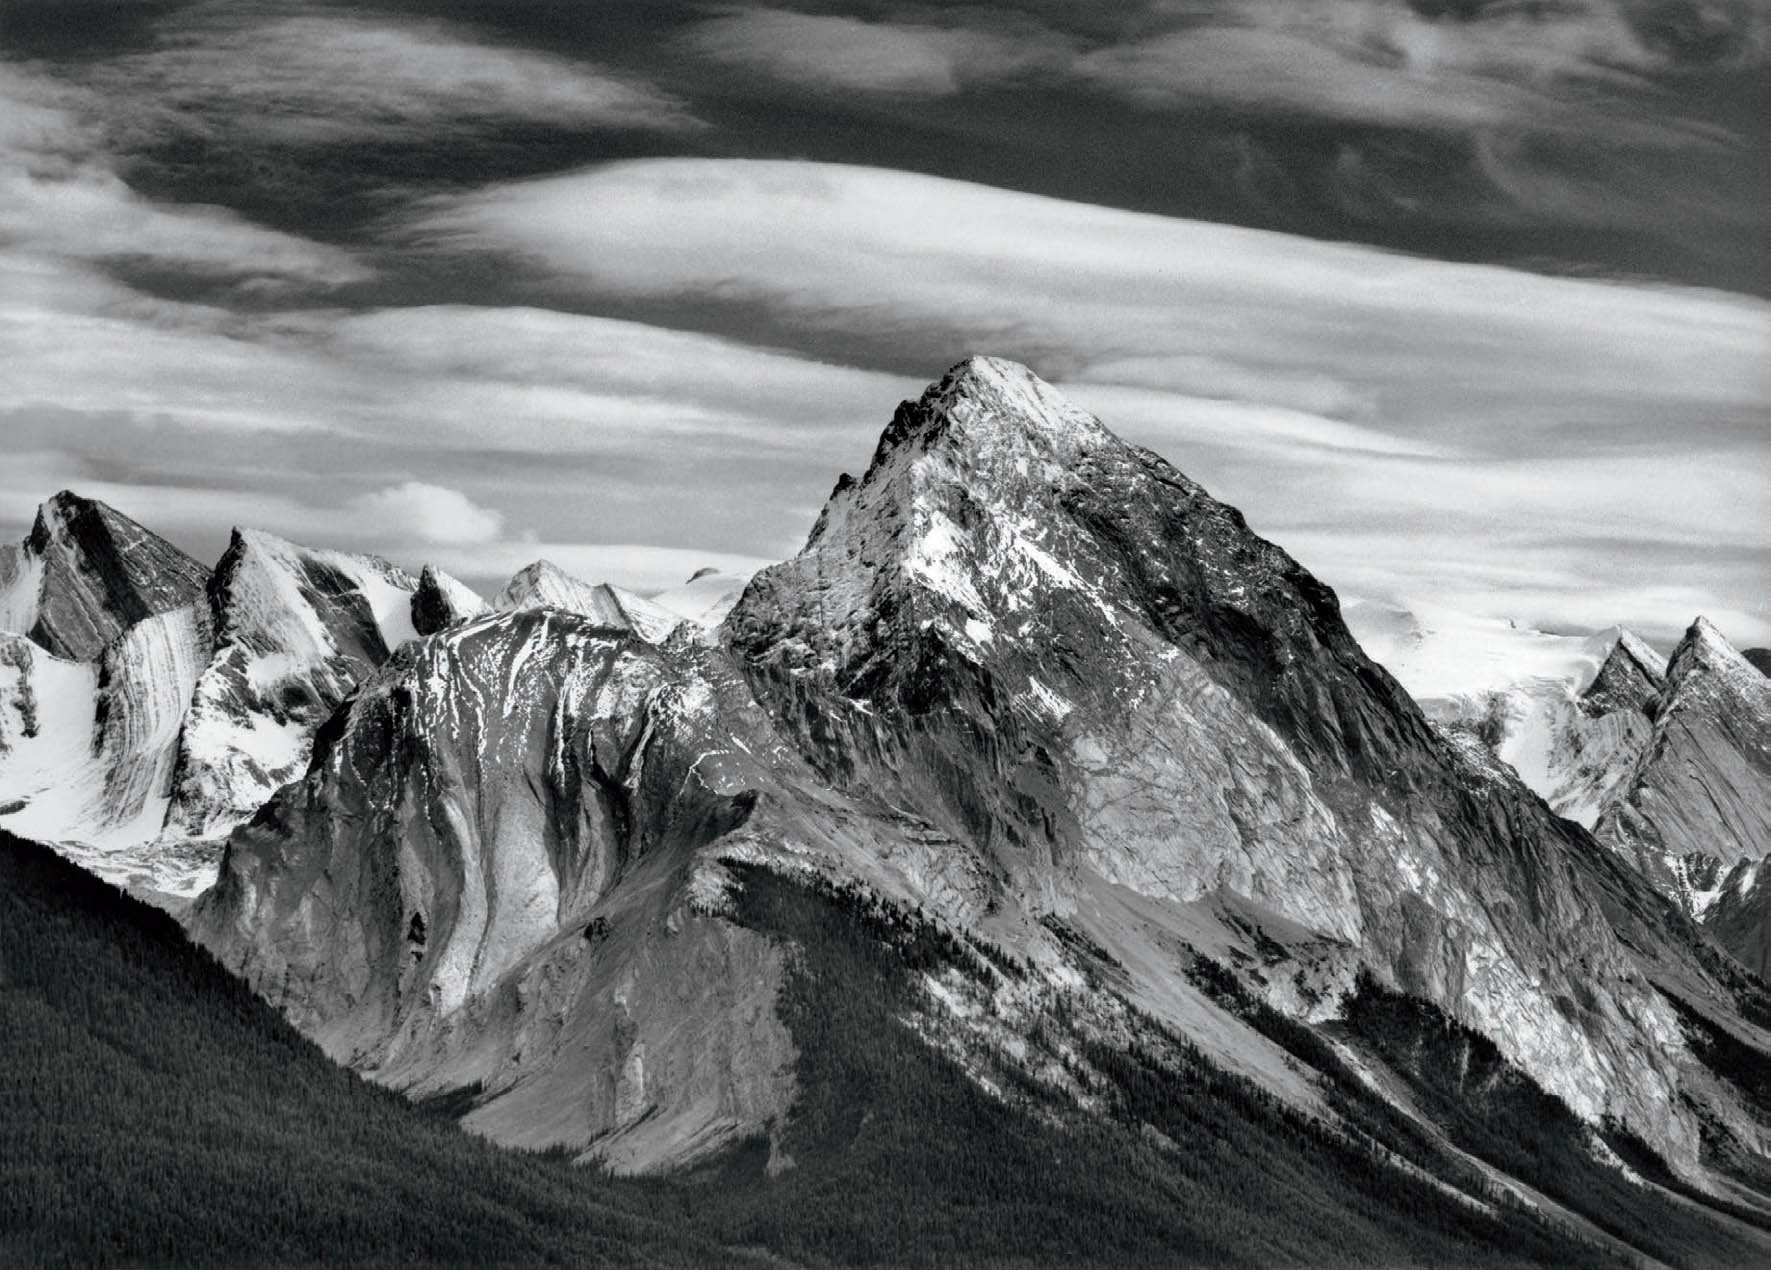
Figure 7-1: Mt. Samson and Peaks of the Canadian Rockies
With sunlight coming in through the hazy sky from the right, the polarizer helped separate the tonalities of the sky from those of the clouds by darkening the blue sky, which exhibits polarized light. It had little effect on the lower portions of the scene. The deep yellow filter further separated the tones of the sky and clouds without darkening the forested lower slopes. A #25 red filter would have created even greater cloud/sky separations but could have blacked out the trees. Thus the yellow filter was a better choice. Yet when I made the print, I dodged the forest throughout the basic exposure, then burned the top two-thirds considerably, and then did an enormous amount of additional burning on the top third.
CHAPTER 7
Filters
![]()
MUCH OF THIS CHAPTER’S DISCUSSION CENTERS on filters used for traditional black-and-white film exposures followed by a brief discussion of color correction filters for traditional color photography. Digital filtration is then discussed, with the recognition that digital photography rarely employs filters during exposure, but filters are applied in post-processing. (This is discussed fully in chapters 11 and 12.) Because most digital filtering is accomplished via a computer algorithm, not an optical alteration, it is not the same as filtering for film. This is not to say that it is inferior or superior, but it is simply different. I urge all digital practitioners to read this chapter fully for a better understanding of how filters work, and how their digital alternatives can be best employed during post-processing. So, let’s move ahead.
The two previous chapters on light and color lay the groundwork for this chapter. More must be added before a complete understanding of filters can be achieved. Let’s begin by looking at light from a technical point of view without getting overly technical or mathematical about it. Visible light is a small portion of the electromagnetic spectrum (EM for short). The entire EM spectrum includes other forms of invisible radiation, such as infrared light, ultraviolet light, X-rays, gamma rays, and radio waves. Within the small portion of the EM spectrum that is visible to our eyes, there is also a spectrum (or range) of radiation levels, and we see that spectrum as colors of the visible spectrum—the colors of the rainbow, if you will. Most people are aware of Newton’s experiment of refracting light through a prism and breaking white light into its component parts, the visible spectrum.
All visible objects are visible only because they radiate light from their surfaces. The reflected or emitted light is made up of some, or all, parts of the visible spectrum. Few natural or man-made objects emit or reflect light from only one portion of the spectrum to the exclusion of other portions. The spectrum of light from a red rose, for example, includes small contributions from blue, orange, violet, and even green and yellow, as well as the dominant contribution of red. Yet the rose appears to be pure red. The blue sky is not highly saturated with blue; the percentage of blue in its spectrum is lower than the percentage of red in the rose. Though the sky’s dominant contribution is from the blue portion of the spectrum, other colors are present in surprisingly high amounts.
Here we have two facts of great importance to start our discussion of filters:
- White light is a combination of all colors.
- Most objects radiate significant amounts of all colors of the spectrum.
Black-and-White Filters for Film
All black-and-white photographic filters (yellow, orange, red, green, and blue . . . and others) allow light waves to pass through that are the same color as the filter itself. Other colors are impeded to a greater or lesser extent depending on two things: the strength or depth of hue of the filter and the “oppositeness” of the color of the light wave from the filter. Thus, a red filter allows red light to pass through unimpeded, but it impedes yellow, green, blue, and other colors to varying degrees, depending on how close they lie to red on the color sphere (diagram 6.2).
In black-and-white, all colors are seen in terms of their gray equivalents on the axis of the color sphere. When two objects of different colors have the same gray tonal value, it may be difficult to separate them in black-and-white. The classic example of the red apple and green leaves comes to mind. There is no problem separating them in color, but in black-and-white they both translate to a middle gray tonality. Textural differences help separate them, but only through filters can their tonal values be changed to create a visual separation of the tones.
Let’s say you use a red filter during exposure of the red apple and green leaves. The predominant red rays of the apple pass through the filter, but the predominant green rays of the leaves are stopped. Because the green rays are stopped, they don’t reach the negative and the leaves are lighter (or “thinner”) on the developed negative, and therefore will appear darker on the final print. The leaves don’t become black, however, because other colors reflect off their surfaces, and those colors pass through the filter to sensitize the negative. Some of the colors reflected off the apple are stopped by the filter, but at a far smaller percentage than those radiating off the leaves. Thus, the apple appears lighter and the leaves darker. If a green filter were used, the opposite effect would occur: the apple would be darker and the leaves lighter.
Which filter would be most appropriate? This question brings us into the realm of interpretation and creativity. The green filter is the more “realistic” choice because the darkened apple appears heavier. Psychologically, we ascribe greater physical weight to dark objects. The green filter would be more in keeping with this fact, while the red filter would oppose it. Of course, there may be a good reason to purposely fight the natural, comfortable feeling. You may want to create a feeling of strangeness or a slight off balance. It’s a matter of individual preference and creativity.
When you understand what various filters do, you can use them as interpretive and expressive tools. This is crucial for creative photography. Full knowledge of your equipment is immaterial unless you use it to further your interpretive goals. And, of course, you cannot further your goals unless you first define them.
If two filters have the same color, the darker or deeper filter is the stronger one, and allows a smaller percentage of other colors to pass through it. Thus, a deep red filter allows little but red radiation to pass through and blocks a greater portion of other colors than a medium red filter. A yellow filter, which is a lighter hue than red, allows substantial amounts of colors other than yellow to pass through. (For example, the #12 yellow [or “minus blue”] filter cuts out blue light almost completely.) For this reason, the more deeply hued filters are considered stronger filters, as they have a more pronounced effect on the relative intensities of light passing through them.
All filters require an increase in exposure to compensate for the amount of light being stopped. Stronger filters require substantial increases in exposure. This exposure increase is known as the “filter factor.” A #25 red filter, for instance, requires a three-stop exposure increase over the unfiltered exposure because only ⅛ of the light hitting the filter passes through it! Ignoring the filter factor can result in a disastrous underexposure.
Because the red filter prevents ⅞, or 87.5 percent, of the light that hits it from passing through (on average), it does not truly lighten reds within the scene as most people think. Rather, it darkens everything. But because you open up three stops, you compensate for the overall decrease in light. The red portion of the spectrum is not stopped by the filter, so red objects are selectively lightened in comparison to other objects. An object that is pure red (i.e., that emits only red rays of light) is not affected by the filter because its rays pass through unimpeded; but because you open up three stops to compensate for the filter, it is brightened by that amount. An object that is pure green (i.e., that emits only green rays of light) is totally stopped by the red filter and reads as black no matter how much you increase the exposure! The only reason that a green leaf appears at all is that it emits colors other than green that do pass through the filter to the negative.
![]() Full knowledge of your equipment is immaterial unless you use it to further your interpretive goals.
Full knowledge of your equipment is immaterial unless you use it to further your interpretive goals.
A yellow filter requires only a ½ or 1 stop exposure increase, as it is weaker than a red filter. It should be pointed out that even with the appropriate filter factor for correct exposure, a red filter will darken blue far more than a yellow filter because it impedes blue more thoroughly than the weaker yellow filter.
The filter factor is correct only if the scene contains a broad spectrum of color. For example, if a scene is dominated by red and a red filter is used, little exposure increase is necessary because all red wavelengths would pass through the filter unimpeded. However, if a red filter is used on a scene that is dominated by green, an exposure increase of more than three stops would be necessary because a high percentage of the wavelengths would be stopped by the filter. Thus, the filter factor represents a starting point for the average scene. It must be increased or decreased as appropriate if the scene diverges greatly from the theoretical standard.
Examples with a Hypothetical Landscape
Walk with me into an idyllic landscape and consider the effect of various filters on it. The foreground is a rolling pasture of luxuriant green grass with a background of low hills and distant mountains. A red barn is off to one side, large orange poppies dot the foreground grass, and a deep blue sky with fleecy white clouds tops the scene. It is a hypothetical scene that possesses just about every color, so playing with filters can be an interesting exercise. Following are some of the possible effects of using (or not using) filters on such as seen:
- Using no filter with any of the common panchromatic films (which have a higher sensitivity to blue light than our own eyes), the sky would come out as light gray. The clouds would not stand out strongly against the light tonalities of the sky, and the distant mountains would also be rather light due to the bluish atmospheric haze—however slight that haze may appear—and therefore would not be terribly outstanding. The barn would be dark, as would the grass, while the poppies would stand out as light gray dots.
- With a light yellow filter (#8 or K2), the sky would be darkened to the gray value that your eye would tend to expect. The clouds would be more visible against the darker gray, and the distant mountains would also be somewhat more visible due to the reduction in blue haze. The grass would be slightly lightened and the poppies would be lightened even more, while the barn would be slightly darkened, separating it somewhat from the grass tones. A deeper #12 yellow filter would darken the sky considerably, making the clouds pop out more strongly. Again, the grass would be lightened to about the same extent as with the K2 filter, but the poppies would be made even a bit brighter against the grass. The barn would be darker than with the K2 filter.
- A #21 orange filter would darken the sky considerably, bringing out the clouds quite strongly, and the mountains would also be darkened. The orange poppies would be nearly white against darkened grass, and the barn would be slightly lighter than the grass.
- A #25 red filter would turn the sky dramatically dark. The white clouds would jump out boldly, and the mountains would be even more visible, as atmospheric haze would be cut to a minimum. The orange poppies would be quite light, but the grass would be even darker than with an orange filter—so the contrast between the two would remain about the same as it is with the orange filter. The red barn, however, would appear quite light, and if it were a newly painted bright red, it could be rendered nearly white! If it were a typically dark red barn, weathered and unpainted for many years, it would still be lightened significantly. A somewhat less intense #23 red filter would slightly subdue each of these effects; an even stronger #29 red filter could dramatically intensify them.
Before looking into the effect of green and blue filters on the scene (and you are certainly permitted to think about them before reading on!) consider the most appropriate filter among those discussed. Recall the general mood of the scene, which is one of vivid colors and crispness, yet one of peace and restfulness. The red filter would be too strong for me because it overdramatizes the scene and the mood. I would want my gray tonalities to be rich and brilliant, but not so sharply rich and brilliant. Without any filter, the photograph would be rather bland, lacking the required crispness that I feel the scene deserves. Thus, for me, it comes down to a choice between the yellow and orange filters. I will make my choice, you make yours!
Back to the remaining filters:
- A green filter would slightly darken the sky, more than that of the K2 filter, and about as much as the #12 filter, but it would lighten the grass and darken the poppies. The barn would be darkened considerably, which could be interesting. However, the effect it would have on the grass—brightening it—and poppies—darkening them—would be highly unpleasant to me because it would virtually merge those tonalities, and I would avoid its use.

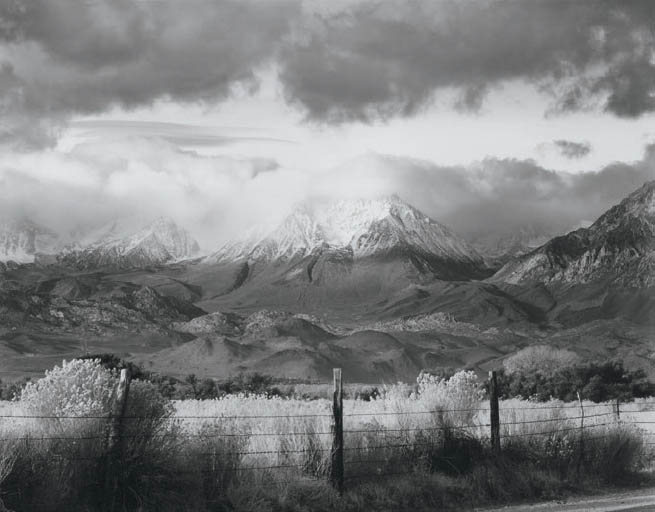
Figures 7–2a and 7–2b: Basin Mountain, Approaching Storm
Figure 7–2a is a straight print, showing how much brighter the sky is than the foreground and middle ground of the scene. We tend not to see this tonal disparity because when we look around a scene, the eye automatically opens and closes its own aperture (the iris) to compensate for brighter and darker portions, and the brain further smoothes out the differences. The camera sees the entire scene at one aperture, often with surprising results.
With a good deal of manipulation in the darkroom, figure 7–2b shows how the tonal imbalance is corrected by darkening the upper portion of the image, then by subtly darkening the edges to direct the eye toward the center, Basin Mountain. The manipulated image is far closer to the way I saw the scene than the straight print.
- A blue filter, in my opinion, would be utterly inappropriate, for it would turn the sky almost white and do much the same for the mountains. The clouds would effectively disappear. The barn would be dark gray, while the grass and poppies would be nearly equivalent mid-gray tonalities. That is not the effect I would seek.
Those are my opinions about the desirability of each filter in a hypothetical scene. You may prefer one of the other effects, perhaps even the last one that I rejected so thoroughly. You may wish to concentrate your vision on only a small portion of the scene, rather than the full panorama, and use a different filter to alter its qualities. Your approach could be perfectly wonderful and could show great insight. There is no “right way.” There are many things to consider, and they should all be considered. This is what creativity and personal expression are all about.
Keep in mind the fact that all black-and-white filters perform two tasks: they make their own color (as well as closely related colors) relatively lighter, and they turn other colors darker. (Actually, they only darken colors away from themselves on the color wheel—progressively more for colors toward the opposite side of the color wheel from that of the filter.)
Both effects must be considered on all parts of the scene and all elements of the photograph before the exposure is made. Too often the careless photographer considers only the prime purpose of the filter, without considering its side effects on other areas of the photograph. You may commonly find the most appropriate filter to be a compromise choice. The best filter for one purpose—the primary purpose—may be decidedly harmful to other aspects of the image, whereas a filter that is not quite as effective for the primary purpose could be either neutral or helpful to secondary effects (figure 7-1).
Filters are important aids in black-and-white because the effects they produce cannot be duplicated by even the most intricate darkroom maneuvers. Imagine trying to photograph the hypothetical scene of the previous example without a filter, and then in the darkroom attempting to darken the sky without darkening the clouds, or brightening each poppy without brightening the grass! It would be a miserable task, indeed.
Contrast Control with Filters
At the same time that filters alter the relative tonalities of objects based on their colors, they also change contrast between objects. They can actually alter the composition by directing the viewer’s eye toward objects or areas that are accentuated and away from those areas subdued by filtration. Thus, they are important compositional tools. A #25 red filter increases contrast in a landscape because it cuts through the blue, contrast-reducing atmospheric haze, even when the air seems crystal clear. A #12 deep yellow filter has a similar, but milder, effect because it also cuts through blue haze very effectively (figures 7-2a and 7-2b). I consider the effect that filters may have whenever I set up my camera for a black-and-white photograph, even though I may use them in only a small percentage of instances. I feel that landscapes can benefit most from thoughtful filtration because most colors are so unsaturated in nature, and therefore have a tendency to be rather gray under soft lighting. With filters, tonal variations may be separated with clarity.
Not only can filters be used to separate tones, but they can also be used to bring diverse tones closer together—as the green filter brought the grass and poppies together in the hypothetical example above. Jay Dusard often uses filters in this manner, separating the tonalities later in a very different manner during negative development. There may be times when a darker or lighter color can be intrusive or disruptive to a composition, and it can be better blended with its surroundings through filtration.
An example drawn from my experiences in the Utah/Arizona canyon country helps explain this idea. The dominant features of the landscape in that area are the enormous sandstone cliff faces. Some cliffs that are nearly white in color have visible horizontal lines of various red/purple hues caused by the stratification of ancient dunes or clay deposits. They also have dark, vertical eroded crevices caused by water pouring down the cliffs during heavy downpours. Photographing these cliffs with a green filter further darkens the horizontal streaks, making them the dominant feature. A red filter, however, lightens the horizontal streaks almost to the point of tonal merger with the rest of the cliff. When the horizontal streaks nearly disappear, the vertical eroded crevices become the dominant feature. Thus, the choice of filter can potentially change the dominant line structure of the image from vertical to horizontal!
Just as with any other aspect of photography, no two photographers will have the same approach. This is the meaning of personal expression, and it is as it should be! The important thing is to use your tools with understanding and with a purpose in mind. Filters can be exceptionally useful tools. (In chapters 11 and 12, you will see how to use the digital tools, with multiple cautions about using them wisely to help you achieve your goals, rather than using them as playthings. Effective use or destructive misuse of available tools is a common two-edged sword to both traditional and digital processes.)
Infrared Film and Filters
Infrared black-and-white film sees more than the visible spectrum that the eye sees. Its sensitivity goes beyond our visible range into the infrared portion of the EM spectrum, immediately beyond red. Using infrared film can allow the creative photographer some interesting departures from reality. A variety of filters can be used with infrared film to accentuate or subdue the effect that this film imparts.
An infrared filter completely blocks out all visible light, allowing the film to record only the infrared component that is transmitted to the film. Use of such filters with infrared film creates some eye-popping images, both with portraits and landscapes. In portraits, skin tones are rendered in especially milky and unusual tonalities; in landscapes, sunlit foliage often appears blazingly white, as do clouds, while blue skies are rendered intensely black. An infrared filter accentuates this effect to the greatest extent. Of course, since the filter blocks out all visible light, you’ll see nothing if you look through it; it’s as opaque to your eye as a lens cap! But it allows infrared rays to penetrate through.
A #29 dark red filter allows some of the visible light onto the film, creating a nearly complete infrared effect; a #25 red filter allows still more of the visible spectrum through, yet the infrared effect is still quite strong. Going to weaker filters—such as #21 orange, #12 deep yellow, #8 (K2) light yellow, or no filter, whatsoever—allows progressively more visible light through to the film, and progressively more subtle infrared effects. As the infrared effect becomes more subtle, the viewer may be unaware that infrared film was used. The leaves on deciduous trees may appear to be bright, perhaps brighter than normal, but almost subliminally so (see figure 2-2, infrared film exposed with a #12 yellow filter).
I tend to like the effect of infrared film used with the weaker filters or no filter at all. It removes the bludgeon approach that makes it obvious that I’m dealing with infrared film. In general, I want my techniques to be so subtle that they are transparent. If people respond favorably to my prints, I want them to think that they could have produced the same photograph if only they had been in the right place at the right time. I don’t want any of my manipulations—either in exposing the negative or in printing it—to be obvious. In the same way, I don’t want the materials I use to be the issue of interest; I want the image itself to be the issue. So, the strong infrared effects that you get with infrared or deep red filters are generally much too blatant for my sensibilities. Viewers immediately say, “Aha, infrared film!” They are more aware of the film used than the image produced, and I feel that it generally detracts from the intended message.
![]() If people respond favorably to my prints, I want them to think that they could have produced the same photograph if only they had been in the right place at the right time.
If people respond favorably to my prints, I want them to think that they could have produced the same photograph if only they had been in the right place at the right time.
Color Correction Filters for Traditional Film Imagery
Filtration for color film is not as pronounced as that for black-and-white, but the emotional impact of its subtleties can be every bit as great. Color filtration is limited to altering the color balance in the scene. In addition, filters can be used to change the balance of indoor film to outdoor film or vice versa (chapter 6). An 85B filter with a ⅔ stop filter factor converts indoor transparency film to outdoor color balance. An 80A filter with a 2 stop filter factor converts outdoor film to indoor balance for tungsten lights with a color temperature of 3200 degrees. An 80B filter with a 1⅔ stop filter factor converts outdoor film to indoor balance for tungsten lights with a color temperature of 3400 degrees.
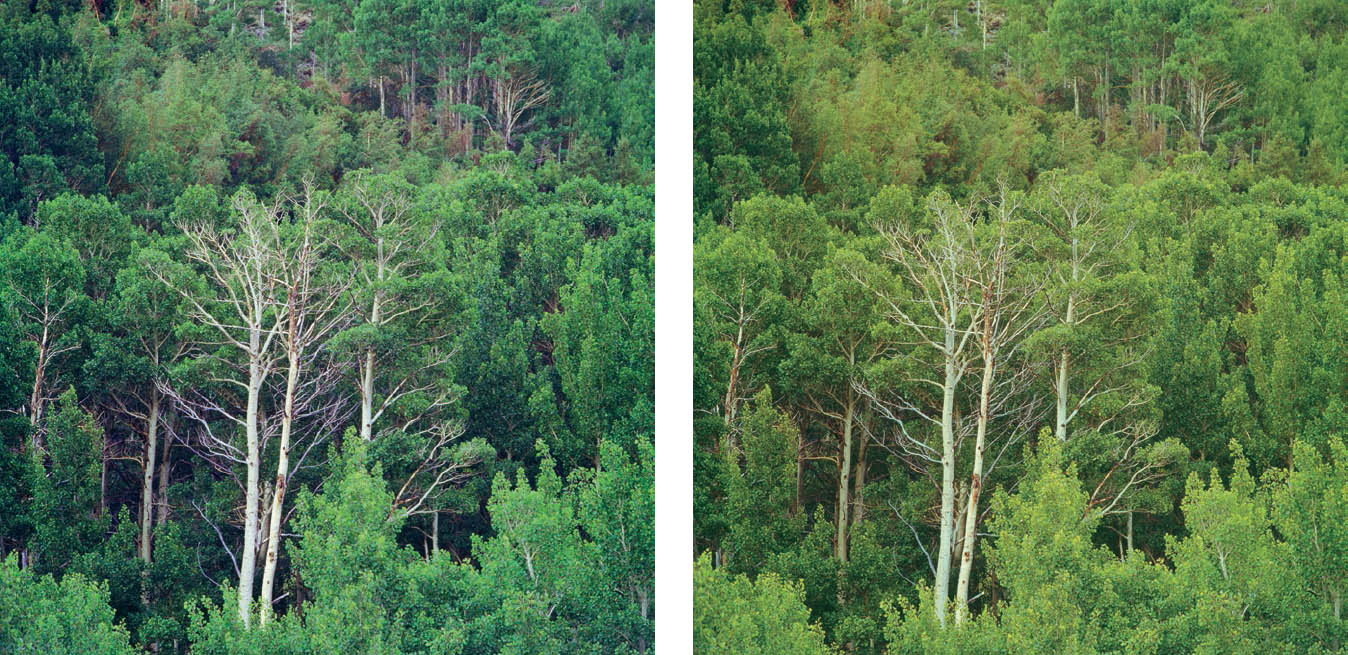
Figures 7-3a and 7-3b: Aspen Group, Sierra Nevada Mountains
Photographed in the late afternoon under the shade of a nearby ridge, figure 7-3a takes on a mild yet distinct blue cast. For figure 7-3b, I used a CC10Y yellow color correction filter to neutralize the shift toward blue, giving the image a more natural feel.
For general color correction, the prime tools are color correction (CC) filters. They are available in several colors—red, magenta, blue, cyan, yellow, and green—and varying intensities of hue in each of the colors. They are nicely color coded by both color and hue intensity as follows: after the letters CC, a number signifies the intensity of the hue and a final letter indicates the color of the filter. Thus, magenta filters come in CC05M, CC10M, CC20M, CC30M, etc., in which two CC05M filters equal one CC10M. Similarly for green, two CC10Gs equal one CC20G. Filters can be combined to reach any desired filtration level and combination. Thus, if you need 25 units of yellow and magenta for filtration, add CC20M + CC05M to CC20Y + CC05Y.
My experience with CC filters shows that for every 25 units of filtration, there is a filter factor of ½ stop, so the 25M + 25Y combination would necessitate a 1 stop filter factor (i.e., open up your exposure one full stop after metering the scene when using those two filters in combination). A full explanation of this procedure can be found in chapters 8 and 9.
CC filters are available as thin gels, somewhat like thick cellophane sheets, which are placed in front of the lens like any other filter. The filters alter the color balance of the scene, shifting it toward the color of the filter just as if they were cellophane sheets—except the filter’s shift is quite subtle.
In the previous chapter, I pointed out that outdoor color film tends to shift toward blue in the shadows or under cloudy conditions. This can be an advantage at times, but it can be harmful as well. Color correction filters can neutralize this blue shift (figures 7-3a and 7-3b). My own experience shows that a combination of CC10M and CC05Y, or alternately, CC10Y and CC05M, returns the color shift to the colors I see. If I want to subtly emphasize yellows or greens in the transparency, I use the CC10Y + CC05M combination, but if I want to bring out warmer tones, I tend to use the CC10M + CC05Y combination. I have used the two combinations often when photographing the deep, red-walled canyons of Utah and Arizona (figure 7-4). (I should note here that the effects seen in figures 7-3a, 7-3b, and 7-4 may be easily achieved digitally by either choosing the appropriate white balance before exposing the image, or altering the image’s temperature and tint in post-processing.)
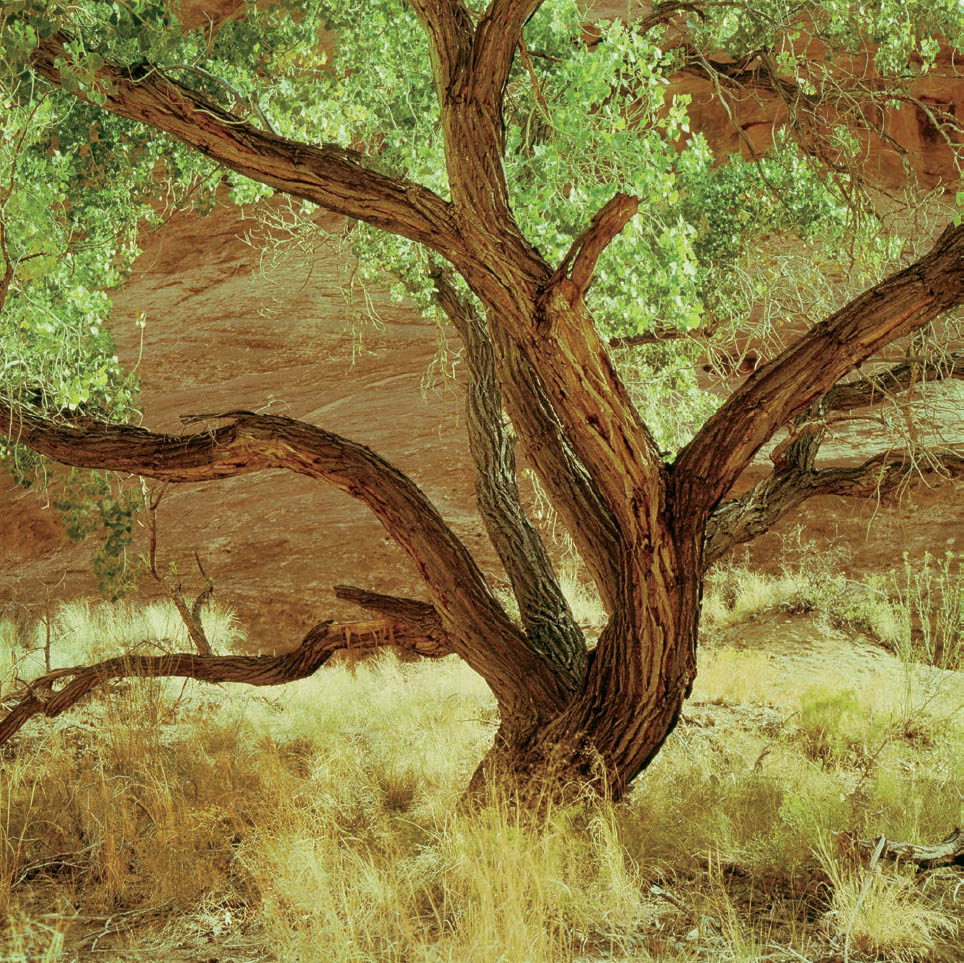
Figure 7-4: Shiva the Dancer, Paria Canyon
In this deep canyon of Northern Arizona, I combined CC10M and CC05Y filters to warm the scene. The major emphasis was on warming the walls and tree trunk to prevent a blue cast.
CC filters can be used not only to neutralize unwanted color shifts, but also to enhance moods by enriching colors. Suppose you have a composition dominated by green leaves, but they are rather dull in color. A combination of yellow and green CC filters could lighten and enliven the colors. In a similar way, slight amounts of red CC filtration could warm skin tones for portraits—or, you could do a variation on Newman’s portrait of Krupp by using a green CC filter for a more macabre look! Only the slightest amounts of filtration (CC05 or CC10) should be used, or the results may look too contrived.
It takes some time, and a good feel for mood, to learn how to effectively use CC filters, but the emotional shifts they can create are quite remarkable. The emotional connotations of slight color variations have extraordinary impact. CC filters should be an indispensable part of any serious color photographer’s tool kit.
An abundance of other filters can be used for color filtration. The most well known are the haze, skylight, and ultraviolet (UV) filters, which correct for the blue cast of ultraviolet light in bright sun or high altitudes. Film responds strongly to UV light. Since the eye compensates and we tend not to see the blue shift, these correction filters can be very valuable in reducing the blue.
Many people place a filter permanently on the lens, feeling that the correction is proper and that the filter affords protection from damage in case of an accident. This strikes me as a counterproductive approach. First, permanent use of a filter reduces options for later filtration. Second, if the film looks better with the filter on permanently, it may indicate that you should seek another film with a more pleasing color balance. Finally, if you need protection from lens damage, it may indicate that you are too careless and should change your habits, pronto!
One final note on color filtration: CC filters can be combined in extremely high levels to correct for the green shift of fluorescent lighting. However, there are many different types of fluorescent lights, and each requires its own filtration packet. You can write to Kodak or Fuji and obtain their booklet explaining fluorescent filtration. As an example, the appropriate filtration for old Ektachrome or current Fuji-chrome indoor 4×5 transparency film is CC50M + CC60Y for “cool white” fluorescent, with a filter factor of 2 stops. This is a great amount of filtration, but since it does negate the unpleasant green shift associated with fluorescent lighting, it’s worth using.
Digital cameras avoid the fluorescent problem entirely with their white balance feature that recognizes fluorescent lighting and rebalances color for it. On most cameras, you set it manually, simply by going through the various options to see which comes closest to the colors you are seeing. It’s a valuable feature that removes the guesswork and off-colored images that can be the bane of traditional color films. Of course, fluorescent lighting is never a problem with black-and-white film because the film sees only light levels, not colors. As an intriguing aside, Dr. Edwin Land, the creator of Polaroid film, spent much of his life trying to develop a film that would work equally well in daylight, tungsten light, and most fluorescent light. The prime motivation was apparent: the human eye basically sees the same colors under most of those varied forms of lighting. How does the eye/brain system compensate for those different types of lighting? It turns out the eye/brain system has capabilities that still are not understood. Perhaps, if they are determined in the future, we may be able to produce films or digital sensors that can automatically compensate for varying lighting, as does the human eye/brain. Today, we’re still looking for that same “holy grail” that eluded Edwin Land for so many years, and many other researchers to this very day.
Neutral Density and Polarizing Filters
Two types of filters are useful for both black-and-white (including infrared) and color photography . . . and even for digital: neutral density and polarizing filters. The neutral density filter essentially amounts to putting sunglasses on your camera. It cuts the amount of light entering the lens equally from all parts of the visible spectrum. It does not alter color balance, nor does it selectively block specific color wavelengths while allowing others to pass unimpeded. Its purpose is to force longer exposures.
Neutral density filters allow anything from slight exposure increases (1-stop neutral density filters) to extreme exposure increases (10-stop neutral density filters). This may seem like a strange approach considering today’s emphasis on faster films and lenses (i.e., lenses with wider maximum apertures), but it does have wonderful uses. Consider the example of Wynne Bullock’s extended time studies cited in chapter 3. I don’t know whether Bullock’s exposures were made at dawn or dusk under low light levels, or whether he artificially created long exposures at midday through the use of neutral density filters, but the effect is magical. It could not have been done with standard exposures.
Most photography today emphasizes stopped motion; but if you are interested in exploring the effects that motion can produce under long exposures, neutral density filters are mandatory. They can be expressive and creative tools with more applications than most photographers realize (see figures 3-26 and 3-27).
The polarizing filter (or polarizer) is a neutral density filter with a 2-stop filter factor. Beyond that, it reduces glare, which is highly polarized light. In order to understand what a polarizer does, we must first understand what polarized light is. Again, we must become somewhat technical, but not very much so.
For our purposes, we can say that light propagates as waves from its source (the objects in the scene) to the receptor (your eye, the camera lens, etc.). If you drew a straight line through space from the source to the receptor, there would be millions or billions of light waves traveling along that line. Each individual wave would be oriented at a slightly different angle to the direction of travel. Most objects emit or reflect non-polarized light, in which approximately equal numbers of waves are oriented at any given angle to the direction of travel. Some objects emit or reflect polarized light, in which most waves are oriented in one plane perpendicular to the direction of travel. If we drew a coordinate system in space, with X, Y, and Z axes at 90 degrees to one another, and polarized light traveled along the Z-axis from left to right, there would be a predominance of waves in the X-Z plane (i.e., the vertical plane) compared to the Y-Z plane (i.e., the horizontal plane).

Diagram 7.1: The Polarizer—How It Works
Two light waves travel along the Z-axis from left to right. Light wave #1 is in the X-Z plane (the vertical plane), perpendicular to the Y-axis. Light wave #2 is in the Y-Z plane (the horizontal plane) perpendicular to the X-axis. The “pickets” of the polarizer are aligned parallel to the X-axis (i.e., vertically). Light wave #1 passes through the filter. Light wave #2 is stopped, for its angle of orientation is 90 degrees to that of the filter.
In a sense, the polarizer acts as a visual “picket fence,” allowing only waves oriented in the same direction as the pickets to pass through the filter. Therefore, if the pickets are parallel to the X-axis, waves in the X-Z plane pass through while those in the Y-Z plane are stopped. If the polarizer is rotated 90 degrees so that the pickets are parallel to the Y-axis, then waves oriented in the X-Z plane are stopped and those in the Y-Z plane pass through. Those at intermediate angles pass through in direct proportion to their closeness to the angle of the pickets.
Objects exhibiting polarization (i.e., objects reflecting polarized light) can be made slightly lighter or much darker than other objects not exhibiting polarization simply by rotating the polarizer. All good polarizers can be rotated while mounted on the lens. When the polarizer is rotated to correspond to the polarization angle of the incoming light (i.e., the angle at which most of the light rays are oriented), the object emitting or reflecting the polarized light is hardly affected. When the polarizer is then rotated 90 degrees, most of the rays of the polarized object are blocked, and it turns quite dark. A second non-polarized object, however, has the same portion of its light blocked by the polarizer at any angle to which the polarizer is rotated.
Skylight is polarized, as are window and water surface reflections. Lesser-known objects that reflect polarized light include the thick leathery leaves of live oak trees. When the camera is aimed at a landscape that includes sky and clouds, the polarizer can make the sky lighter or darker compared to the clouds because clouds don’t show polarization. The effect of the polarizer can be seen as you look through the lens and slowly turn the filter. You can clearly see the sky grow darker and then lighter as the filter is rotated. The clouds become more or less pronounced as the sky darkens and lightens around them. This is why I used a polarizing filter along with a #12 deep yellow filter when photographing figure 7-1, Mt. Samson and Peaks of the Canadian Rockies. The two filters together helped separate the tonalities of the sky from the clouds, but they had little effect on the rest of the image. I’ve employed that combination of filters at other times as well.
When looking at the surface of water, rotating the polarizer can effectively reduce or even eliminate surface reflections at certain angles and allow objects beneath the surface to be seen clearly. You can watch the reflections disappear while subsurface objects become visible as you stand behind the lens rotating the filter. As you continue to rotate the filter, you will reach a point of minimum surface reflection and maximum subsurface visibility. Beyond that point, the relationships will reverse until you reach maximum reflection and minimum subsurface visibility.
![]() A polarizer can be misused by rotating it to its maximum polarizing angle. When this angle is used for color slides of dramatic landscapes and cloud-scapes, the polarizer can make the sky oppressively blue-black.
A polarizer can be misused by rotating it to its maximum polarizing angle. When this angle is used for color slides of dramatic landscapes and cloud-scapes, the polarizer can make the sky oppressively blue-black.
The polarizer, like the neutral density filter, can be used in combination with any CC filter or black-and-white filter because it has no color shift. I have often used a polarizer in combination with a red, orange, or yellow filter in black-and-white primarily to accentuate clouds against a blue sky for heightened drama, but for other purposes as well.
Problems Associated with Polarizers
A polarizer has one oddity when used on the sky: it works to maximum effect at 90 degrees to the direction of the sun. When lined up with the sun it has no polarizing effect whatsoever. Thus, if the sun is directly behind or in front of you, the polarizer is nothing more than a 2-stop neutral density filter. But if the sun is to your left or right by 90 degrees, the sky can be dramatically affected by the polarizer.
There is a hidden danger here. If your photograph includes a portion of the sky 90 degrees to the angle of the sun, and substantial portions of the sky at other angles, the polarizer can make the sky appear very uneven. The portion of the sky at right angles to the sun will be greatly darkened, while other parts will be darkened far less. If the photograph is made with a wide-angle lens, the unevenness can be excessive and very distracting.
Another danger is that the polarizer can be misused by rotating it to its maximum polarizing angle. When this angle is used for color slides of dramatic landscapes and cloudscapes, the polarizer can make the sky oppressively blue-black. The viewer becomes more aware of the polarizer than either the scene or the photograph. In a similar fashion, maximum reduction of reflective glare off windows or water surfaces can effectively eliminate the substance of the window or the water itself. In some cases this may be desirable, but in most cases an intermediate angle of rotation allows the reflective surface to be visible as well as the objects behind or under it. With sky and clouds, the optimum angle is often less than the maximum polarizing angle. Overuse of the polarizer is more objectionable in color than in black-and-white because of the closeness of color to reality. Moderation is mandatory for effective use of this tool.
I learned about the seductive effect of the polarizer the hard way. I was photographing a color scene in the rolling, oak-covered grasslands of California near San Luis Obispo in the early 1970s. The leaves on the live oak trees were quite reflective and bright, the grasslands were covered with spring wildflowers, and the blue sky had streaked white clouds. I used a polarizer to accentuate the contrasts and colors. At the non-polarizing angle, the filter simply darkened the entire scene. But as I rotated it, the clouds began to pop out from the blue sky and the leaves on the oaks became progressively greener. I finally reached the maximum angle of polarization and was giddy with how colorful everything had become. It turned out that the resulting transparency was a complete dud! By eliminating the reflection off the leaves, I lost all the feeling of light and life—effectively turning the trees into blobs of deep color, as if they were painted. Somewhere between the non-polarizing angle and the maximum polarizing angle I could have moderately accentuated the clouds against the sky, while at the same time retaining some of the brilliant light off the leaves and moderately enhancing their color saturation. It was a lesson learned.
It is easy—perhaps compelling—to gravitate toward the maximum polarizing angle because its effect can be intoxicating. Each increment in dramatic effect gains acceptability, making the next one acceptable and desirable as well. Always keep in mind the fact that believability can be pushed somewhat beyond reality—into a realm bordering on “super-reality,” heightened impact, and increased drama—but pushing too far creates a decidedly unreal and obviously contrived photograph.
Digital Polarizing Filter
Because of the way a polarizing filter works, selectively having its effect on light rays that show polarization, the only way to replicate its effect digitally would be to place a polarizer in front of the lens when exposing an image. However, placing a polarizer in front of a lens may produce unexpected optical conflicts with the tightly controlled lens/sensor system built into the camera. The only way to see if a polarizing filter can be effectively used with your camera is to try it several times, make careful notes of what you’ve done, and observe the results. It may have the same results as a polarizer used with a film camera. If not, it is difficult to envision an algorithm capable of replicating the effects of the polarizer. Programmers would not only have to create a method of replicating the polarizer’s effect on the sky, including the angle of the sky in relationship to the sun, but also the effect of polarized light reflected off many shiny objects, and reflections off surfaces such as still water on a pond or a glass window. That monumental programming task has not been accomplished, and it’s hard to imagine how it could be accomplished (though future advances could accomplish the seemingly impossible).
Because a polarizer is an extremely valuable tool for both black-and-white as well as color traditional photography, its possible loss for digital photography would be unfortunate. Some of the polarizer’s effects may be possible to duplicate in post-processing, by increasing color saturation and reducing bright glare off live oak leaves (to relate it to my personal experience). It would be possible to replicate its effect on the sky (while having no effect on the clouds), by isolating the blue of the sky and darkening it, but it seems impossible to replicate partial or total reduction of reflection from a water or glass surface. For this reason I strongly recommend experimentation to see if holding a polarizer in front of your camera lens is a viable option. If it doesn’t work, then resorting to post-processing to emulate some of its effects is your only option.
Digital Black-and-White Filtration
As stated at the start of this chapter, digital filtration is generally accomplished in post-processing, not during the exposure. Few digital photographers use filters when photographing in the field or studio, relying instead on software to do the work later in post-processing, particularly for black-and-white work. Black-and-white filters may be used with digital cameras, but their effect on digital sensors may be quite different from their effect on film. It may be worth trying black-and-white film filters on your digital camera (simply hold it in front of the lens when making the exposure) just to see the effect. This may prove to be utterly counterproductive if your RAW files are typically in color, but may be worth exploring if you’re using one of the digital cameras dedicated to black-and-white imagery exclusively. (NOTE: While such cameras have wonderful black-and-white capabilities, discussion of them is beyond the scope of this book.) For standard digital cameras based on full color imagery, trying to use standard film black-and-white filters makes little sense.
The digital approach to filtration is completely different, relying on the three color channels—red, green and blue—of the original RAW exposure to post-process the image. You can apply changes to the entire image or even to select parts of the image to different percentages of the three channels. This would be the rough equivalent of filtering each part of the image in isolation, without concern for any undesirable effects filtration may cause to other parts of the image even if it proves to be the apparent choice for a key part of the image.
Let’s see how this can be applied to the hypothetical idyllic pastoral scene discussed earlier in the chapter. Let’s assume you like the yellow filter to help separate the white clouds from the blue sky. But at the same time, the filter will slightly lighten both the grass and the orange poppies dotted within the grass. Perhaps, in that section of the image, you’d prefer an orange filter, which would lighten the poppies while darkening the grass. Digitally you can do this.
The great advantage of digital filters is twofold: you can see what any one does to the image as you move its slider to the left or right, and you can move that slider to any degree you choose. This flexibility offers wonderful options when converting the original color RAW file to a final black-and-white image. But the problem is, once again, that most practitioners tend to go too far before they believe they’ve gone far enough. And, once again, I caution moderation in the use of filter manipulation, always keeping an eye on the final composition, and how you want to direct the viewer’s gaze. If you filter each portion of a black-and-white image for too strong an effect, you could end up drawing too much attention to portions of the image that should serve a supporting role, and hence you can lose your compositional focus (please reread chapter 2 for the meaning of good composition). Second, digital filters are clearly not the same as traditional black-and-white filters, so the effect could be quite different. Certainly they are to me—I have a lifetime of working with traditional black-and-white filters, and find the digital equivalents to yield significantly different results. Digital filters are computer algorithms created by software programmers and computer engineers; they are not optical filters like those used in traditional photography. This is not to say that digital filters are wrong or bad in any way, but simply to say their effect on the image is different from those of traditional black-and-white filters.
Allow me to briefly explain the differences as I see them. It is clear that red and magenta are not very far from one another on the visible spectrum, nor are blue and aqua. But moving the red filter slider to the left or right may have a huge effect on an image, whereas moving the magenta filter to the left or right shows no visible effect, whatsoever (or vice versa). I’ve seen the same strange effect when playing with blue and aqua filters on an image. The same is often true with any other filters with closely aligned colors: one may work to a remarkable extent, while the other shows virtually no effect.
While some filters do, indeed, have a huge effect on an image, there seems to be little relationship between the alleged color of the filter and its effect on the image. These unexpectedly large differences, where I would expect small differences, make me wonder if the algorithms should be listed as #1 filter, #2 filter, #3 filter, and so on, rather than as yellow, orange, red, and so on around the color wheel. Therefore, while the filters can be very effective, they seem to have only a cursory relationship between their alleged color and their effect on the image. But, as stated above, these unexpected results are largely irrelevant because you can actually see the effect of each filter on the image, and you can increase or decrease the degree of that effect as you see fit. I look upon the names of the digital filters merely as potential indicators of what effect they may produce, and then I work the sliders to see what they actually do. (From a practical point of view, it’s also easier to remember “magenta filter” rather than “#4 filter.”)
Digital Color Filtration
In essence, there is no such thing as digital color filtration, nor is there any need for it because digital methods have resolved the issue in such applications as Adobe Camera Raw or Lightroom with their tint and (color) temperature sliders. Nothing has to be done—or guessed—in the field to achieve proper color correction for imbalances such as the blue shift in outdoor shadows. Instead, your selection of the original white balance, and the minute color balance alterations using either or both tint and temperature can quickly and easily rebalance colors to those you remembered in the field, or to those you wish to convey in your finished image. Further post-processing changes of exposure, lightness, and color saturation produce major or minor shifts in the color balance of the image. As a result, any of the tweaks available via color correction filters for film can easily be accomplished digitally, but with greater precision. Furthermore, adjustments may be made over time as your vision of the image changes without affecting the original RAW file. Perhaps it’s unnecessary to note, but it’s always worth a reminder: for such color balance alterations to be precisely what you want, you’ll need to be sure that your computer monitor is properly calibrated, and that its profile matches your printer (whether it’s your own printer or the commercial printer you use). Otherwise your end result my exhibit colors that are quite different from your intent.