

Job:02-30034 Title:RP-Fashion Design Ref and Spec Book
#175 Dtp:225 Page:153
Book
e:152
146-161_30034.indd 153 2/27/13 3:01 PM
Rendering 15 3
(Text)
14
e
-
r
t
Many are of the opinion that designers should take anatomy classes to help improve their
sketching. When it comes to the art of fashion, these classes better serve the fashion illus-
trator. On the other hand, anatomical study will have an impact on designers’ patternmaking
skills. Anatomy provides them with an understanding of the structure and mechanics of the
body, from which they can gain a greater appreciation for how clothing will fit and flow around
the human form.
Designers should remember to draw only what they would see from a particular vantage point.
For instance, on a front view drawing of a garment the side seams would not be visible. If
there is a reason to show the side seams, the figure should be rotated—front, side, three-
quarter, and back views—to display the feature in those areas. When a designer chooses to
place two or more figures on a page, the poses should reflect the desired dynamic between
them. These poses should also create good negative space around and between the figures.
A designer wants the viewer’s eye to focus on the clothing, first and foremost. A natural border
of space is recommended when determining where to place the figure on the page. To best
serve the clothing in a sketch, poses should not distort the garments, but rather, allow for a
clear interpretation of how they are made and how they hang on the body. Keeping arms below
the shoulder line, bent knees to a minimum, and arms or long hair from obscuring the design
are few general guidelines that will help the croquis retain its value as a communication tool.
Fashion gure in 9-head
proportion—shadow-mapped
fashion sketch
RENDERING THE HEAD
Face
Facial structure, like that of the body, is varied. Moreover,
different cultures have their own standards of beauty. The
“rules” that provide a baseline for the basic proportions of
the face, therefore, rely heavily on balance. Designers have
the discretion to adjust measurements to capture the es-
sence of their ideal or the customer for whom they are creat-
ing a sketch. The face begins with an inverted egg shape,
bisected by a centerline, with a corresponding perpendicular
line to mark the chin and top of the head. Half way from the
top of the head to the chin would indicate where the eyes
are to be positioned. The area below the eyes is then halved
to find the position for the nose. The mouth can be placed in
the middle of the area between the nose and the chin. The
nose and the mouth are centered, while the eyes are dis-
tributed in the space of four eyes. Working from the center
outward, one eye will represent the space between the eyes.
The two actual eyes will be placed on either side, which
should allow for the space of half an eye between the eye
and the side of the face. The oval can be sculpted on either
Job:02-30034 Title:RP-Fashion Design Ref and Spec Book
#175 Dtp:225 Page:153
Book
e:152
146-161_30034.indd 153 2/27/13 3:01 PM
Job:02-30034 Title:RP-Fashion Design Ref and Spec Book
#175 Dtp:225 Page:154
146-161_30034.indd 154 2/27/13 3:01 PM
15 4 THE FASHION DESIGN REFERENCE + SPECIFICATION BOOK
(Text)
14
side by two parallel lines to the face. At the level of the mouth, these lines can bend inward
to meet the chin line, defining the jawline. Depending on scale, the ears usually line up on top
with the eye and end somewhere between the nose and the mouth. The same proportions are
valid for profiles with the exception of the volume of the nose, lips, and chin protruding off the
egg at the precise locations.
Eye
The eyes start with an almond shape. The centerline between both tips establishes the tilt of
the eye. A third line with less of an arc is drawn from one tip to the other to create the lid. How
low the lid is drawn will determine how open the eye seems to be. A circle representing the iris
is placed within the original almond shape. The lid line should cut off the top of the circle de-
picting the iris, which should appear to be perfectly round, although obscured by the eyelid. If
the iris is rendered as a complete circle the result will be a wide-eyed, shocked, or frightened
expression. When rendering the iris in color, omitting color or adding a white accent in the
shape of a small crescent creates the illusion of glistening light.
Lashes can be drawn from the center of each lid outward, with an emphasis on quality of line,
so that the drawing tool lifts off the page at the end of each lash. Three to five top lashes are
plenty considering the size of the average croquis (obviously, the larger the rendering the more
details it can handle). A point above of the eye closest to the center of the face is the starting
point for the eyebrow. The arch can follow the angle of the top of the almond and extend as far
as three-quarters of the eye before it breaks to level off.
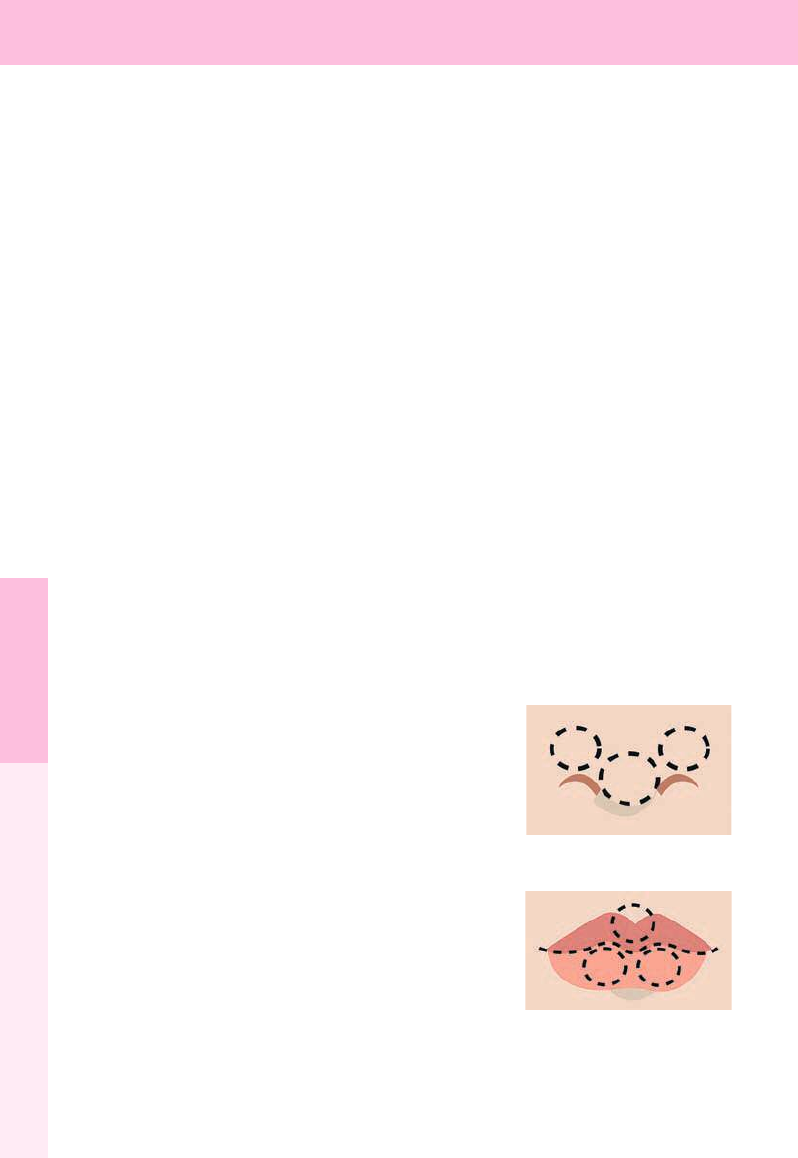
Nose
Nose
Mouth
H
Rendering the nose is more about shadows than lines. Three
circles will define the scale of the tip of the nose and the
area over the nostrils. Under the spots where these circle
touch are spaces where arcs can be drawn to show the nos-
trils. In most fashion sketches, these markings alone can be
enough to create an impression of the nose.
Mouth
Building the shape of the mouth can be done using three
circles stacked into a pyramid. The hill-like space between
the circles will determine the opening of the mouth. Cutting
a V or U shape out of the top circle establishes the center of
the top lip, and drawing sloping lines to connect it with the
sides of the mouth will complete the archer’s bow silhouette.
A straight (or slightly indented) line between the bottom two
circles creates an area for shadow under the bottom lip. This
Job:02-30034 Title:RP-Fashion Design Ref and Spec Book
#175 Dtp:225 Page:154
146-161_30034.indd 154 2/27/13 3:01 PM
Job:02-30034 Title:RP-Fashion Design Ref and Spec Book
#175 Dtp:225 Page:155
Book
e:154
146-161_30034.indd 155 2/27/13 3:01 PM
Rendering 15 5
(Text)
14
p
e
e
w
s
,
e
g
ar
can also be connected with the sides of the mouth. When
rendering the lip in color, making the upper lip a shade darker
will create a more three-dimensional look.
Complexion
The complexion of the figure may or may not be a direct re-
flection of the ethnicity designers are going for. How they com-
bine color with modified features will allow them to develop
an international rainbow of models. The place to start is the
level of light or dark (very fair, fair, midtone, tanned, dark, very
dark) that the designer wants to establish. Once the range is
selected, it is a matter of mixing color in the equivalent level
of white, cream, tan, or brown with colors that will tint them in
the direction the designer desires. For Caucasian skin, pure
white will create the appearance of alabaster, but adding red
to it can result in a ruddy complexion. Tinting tan with olive
can give the impression of swarthy Mediterranean skin, while
adding a little black to a darker brown can create a rich Afri-
can skin tone. Adding the tone-on-tone of freckles to any color
makes for a completely new look. As in all things, the choices
and customizations designers make will reflect their aesthet-
ics and how their customers see themselves. Keep the visual
focus of the presentation on the garments and use skin tones
to enhance your presentation and color story.
Hair
When rendering hair, it should be broken down into sections
and locks. Hair stylists use a standard technique for section-
ing hair for a haircut, called seven-section parting, which
designers can borrow for creating a hairstyle on their croquis.
These sections are top, temple/right side, temple/left side,
right crown, left crown, right nape, and left nape. Dividing the
hairstyle among them helps to plot out what it will do at each
point (stand up, curl, lie flat, etc.) as well as how long and at
what angle it will be cut. Although a sketch might represent
a frontal view, designers should clearly understand what is
happening in the back of the head and what part of it will be
seen from the front. Once a hairstyle is mapped out, the base
shapes can be rendered in a medium tone of the desired
color. Highlights and lowlights (or shadows) are added as ac-
cents for each section. Fine details can be introduced in the
form of tufts, wisps, or strands of hair to finish off each sec-
Hair
Job:02-30034 Title:RP-Fashion Design Ref and Spec Book
#175 Dtp:225 Page:155
Book
e:154
146-161_30034.indd 155 2/27/13 3:01 PM
Job:02-30034 Title:RP-Fashion Design Ref and Spec Book
#175 Dtp:225 Page:156
146-161_30034.indd 156 2/27/13 3:01 PM
15 6 THE FASHION DESIGN REFERENCE + SPECIFICATION BOOK
(Text)
14
tion. The texture of hair must also be designed. Will straight hair be blunt, curl under, or flip
out? Will curls be large and loose waves or small and tight ringlets? How will sections of hair
be swept up to create an updo? How will the scalp be sectioned for braids or dreadlocks? The
thickness and length must be determined as well.
Makeup
The application of cosmetics on the croquis should be undertaken with the same kind of plan-
ning and artistry with which real makeup is applied. After laying down a base color for the skin,
a second layer of the same color can be used to create shadows. Once these shadows have
established the contours of bone structure, designers can add eye shadow, rouge, and lip
color. A thin wash of color over the skin tone will create a natural look, while a heavier treat-
ment will result in something more theatrical. A light touch is required for eyeliner, lashes, and
brows. These details help to define the eye, and it is easier to add than remove.
ca
tu
b
P
T
o
ca
a
A
ch
th
b
a
sw
to
To
b
s
to
q
A
u
th
C
ty
of
co
sa
A
fr
q
st
b
RENDERING FABRIC
Besides having a grasp on the structure
of the body and facial details, the de-
signer must, of course, be able to capture
textiles, construction, and ornamentation
as they relate to the garments they are
depicting. Fabric that is manipulated in
three dimensions must be translated into
two. Flares, for instance, might be trum-
petlike when the garment is made out of a
crisp, stiff fabric such as taffeta or more
flutelike were the same style of garment
to be made of chiffon.
The roundness of gathered fabric is sub-
ject to the same idea when it comes to
ruffles, shirring, smocking, quilting, and
puffs. When rendering each pucker and
release of a gathered fabric, the designer
should remember that each little divot is
in fact a shadow and not a line.
Pleats, on the other hand, have a crisp
crease in the folds of tuck, box, accor-
dion, and fan pleating. Irregular pleating
Job:02-30034 Title:RP-Fashion Design Ref and Spec Book
#175 Dtp:225 Page:156
146-161_30034.indd 156 2/27/13 3:01 PM

Job:02-30034 Title:RP-Fashion Design Ref and Spec Book
#175 Dtp:225 Page:157
Book
e:156
146-161_30034.indd 157 2/27/13 3:01 PM
Rendering 15 7
(Text)
14
e
-
n,
d
can take many forms and therefore variations should be studied closely before trying to cap-
ture them on the page. This style of pleating, called primitive, mushroom, or broomstick, has
been explored by designers from Mariano Fortuny to Mary McFadden to Issey Miyake in his
Pleats Please line.
To draw fabric that is draped by folding or tying as well as fabric that falls into cowls or cas-
cades, a designer must be familiar with the nature of the fabric and how it will respond to
any of these manipulations.
Another textile issue the designer faces with the creation of a sketch is pattern. Stripes,
checks, plaids, and overall patterns each present their own challenges. As in textile design,
the fashion designer creates a motif, then decides on its scale and repeats in relation to the
body. Grids that represent the direction of grainlines help to plan out how a pattern will wrap
around the form. The size of each repeat determines the size of the grid. Holding a fabric
swatch up to the body can help a design illustrator visualize how a motif will fit from shoulder
to hip and use the scale to fit the body they have drawn.
To show textiles as texture, the designer’s focus is on rendering with color. A sheer fabric
becomes a filmy wash of color layered over skin tone and any other fabrics it rests on in the
sketch. Lace work is also layered over other colors, but demands strong bias cross-hatching
to create the illusion of netting on which the pattern of the lace is built. Feathers and fur re-
quire layers of color to create depth at the center and a wispy lightness along the perimeter.
Any surface texture will affect the line quality at the edges of the silhouette, be it smooth or
uneven. Knits are depicted by building up ribs, cables, or twists and stitch details to create
the appropriate surface texture for the bulk of the fabric.
Color-on-color surfacing—usually pencil over watercolor—can be used to create different
types of weaves—linen, raw silk, denim or twill, and corduroy, for example. The desired level
of roughness is influenced by the density of threads, nubs, and slubs in the weave. The vis-
cosity of paint can be applied thickly for velvet, leather, and suede or in thinner wet washes for
satin, ombre stripes, dip-dye, or tie-dye.
Adding any type of embellishment or decorative detail (embroidery, sequins, beads, fringe,
frogs, bows, piping, decorative stitching, appliqué, passementerie) is the final stage and re-
quires delicate pencil, marker, or even watercolor work. Each type of detail requires individual
study, be it the direction of threads, the overlap pattern of sequins, the shape of stitches or
beads, or the twist and gauge of cording.
Job:02-30034 Title:RP-Fashion Design Ref and Spec Book
#175 Dtp:225 Page:157
Book
e:156
146-161_30034.indd 157 2/27/13 3:01 PM
..................Content has been hidden....................
You can't read the all page of ebook, please click here login for view all page.