
14
Characteristics and Use of Lenses on All Camera Models
FOCAL LENGTH
Lenses are distinguished mainly by their focal length, which is measured from the rear nodal point (or principal plane H). Focal length is an optical characteristic built into the lens. You can change it only by adding or removing optical components, such as a teleconverter. Focal length is unchanged when you add extension tubes or bellows, switch a lens from one camera to another, or use a lens for different film formats. On zoom lenses, you can change focal length within a certain range by moving some of the optical components inside the lens.
To classify lenses into standard, wide angle, and telephoto, consider the focal length in relation to the format. A lens is considered standard when its focal length is about equal to the diagonal of the picture format for which it is used. On Hasselblad cameras, 80mm is a normal focal length because the diagonal of the 2¼-inch (6 × 6cm) square is 78mm (70mm for the 6 × 4.5cm format). Lenses with longer focal lengths are classified as long focal length lenses, telephotos, or telelenses, and those with shorter focal lengths as wide angles.
ANGLE OF VIEW
The angle of view is the angle of the area that the lens covers on a specific image format (see Table 14-1). The angle of view can be related either to the diagonal or to the horizontal or vertical dimension of the picture. A lens that has a diagonal angle of approximately 50 degrees is considered standard on any format (see Figure 14-1).
Table 14-1 Equivalent Focal Lengths for Different Film Formats
| Focal length of lenses (mm) | ||||
| Horizontal angle of view (degrees) |
4.5 × 6cm and 2¼ × 2¼ inch (54 × 54mm) |
35mm (24 × 36mm) |
6 × 7cm (54 × 68mm) |
4 × 5 inch (98 × 120mm) |
| 84 | 31 | 20 | 38 | 67 |
| 72 | 38 | 25 | 48 | 83 |
| 69 | 40 | 26 | 50 | 87 |
| 65 | 43 | 28 | 54 | 93 |
| 62 | 46 | 30 | 58 | 101 |
| 58 | 50 | 33 | 63 | 109 |
| 54 | 54 | 35 | 68 | 117 |
| 49 | 60 | 39 | 75 | 130 |
| 40 | 76 | 50 | 96 | 167 |
| 38 | 80 | 52 | 100 | 175 |
| 36 | 84 | 55 | 105 | 183 |
| 32 | 100 | 65 | 125 | 218 |
| 30 | 105 | 69 | 131 | 229 |
| 26 | 120 | 78 | 150 | 261 |
| 24 | 130 | 85 | 163 | 283 |
| 23 | 135 | 88 | 169 | 295 |
| 21 | 150 | 100 | 190 | 330 |
| 15 | 206 | 135 | 259 | 450 |
| 13 | 250 | 163 | 314 | 545 |
| 10 | 306 | 200 | 383 | 667 |
| 9 | 350 | 229 | 439 | 763 |
| 7 | 458 | 300 | 575 | 1000 |
| 61/2 | 500 | 327 | 627 | 1090 |

Figure 14-1 Angle of view 2. The diagonal angle of view of different lenses on Hasselblad: 88 degrees for 40mm; 75 degrees for 50mm; 52 degrees for 80mm; 29 degrees for 150mm; and 18 degrees for 250mm focal length. 3. The angle of view can be expressed in relation either to the picture diagonal or to the horizontal or vertical side. The two are different. 1. On the 30mm full-frame fish-eye lens, the 180-degree diagonal angle of view is completely out of proportion to the 112-degree horizontal or vertical angle. 4. The covering power of a lens is the diameter of the circle within which satisfactory image quality and illumination are obtained.
AREA COVERAGE
The angle of view of a lens determines the area coverage and the magnification. The area coverage for any lens is directly proportional to the subject distance. At twice the distance, a lens covers an area twice as wide. A lens with a larger angle of view covers a larger area, and this also means that the subjects are recorded smaller because the magnification is lower.
COVERING POWER
Lenses are optically designed to produce satisfactory image quality and illumination in a specific image format. The Hasselblad lenses are designed to produce this promised quality in the 2¼-inch (6 × 6cm) square format or the 6 × 4.5cm H camera format and not necessarily in anything larger. This design characteristic is called covering power. The covering power depends on the design of the lens, not the focal length. Lenses with a 100mm focal length, for instance, can be made to cover the 35mm format, the 55 × 55mm film area of the medium format, or the larger area of a 4 × 5-inch camera.
Because lenses produce a circular image, the covering power of a lens is indicated by the diameter of the circle within which definition and illumination are satisfactory (Figure 14-1). Beyond that circle, the illumination or the sharpness or both are unacceptable. Lenses designed for a larger format can be used for a smaller format.
RELATIVE ILLUMINANCE
The corners of the image recorded by any lens receive somewhat less light than the center. The loss of illumination can be caused by the lens design, such as limiting the lens diameter to keep lenses compact and lightweight. On wide-angle lenses the cause is often found in the lens barrel design. Light rays that enter the lens at steep angles are cut off by components in the lens barrel. Furthermore, the diaphragm opening is circular when seen from the front and allows a large amount of light to enter. Viewed from the side, this same opening takes on an elliptical shape of a much smaller size, letting less light through the opening.
Lens designers try to keep the difference within acceptable levels. If this is not possible, you can improve the results by reducing the illumination that goes to the center of the image using a neutral density center filter placed over the lens. Within the Hasselblad line, this is necessary or recommended only with the 30mm and 45mm lenses of the XPan camera and the Roden-stock lenses for the ArcBody. On all other Hasselblad lenses, the corner illumination is within acceptable levels so a darkening is never objectionable or even visible in the final image.
You always improve corner illumination by stopping down the lens (see Figure 14-5), and that explains why the center filter for the 45mm XPan lens is really necessary only when the lens is used at apertures f/8 or larger. The data for relative illuminance at two lens apertures are published for all Hasselblad V and H system lenses and are available from Hasselblad.
COLOR RENDITION
Color rendition in an image is determined mainly by the glass used in the lens. Individual multicoating of the different lens surfaces can also help to reduce variations between lenses.
Because sequences of images are frequently taken with different focal length lenses, accurately matched color rendition in all lenses is extremely important. All lenses in the Hasselblad system produce images with virtually identical color rendition. This applies even when we compare the V system and the H system lenses.
LENS QUALITY
A single lens element produces an image affected by all kinds of faults, called aberrations, that include spherical and chromatic aberration, coma, astigmatism, field curvature, and distortion. The aberrations can be reduced by combining various lens elements of different curvatures and thicknesses, made from different types of glass and arranged in different ways within the lens mount. It is the lens designer's job to find a combination that reduces all aberrations to a point where they are not visible or objectionable in the applications for which the lens is made.
Although large-aperture and extreme wide-angle lenses require more elements, the quality of the complete lens is not determined by the number of elements. Rather, it is governed by the skill of the designer in combining a number of elements to produce the maximum in quality, using the latest types of glass and design techniques.
Although lens design is important, the quality of the finished lens is determined even more by the accuracy with which each lens element is ground and polished, the accuracy and workmanship that goes into each mechanical component of the lens mount, the precision that is used in assembling the components, and the time and care taken in testing the finished lens.
Lens quality used to be expressed by the number of lines per millimeter a lens is capable of reproducing as separate lines. Lens and photo technicians have, however, found that the sharpness in a photograph is not determined so much by the resolution of fine detail as by the edge sharpness of lines within the image. This is known as acutance. Acutance values correlate very well with the observer's impression of sharpness.
The image-forming qualities are expressed today with modulation transfer function (MTF) diagrams, which are published in identical fashion for all the lenses in the V and the H systems and are available from Hasselblad. These diagrams can be helpful for comparing the performance of the Hasselblad lenses or to see whether image sharpness improves when the aperture is closed down.
On the MTF diagrams, the center of the image is on the left. Each vertical line represents 10mm, so the far right is 40mm from the center. The corners of the 2¼-inch (6 × 6cm) square are at 38mm, and at 34mm for the 6 × 4.5 format. The performance is illustrated with three sets of lines for different resolution figures, with the top line (or the two top lines) being the most important to be considered for general photography. The higher the lines, the better the lens. The dotted curve is for tangential lines, and the solid curve for sagittal lines (see Figures 14-2, 14-3 and 14-4).

Figure 14-2 MTF diagrams 1. The quality of a photographic image is not determined so much by the number of lines that are resolved as by the edge sharpness, which is called acutance. 2. On the MTF diagrams, the image height is on the horizontal axis, with the center at the left. The diagrams are shown with the aperture wide open (left) and stopped down about two aperture values (right). Illustrated are the curves for the FE 50mm f/2.8.

Figure 14-3 MTF curves for different lenses Although the Planar 80mm (left) is an excellent lens, the MTF diagrams clearly show the better quality of the Planar 100mm (right), especially at the corners of the image.

Figure 14-4 Image quality at different distances The MTF curves for the Makro-Planar lenses are shown at long and close distances, clearly illustrating the better performance in close-up work (left) at the same lens aperture.
The Hasselblad MTF diagrams cannot be used to compare the Hasselblad lenses to those made by other companies because there are no standards within the industry. Most companies publish these diagrams based solely on the computer printout, not taking into account the manufacturing precision. The charts for the Hasselblad lenses show the actual performance of the lens that you bought or that is waiting for you at the dealer.
Image Quality at Different Lens Apertures
The very best lenses in the V system—such as the Biogon 38mm, the Planar 100mm, the Sonnar 180mm, the Superachromats, and the Makro-Planars used in the close-up range—produce almost perfect corner sharpness with the aperture wide open. However, image sharpness improves on any lens as the aperture is stopped down, with excellent, or even maximum, corner-to-corner sharpness when the aperture is two f stops below the maximum.

Figure 14-5 Relative illuminance The relative illuminance for Hasselblad lenses is also published with the aperture wide open (top line) and closed down two f stops (bottom line). The image height is again on the horizontal axis with the center at the left and the corner at the right.
Image Quality at Small Apertures
When lens apertures become very small, a loss of sharpness may be caused by the nature of light, not the lens or lens design. Light going through a small opening spreads slightly at the edges, an effect known as diffraction, possibly affecting image sharpness at small apertures. To reduce this problem, manufacturers of high-quality lenses limit the minimum aperture to a point where the quality loss is not objectionable or even noticeable. This explains why some of the lenses may stop down only to f/16 or f/22. As a result, you need not be concerned about closing the aperture too far. Stop it down completely if the depth of field requires it.
Your Own Quality Tests
There are probably occasions when you want to make your own film tests. You can use the readily available lens test charts for that purpose, but other objects with fine detail and sharp outlines, such as good-quality printed material, are even better. Brick walls are often suggested for outdoor tests, but they are not exceptionally good because they do not have sharp outlines or much contrast. An old building made from stone or weathered wood is a better choice.
Here are a few other points that you must consider:
• The test target must be absolutely flat so that you need not worry about depth of field.
• The image plane must be parallel to the test target.
• If you compare different focal length lenses, each lens must cover the same size area.
• Each negative or transparency must have the same exposure and must be developed identically.
• Eliminate any possibility of camera motion.
• Make the test with the aperture wide open and with it somewhat closed down.
When evaluating the results, look at the actual negative or transparency with an 8× or 10× magnifying glass. Never evaluate prints made from a negative or slides projected onto a screen because too many other factors can enter and distort the results.
Evaluate the center and the corners of the negative or transparency. Also keep in mind what the lenses are designed for. The Distagon retrofocus lenses were designed to give the best image quality at long distances. Make the test at longer distances. The Makro-Planars were designed for optimum quality at a 1 : 5 magnification. Make the test at closer distances.
Color Correction and Apochromatic Lenses
Most photographic lenses are corrected so that mainly the red and blue light rays form the image at the same point. Such achromatic lenses can produce images of superb sharpness, at least within the wide angle, standard, and short telephoto range, but they may produce images with color fringes in long telephotos. As a result, many long telephoto lenses are of the apochromatic design. They are corrected not only for red and blue but also the colors in between and may carry the letters “apo” or the word “apochromatic” as part of their name.
Apochromatic lenses may have elements made from special optical materials (not glass) that are sensitive to changes in temperature that affect the focus setting. As a result, the focusing ring goes beyond the infinity setting. Such a lens must always be focused visually on the focusing screen. Don't just set it at infinity if the subject is far away.
The 250mm Sonnar Superachromat, originally developed for the American space program, is further corrected into the infrared range of radiation from 700 nm to 1000 nm. It is an ideal lens for highest-quality infrared photography without the need of adjusting the distance setting.
Coating and Multicoating
Lens coating, invented by Zeiss in 1935, reduces light reflections off a glass surface from about 5% to 1%. In multicoating, invented later, each lens surface receives several layers of coating, each of a different thickness, to reduce reflections from the different wavelengths of light. This process reduces reflections down to about 0.3%.
All Hasselblad lenses in the V system are coated, and the newer ones, those with a T designation, are multicoated with six or seven layers on each glass air surface (the surface when glass meets air). The 250mm Sonnar Super-achromat is not engraved T because it has a one-layer coating. Designed also for infrared photography, multicoating would absorb the infrared radiation that is necessary for creating these images.
Coating and multicoating reduce the light that otherwise would be reflected between lens surfaces and eventually reach the image plane, where it would cause flare and reduce the image contrast and color saturation. Disturbing light reflections can also be created by the interior of the camera body or the lens barrel. The interior of the H camera body is treated to reduce or eliminate reflections and the latest cameras in the V system have a Palpas coating. The rear of the lens barrel in the latest CFi and CFE lenses is also designed to reduce the risk of stray light reaching the film, a major difference between the CFi/CFE and earlier types.
Using Lens Shades
Multicoating of lenses has not reduced or eliminated the need for lens shades. Shades serve a different purpose than multicoating. Multicoating, and coating the interior camera body, reduces reflections from the light that actually goes through the lens to form the image in the camera. Lens shades must be used to eliminate all the light that falls on the lens from outside areas and is not needed for the image. Lens shades are especially important when you are photographing toward light sources and against white backgrounds or bright outside areas such as overcast skies, water, and snow. A lens shade is also a good protection for the lens when it rains or snows. I suggest keeping a lens shade on the lens at all times.
Regular square or round shades are compact and provide good shading in most cases. They are made in different lengths to provide maximum shading for different focal length lenses. Shades for zoom lenses must be a compromise because they can be only as long as possible for the shortest focal length. On the Proshade, the bellows can be extended to match the focal length of the lens. Therefore, it can be used with most of the lenses used for general photography and provides the best shading for all lenses. The Proshade made for the V system is highly recommended when you are photographing against white backgrounds. The Proshade can also be used for holding gelatin filters in the 100mm (4-inch square) size in front of various lenses.
Older Professional Lens Shade
Earlier versions of the Professional lens shade served basically the same purpose but did not have the convenience of a foldable front. The railing was at the bottom and was not foldable. Shades also came in two different sizes to accommodate lenses of different sizes.

Figure 14-6 Distortion diagram Distortion is shown in terms of the percentage of the relevant image height. The two diagrams show the better distortion correction of the Biogon 38mm (right) compared with the Distagon 40mm (left).
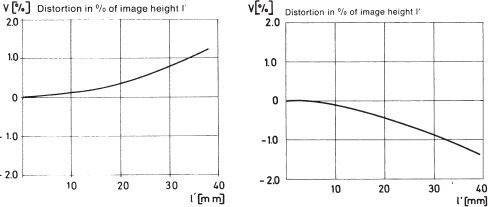
Figure 14-7 Barrel or pincushion distortion If the distortion curve has a positive value and goes upward (left), the lens has pincushion distortion. A curve with a negative value goes down (right), indicating barrel distortion.
Lens Distortion
Distortion refers to the lens's inability to record straight subject lines as straight lines over the entire image area. Straight lines near the edges appear curved, either inward (referred to as pincushion distortion) or outward (called barrel distortion). In some photography such as portraiture, the degree of distortion correction is less critical than in architectural, product, and scientific photography. The distortion corrections for the lenses made for Hasselblad are also published (see Figures 14-6 and 14-7).
The ability or inability to record straight lines properly over the entire image area is the only distortion caused by the lens design. Don't blame the lens for any other distortions that might appear in your images, especially with wide-angle lenses.
Other Image Distortions
When a subject or part of a subject close to the camera, such as the nose in a portrait, appears excessively large in relation to the rest of the subject or scene, we do not have lens distortion but instead have foreshortening caused by the lens being too close to the subject. To avoid excessively large noses with any lens and any camera, the camera must be at least three feet (one meter) away from the person.
Slanted vertical lines are frequently referred to as distortion but again are not created by the lens but by a tilted camera.
Another type of distortion occurs when three-dimensional subjects are photographed with wide-angle lenses. The objects near the edge of the picture appear wider than those in the center. A perfectly round chandelier, for example, appears egg-shaped in the corner of the picture. A person's face is elongated. This effect is called wide-angle distortion because it becomes obvious and objectionable only in pictures taken with wide-angle lenses. In fact, it is not caused by the lens. It happens in pictures taken with the best wide-angle lenses such as the Biogon.
The flat image plane is the major cause (see Figure 14-8). A second reason can be found in the fact that the lens sees objects on the sides from a different angle than those in the center. In a group of people the lens sees those in the center from the front, but looks at the side of the head of those at the sides. In group or product pictures, the distortion can be reduced by turning the people or products so that they all face toward the center of the lens (see Figure 14-8). In cases with immovable objects, try to make the composition so that objects that easily look distorted do not appear on the edges or corners of the frame.
LENS DESIGN
The names on Carl Zeiss lenses in the V system indicate a specific lens design. They do not mean that one design is better than another, but simply that a specific design was selected as the most suitable for that particular focal length (see Figure 14-9).
Planar lenses are of a symmetrical design, with five to seven elements grouped into similar front and rear sections. The name is based on their ability to produce an exceptionally flat field. Makro-Planars, originally called SPlanars, are corrected to produce the sharpest images at close distances, but they also produce good quality at longer distances.
Sonnar lenses, consisting of four or five elements, are of a compact design, with the main components in the front section.
The Tessar is a classic four-element lens design that produces lightweight lenses of a compact design.
Tele-Tessar lenses are optically true telephoto types, with a positive front section and a negative rear section separated by a large air space.
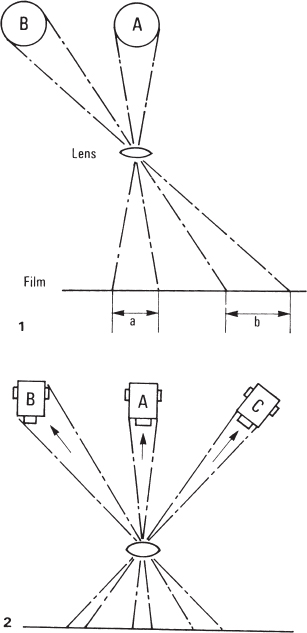
Figure 14-8 Wide-angle distortion 1. A round subject at the edges (B) becomes elongated when traced onto the image plane. Distance (b) is greater than distance (a) for the round subject in the center. 2. When you photograph groups of people or products, wide-angle distortion is further emphasized because the lens sees the subjects at the edges from the side (B), but it sees those in the center from the front (A). You can greatly reduce the distortion by turning the people or the products on the sides so that the lens also sees them from the front (C).

Figure 14-9 Lens designs 1. Planar lenses are (left to right) 80mm, 100mm, and 135mm. Makro Planar 2. Sonnars are (left to right) 150mm f/2.8, 150mm f/4, and 250mm f/5.6. 3. Tele-Tessars are (left) 500mm Tele-Apotessar and (right) 350mm f/5.6 Tele-Tessar. 4. The Biogon 38mm is an optically true wide-angle lens. 5. The Distagon is a retrofocus-type wide-angle lens: 60mm (left), 30mm fish-eye (right). An apochromatic design is shown at the bottom left; it is the 350mm Tele-Superachromat. The 60 to 120mm zoom design is shown at the bottom right.
Superachromatic types are apochromatic lenses of the highest quality, corrected for all colors in the spectrum.
Distagons are retrofocus-type wide-angle lenses with a long back focus for use on SLR cameras.
The Biogon (on the Superwide cameras) is an optically true wide-angle design.
Variogon is the trade name for the zoom lens made by Schneider. The 60mm to 120mm zoom lens is designed by Hasselblad and manufactured to Hasselblad's specifications and tolerances.
Lenses for the H Camera System
All lenses for the H camera system are made by Fuji in Japan in cooperation with Hasselblad in Sweden and do not have specific names for the different optical designs, unlike the typical practice with the Carl Zeiss and other German-made lenses. The lens designs and lens specifications are shown in Figure 14-10.
All lenses are manufactured to the highest standards specified by Hasselblad, with all the glass and air surfaces multicoated. All H system lenses are designed to produce the most satisfactory image quality not only on film but also in digital photography.
Wide-Angle Lens Designs
Biogon and Distagon are wide-angle lens designs of two completely different optical configurations. The Biogon is an optically true wide-angle lens, the classic design that is still used for wide-angle lenses on large-format cameras for the most critical architectural, commercial, and scientific work. Because the nodal point from which the focal length is measured is within the physical dimension of the lens, these wide-angle lenses must be close to the image plane, something that is possible on the Superwide cameras. For the very best in corner-to-corner sharpness, for architectural, product, scientific, or any other type of wide-angle photography that requires “view camera quality,”the Superwide and the Biogon 38mm lenses should still be considered.
The Biogon focuses down to 12 inches (0.3 meters) and maintains the superb sharpness from infinity down to 12 inches, making the Superwide also a superb tool for copying and other critical close-up photography.
Distagons are retrofocus wide-angle designs, sometimes also called inverted telephotos. The nodal point is behind the physical dimension of the lens, bringing the rear element of the lens far away from the image plane. This is necessary on SLR cameras, where the mirror must have room to move up and down. Wide-angle lenses on SLR cameras must have the retrofocus design. It is more difficult to design a retrofocus lens for maximum sharpness over a wide range of distances. They are designed to provide best image quality at long distances, where they are normally used. Edge sharpness suffers somewhat at closer distances but can be corrected by closing down the aperture.
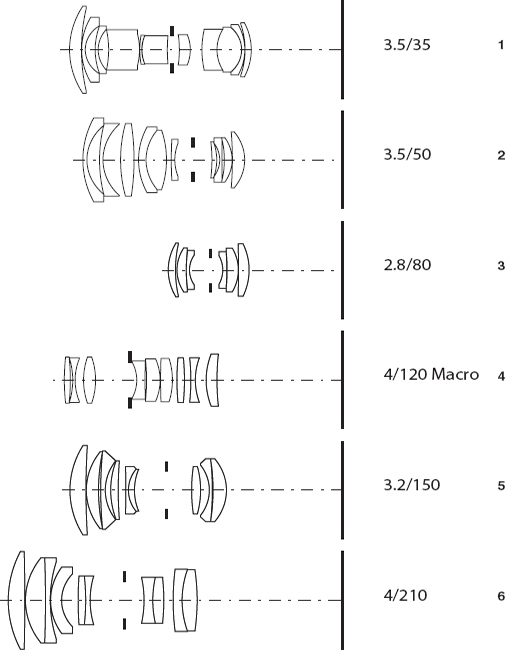
Figure 14-10 Lens designs of H system lenses 1. The HC 3.5/35mm retrofocus wide-angle with 11 lens elements and rear focusing. 2. The HC 3.5/50mm retrofocus wide-angle with 10 lens elements and rear focusing. 3. The symmetrical design of the 6-element HC 2.8/80mm standard lens with full focusing. 4. The 9-element HC 4/120mm Makro lens with focusing from infinity to life-size magnification. 5. The HC 3.2/150mm telephoto with 9 elements and internal focusing. 6. The HC 4/210mm telephoto with 10 lens elements and rear focusing. The zoom lens and the teleconverter are illustrated later in this chapter.
Floating Lens Elements
The floating element (FLE) lens design improves image quality with retrofocus-type lenses at closer distances. In an FLE lens, some of the lens elements can be or are moved separately from the rest (see Figure 14-11). In the 40mm and 50mm shutter lenses, you manually move the floating elements using an adjustment ring at the front of the lens (see Figure 14-12). Do not forget to set it before you take a picture, and always set the front calibration ring first to one of the click stops based on the subject distance; then focus the image in the normal fashion by turning the regular focusing ring. Do not focus the image first and set the calibration ring afterward. The image will be out of focus.
If the calibration ring is set to the wrong click, the images most likely will still be usable but may not exhibit the very best image quality. If you want sharpness from foreground to background, set the calibration ring to the longest or second-longest distance setting. If all the wide-angle photography is done at longer distances, in wedding photography perhaps, you may want to tape the calibration ring at either one of these two settings so that it cannot move accidentally.
On the Distagon FE 50mm f/2.8 non-shutter lenses, the floating portion of the lens elements moves automatically to the proper position when you turn the regular focusing ring.
True Telephoto Lenses
An optically true telephoto lens is an optical design in which the principal plane, from which the focal length is measured, is not within the physical dimension of the lens but is somewhere in front of it. This lens design allows the lenses to be made physically more compact—shorter than the focal length of the lens.
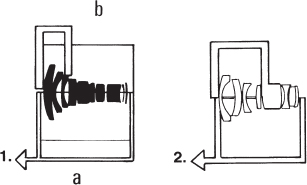
Figure 14-11 Floating lens element design 1. The focusing ring on a lens moves all the lens elements (a). In a floating lens element design, some elements—two elements on the Distagon 40mm—are or can be moved separately (b). 2. On the 50mm Distagon f/2.8, the four floating elements are moved automatically when the focusing ring is turned.

Figure 14-12 Operating the floating lens elements On the 40mm and 50mm CFi (CF) lenses, the floating elements are moved with the front ring to three or four click stops, which are engraved in meters only. The four settings on the 50mm lens are infinity to 12 feet (4 meters); 12 feet (4 meters) to 4 feet (1.2 meters); 4 feet (1.2 meters) to 32 inches (0.8 meter); and 32 inches (0.8 meter) to 19 inches (0.5 meter).
Telephoto Lenses for Close-Up Work
As the focal length of a lens increases, so usually does the minimum focusing distance, and this may give some photographers the impression that these lenses are meant for long-distance photography only. This is not so. The focusing distances are limited for mechanical design reasons. All telelenses can be used at closer distances in combination with close-up accessories. Extension tubes are perfect for this purpose.
Internal Focusing
Focusing a lens to closer distances usually means moving the entire lens farther from the image plane by making the lens physically longer. This is still the case with many lenses of shorter focal length. On other lenses, especially telephotos, focusing is accomplished optically by moving some of the lens elements within the lens design. This method, usually known as internal focusing, can result in smoother, easier focusing than the mechanical type, especially in long telephotos. On some Hasselblad H system lenses, internal focusing is indicated as rear or front focusing, depending on whether the front or rear elements are used for this purpose.
CHARACTERISTICS AND USE OF ZOOM LENSES
The focal length on zoom lenses can be changed with the zoom control, which moves some of the lens elements (see Figure 14-13). The ratio between the shortest and the longest focal length is known as the zoom range and is 2 : 1 (or 2×) for the Hasselblad FE f/4.8 zoom lens (60mm to 120mm), and 2.2× for the 50mm to 110mm HC zoom for the H camera.
Zoom lenses can reduce the number of lenses that you must carry and can reduce or eliminate the need for changing lenses and focusing each lens after the change. You are always ready to shoot.
With manual focusing, it is recommended that you focus a zoom lens while it is set to the longest focal length, where the image on the focusing screen has the highest magnification and the minimum depth of field, regardless of the focal length setting used for the picture. This suggestion need not be considered with automatic focusing. The aperture remains the same over the entire zoom range; however, many zoom lenses have a somewhat smaller maximum aperture at the telephoto setting than at the shorter focal length. This is the case with the HC 50mm to 110mm zoom for the H camera, explaining why the aperture figure is f/3.5–4.5. The slightly smaller aperture is f/4.5 at 110mm.
Zoom Lenses for Close-Up Photography
When the distance from the lens seat to the image plane is changed with an extension tube, the subject does not stay in focus when the focal length of a zoom lens is changed. You can use the Hasselblad extension tube 16, however, with the Variogon and the Hasselblad zoom lens set at one specific focal length if you are willing to refocus whenever you change the focal length. Set the lens for the desired area coverage, and then focus.
The 140mm to 280mm Variogon (now discontinued) focuses down to a little more than 8 feet (2.5 meters) at any focal length. You can use the lens for photography at closer distances by pushing the button next to the zoom ring to Macro. The zoom ring can now be turned beyond the 140mm setting. This does not change the focal length, which stays at 140mm, but enables focusing from 8 feet (2.5 meters) down to 2.5 feet (76cm), covering an area about 13 inches (33cm) square.

Figure 14-13 Zoom lens design The 14-element HC 3.5/4.5 50mm–110mm zoom lens with front focusing in the 50mm position (1), set at 80mm (2), and set at 110mm (3). This zoom lens can be used with extension tubes. See Chapter 18, Close-up Photography, for more detail.
Using the Zoom Lens for Creative Purposes
Zoom lenses, used in combination with longer shutter speeds, offer unique possibilities for creating fascinating images by zooming while the shutter is open. Zooming changes the size of the subject and converts highlights into streaks radiating either from the center to the outside (when you zoom to longer focal lengths) or vice versa (when you zoom from the long to the shorter focal lengths). Shutter speed must be long enough to allow time for zooming. One second is usually a good choice.
If you zoom for the entire exposure time, the image consists of streaks only. Most zoom images are more effective when the subject can be recognized and is surrounded by streaks. For such results, keep the focal length at a fixed setting for about half the exposure time (½ second when the total time is 1 second), and zoom only during the second half. To produce bright streaks, effective zoom shots require subjects that have bright areas. The streaks produced by the highlights are also more visible if they cross darker image areas. You can make the streaks longer by zooming over the entire focal length range or shorter by using only part of the zoom range.
USING FISH-EYE LENSES
Fish-eye lenses produce a curvature in all straight lines that do not pass through the center of the image. The effect is one of greatly exaggerated barrel distortion, resulting in strangely beautiful images. Some fish-eye lenses produce a circular image that covers only the central area of the image. The effect can be striking, but it is largely the circular image that attracts attention. The effect wears off quickly as all pictures start to look alike. Such lenses therefore have limited application in serious photography.
Other fish-eye lenses, including the 30mm Distagon in the V system, cover the entire format without any visible light falloff in the corners and with excellent sharpness from corner to corner even with the lens wide open.
The 30mm Distagon Lens
The 180-degree diagonal angle of view of the 30mm Distagon does not allow placement of accessories, filters, or shades in front of the lens because they would cut into the field of view. The Distagon design and the multicoating have reduced flare to a degree that makes it possible to photograph directly into a light source, including the bright sun, without any noticeable loss of contrast.
The filter problem has been solved with a removable front section that allows you to attach small, 26mm filters inside the lens. The lens comes from the factory with a clear glass in place. This clear glass, or filter, must always be there because it is part of the lens design. Image quality suffers without the glass. Four of the most common filters are supplied with the lens.
Fish-Eye Images without the Fish-Eye Look
Fish-eye images are best recognized by the curved lines they produce. With the full-frame Distagon design, however, images need not have the typical fisheye look. Straight horizontal, vertical, and diagonal lines that intersect the center of the field are recorded as straight lines.
You can avoid, or at least reduce, the fish-eye look in scenic pictures by composing the image so that the horizon crosses the center of the field. A tree trunk photographed with a tilted camera can be perfectly straight if composed to go from one corner to the other, crossing the center of the image. Circular subjects, such as the face of a clock, if perfectly centered in the square remain perfectly circular. Compared with a wide-angle picture, the fish-eye shot covers a 180-degree angle diagonally, including a much larger background area.
CHARACTERISTICS AND USE OF TELECONVERTERS
Teleconverters, also called tele extenders, are optical components that are mounted between camera and lens to increase the focal length of the lens used in front of them. A 2× converter doubles the focal length of the lens. Combined with a 250mm lens, we end up with a 500mm focal length. A 1.4× converter increases the focal length 1.4 times, so the focal length of a 100mm lens is increased to 140mm. The H1.7 X converter, for the H system, changes the 150mm focal length to 255mm. The XE designation in the V system converters means that the converter has the electronic Databus connection for the metering system in 200 cameras. The XE converters can also be used on the other V system camera models.
The teleconverters are attached to the cameras like other lenses are. When you remove a teleconverter from a V system camera, remove the lens first from the converter and then remove the converter from the camera. Never remove a lens from a converter that is not attached to the camera.
Compact size and low weight are the advantages of teleconverters. You can have a 360mm focal length with a 180mm Sonnar that is only 5 inches (128mm) long and a 70mm long 2× converter. As a further advantage, a converter can usually be used with different lenses, thus giving you a choice of twice as many focal lengths. With three lenses and one converter, you can have six different focal lengths.
Teleconverters with Different Lenses
Some teleconverters can be used with all lenses in a camera system, and others are made for specific lenses only. The 1.7× teleconverter in the H system can be used with all H system lenses except the 35mm wide-angle and the 50–110mm zoom lens.
The Hasselblad 2 XE teleconverter can be used with all fixed focal length system lenses except the Makro-Planar 135mm. It should not be combined with zoom lenses.
The Apo 1.4 XE converter was designed and optically optimized for the Tele-Superachromat CFE 350mm but can also be used together with the Sonnar CFi 250mm, the 350mm Tele-Tessars, and the 500mm Tele-Apotessar. For physical reasons, the Hasselblad teleconverter 1.4 XE can be used only with lenses from 100 to 500mm focal length (except the 135mm Makro-Planar). The 1.4× converter can be used in combination with the Variogon 140–280mm at all focal lengths, and the Hasselblad 60–120mm zoom lens at longer focal lengths, with satisfactory results.
Focusing Range and Area Coverage
The focusing range of the prime lens is maintained when combined with a teleconverter. If the lens focuses down to 5 feet (1.55 meters) it still focuses down to 5 feet when combined with a 2× or 1.4× converter. Combining with a 180mm lens, we have a 250mm (with 1.4×) or a 360mm (with 2×) lens that focuses as close as 5 feet—probably much closer than a telephoto lens of the same focal length. A converter might even serve as a close-up accessory instead of an extension tube. The 120mm Makro-Planar, which focuses down to somewhat less than 3 feet (0.8 meter) and covers an 8-inch-wide area, covers an area as small as 4 inches (100mm) when combined with the 2 XE converter.
Image Quality with Teleconverters
Because teleconverters emphasize quality faults in the basic lens, they can produce good-quality images only if combined with a high-quality lens. Fortunately, this is no problem in the Hasselblad systems. The image quality of a converter also varies depending on the lens and lens design with which it is combined, but all teleconverters made for Hasselblad and used with the recommended lenses produce a sharpness that comes close, or even matches, that of an equivalent longer focal length lens (see Figures 14-14 and 14-15).
Exposure with Teleconverters
With any 2× converter, the light that reaches the film is reduced by two f stops. A 2× converter combined with the Planar 80mm f/2.8 results in a 160mm focal length with a maximum aperture of f/5.6. A 1.4× converter causes a loss of 1 f stop, a 1.7× converter, 1½ f stops. You must compensate for this loss of light when taking a meter reading with a separate exposure meter.

Figure 14-14 Teleconverter design To achieve good image quality, a teleconverter may need as many or more lens elements than basic lenses. Shown is the seven-element design of the Hasselblad 2 XE teleconverter.

Figure 14-15 H system converter design The 1.7× teleconverter in the H camera system is a six-element lens design.
If the light is measured through the lens with a meter built into the camera or meter prism viewfinder, you need not worry. Whatever the builtin meter shows is correct. The aperture on a meter prism finder is set for the maximum aperture of the lens as usual.
The Mutar Teleconverters
Mutar is the name for teleconverters made by Zeiss. When the name is combined with “Apo,” it indicates a Zeiss teleconverter with apochromatic correction. The PC Mutar is a 1.4× teleconverter with shift capability.
CREATIVE USE OF LENSES
Wide-angle lenses, with their larger angle of view, cover larger areas and record subjects smaller than the standard lenses. Telephoto lenses have a smaller angle of view, and they cover smaller areas and make subjects appear larger. Using various focal length lenses to cover areas of various sizes is a good application and good reason for selecting wide-angle, standard, or tele-lenses. Lenses, however, can also be major tools for creating effective, beautiful, unusual, and interesting images.
Changing Perspective
Lenses can be used to change the size relationship between foreground and background, known as perspective (see Figure 14-16). Visualize a scene with a birch tree in the foreground and a mountain range in the back. You have a choice of photographing the scene with a wide-angle lens, perhaps a 50mm, from a close distance of 10 feet (3 meters) or with a telephoto lens, perhaps of 250mm focal length, from a longer distance of 50 feet (15 meters). Although the size of the birch tree is identical in both images, that of the background is not. In the wide-angle scene, the mountains appear small, even smaller than we see them with our eyes. In the telephoto shot, the distant mountains are five times larger—more majestic and much larger than seen with our eyes. The same picture taken with an 80mm lens would show the scene as seen with our eyes. That's why it is called a normal or standard lens.
Although there are times when, for good reason, you want to see the image in the “standard” fashion, you frequently will create more fascinating images when changing the perspective with wide-angle lenses or long tele-photos. The description of the birch tree and mountain scene might perhaps give the impression that the focal length of the lens determines perspective. Not so. Perspective is determined by the subject distance. The different focal length lenses are necessary only to let you cover the foreground subject in the same size from different distances. You need a wide-angle lens to cover a large-foreground subject from a close distance, and you need the telephoto to cover the same foreground subject in the same size from farther away.

Figure 14-16 Image perspective With a telephoto lens (A), the pieces of fruit appear close to each other, with the banana as large as the apple. With the standard lens (B), the relative positions are as seen by our eyes. With the wide-angle lens (C), the banana is much smaller than the apple and appears to be much farther away.
Selective Backgrounds
Different focal length lenses can also be used to change the background area without changing the size of the foreground subject (see Figure 14-17). Long lenses permit us to cut down background areas, eliminate distracting background elements such as billboards, cars, people, or direct light sources. In the studio, a longer lens allows smaller backdrops to be used. In outdoor people pictures, longer lenses may be preferable because they produce a blurred, undisturbing background for the portrait.
In other pictures, such as candid shots of people, a large background may be desirable to identify a location.
If the backgrounds are beyond the depth of field and therefore are not sharp, the focal length of the lens determines the degree of blur. As longer lenses magnify backgrounds, they also magnify the blur. Such backgrounds are therefore more diffused, less disturbing. With a short focal length lens, the backgrounds may be just slightly out of focus at the same diaphragm opening.

Figure 14-17 Background area coverage A short focal length lens (1) covers a large background area, whereas a longer focal length lens used from a longer distance (2) covers a smaller background area. The size of the main subject is the same with both lenses.
Effective Wide-Angle Photography
Consider wide-angle lenses not only for covering larger areas but also for enhancing the three-dimensional aspect of a scene, especially outdoors. They work beautifully for this purpose. All you need to do is to include effective foreground elements in the composition. The foreground subjects can be anything: a rock or rock formation, a flower bed, a field, an area of water, a tree stump, a fence, you name it. Such compositions can be especially effective when the foreground area covers a good part of the image and thereby adds depth and a three-dimensional feeling to the image. This approach is especially effective with wide-angle lenses because they emphasize the size relationship between foreground and background, making the background subjects appear to be farther away than they actually are. The wide range of depth of field also allows you to maintain sharpness from foreground to background, if desired.
Foreground Sharpness
Although blurred backgrounds work in many pictures, you must be more selective with blurred foregrounds. Such blurred foregrounds can work beautifully on color film, where blurred patches of flowers can add a touch of color or can be used to frame the main subject. Blurred foregrounds are generally best when blurred completely so that the subjects are hardly recognizable. When the foreground is blurred just a little, the effect might look like a mistake. If the standard lens does not provide enough blur, go to a longer lens. Blurred foregrounds are seldom successful in black and white.
Correcting Verticals
The vertical lines of a building or other object appear in the finished picture vertical and parallel to each other only if the camera was level, with the image plane parallel to the building. When the camera is tilted upward or downward, the verticals slant toward each other, and the building seems to be falling over (see Figure 14-18).
Sometimes you can avoid this effect by photographing the building with a longer lens from a longer distance. The longer distance may eliminate or at least reduce the need for tilting the camera (see Figure 14-19). Other solutions exist, or at least existed, with the PC Mutar, the FlexBody, and the ArcBody. These items are no longer made.

Figure 14-18 Slanted verticals Tilting the camera to cover a building from bottom to top results in slanted verticals (1). To record straight verticals (2), the image plane must be parallel to the building.
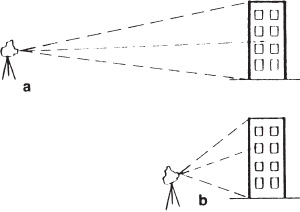
Figure 14-19 Photographing buildings from different distances Photographing a building from a longer distance with a longer lens (a) may reduce the need for tilting the camera, which is necessary from a shorter distance with a shorter lens (b). The result is less slanting of the verticals.
THE PC MUTAR TELECONVERTER
The five-element PC Mutar is a 1.4× teleconverter that can be used with lenses from 40 to 80mm focal length. The PC Mutar also increases the covering power of Hasselblad lenses from an 80mm circle to one of 106mm diameter. This allows you to shift the lenses on V system cameras 16mm up or down, giving you perspective control without loss of image quality or darkening of the corners. The PC Mutar eliminates the need for tilting the camera in architectural and product photography. Image quality is excellent.
Camera Operation with the PC Mutar
There is no mechanical connection between the camera and the lens, so the camera and lens shutter must be operated with the supplied cable release. The two cable release ends can be adjusted so that camera and lens operate in the proper sequence as follows:
1. The shutter in the lens closes.
2. The mirror lifts up, and the auxiliary shutter opens while the shutter in the lens remains closed.
3. The shutter in the lens opens and closes to makes the exposure. After it is adjusted and locked, the sequence remains intact at least for that particular lens and camera. Do not use the prerelease because the lens shutter does not close down.
Although the operation with the double cable release works, you can simplify the operation by attaching the PC Mutar to a 200 model camera. Using the focal plane shutter for the exposure, you need not worry about synchronizing the camera and the lens. You can operate the camera in two ways:
1. Attach only one cable release to the camera release thread of the PC Mutar to release the camera. (The release button is covered by the PC Mutar.)
2. Make the exposure with the self-timer built into the camera set for a short two-second delay. You do not need a cable release, and this approach can be used with shutter and non-shutter lenses and does not require recocking the shutter in the lens after the exposure. You must remember, however, to close the lens aperture manually for metering and for the exposure (see Figure 14-20).
Exposure with the PC Mutar
Because the PC Muter is a 1.4× converter, exposure needs a one-stop increase. You will also notice a darkening on the focusing screen when the PC Mutar/lens combination is shifted away from the 0 position. This darkening is only on the screen and not in the image (as also described for the Flex-Body and ArcBody). But you must take a meter reading with a meter in the camera or prism viewfinder at the neutral 0 position (before shifting).

Figure 14-20 PC Mutar on focal plane shutter cameras The supplied cable release (a) need not be used with any lens used on 200 V system cameras. Use the focal plane shutter for the exposure, and release the camera with the self-timer. The aperture (b) on all lenses must be manually closed down (c).
Photographing with the PC Mutar
When the camera is level, the vertical lines of a building or any other subject are recorded parallel to each other when the image plane is parallel to the subject. Start the photography by leveling the camera, perhaps using the spirit level built into the newer tripod couplings as an aid. Loosen the PC Mutar shift control lock and shift the PC Mutar up or down until you see the desired image area on the focusing screen. The PC Mutar provides an excellent solution for perspective control, especially when used on 200 V system cameras with 40mm and 50mm lenses.
USING HASSELBLAD LENSES ON OTHER CAMERAS AND ON ENLARGERS
Although Hasselblad lenses can be used on other cameras that produce an equal or smaller image format, it is not a practical approach to be recommended even if a lens adapter is available.
A Hasselblad accessory called a lens flange used to be available for using Hasselblad V system lenses on an enlarger. It is no longer made because a camera lens is not convenient for this purpose and because photographers seem to be reluctant to take the camera lenses into the darkroom.
PROTECTING YOUR LENSES
Lenses are expensive components of all Hasselblad camera systems. It therefore makes good sense to keep them clean and in perfect operating condition. Protect them as much as possible, on and off the camera, by keeping them in cases. Protect them further and reduce the need for cleaning by attaching front and rear covers whenever they are not being used.
This applies especially to the rear of the lens, which is often more difficult to clean. The rear of Hasselblad V system lenses also needs protection to maintain the proper functioning of the connecting mechanism.
If cleaning the lens surfaces seems to be desirable, always start by blowing off any possible dust and dirt to prevent scratches on the lens surface. Do any further cleaning only if deemed necessary. To do so, wipe the surfaces gently with a clean chamois, eyeglass, or lens-cleaning tissue, breathing on the surface if necessary. Lens cleaning fluid can be used, but never put the fluid on the lens. Instead, put it on the cleaning cloth or tissue. Do not overclean lenses. A little dust does not affect image quality, but finger-prints do. Never touch lens surfaces with your fingers. Never touch the electronic contacts on Fe, CFE, and the HC lenses with your fingers.