
19
The Hasselblad XPan Cameras
CAMERA MODELS
The original XPan camera, introduced in 1998, was superseded in 2003 by the XPan II camera model, with the following major changes and improvements: LCD viewfinder display that includes the shutter speed and exposure information, multi-exposure capability, self-timer delay of 2 seconds or 10 seconds, normal or rear flash sync possibility, improved infrared performance without film fogging, and electrical remote release capability. The new model, shown in Figure 19-1, can also be programmed to spool the film completely into the cassette after the last exposure, as on the original camera, or to leave a film tip outside the cassette.
The XPan II has a Mode button and up/down controls next to the camera LCD. The original model had only the AEB button (see Figure 19-8).
The operating instructions and suggestions here apply to both models, unless otherwise mentioned.
IMAGE FORMAT
The Hasselblad XPan is a completely different Hasselblad camera, with no component interchangeability with the other models. It is made for 35mm film and takes the standard 35mm cassettes with 12, 24, or 36 exposures. The images on the film, however, can be produced either in the standard 24mm × 36mm format or in a panoramic format of 24mm × 65mm, in which case you obtain 6, 13, or 21 panoramic exposures on a cassette.
On one and the same roll of film, you can produce all images either in the standard 35mm or in the panoramic format, or you can mix the two in any desired fashion. You make the switch from one format to the other by moving a single control. When you switch, the viewfinder adjusts automatically so that you always see the proper area coverage, and the frame counter adjusts automatically so that all images are always properly spaced on the film.
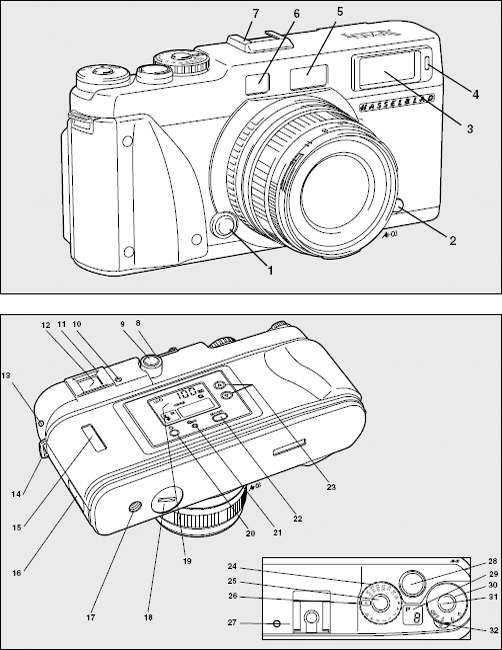
Figure 19-1 The XPan II camera and operating controls.
1. Lens release button
2. PC flash terminal
3. Viewfinder window
4. Self-timer lamp
5. Illumination window
6. Rangefinder window
7. Hot shoe
8. Format selector knob
9. Format selector release
10. Viewfinder eyepiece
11. Viewfinder eyepiece release button
12. Viewfinder LCD
13. Cable release socket
14. Strap lug
15. Film type window
16. Camera back release catch
17. Tripod socket
18. Battery compartment cover
19. Camera LCD display panel
20. LCD illumination button
21. Mid-roll rewind button
22. Program Mode button
23. Up/down controls
24. Shutter speed selector dial
25. Shutter speed selector lock
26. Shutter speed index
27. Film plane mark
28. Shutter release
29. Exposure counter LCD
30. Shooting mode selector
31. Shooting mode selector lock
32. Shooting mode selector lever
FILM PROCESSING AND PRINTING
If all the images on a roll of film are in the standard 35mm format, the film can be processed and printed anywhere, like any 35mm film. If all or some of the images are in the panoramic format, the film can also be developed in the normal fashion but only in a lab that can return the film to you without cutting it. Request that the film be returned in a strip and, in the case of transparencies, unmounted. In most automated laboratories, the machines not only process and print the film automatically but also cut it automatically and most likely will cut your panoramic images.
Prints from standard 35mm frames can be made in the normal fashion. Prints from panoramic images probably must be made in a custom laboratory because few one-hour labs are equipped to make them. You can find the name and address of XPan laboratories on the Hasselblad Web site, www.hasselblad.com, where you select OUR COMPANY/ADDRESSES/XPAN LABORATORIES. In the future, you will undoubtedly find more labs that can make prints from panoramic negatives.
You can make your own prints in the conventional darkroom process if your enlarger is made for negatives up to the 6 × 7cm format. The long side of the panoramic image is almost as long as the long side of the 6 × 7cm format. You must mask the negative carrier to the 24 × 65mm image area so that no light spills beyond the XPan image, reducing the contrast in the print. You can also scan your XPan negatives or transparencies and then make your own digital prints or send the scans to a digital laboratory. The scanner must be made for scanning the larger image area. A 35mm scanner is usable only for negatives or transparencies in the standard 24 × 36mm format.
The projection of panoramic transparencies is discussed in Chapter 22.
LENSES FOR XPAN CAMERAS
Three lenses are available: a 45mm f/4 standard, a 90mm f/4 telephoto, and a 30mm f/5.6 wide-angle (see Figure 19-2). On the standard 35mm format, these lenses perform in the same way as 30mm, 45mm, and 90mm lenses perform on any other 35mm camera. In the panoramic format, the 45mm lens covers along the long panoramic side an area that is equal to a 25mm focal length on the 35mm format; the 90mm is equal to a standard 50mm, and the 30mm covers a panoramic area equal to a 17mm lens on the 35mm format.
You attach the lens to the camera by aligning the index on the camera and lens and then turning the lens clockwise until you hear a click. The viewfinder automatically adjusts to the focal length of the lens on the camera, except with the 30mm wide-angle lens, which is supplied with a special viewfinder that is attached to the flash shoe on the camera. The composition is made through this special finder, and the lens is focused with the split-image rangefinder in the camera viewfinder. You remove the lens by pressing the lens release button and turning the lens counterclockwise. Always attach and remove lenses by holding the lens on the rear lens attachment ring, not on the aperture or focusing ring.
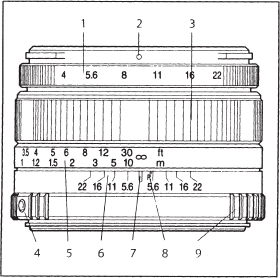
Figure 19-2 The lens controls.
1. Aperture scale
2. Aperture index
3. Focusing ring
4. Attachment index
5. Distance scale
6. Depth-of-field scale
7. Central index
8. Infrared index
9. Attachment ring
All three lenses close down to f/22 in ½ stop settings. The 30mm and 45mm lenses focus down to 27 inches (0.7 meter), and the 90mm down to 39 inches (1 meter). The 45mm and 90mm lenses take standard M 49 screw-type filters. Two filters (including one of the polarizing type) can be used on the lenses without vignetting.
Image Illumination
All XPan lenses are optically designed to cover the wide panoramic format. However, as discussed in the section Relative Illuminance in Chapter 14, when light rays enter a lens at steep angles—as is the case when 45mm and 30mm lenses are used for the panoramic format—the light reaching the image area is reduced, causing a slight darkening at the edges and corners of the image. This may be noticeable on transparencies taken with the 30mm lens at any aperture and with the 45mm lens at apertures f/8 or larger.
You can eliminate the darkening by attaching a center gray filter. Such a filter is supplied with the 30mm lens and should always be on the lens when you take panoramic pictures. Such a filter is available as an accessory for the 45mm lens, and it is recommended that you use it when taking panoramic pictures at apertures f/8 or larger, especially if the pictures include sky or other areas of even brightness where the darkening is most noticeable.
The filters can be left on both lenses for all pictures, panoramic or 35mm, and the only negative aspect is that they create a loss of light equivalent to one f stop. Exposure must be increased by one f stop with these filters, but only if the meter reading is made with a separate exposure meter. The XPan's built-in metering system automatically compensates for the loss of light.
The gray filters are optimized for use at larger lens apertures. It is therefore recommended that you photograph at apertures f/11 or larger when a gray filter is on the 30 or 45mm lens, whether you are photographing in the panoramic or the 35mm format. Avoid working at f/16 or f/22.
POWER SUPPLY
The XPan camera's built-in motor, which advances the film automatically after each exposure, and all the other operating controls are powered from two 3V lithium batteries type CR2 (see Figure 19-3). Two fresh batteries will provide power for about 3000 exposures. The camera does not operate without batteries, so you may want to carry spares.
You turn on the power to the camera by moving the mode selector to either S (for single pictures) or C (for sequences) or to the self-timer symbol (see Figure 19-4). To save power, the camera switches automatically to a standby mode after three minutes. You can reactivate the camera by setting the mode selector to C or S or to the self-timer symbol; by pressing the back illumination, the Mode button, or the shutter release halfway; or by operating the remote release.
Set the mode selector to OFF whenever the camera is stored or not used for longer periods of time.
FILM LOADING
Before loading a film, set the ISO dial to DX for DX-coded films or to the desired ISO value for noncoded films or if you want to use a different ISO value for a coded film. You must do this before loading the film because the camera will not transport a noncoded film if the dial is set to DX.
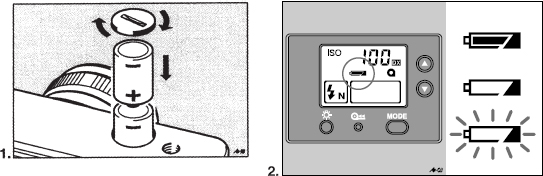
Figure 19-3 Batteries and battery checking 1. The CR2-3V batteries are inserted as shown after the cover is removed using a small coin. The battery condition is shown in (2) after the mode selector is set to S:The batteries are in good condition (top); the batteries are low (center); the batteries are exhausted (bottom).
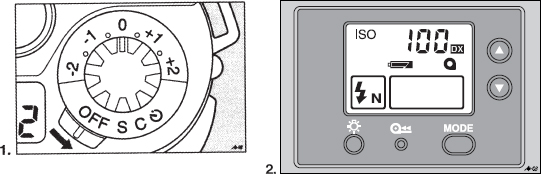
Figure 19-4 The mode selector 1. The mode selector with the three operating settings: S for single pictures, C for sequences, and self-timer. 2. The film sensitivity is shown on the display. This display also shows that the flash is set for N (normal), in which the flash fires as soon as the shutter is fully open.
On the XPan II, you can also program the camera so that the film rewinds completely into the cassette at the end of the roll or rewinds to leave the film tip out of the cassette. You do this by switching the camera from OFF to S while holding down the Mode button on the camera's LCD panel. When the cassette symbol shows up, select OUT, if you want the tip of the film out of the cassette, or IN, if the film should rewind completely into the cassette. Confirm the choice by pressing the release halfway.
You insert the film cassette after opening the back cover and with the mode selector in the OFF position (see Figure 19-5). Pull enough film out of the cassette so that the beginning of the film, with the film lying flat over the guide rails, reaches the film tip mark on the other side of the camera body. Close the camera back until you hear a click. The camera now winds the film automatically out of the cassette and onto the take-up spool.
The XPan film transport is different from that of most 35mm cameras, in which the film moves from the cassette to the take-up spool while the pictures are made and is rewound into the cassette after the last picture. In the XPan cameras, the entire roll of film winds to the take-up spool when the camera is closed. The film then moves from the take-up back into the cassette while the pictures are made. This method eliminates the need for rewinding the film at the end of a roll. Because all the exposed XPan pictures are in the lighttight cassette, it also prevents exposed images from being ruined in case the back cover is opened accidentally.
The film counter shows the number of unexposed frames remaining on the roll of film. The counter changes automatically when you switch from one format to the other (see Figure 19-6). For example, the counter shows 36 when a 36-exposure cassette is loaded with the camera set for the standard 35mm format, but it shows 20 when it is set to the panoramic format. When fully exposed, the remainder of the film is automatically rewound into the cassette.
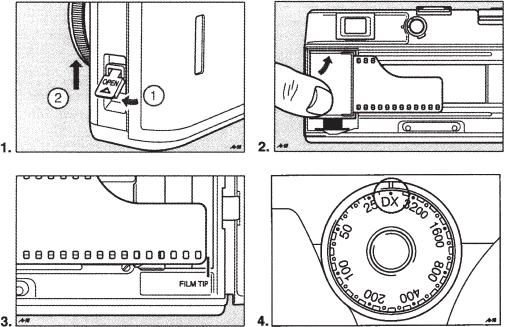
Figure 19-5 Loading the film 1. Open the camera back with the lock on the side of the camera. 2. The film cassette is properly placed. 3. The beginning of the film is placed against the film tip indicator with the film lying flat in the camera. Close the camera back. 4. The ISO dial is set to DX for coded films or to the film's sensitivity for other films.
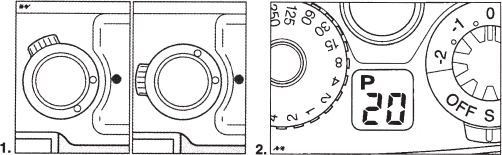
Figure 19-6 Changing the image format You change the image format by setting the selector knob to either of the two positions. The panoramic position is indicated by the letter P on the top of the dial and on the LCD display. A flashing P indicates that you have changed to the panoramic format when only one frame of the standard size remains on the film.
When evaluating the exposed rolls of film, you want to remember that the last picture you took is frame 1 on the film and so on.
A cassette of film can be removed after being exposed only partially. To do this, you must press the mid-roll rewind button located below the LCD panel. The control is recessed to prevent accidental use. It can be pressed with the tip of a ballpoint pen or similar object (see Figure 19-16).
OPERATING THE CAMERA
You put the camera into the operating mode by setting the operating dial either to S for single pictures, to C for sequences, or to the self-timer setting, where the exposure is made 10 seconds after the release is pressed on the original XPan model. On the XPan II you can program the delay time for either 2 or 10 seconds. The change is made with the up/down buttons on the camera LCD panel, where you can also see the self-timer setting. After the release is pressed with a 10-second delay, the self-timer light at the front of the camera lights up for 7 seconds and then flashes for 3 additional seconds (see Figure 19-7). Set to a 2-second delay, the self-timer light starts flashing immediately. Self-timer operation can be stopped even after it is in operation by changing the operating control dial to S, C, or OFF.
The exposure is made with the shutter release on the camera or with a cable release attached to the cable release socket. Pressing the cable release, however, does not turn on the metering system. You must press the release on the camera if you want to see the exposure information.
Multiple Exposures on the XPan II
On the XPan model II, you can produce multiple exposures, making as many as nine exposures on the same film frame. To program the camera for multiple exposures, press the Mode button on the camera LCD panel for one second and then press it again repeatedly until a flashing double frame symbol appears on the display. Use the up/down buttons to select a nonflashing double frame symbol. Confirm your selection by pressing the release halfway, which brings up the double frame symbol on the display.
You can now select up to nine exposures by pressing the Up button, with the numbers shown on the small exposure counter LCD. Keep in mind that most multiple exposures need adjustments in the exposure value; otherwise, the final image will be overexposed.
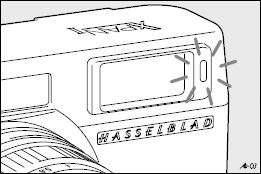
Figure 19-7 The self-timer A light at the front of the camera next to the camera's viewfinder window indicates when the self-timer is in operation.
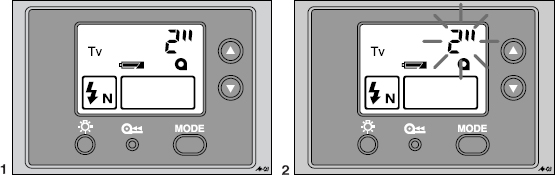
Figure 19-8 The camera LCD display on XPan II 1. When the release is pressed halfway, the ISO number disappears and is replaced by the set shutter speed. 2. A flickering shutter speed number indicates that the light is beyond the metering range.
Remote Releasing
All XPan cameras have a cable release socket for operating the camera with a standard cable release. The XPan II model can also be released with an accessory electrical release cord, which activates the camera (including the metering system) and fires the camera immediately. In Auto mode, you can see the selected shutter speed on the viewfinder display. In Manual mode, pressing the release halfway activates the meter and makes the settings.
Viewing and Focusing
Viewing and focusing are done through an optical viewfinder with a coupled rangefinder. The image in the finder is always sharp, so do not forget to focus the lens before taking the picture. You do this by looking into the bright center field and turning the focusing ring on the lens until the ghosted image coincides with the sharp image of the subject. Focusing is most successful and fastest when you view a subject area that has high contrast and sharp vertical lines. If the subject has dominant horizontal lines, you may want to turn the camera to the vertical position for focusing. The viewfinder is parallax corrected, so the outlined image area is correct at all distances.
The rangefinder in the camera is also used for focusing the 30mm lens. The viewing is done with the special 30mm viewfinder that comes with the lens and is attached to the flash shoe.
The eyepiece in the camera's viewfinder has a −1 diopter correction. This standard eyepiece can easily be exchanged for accessory eyepieces available in diopter powers from +2 to −4. You change the eyepiece by sliding it in and out of the viewfinder frame (see Figure 19-9). On the XPan II, the selected eyepiece is secured by a locking device.
This wide selection should allow any photographer to have a sharp view through the finder, with or without eyeglasses.
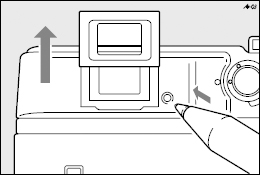
Figure 19-9 Changing the viewfinder eyepiece You change an eyepiece by sliding it in and out of the viewfinder frame. On the XPan II, the eyepiece is locked in position. To remove it, press the lock button while simultaneously sliding the eyepiece out of the frame.
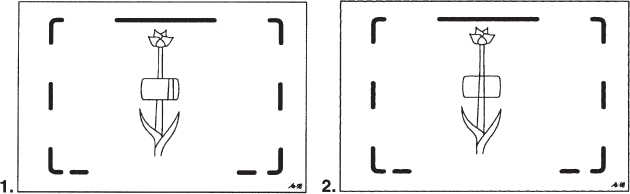
Figure 19-10 Focusing You focus the lens by watching the bright center area and turning the focusing ring until the ghost image (1) is lined up with the real image (2). Straight vertical lines are best for doing this.
COMPOSITION IN THE PANORAMIC FORMAT
A panoramic image must include important elements that enhance the image all the way from the left to the right or from the top to the bottom. There must never be an empty area that is considered unnecessary on either side or on the top or bottom of the image. Such areas make the viewer question why the image was made in the panoramic format. When evaluating the image in the viewfinder, look all the way from left to right or from top to bottom, and assure yourself that the image format is covered effectively.
Also be careful in aligning horizontals, such as the horizon, or verticals, such as the lines of buildings, so that they are perfectly parallel to the outside frame. The long side of the panoramic format makes slanted lines more obvious.
A spirit level accessory is available for the XPan camera and can help in the alignment of horizontals and verticals especially when you are working from a tripod (see Figure 19-11).
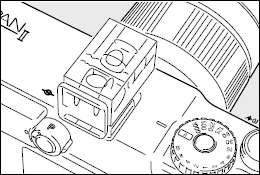
Figure 19-11 Spirit level The accessory spirit level must be pushed into the camera hot shoe as far as it goes. It is designed for leveling the camera in the horizontal or vertical position.
EXPOSURE CONTROL
The XPan camera has a built-in exposure metering system that measures the center area of the image (see Figure 12-12 in Chapter 12). Exposure information is shown in the viewfinder. The viewfinder display on the XPan II also shows the set shutter speed, which is helpful in making you aware of shutter speeds that might be too long for handheld photography.
Exposures can be made in either the Automatic or the Manual mode. The decision to select automatic or manual must be based on subject brightness and color, as discussed in Chapter 12. If the center field includes areas of more or less average brightness, as is the case with most outdoor subjects, Automatic is the logical approach. Avoid bright areas, such as white skies, within the metering area.
If the subjects within the measuring area are brighter or darker than the 18% reflectance, you have two options. You can still use the Automatic mode, but set the exposure compensation dial to a plus or minus setting. Set it to plus when subjects are brighter—for example, to +2 for snow. Set it to minus for darker subjects, such as −1 for dark green trees (see Figure 19-12). Do not forget to reset the dial to 0 after the exposure. You can also photograph such subjects in the Manual Exposure mode, making the necessary compensation.
For automatic exposure, set the shutter speed dial to A, set the aperture to the desired value, and make the exposure. For manual exposure, set the aperture or shutter speed to the desired value, and then set the other until the indications in the viewfinder show the correct setting.
The exposure information is shown in Figure 19-13 for the original XPan and in Figure 19-14 for the XPan 11.
Automatic Exposure Bracketing
The automatic metering system in the XPan camera produces beautiful results with most subjects and lighting conditions, even on transparency film. If you have any doubt about the exposure being correct and feel better if you bracket exposure, use the Automatic Bracketing mode, which changes the shutter speed automatically (see Figure 19-15). To make the three exposures immediately after each other, simply keep the shutter release pressed; you need not remove your eye from the viewfinder. You can bracket in ½ f stops or full f stops by pressing the AEB button on the original camera once for ½ stop or twice for 1 stop bracketing, which is my recommendation. You set the XPan II for automatic bracketing by repeatedly pressing the Mode button on the LCD display until AEB and +/− appear on the display. Select the bracketing value with the up/down controls, and then press the Mode button or press the release halfway again. A programmed exposure compensation is taken into account in the Automatic Bracketing mode.
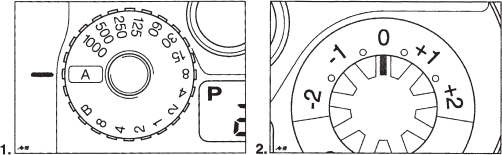
Figure 19-12 Shutter speed and compensation dial 1. The shutter speed dial is set to A for automatic exposures for the desired shutter speed in the manual. 2. You can increase or decrease exposures by using the exposure compensation dial.
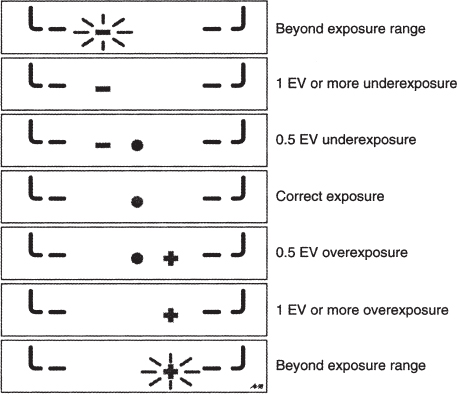
Figure 19-13 Exposure information on the original XPan camera.
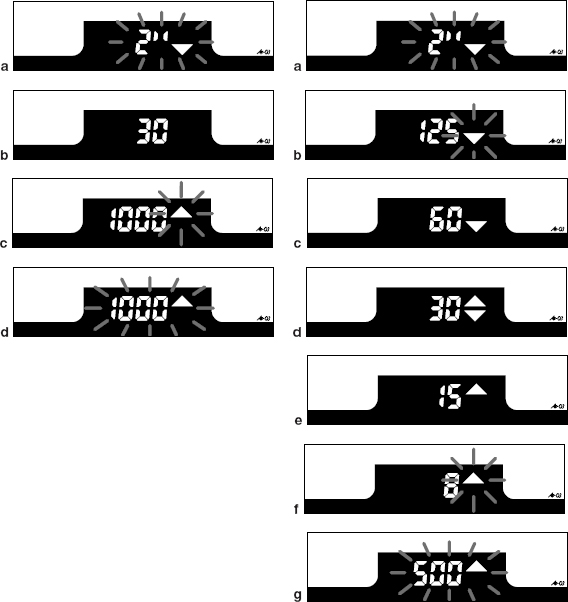
Figure 19-14 Exposure information on the XPan II camera model The indications when the camera is set to automatic exposure are shown on the left: a. Setting beyond metering range (too dark). b. Correct exposure. c. Calculated exposure time less than 1/1000 second. d. Setting beyond metering range (too bright). The indications in manual exposure are shown on the right: a. Setting beyond metering range (too dark). b. More than 1 EV value underexposure. c. 0.5 EV value underexposure. d. Correct exposure. e. 0.5 EV value over-exposure. f. More than 1 EV value overexposure. g. Setting beyond metering range (too bright).
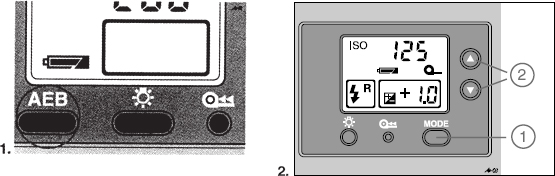
Figure 19-15 Automatic bracketing 1. On the original XPan camera, the Automatic Bracketing mode is actuated by pressing the AEB button once for ½ stop bracketing and twice for 1 stop bracketing. On the XPan II, bracketing is set with the mode and the up/down controls. 2. On both cameras, the bracketing value (1 stop in the illustration) is indicated on the LCD display. The display shows that the camera is also set for the flash to fire at the end of the exposure.
You turn off the automatic bracketing by again pressing the AEB button (in the original XPan) or the Mode button (on the XPan II), or it automatically goes off when the camera is turned off.
When working with automatic bracketing, you should finish the sequence of three images; otherwise, the exposure adjustments for the remaining image or images will still be programmed into the camera. The camera will not operate if it is set to the Automatic Bracketing mode with only one or two images left on the film.
FLASH PHOTOGRAPHY
Electronic flash can be used at shutter speeds from B to 1/125 second. The flash unit can be connected to the camera through either the hot shoe on top of the camera or the PC contact at the front of the camera.
When you are photographing in the standard 35mm format, any flash unit should cover the entire subject area with the 45mm and 90mm lenses. When you are photographing in the standard format with the 30mm lens, the flash unit must cover the 30mm area that is the area of a 17nm lens on a 35mm camera. When the 45mm lens is used in the panoramic format, the flash unit must cover the area of a 25mm focal length lens. Check the specifications of the flash unit. Some flash units have a wide-angle setting. If the flash does not cover the area, consider bare bulb or bounced flash use.
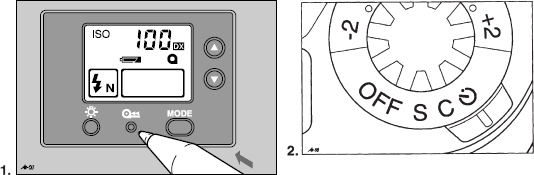
Figure 19-16 Other XPan controls 1. The display on the LCD panel can be illuminated by pressing the LCD backlight button, which is in the center on the original camera and on the left on the new model. A partially exposed film is rewound by pressing the rewind button, which is in the center on the new camera, on the right on the original model. 2. The self-timer is actuated at the self-timer setting.
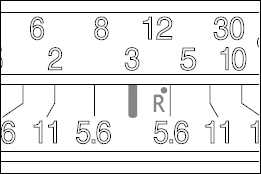
Figure 19-17 For infrared photography, focus the lens as usual, read the distance on the focusing scale (here, 3 meters), and then set the distance (3 meters) opposite the infrared index (R).
On the XPan II model, the flash can be programmed to fire at either the beginning or the end of the exposure. To do so, press the Mode button on the camera LCD panel repeatedly until the flash symbol and the letter N or R appears on the display. By pressing the up/down controls, set the mode to N, if the flash is to fire at the beginning, or to R, if it is to fire at the end. Press the Mode button again to confirm the selection.
Infrared Photography
Because the image created by infrared light is formed farther from the lens than it is with visible light, a focus adjustment on the lens is necessary, as discussed in Chapter 16.
For infrared photography, focus the lens as usual (see Figure 19-17). Then move the focusing ring until the distance that is opposite the regular index is opposite the red infrared dot (R).
The XPan II has a film transport system that does not fog high-speed black and white infrared film and therefore is an excellent camera for infrared photography.