SCENARIO 1
Creating Gold Haze
For that warm glow whenever you want it.
GEAR NEEDED:
- Camera + Trigger
- Long focal length lens (100mm or higher recommended)
- Off-camera flash
- 2 Full CTO (color temperature orange) gels
- Light stand
GOAL IMAGE
With this trick you’re looking to create that gorgeous just-before-sunset light. Think about using your off-camera flash to mimic the sun low in the sky. Shoot toward it to let the light directly hit your camera. All of the warmth of the “sun” beautifully spills over into your subject and you’re left with an image that’s soft and glowing. All images in this chapter are almost straight out of the camera, with only the areas of highlight (the white dress and shiny skin) taken down in Adobe Lightroom.
In my experience, the easiest way to achieve this look is to use a longer lens and a lower aperture. They both contribute to any flare or bokeh in the image being smoothed out and softened as much as possible. You can create a haze with a wider lens, but it is more difficult to find the right angle that will produce a haze versus just a glowing light in the background of your image.
As always, your mindset should be to think about how you’d create this look with natural light, and then simply copy the light positions and colors. With natural light, you’d probably take this photo during golden hour. The light would be nice and low in the sky and behind your subject fairly far away. It would also be behind trees and bushes so place your light behind some foliage if possible.
The color of the sun at this time of day is warm. I recommend doubling up on your CTO (color temperature orange) gels so you have two full CTO gels in front of your flash. It’ll suck up a little bit of light from your flash, but it will ensure that your light has the golden glow that you’re looking for.
All of the images in this chapter are pretty much straight out of the camera with zero retouching involved. I want you to see what the light actually does, not what Adobe Photoshop does. If you wanted, you could cool the light down a little in post, or take some of the yellow tones out of the skin.

FIGURE 1.1
GOAL IMAGE.
Step by Step
- Position your light: Try to get the light at least 20 feet away from your subject, behind them and behind trees or bushes that’ll break up the light and make it look more natural.
- Set the camera exposure: Get an exposure for the natural light on your subject as if you weren’t using off-camera flash. Try to keep your aperture as low as possible, about f/2.0. Take a test shot and check your histogram.
- Set the white balance: Because the flash is gelled and you want it to look warm, you’ll set your white balance for the light hitting your subject. If you’re not into dialing in your white balance Kelvin setting manually, try using the cloudy day preset. Take a test shot and check the coloring of your photo.
- Set the flash: I enjoy using TTL +2 in this scenario because it makes the backlight very prominent. If you’re using a manual flash, start in the mid-high power range, or use a light meter and adjust up or down to your liking. Take a test shot and adjust your light based on the results.
- Change your angle: This is where you get to play. Move your camera angle around to experiment with how the backlight is hitting your lens. The look of the haze will change a bit with each movement depending on the angle of the light to your lens.
- Make adjustments: Once you have a solid image, feel free to change your exposure, white balance, or flash settings. Be sure to only change one thing at a time so you don’t get so far away from what was working originally that you can’t get back.
OPTIONAL: Use a white reflector in front of your subject to bounce some of the light from the sun or the off-camera flash back into their face and eyes.
Shot by Shot

FIGURE 1.2
NATURAL LIGHT.
CANON EOS 5DS R, CANON 135MM 2.0, ISO 200, F/3.2, 1/200, WB 5700K
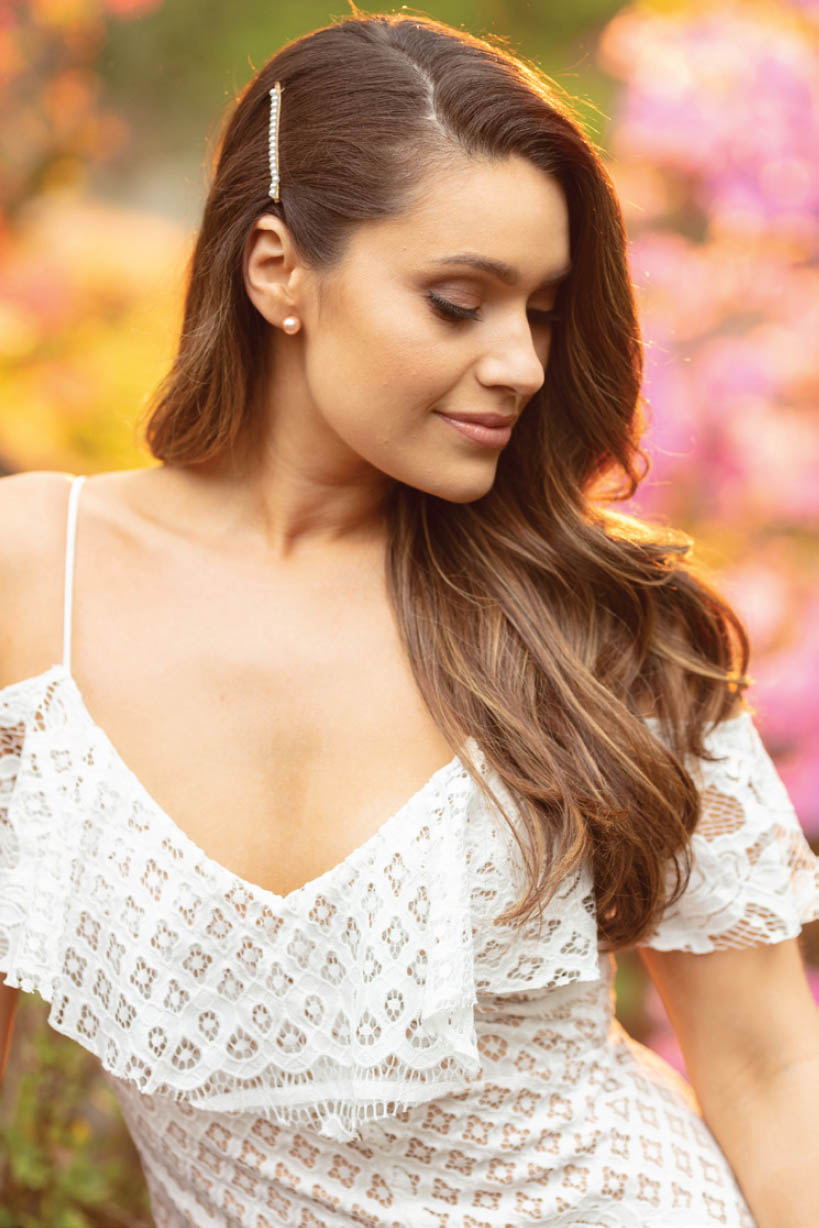
FIGURE 1.3
ADDING OCF IN BACK.
CANON EOS 5DS R, CANON 135MM 2.0, ISO 200, F/3.2, 1/200, WB 5700K
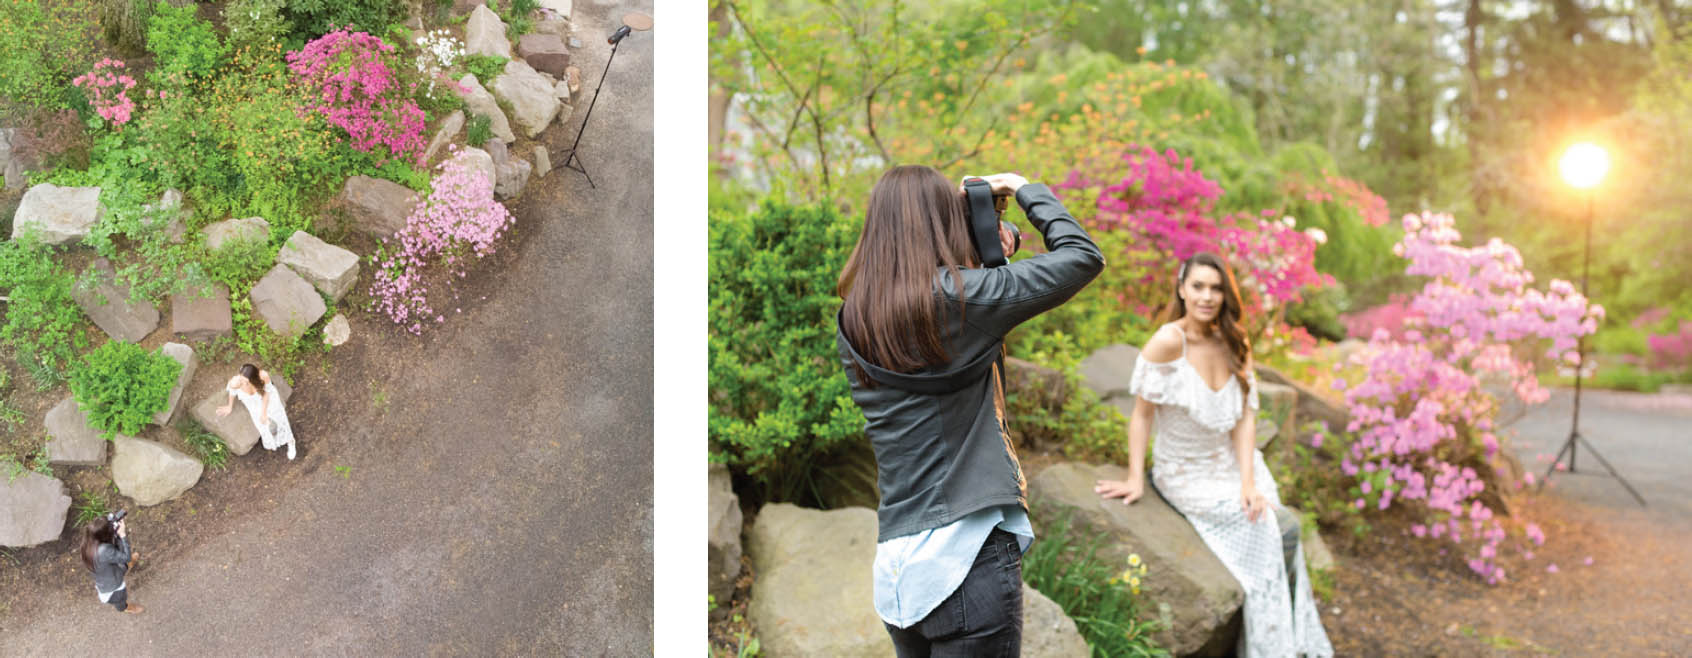
FIGURE 1.4
BEHIND THE SCENES.
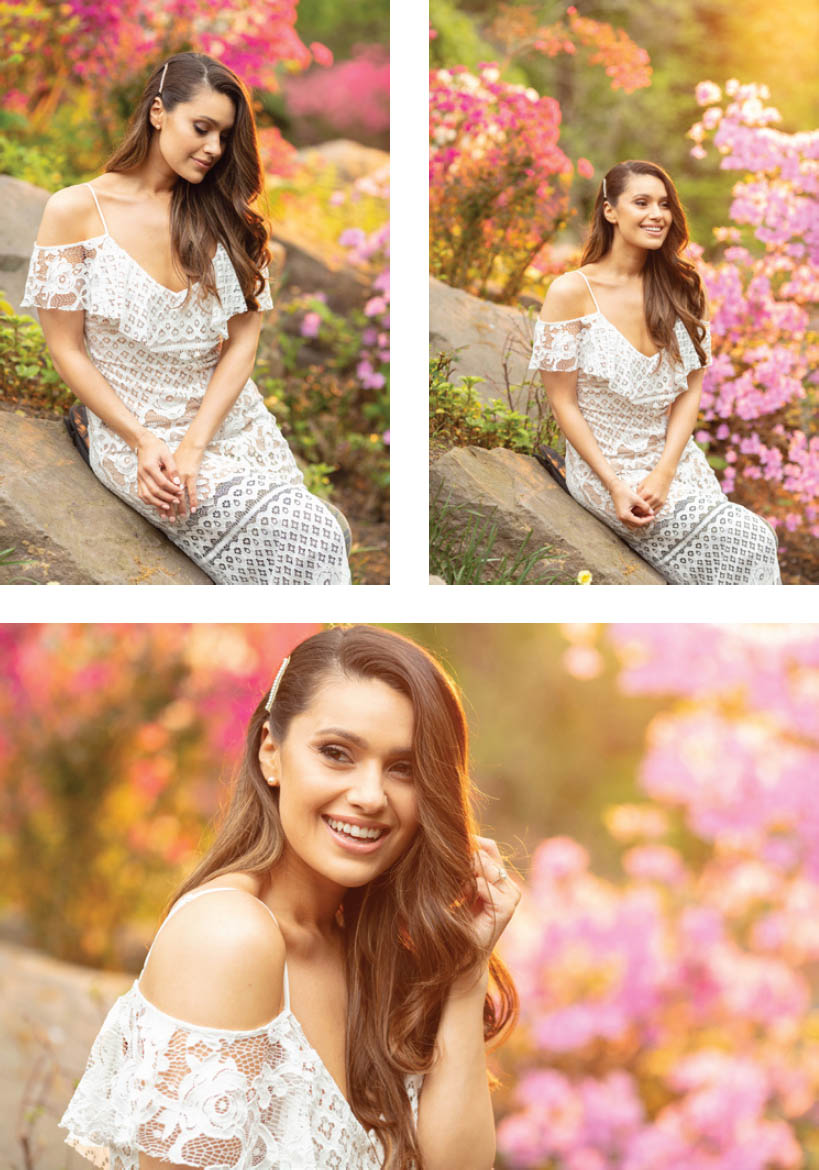
FIGURE 1.5
ALL SETTINGS: CANON EOS 5DS R, CANON 135MM 2.0.
ISO 200, F/3.2, 1/200, WB 5700K

FIGURE 1.6
ADDING OPTIONAL WHITE REFLECTOR.
CANON EOS 5DS R, CANON 135MM 2.0, ISO 200, F/3.2, 1/200, WB 5700K

FIGURE 1.7
BEHIND-THE-SCENES AERIAL FOOTAGE USING AN OPTIONAL REFLECTOR.
Potential Problems
When you’re creating backlight and letting it spill into the lens, it can be easy to overdo it. Keep in mind that the more haze you have, the less contrast you’ll have in the image. This can make the image look a bit out of focus, or it can really distort the coloring of your subject’s skin tone (it’s already going to be a bit yellow because of the haze). The creativity is up to you though, so if you like that look then go for it.
Another possible problem is the placement of the light in relation to your subject. I don’t recommend placing the light directly behind your subject because it will overexpose the image and create a distracting element right behind your subject. Do this: Figure 1.8; don’t do this: Figure 1.9.
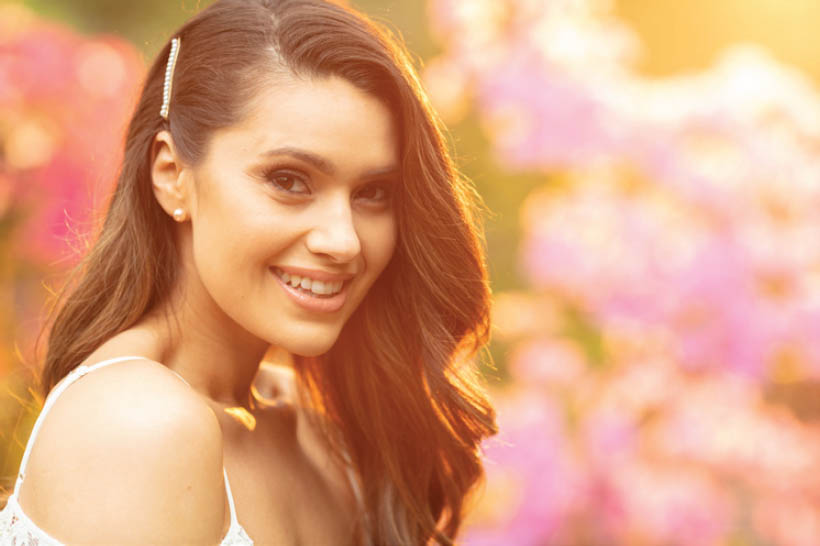
FIGURE 1.8
BEST PLACEMENT OF LIGHT.

FIGURE 1.9
DISTRACTING PLACEMENT OF LIGHT.
Practical Uses
This is one of my favorite lighting setups on any given shoot. It’s an easy, one-light setup that doesn’t boggle the mind with all of the settings. It creates a soft dreamy look that wouldn’t be possible without shooting during the golden hour.
Give this a try for individual and couple portraits, and for creating a magical, glowing scene in photos of children. If you advertise a warm photographic brand, you can use this technique consistently in your images.