SCENARIO 16
Creating a Silhouette
Quick drama anytime day or night.
GEAR NEEDED:
- Camera + Trigger
- Lens of any focal length (though I prefer wider)
- Off-camera flash
- Colored gels (optional, but recommended)
- Light stand (optional)
- Second off-camera flash (optional)
GOAL IMAGE
This is a fun technique with a myriad of applications. I’ve seen some incredible photographers using this technique to silhouette a subject while another part of the frame is properly exposed. I often use this when I have a not-so-sexy room to photograph in and I want to give my client something more dramatic (Figure 16.1).
The idea behind this technique is that you’re blacking out your subject by creating a brighter light behind them that you can expose for. Depending on your lighting conditions, you may need to use High Speed Sync to cut out the natural light enough that there isn’t any hitting your subject.

FIGURE 16.1
GOAL IMAGE.
CANON 1DXII, CANON 24MM 1.4, ISO 160, APERTURE 4, SHUTTER 1/2000
Step by Step
- Position your subject: This technique is easiest with your subject about 5–10 feet from a blank wall. Choose a pose that will be flattering in a silhouette.
- Put a colored gel on your light: This is optional, but I have a lot of fun playing with different colors lighting the background behind the subject.
- Position the light: I like to have my light position close to the couple and pointed at the wall. A modeling light is very helpful here, but if you’re using a speedlight that doesn’t have one, just test fire the flash to see where your light is falling. I go for a nice even circle around the subject.
- Set the camera exposure: Find an exposure that makes your subjects go completely black. This may mean that the rest of the photograph goes completely dark as well.
- Set the white balance: Because the flash won’t affect the light on your subject, auto WB or flash would be fine here.
- Set the flash: If you needed to set your shutter speed over your camera’s sync speed, be sure to turn on High Speed Sync on your flash. Try TTL first to see how bright the flash is in the image. You could set your flash to manual at the mid power range, or use a light meter on the wall to determine flash power. If you’re using a colored gel, you may want to lower the flash power so that you get a more saturated color on the wall. The higher the flash power, the less saturated the color will be.
OPTIONAL: Place an additional light with a different-colored gel, like a speedlight, pointed directly at your lens and “flash yourself.” See Scenario 29, “Making Front Bokeh,” for more information on doing this effectively.
Shot by Shot

FIGURE 16.2
NATURAL LIGHT (BLACK IMAGE).
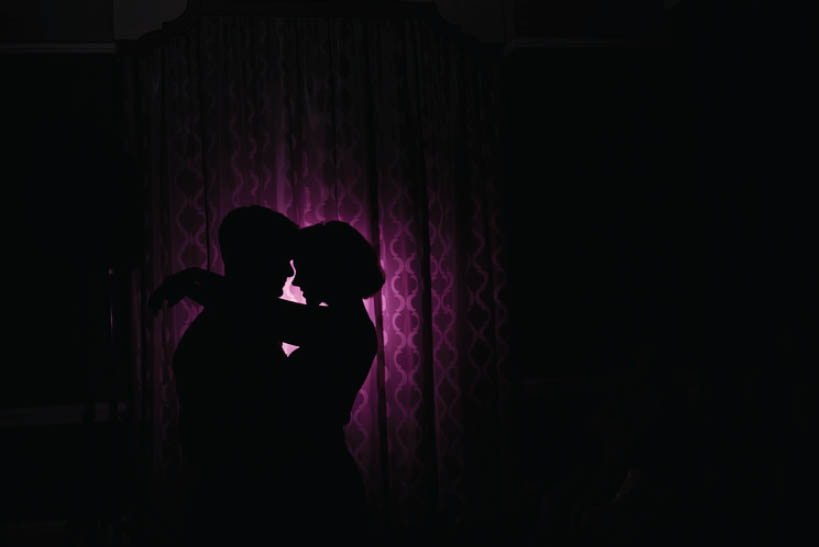
FIGURE 16.3
SHOT WITH A PROFOTO B10 WITH PINK GEL TO CREATE A SILHOUETTE.
CANON 35MM 1.4, ISO 1000, APERTURE 18, SHUTTER 1/250

FIGURE 16.4
“OPTIONAL FLASHING YOURSELF TECHNIQUE” WITH A PROFOTO B10 WITH A TEAL GEL POINTED AT AND RIGHT NEXT TO MY LENS. IT WAS TOO BRIGHT.
CANON 35MM 1.4, ISO 1000, APERTURE 18, SHUTTER 1/250

FIGURE 16.5
I RAISED THE APERTURE TO 22 TO GET THE BEST “BOKEH BALLS” AND LOWERED THE INTENSITY OF THE FRONT LIGHT. I RAISED THE BACKLIGHT TO KEEP THE SCENE AS BRIGHT AS IT WAS IN THE PREVIOUS PICTURES.
CANON 35MM 1.4, ISO 1000, APERTURE 22, SHUTTER 1/250
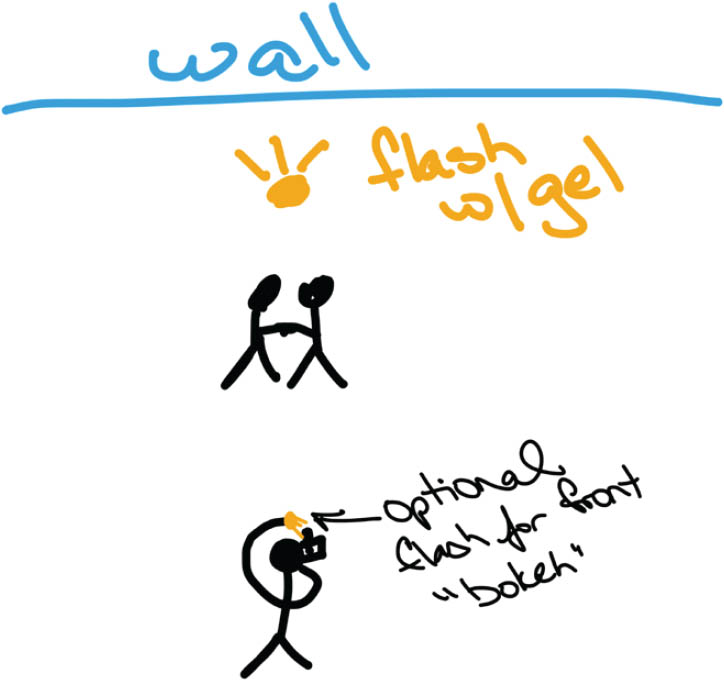
FIGURE 16.6
LIGHTING DIAGRAM.
Potential Problems
Because you may be attempting this shot during the day, there’s a chance you will need to use High Speed Sync in order to get a blacked-out exposure on your subject. When you enter HSS, the flash isn’t as powerful and will suck up more battery power. If you can, find a location that is dark, inside, or in shadow, and you’ll have an easier time with the flash. Another option is to use an ND filter to darken your image, making it easier to stay below your camera’s sync speed.
Sometimes when I use a gel during this shot, the color isn’t quite what I want it to be. Since you don’t have any light on the subject, change your white balance, color tint, or white balance shift to get the color you want. It won’t affect how your subject looks because they’re in silhouette.
Practical Uses
This technique easily produces a “hero” image. If you’re in a creative slump or not thrilled with your shooting location, this is a perfect way to get a wide, epic image. It’s always a goal of mine to capture a hero image like this one because it will look great spread across an album or printed as wall art.
Give this a try for individual and couples portraits, getting a “nighttime” shot in the middle of the day, hiding an unattractive location and getting an epic image, and creating a base layer for a multiple-exposure photograph.